This is a neat design, glad to see you having some success with it. To me it looks like it wrinkles the inside of the tube because the tube is constrained at the two printed blocks at the base, I wonder if maybe if those two support points on the base were able to roll (like a printed profile over a bearing) it would give the material enough room to flow and reduce wrinkling?
1 Like
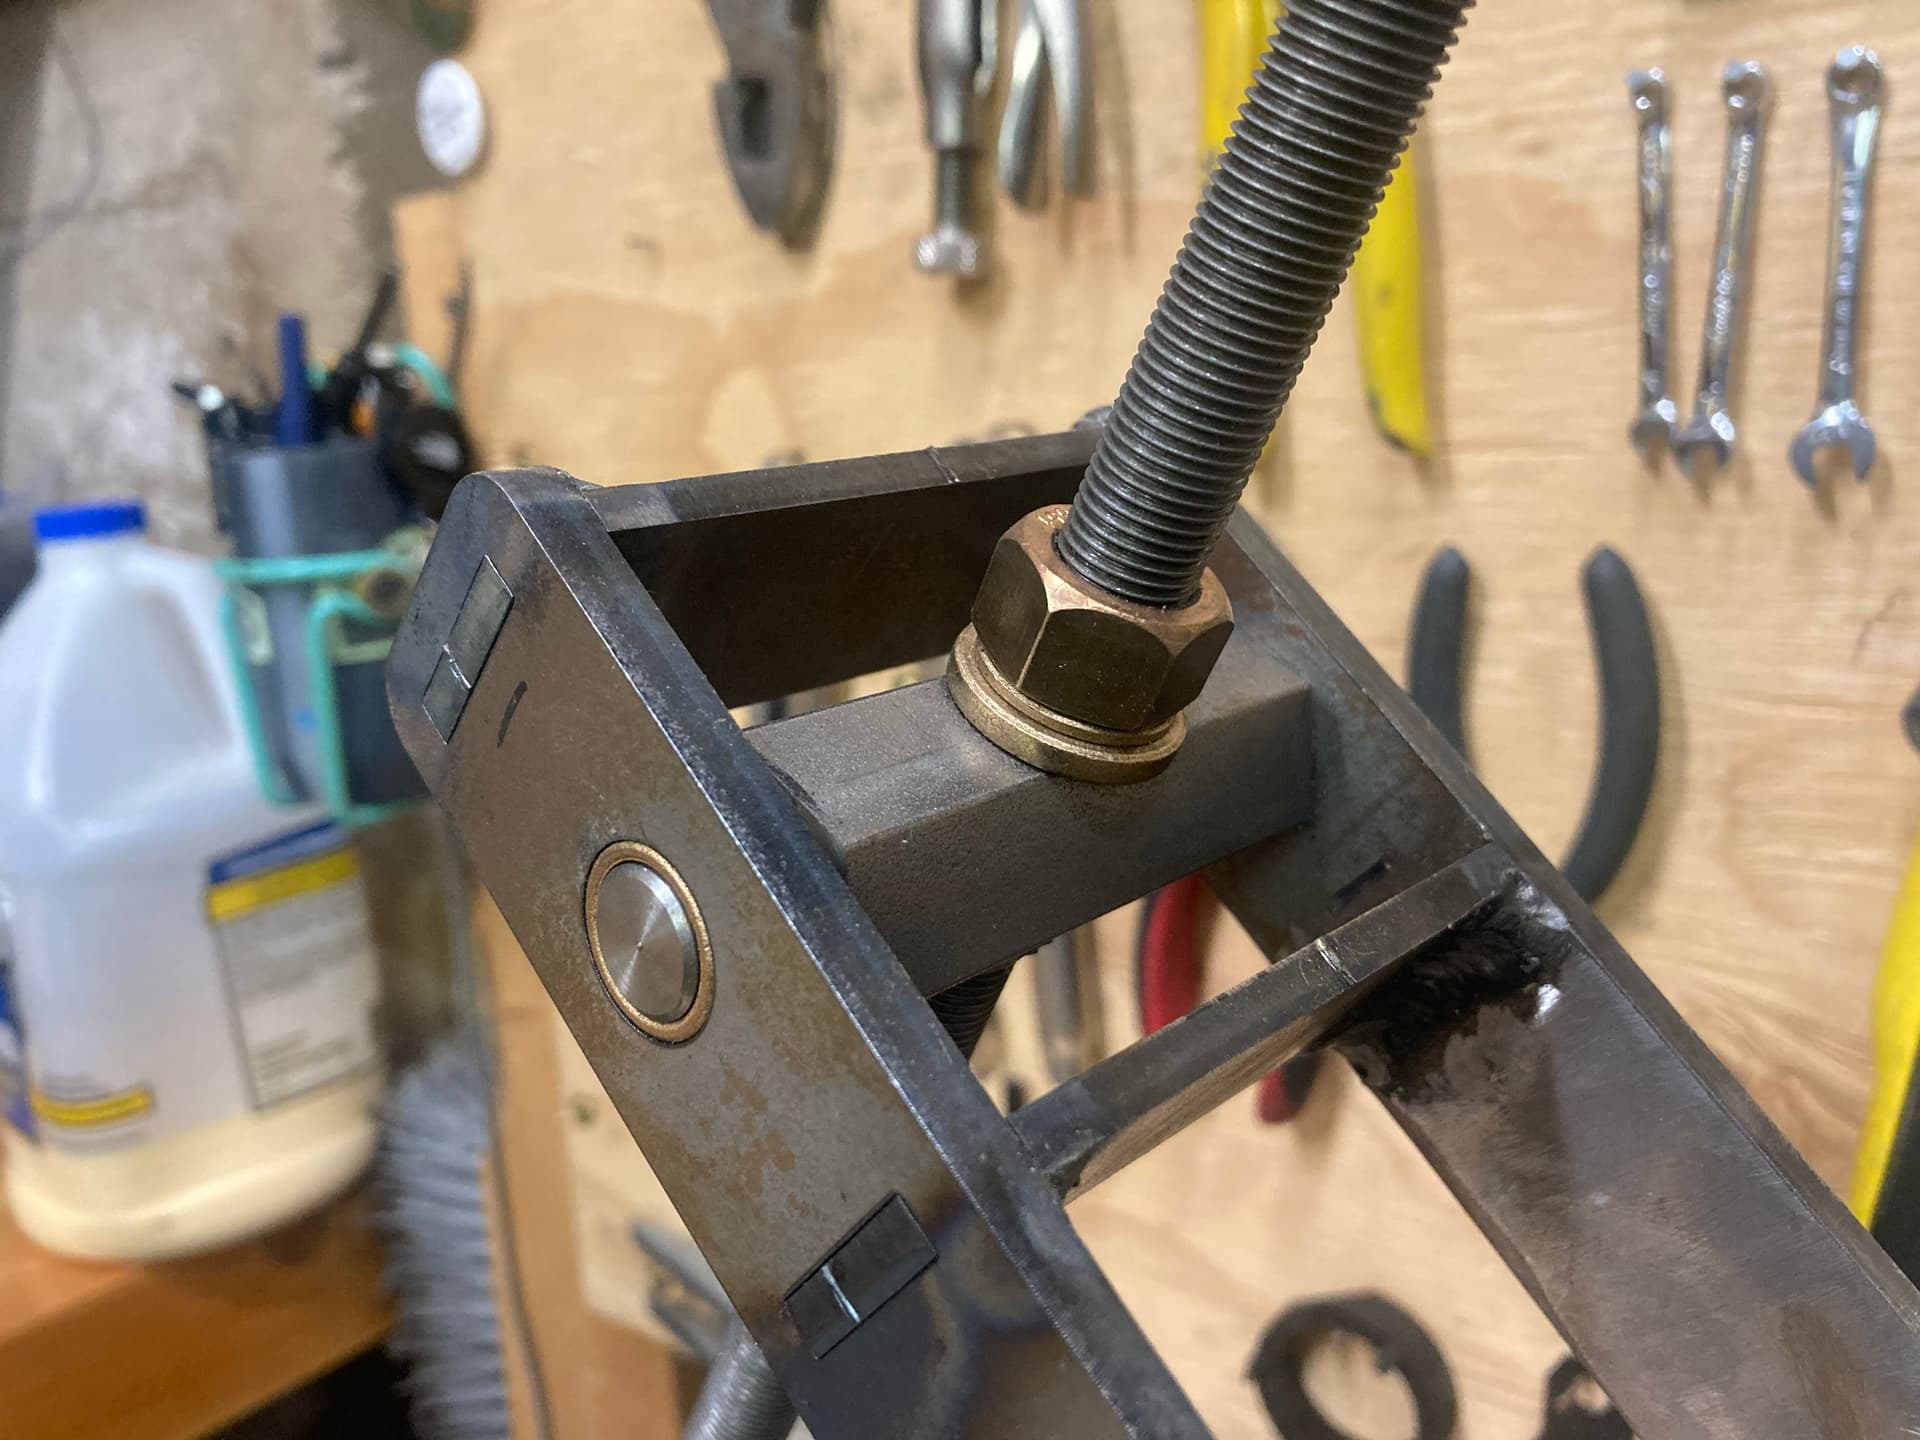
I was brainstorming the same thing. I did notice the two outer dies shifting out as the bend progressed, even with the bit of hot glue the first time.
To be honest, I’m nowhere near an expert (or even that experienced) with tube bending. Lot of factors i don’t understand.
I’m wondering if the magnetic attachment for the dies would allow enough movement.
2 Likes
Nice result! Thanks for sharing the progress.
3 Likes
Wow. That worked remarkably well!
1 Like
Days late, dollars short, etc., here is the bender I was talking about above. It was inspired in twain by a Matt the Maker instagram post of FDM 3D printed bending dies sandwiched in steel plate and my need for identically bent 3/4" chainstays. Can you guess whose great idea I totally ripped off?

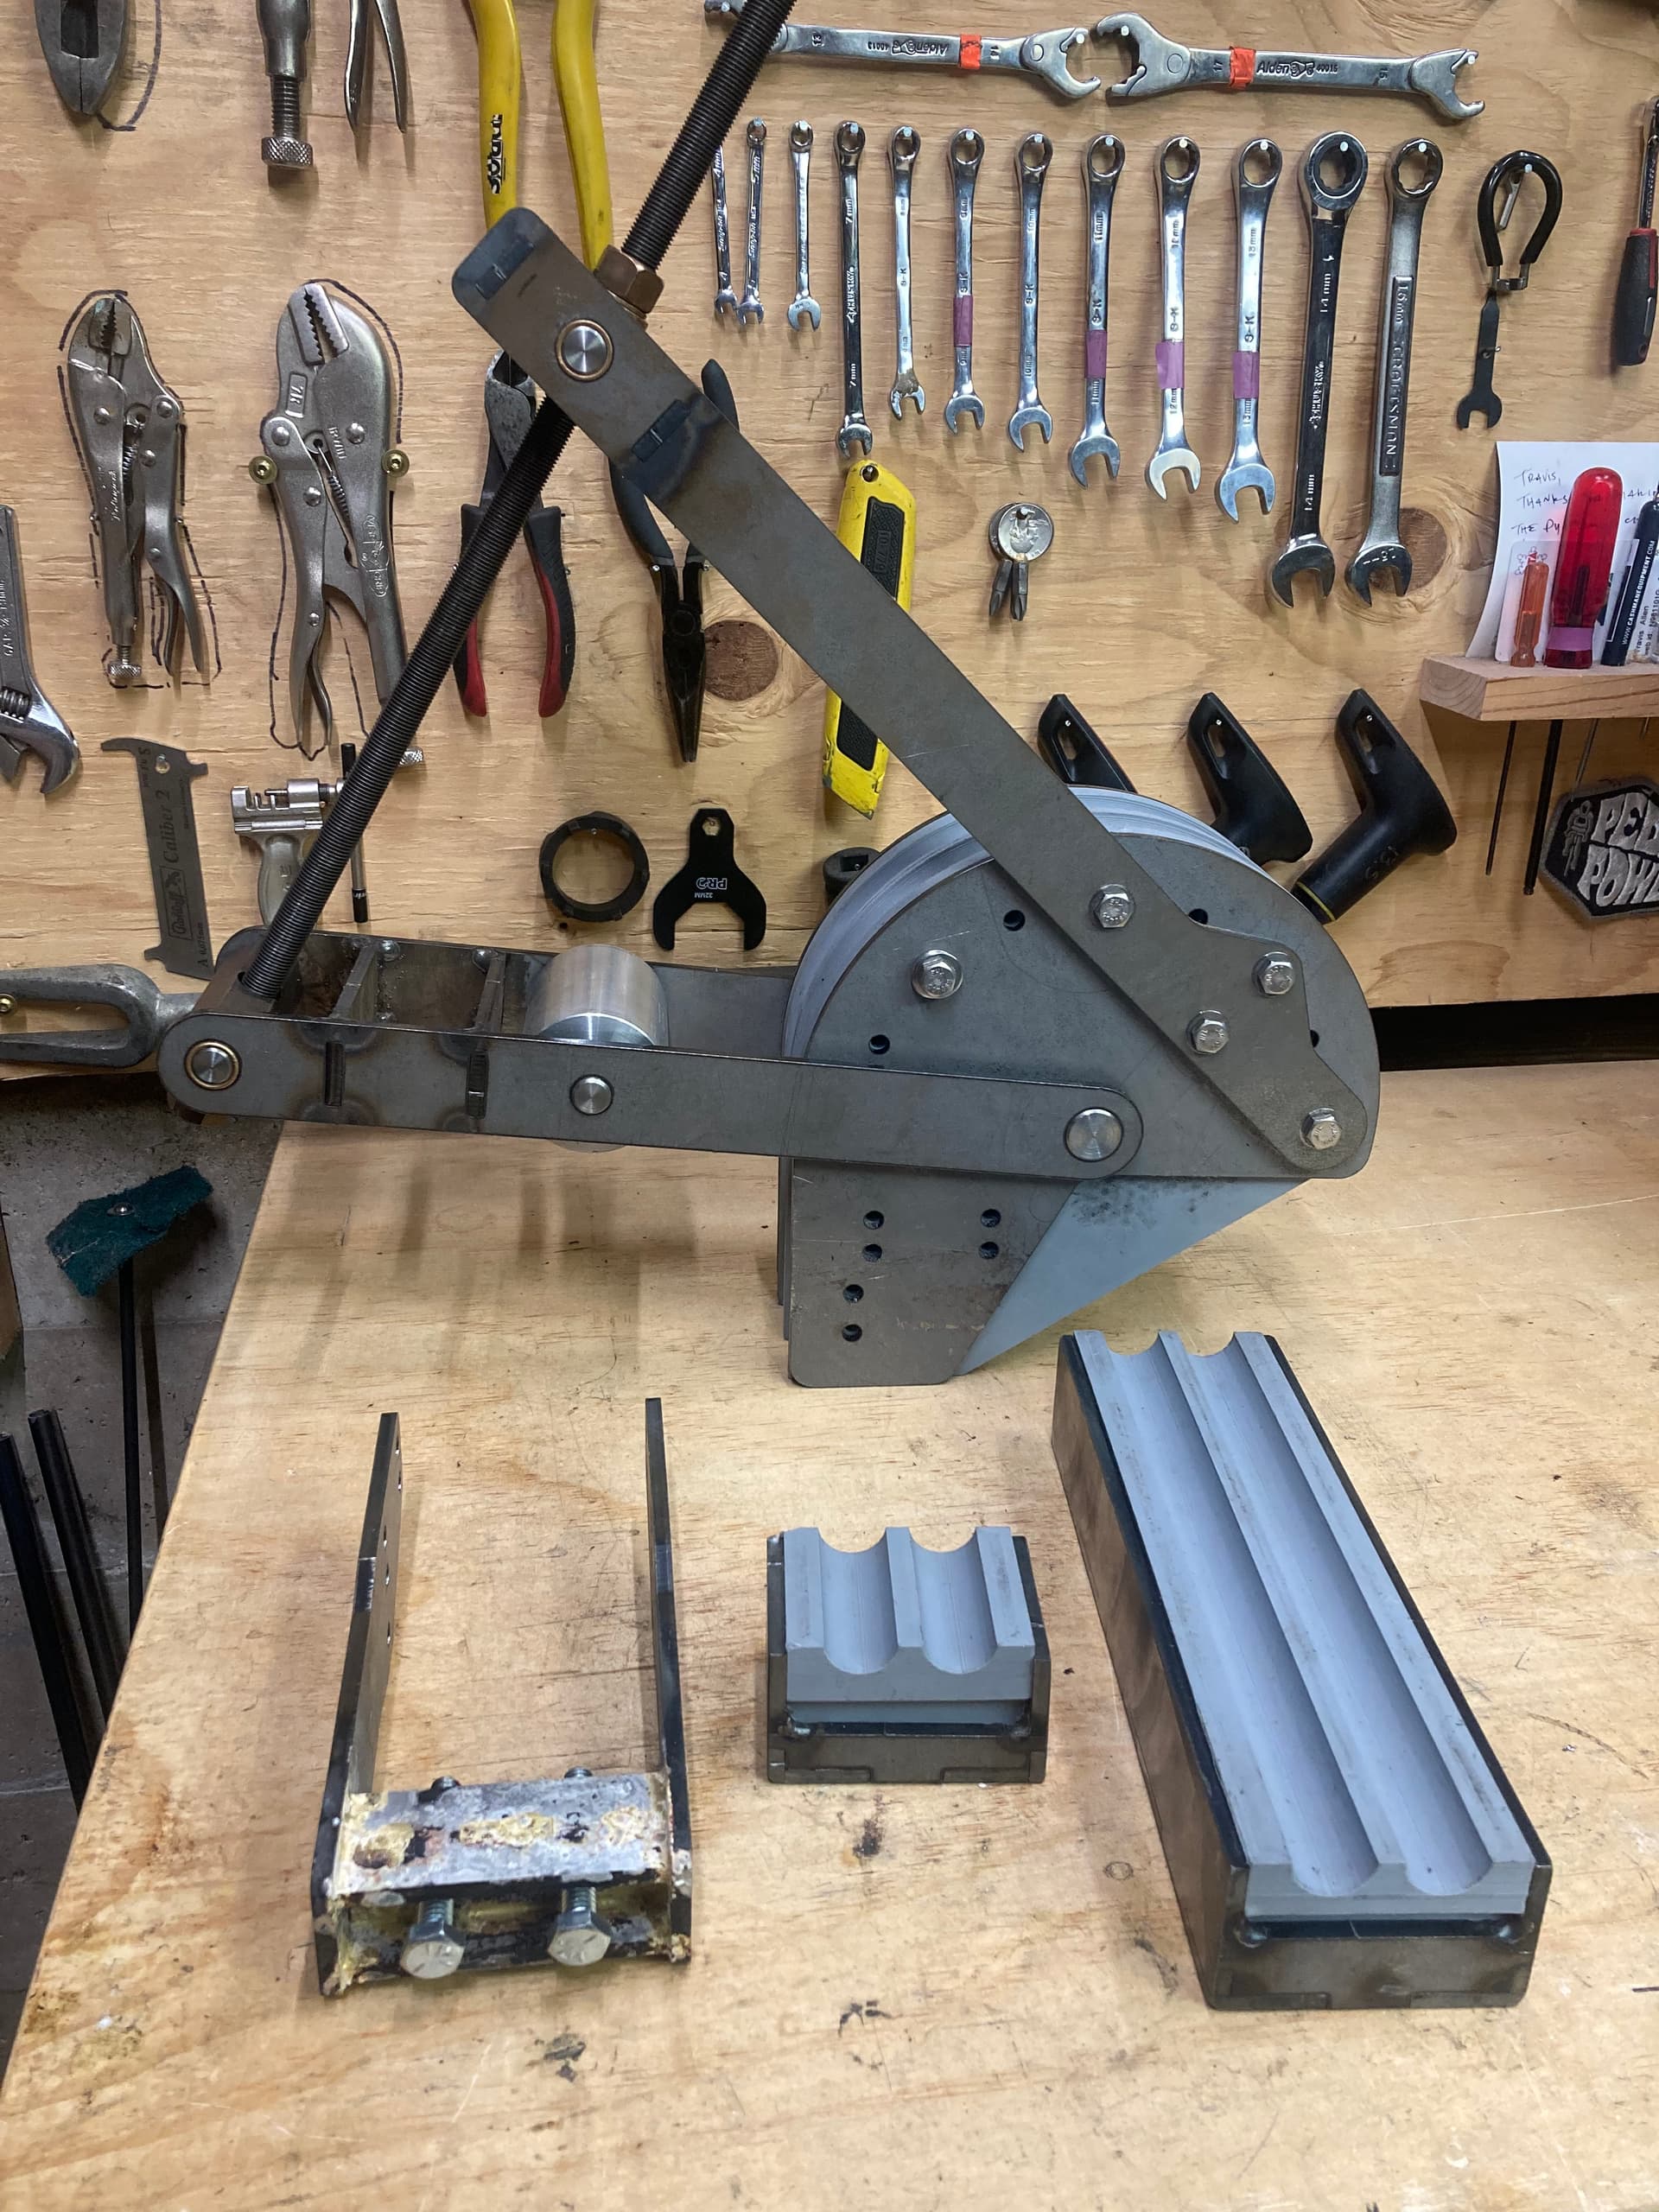
When the only precision tools you have are a lathe and a computer, all of your designs start to look axially symmetric or like a 3D puzzle piece. Thus, this is made from laser cut 0.188" mild steel, 4 separate PLA bending “dies” in the body of the bender which are sandwiched together (to avoid overhang that would occur if printing a semicircle in that orientation), lots of bronze bearings, some leftover stainless round bar, and some 12L14 hex bar with turned down bearing surfaces. It uses tab-and-slot (Pettis?) joints for most of the 3D geometry, and these are either poorly flux-core welded or poorly brazed together. Its a 4" CLR, and technically you can print different size dies, follower, and clamp for different size tubing, but I haven’t. Lots of through holes for lots of long screws to hold everything together, possibly in different configurations.
Like my other 3D printed benders it gets the job done, if only just barely. It lacks some crucial features that the original has, and this makes it very annoying to set up. Even so, it does just good enough of a job to where I don’t consider the 3/4" x 0.035" tubing I’ve bent with it to be scrap. 3/4" x 0.028" is better left to real benders. I’ve used it enough to feel a lot less proud of it - there are a TON of simple revisions I would make if I I made another one, but I have already sunk a ton of time into this project and I have almost no intention of making another. I actively discourage others from making something like it. Seriously, just buy Joe’s bender or make friends with someone who has one.
9 Likes
Wow, this is very cool! Thanks for sharing it! I think you are being a bit hard on yourself. As far as I know, it’s the first sheetmetal + 3D printed bender system for bike tubing (not just a die). That is pretty groundbreaking.
Is there a reason why you went with such an aggressive bend angle? Do you think the project would be easier to tackle with a single chainstay or with a larger 9in die?
What would you do differently?
Thanks. I’m mostly being hard on myself and stressing the negatives because I do not want anyone to think that this is a substitute for a Cobra bender.
I believe I decided to do a 4" CLR because I saw a photo where Drew at Engin had bent some seat stays with the same CLR and I liked the way they looked. As I’m sure you know, when designing with bends one must take into account the available tooling, so most of my work at the time was using 4.5" CLR bends. 4" was close enough to 4.5" that I didn’t have to totally reinvent any of my work - if anything I felt I could get away with more if I had a smaller bend radius. All that and I wanted to make something that I couldn’t buy.
As for revisions, I am ethically on the fence about whether or not it’s ok for me to share this stuff. On the one hand, I think there is a lot to be learned from my mistakes and oversights. On the other hand, I don’t want to arm people with knowledge that could take a sale away from someone who is integral to our community. I don’t want people who would buy a Cobra bender to make one of these instead. I’m happy to have others weigh in with their thoughts on whether or not this is ok.
I imagine that if I had chosen a larger radius (5", maybe 6") the bend quality would turn out better with no other revisions. I likely wouldn’t do this though, because I like the smaller bend radius.
I would not sacrifice the ability to bend two tubes simultaneously. To me this is the single factor that sets the Cobra bender apart from other benders. I consider it almost necessary for efficient, high quality work.
My first revision would be to make everything just a little bit bigger/wider. Part of what is so annoying about setting it up is that everything is really close quarters. I’d space the moveable arms out a little farther from the body and lengthen the fixed arms another inch or so.
Then I’d add more locating or joining features between the two sides of the body. This would help stiffen things up and generally make things less fussy.
The next revision is what I’m really kicking myself for not having thought of when I was still designing the bender. It would have fixed a lot of problems with one change. I’d likely significantly restructure the bender and design around a 4.5" CLR with the express purpose of incorporating stock Cobra dies. I.e. design the bender to accept off the shelf dies you can buy from Cobra. I feel that the limiting factor of this bender is that the PLA dies are too soft and allow the tube to deform while bending. The follow bar is fine in plastic, but a stiffer die would help reduce distortion. This change also has the benefit of easily swapping to different tube sizes. Printing shapes with high volume and high density can get costly quickly, so at a certain point it makes more sense to shell out for easily swappable aluminum dies.
Finally, what this bender lacks that the Cobra bender has is a way to move the pivot of the roller back and forth along the movable arms. This is a pretty critical feature in my opinion. I couldn’t come up with a way of adding this feature this with laser cut parts that was both rigid and compact , so I resorted to giving myself 5-10 thou of clearance to slide the follower in between the tubes and the roller. It works ok but is annoying to set up, especially with everything else being too close together.
As an aside, if I didn’t live in a place with low humidity I would need to paint and oil it to keep it from rusting.
4 Likes
I say share away. The people that are going to buy a Cobra are not the same people looking for an economical DIY bender.
4 Likes
A few questions:
- number of shells
- layer thickness
- infill pattern
- infill density
There are also other filaments that theoretically have 2x the youngs modulus of PLA.
There is also some buzz on the internet about filling prints with plaster, but I can’t find any examples used in a structural application.
Totally up to you!
my two cents: The more people building frames, the better business for everyone, regardless if products directly compete with eachother.
I also think 3D printed dies is not about being cheaper, it actually solves some unique problems:
- You could afford to have one dedicated bender per tube diameter
- saves a lot of time swapping dies between CS and SS
- You can optimize your bender just for SS and CS’s
- a 38mm downtube is 13x stiffer than a 16mm SS, so if you are bending only stays, you can design things differently
- You can unlock complex FEA-driven bending die/dimple shapes
- You can unlock the use of oval chainstays
The lack of a good oval bender is, in my opinion, a huge blocker for the framebuilding world. Most chainstays are designed for QR dropouts. With thru-axle and modern geometries, you end up having to do some sketchy chainring, tire, or crank clearance. Many are off by only 1 or 2 degrees, but there is nothing you can do but dimple it and hope your tire is undersized.
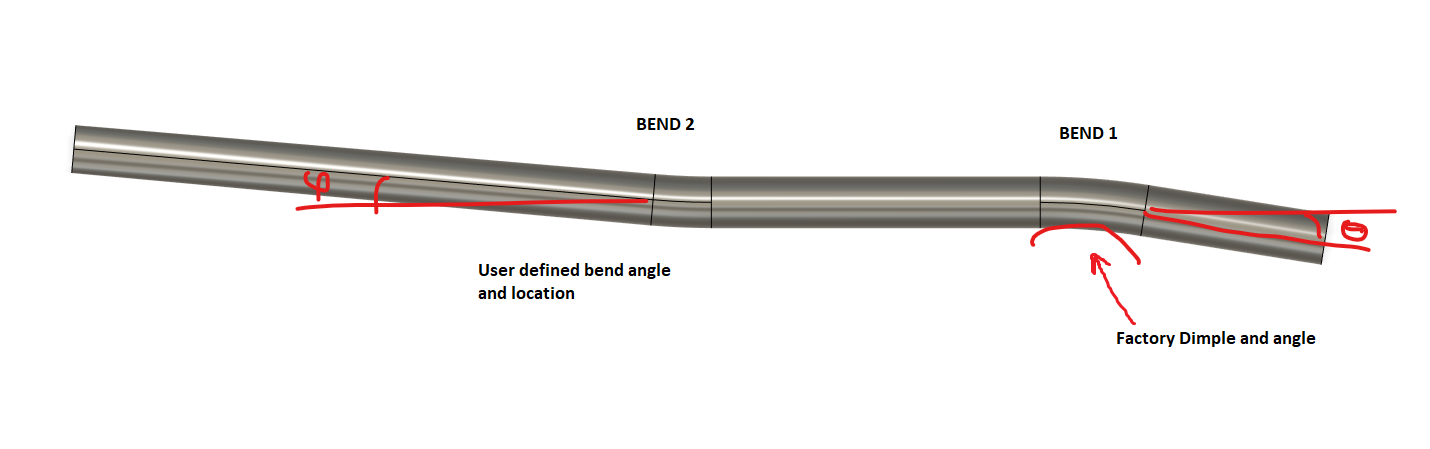
My dream solution would be an engineered chainstay for Fairing to produce. They have the tooling to get a super tight BEND 1 and a professional dimple for tire clearance. The user could do a large radius BEND 2 to hit your dropout perfectly.
Either way, I’m glad you were able to make a bender. It will definitely open up more doors for frame designs.
Just as a point of reference I don’t imagine I will ever buy a cobra bender. Just the postage to get it to my part of the world is more than $800usd. Then when it gets into the country I will have to pay 15% tax, plus tarriffs all that kind of jazz. It’s a lovely tool but there’s no way I can justify the cost as a hobbyist. But I like to make things so at some point I will be trying to make some better bending tools.
6 Likes
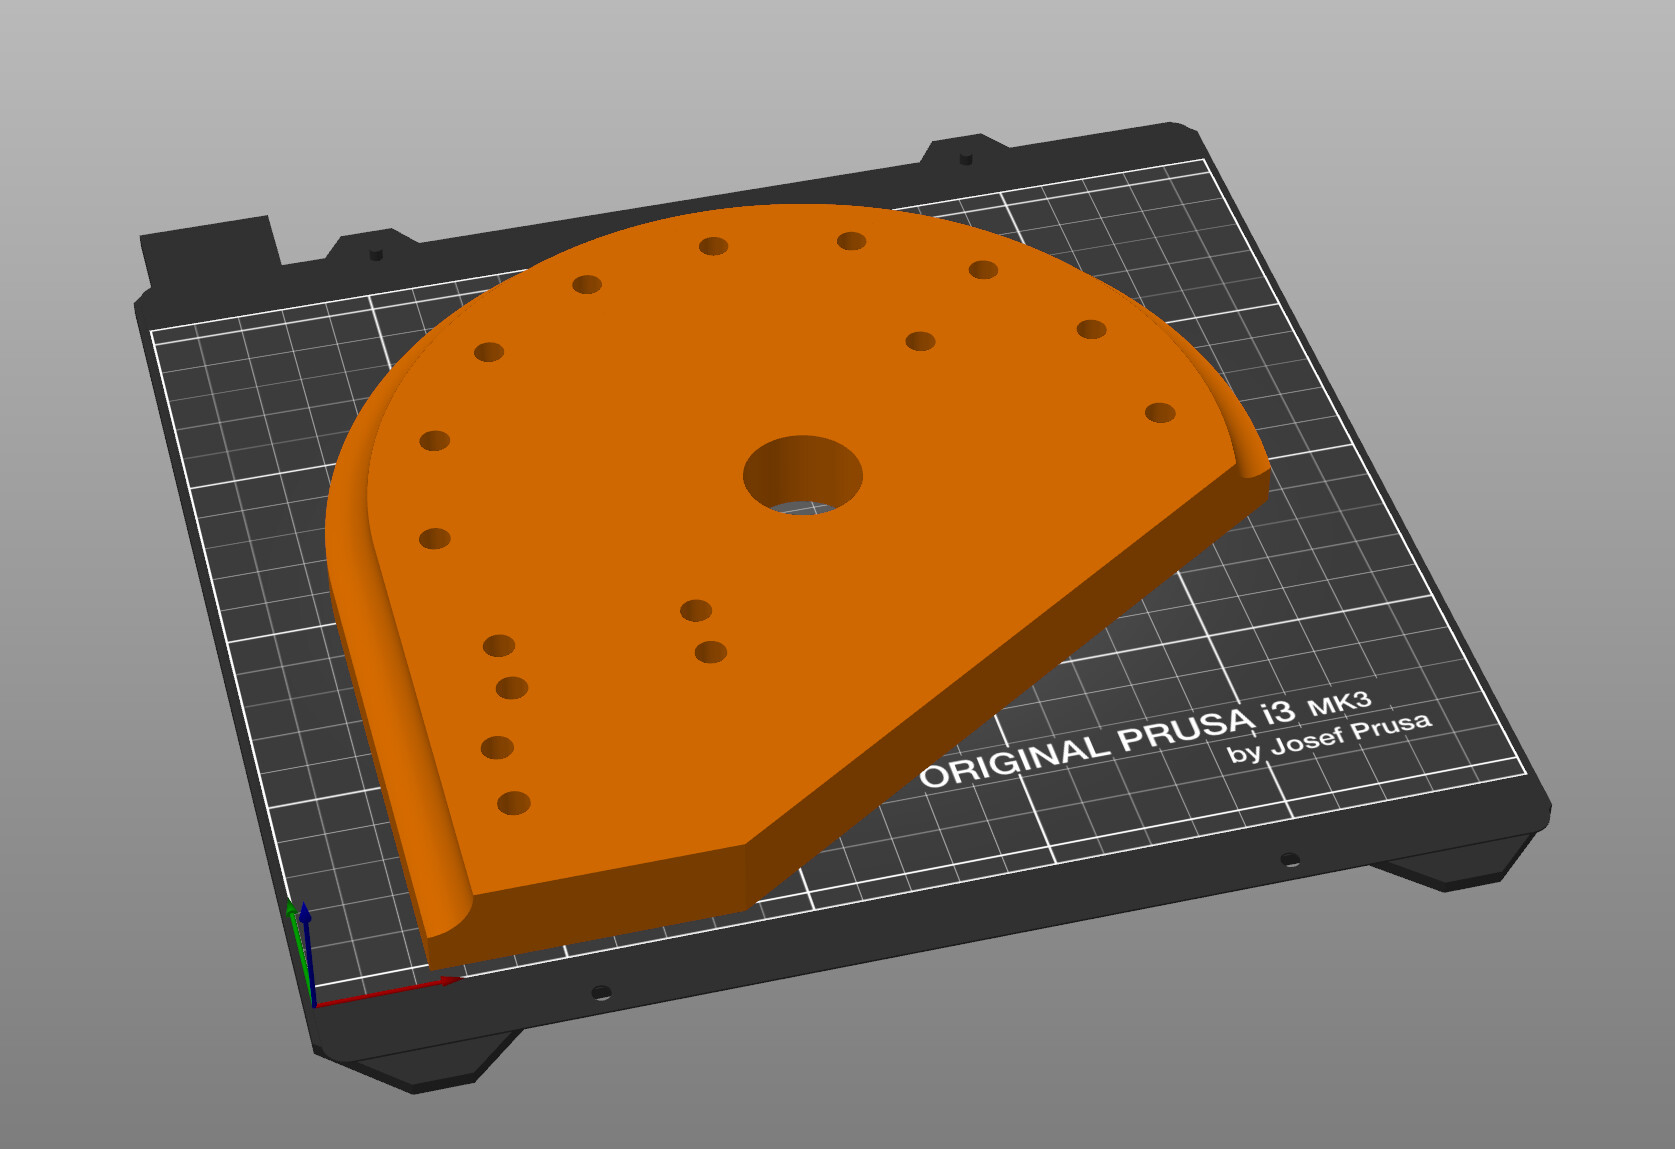
- 12 shells, 6 layers top and bottom faces of each 1/4 section
- unsure but likely 0.15mm. To my knowledge this is fine
- unsure but likely square grid. If I had control I would chose triangle
- 70% infill density. Coulda gone higher but I’m not convinced that this is the fundamental problem
Printed on Prusa i3 MK3s’s.
These were printed by my school so I had less control over the prints than I wanted to, but the price was right. Printing dies with fancy filament is something I’d like to explore, sadly it was not an option for me at the time. I’ve only printed in PLA and PETG so I’m a total noob when it comes to more exotic materials - I have no idea what’s out there.
I’ve never actually used a Cobra bender, but I have to imagine this process takes almost no time. On my bender it takes comparative ages and is a total PITA, but like I said I would design my way out of this hole in the next iteration. If not with off the shelf dies then by some other means. Having multiple benders of identical architecture seems wasteful to me in a way that having multiple dies doesn’t. That could just be me though.
This is mostly what I did. Even though my bender is made of steel, not aluminum, I bet it weighs less than a Cobra bender, in some part bc I could use less material in lots of places.
I’m mostly on board with this, and I think Nick is right: there probably aren’t very many people who can buy a Cobra bender and can make one of these that haven’t already done either or made something entirely different to suit their needs. I just want to be sensitive since I did directly rip off a lot of Joe’s design.
Edit: Just wanted to say again that this forum is great Daniel, thanks so much for putting it together and for giving us nerds an outlet to talk to each other
3 Likes
For what it’s worth, I’ve been working on a similar bender design for a few months and am also squeamish about sharing too many details of the construction. It seems like the toob bender generates a lot of business for Joe, and I would consider its design unique and non-obvious, so copying it and then sharing the plans doesn’t sit right. It’ll be a couple months before I’m able to build and test it so it could be a total dud, though.
I’ll try to do a write-up on some back-of-the-envelope calculations that provide some insight into the tolerances that (I think) you have to hit with a bender for thin wall tubing. It’s probably tough to get all the way there with budget construction methods.
4 Likes
Thats a thicc boy! Anecdotally, thicker layers feel much more solid with the "tap on a table’ test. I’m printing things at .4mm layer height, which would require 3x fewer shells to get get the equivalent thickness.
I can’t tell your print orientation, but printing your curved die vertically will probably be stiffer than horizontally.
Also agree with your assessment of the infill density. I think there are more variables that affect the stiffness than the infill density. It could be that your infill pattern is buckling. Gyroid seems to be the latest and greatest in compression strength and print times, but YMMV.
If you drop your file here, I can print it on my printer with that reinforced nylon to see if it makes a difference. I have been meaning to test this, but I don’t have the time!
1 Like
Each 1/4th printed like so:
The bend channel (it’s definitely not actually called that among professionals but whatever) extends as far as it does because my “business” name is Sunshine Fabrication and sometimes I make custom furniture. I wanted to make large bends in copper tubing for that reason and this design got two birds stoned at once

Agreed. These are the thiccest parts I’ve printed and they feel much more “solid” than others, whatever that means.
Do you have more information on this? I bet there’s a cool math reason for this, but all I can find on the internet in a 30 second search is garbage AI written articles.
It’s been awhile since I watched the whole thing, but I think this video empirically evaluates the strength of common infill patterns, one of which is gyroid infill. The channel is a pretty good resource for anyone interested in structural 3D printing.
1 Like
This thread has been very informative. I’ve been researching the 3d printed/laser cut benders since Joe mentioned it in a podcast episode.
Although, I have also been curious of the “traditional” wooden benders I’ve seen many make like @Meriwether and @anon91558591 have blogged about. As a new builder with access to hardwood, routers and a woodshop I am curious of the longevity, accuracy and workflow of wooden die benders.
If this needs a new thread please redirect me!
Furthermore if anyone has used the wooden benders and then 3d (@sunshine.fab ?) if there was any advice you might have between the two, that’d be awesome. Thanks!
3d printing wasn’t an accessible thing to normal folks when I started bending stuff, but wood is pretty easy to work with and honestly probably faster/easier than 3d printing if you have some basic tools.
In terms of longevity, I’m going on something like 15 years on my wood dies. If you use some sort of hardwood and pay attention to grain orientation/use a decent chunk of wood, it’s not going to break.
Repeatability is pretty good. Keep in mind that bike tubes are often not perfectly to spec (or even close) so if you have a set of .7mm seatstays there’s a chance you have one that’s .78 and one that’s .69 or something wonky like that.
So even if your bender does exactly the same thing each time, you can end up with different bends (and of course there are some situations where you’d use different seatstays/chainstays on each side of the bike anyway where the bends won’t match right away regardless of the bender you use).
In terms of actually making the bending dies, you can do all sorts of stuff, from as simple as a manual jigsaw and a rasp and some experimenting (the equivalent of filing your miters) to a fancy router table and a ball end router bit. If you have a rotary table and a shop vac you can do it on a mill, too, of course. I’ve even heard of people burning in the shape they want (hope they threw away the tube they used to do it afterwards!)
If you just want to bend 3/4" and smaller round tubes, it’s trivial to make a bender from scrap wood and scrap metal and use a mill vise or arbor press to do the squishing. For bigger stuff or non-round tubes it starts to get a lot harder, of course.
Hope that helps, if anyone wants more details about cheapo wood bending stuff, let me know.
-Walt
8 Likes
I have seriously considered using wood for bending dies but I haven’t actually done it yet because I don’t have enough woodworking tools to produce a die that meets my (possibly unnecessarily high) standards. At least in what I consider a worthwhile amount of time. For me the allure of a (hard)wood die over a 3D printed die is the increased durability, but the inferior durability of my dies might be able to be mitigated by using a filament that suits the purpose better than PLA.
One thing I have wondered with regards to dies that rely on a precision fit between tube and die is whether or not the dimensional stability of the wood across seasons matters. If you live somewhere that the humidity fluctuates throughout the year you might find that there is an optimal “bending season.”
1 Like
A 3”x4”x8” piece of maple isn’t going to change shape in any meaningful way. It’s not a 20’ beam or something.
No need to be scared of wood, it’s easy and can be as accurate as any other bending tool without much effort.
-Walt
5 Likes
15 years is a good long time! I had wondered if in those years you had moved on to some sort of metal apparatus.
Time to design some dies and a bender, perhaps still laser cut housing with the option for removable dies? Wood, PLA, Cobra?