Definitely use .058’. This is what should be used for making custom lugs, ST sleeves etc.
Also, the flicking the torch is only necessary if the heat is too high. Knowing when this is remains the trick! ![]()
Definitely use .058’. This is what should be used for making custom lugs, ST sleeves etc.
Also, the flicking the torch is only necessary if the heat is too high. Knowing when this is remains the trick! ![]()
Go back and look at the Brody and Zancanato videos.
Some additional suggestions (in no particular order)
Some additional links to help you visualize technique:
Brian Chapman (@chapmancycles) | Instagram
Brian Chapman (@chapmancycles) | Instagram
Fillet Brazing a Steel 29er Bicycle Fork - YouTube
Manufacturing a Bicycle Frame: Crazy BRAZING skills - YouTube
The flame is still pretty big for such a small part. Try a smaller flame so you can spend more time on the joint and less time away. When you are adjusting the gasses look for a little curl upward at the flame tip. If it’s straight out (and hissing) it’s too big. Couldn’t hear anything in the last two videos, so I assume there is no sound.
Good for you for doing all these practice pieces first! I’ve seen so many “just brazed my first frame, how’d I do” posts over the years!

This i found today! such a nice one
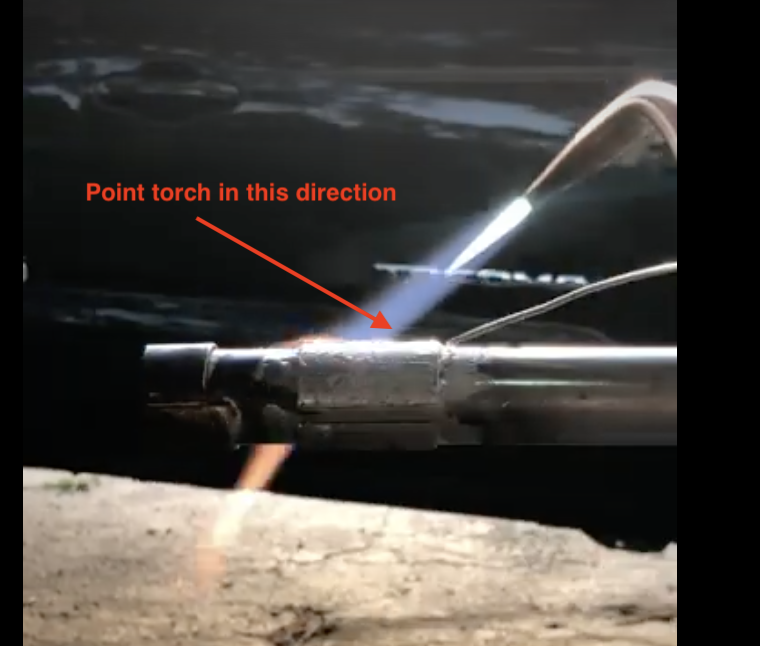
I was thinking about this on a hike today. It looks like you’re trying to push the filler under the sleeve as opposed to pulling it under the sleeve.
Flip your torch angle so it points in the opposite direction as the filler. That way you’ll concentrate more heat where you want the filler to go.
I agree that a smaller flame and a longer pre-heat will help out too. Think about cooking pancakes. If the pan is too hot you’ll burn the outsides but the center will be gooey. If you do a slower pre-heat you can get everything up to an even temp and have a nice fluffy cake inside and a golden brown outside. ![]()
Will do. Uneven heating seems to be the root of my problems
Shade 5
I’ll go for the smaller tip then. And I guess there’s no sound in these videos but the torch was near silent, no hissing so that’s good. I try to go as low as I can with the acetylene without getting smoke.
I appreciate this comment. It’s a little frustrating, since I believe with hands on instruction I could learn in a third of the time. But I’m being patient and this thread has been very helpful.
I’ll try the flipped torch. I like the pancake analogy!
On this video, it looks to me like he’s just melting the bronze rod and letting it flow onto the steel tubing. How do you ensure that there’s enough/good penetration into the joint gap itself? This is the part that I think I’m getting stuck on…
Thanks!
-Jim G
Everyone, I’m excited to announce that I’ve finally been able to fully penetrate a sleeve without burning flux! (or at least 95% of the flux) This was the goal I gave to myself in the first post of this thread.

Things that changed from last time:
Equipment:
Technique:
After all this time I think I’m starting to develop a sense for the temperature of the metal and how to heat it. I’ll keep trying to improve. Thanks to everyone who helped me out in this thread so far.

Proper heat to ensure the bronze flows where it needs to.
Practice + taking notes.
Cutting joints apart to see what you did right/wrong.
The basic equation is really simple. Figuring it out by yourself is the hard part.
"The cost of tuition is there no matter what. You just have to decide if you’re paying a person to teach you or you’re paying for the materials to teach yourself."
Someone on a podcast said that (I paraphrased). I repeat it to myself a lot.
That is a really great quote. That’s basically how I’ve been doing things as well but this thread is very helpful and making me rethink my process a bit.
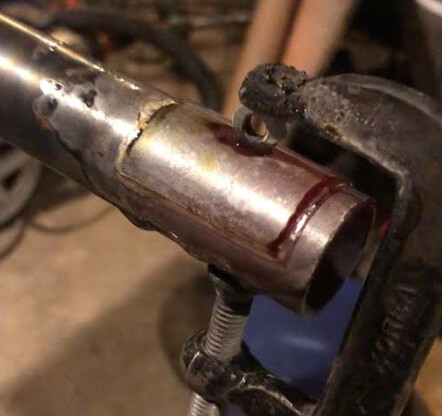
First off, that looks pretty good! Congrats!
I get you’re just practicing here but in real life, be careful clamping things like you have here. I have ended up with stem clamps that ovalized when adding binder bosses. it doesn’t take much pressure at brazing temps to distort the thin-walled tube.
Also, You have a small fillet around the outer edge. If that’s the look you’re going for, then great job. Generally with lugs and sleeves, the goal is to avoid that fillet so that the lug/sleeve forms a 90* angle against the tube. You have to strike the right balance between making sure the joint is full but then stopping before it’s ‘over-full’. Filing the excess filler out of that corner is a painful. Finding a place to let excess filler run is one of the tricks.
Nice Job and thanks for posting up the pics!
Thanks for posting the videos. I didn’t know Paul was back in the shop. I’m excited see what I’ve missed!
So I guess this time it’s me seeking for advice on brazing.
First off, I’m not entirely new to nrazing, I did some brazing before in sbd else’s workshop, but obviously with different equipment and consumables… Back then, I was brazing with a gas fluxer and a different torch, don’t remember what make it was… But everything went quite smooth, the fillets looked like what you’d expect from a novice but it worked.
Now, I have my own oxy acetylene kit, a messer griesheim starlet torch and no gas fluxer. I’m using “Felder F21” flux paste, it seems like it has bigger crystals in it than what you can see on most brazing videos.
Trying to make it work but struggeling a lot, I don’t really know what’s wrong. I have two main problems:
1.) When I heat up the joint and start adding filler, it sometimes “sizzles” up tp the point where it seems to “explode”, it shoots molten brass around and it scares me a bit ![]()
2.) A lot of times, the flux doesn’t seem to work quite like it should, there are spots where the brass just doesn’t want to go somehow, it behaves like a droplet of water on a piece of butter.
This all leads to the fillet (if you can even call it that) being extremely lumpy and with some holes in it as well…
For the flux you can try warming it and mixing very well to dissolve bigger crystals. If it’s dry you can add a small amount of water.
Problem #1 sounds like you’re way too hot.
Problem #2 sounds like you’re too cold or there’s an issue with contamination or flux. How do you clean your base metal prior to brazing?
Hey man, sounds like flux issue to me. Sounds pretty much like what happens if you try to braze with no flux.
As above, try remixing the flux to a smooth paste. Failing that get hold of some Cycle Design LFB paste ![]()
Thom
Thank you for your suggestions… yeah, it feels like it is a flux problem somehow. I just ordered another type of flux as well as filler rod from the same company (Fontargen) so they should work together.
The sizzling and the non-adhesion can happen at the same time, so I guess it’s a bit hard to get too hot and too cold simultaneously ![]()
My base prep looks like this: Grind off mill scale with sand paper and/or scotch brite, then degrease/clean with isopropyl
Another question: At what pressures are you guys running your regulators for what size tip? I just realized I have absolutely no clue what a starting point should be.
4psi at the reg but less at the torch. #1 tip for tube, #2 for plate >2mm (brake tabs etc) ![]()
I don’t disagree with the flux issue but don’t know the flux you’re using so it might be ok. In general, I would suggest ordering a tub of Gasflux blue paste for brass/bronze and CycleDesign SSL for silver.
Are you brazing tubes? If you don’t have vent holes, the internal air expands and causes molten brass to spit around which can hurt. ![]()
The sizzling is just temp control - probably. You might be burning the zinc out of the filler. Are you ending up with white powder around the outside of the brazing area and patches of copper at the edge of the braze?