No, just trying to stick some suspension pickup points into the seat tube. Since the suspension hardware is a lot thicker than the WT of the tube I thought brazing might be more appropriate than welding
Hmm yes, both actually. Probably because whenever the filler “doesn’t want to go” somewhere, I try to convince it with more heat
The plot thickens. You’ll of course want to dump heat into the thicker material without cooking the tube. It can be tricky depending on the geometry, get the torch in super close and watch for the flame blowing back into the thin walled stuff. If possible I do bits like that by heating from the back side of the joint, that way the flame can’t get anywhere near the thinner material until you need it to. You can wait to see it glow (depending on w/t) and then bring the torch around to the joint and begin the fillet.
I still think it sounded like flux though. Sorry, you probably didn’t need any of the above info but you sucked me in
You should be fine, just keep as much heat away from the tube as you can until you get the thick piece up to temp, then just a couple quick flicks can get the tube up to temp. If you’re using Gasflux, I’d say just watch the flux but I don’t know the flux you’re using so it may behave differently.
Forcing it with more heat is a common approach. Rarely successful but common!
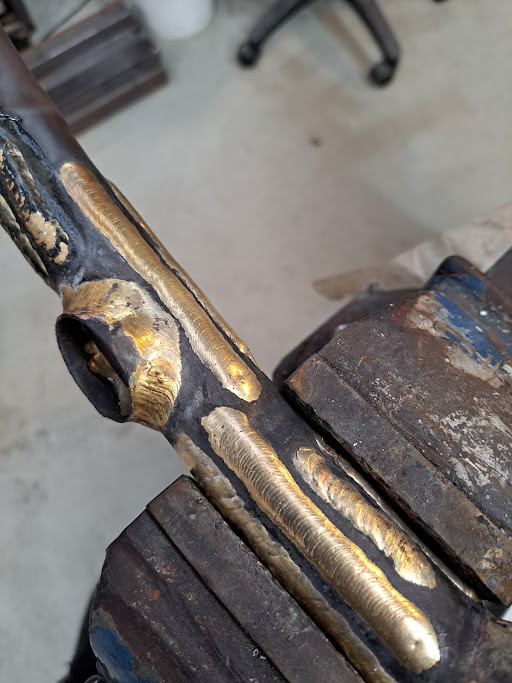
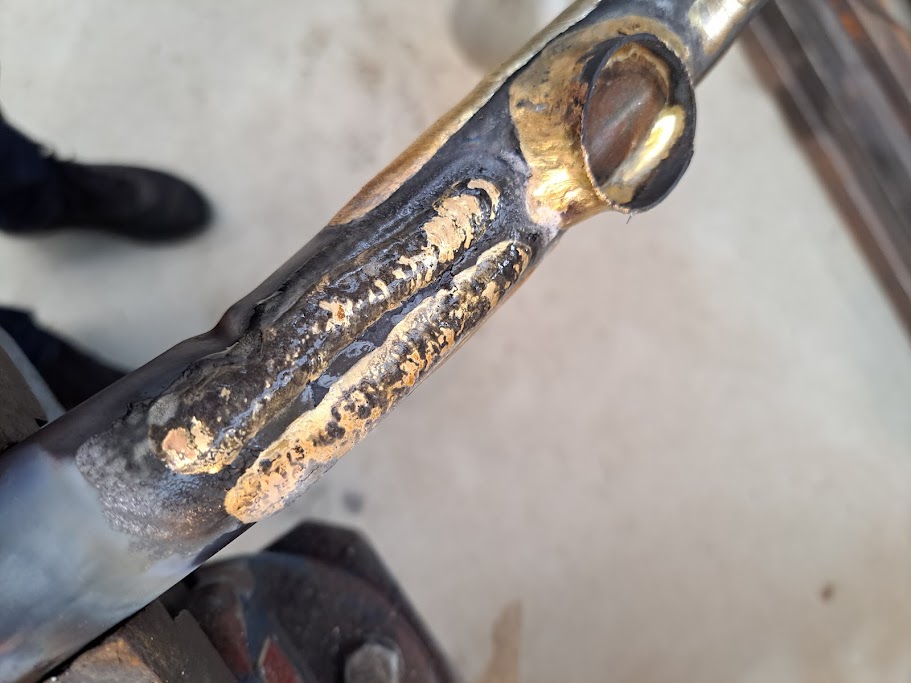
I just got my brazing setup working and have been having a go at some practice beads.
I’m running oxy-LPG with a oxygen concentrator, some random flux that was available locally and 3.2mm LF bronze rods that have been floating around in my shed for the last 10 years.
My torch is a NZIG “the prince” (New Zealand Industrial Gasses, bought out by BOC in 1990) the acetylene tip didn’t really work at all with the LPG so I cut the end off it and silver brazed a fitting on the end and used a Harris 1309n #3 screw in LPG tip. Works great, so far as I can tell. Its harder to figure out if you have a neutral flame than with acetylene though. Need to replace the dodgy old hoses too, so thats on the to do list. I hear good things about the tinman tech ones.
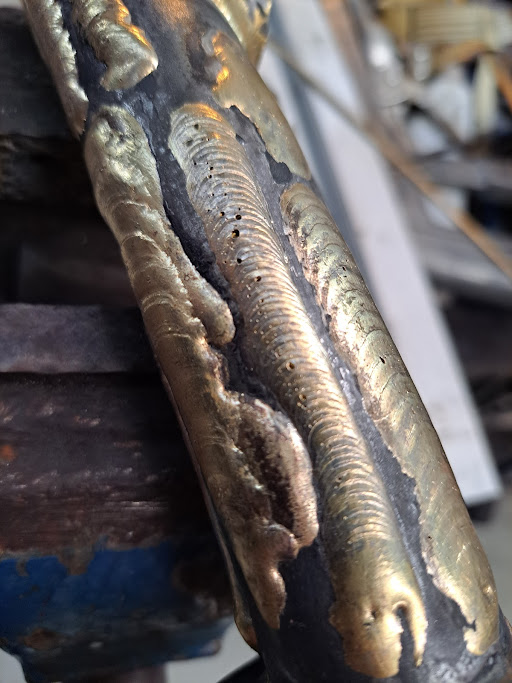
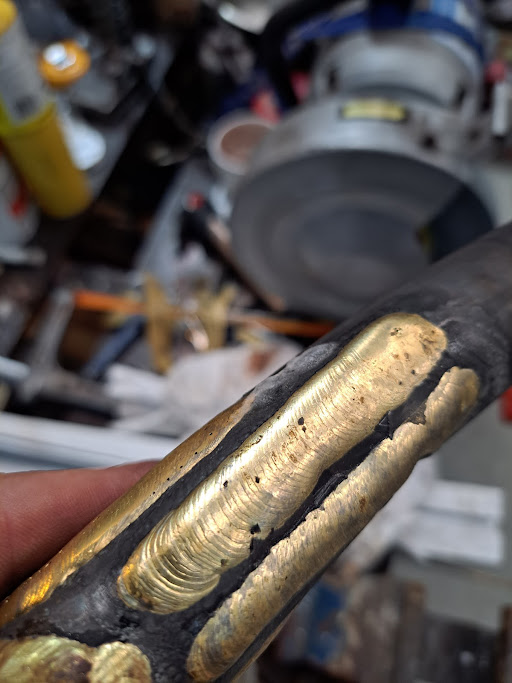
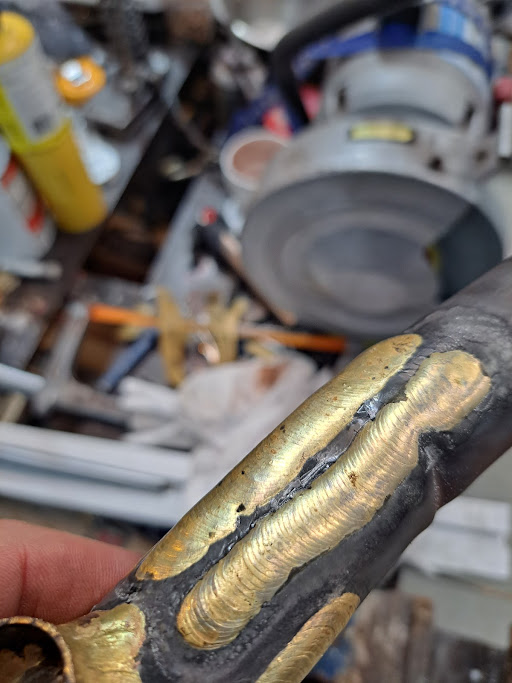
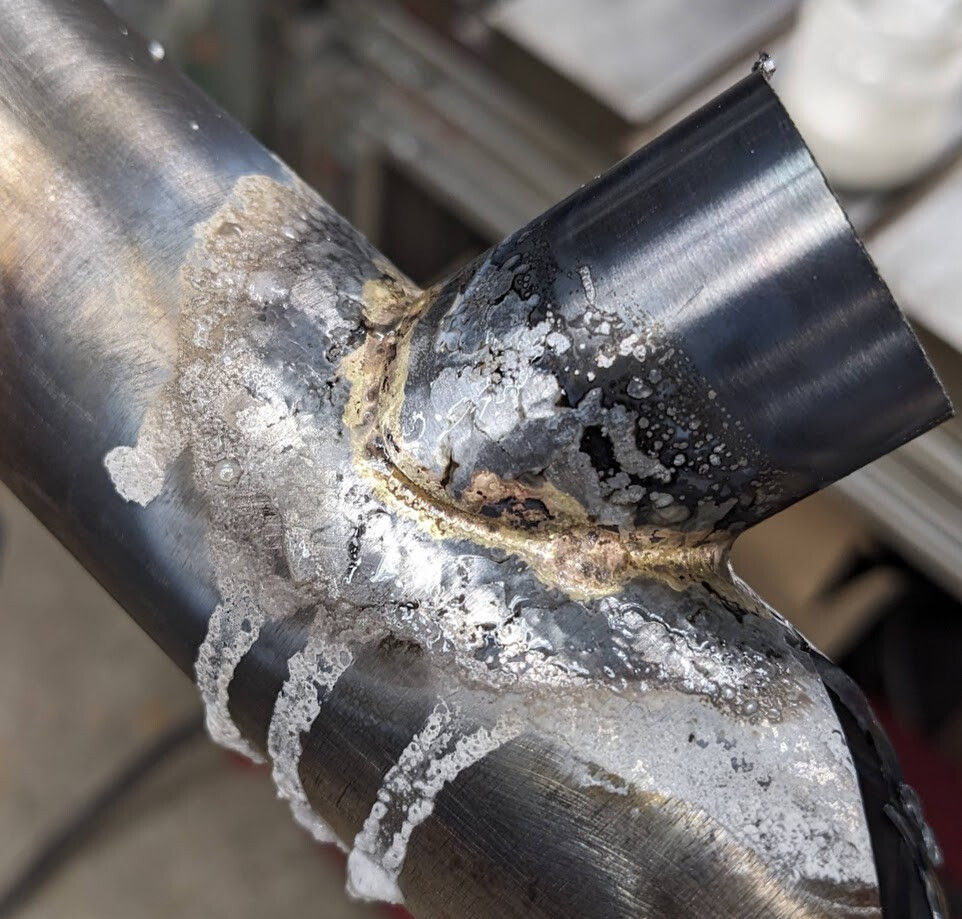
Some of the beads have pinholes, here’s an example. I think it might be when I have been a bit slack in cleaning the base metal but if anyone can chime in and let me know that would be great
The other thing is the flux is super hard to get off, how long should I expect to soak it for to get it off? the stuff thats still grey or white is fine but the blackend stuff is like glass and really stick to the root of the bead
You can see its still very stuck in the transition from brass to steel in some places.
I have heard some brands are better than others to remove, I was thinking I might get some Gasflux brand stuff next time I need to order some tubes from BFS and try that out.
This seems like when you need a screwdriver to open a package with a screwdriver inside
I love the set up though!
As little as I know about brazing I think new brass and flux would help. Paul Brodie has a silver brazing video where he sands the outside of the silver rod to get oxidation off. I started doing this and it really helped the silver flow. I imagine brass does the same thing…
I hope it’s okay to tag on this thread rather then create another beginner brazing thread!
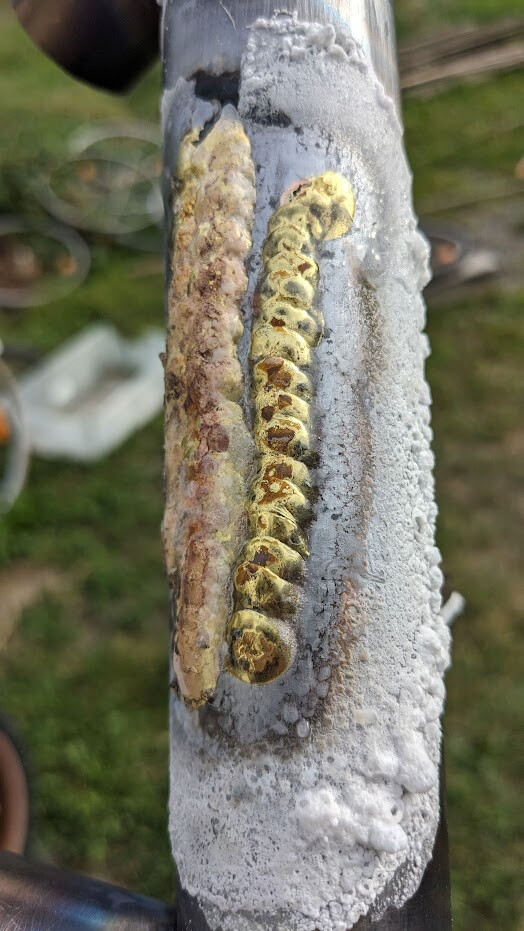
I am also using a oxy propane setup with LFB and cycle design flux. These results below are with a 2-Ten tip which has a pretty small cone. From watching a lot of the oxy-acetylene videos, the flame is quite quiet. I need to get mine to have a slight hiss to get it hot enough. Not sure if this is normal?
Here are a few tests. Not sure if any tips jump out from the photos.
Some nice looking beads! Looks like you have great control with your filler hand.
The pin holes could well be caused by less than ideal clean up. Everything else looks pretty good so that would be my guess. Try cleaning the rod too if you didn’t already (as mentioned above).
I usually soak a frame for around 30-40mins and it’s more than enough in water straight from our hot tap. It could be that your flux is a little more stubborn than say Cycle Design or Gasflux which are what most frame builders use. Or perhaps you’ve layered it up a bit while re-fluxing on your practice piece?
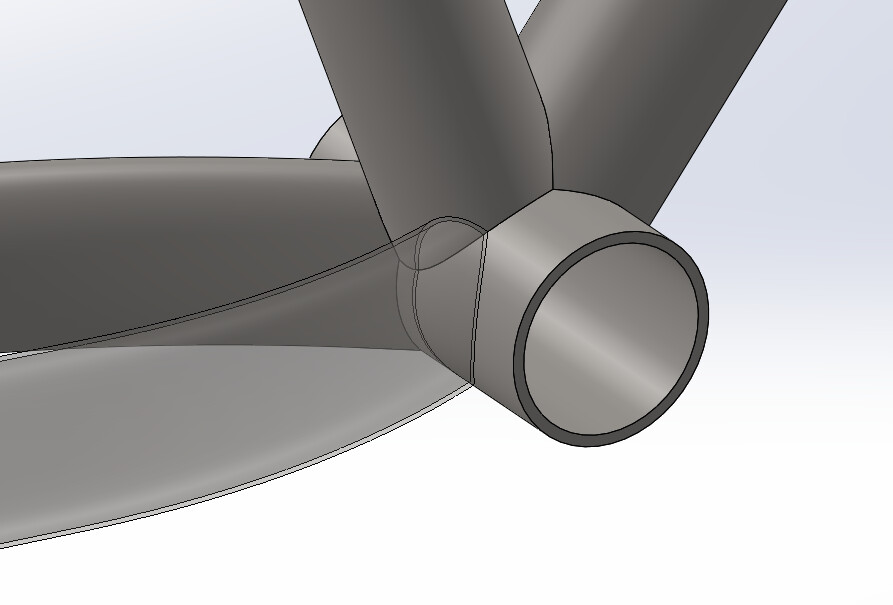
How would you tackel brazing up this mess of a joint? The main concern is that the top of the chainstays is overlapping with the seat tube.
I thought about two possible ways:
Braze seat tube to BB only with a tiny little root pass first (I would use a more liquid filler rod for that), then do a fillet around all the visible outside surfaces
Do a normal fillet around the seat tube/bb and cut/file the CS accordingly
Which way would you recommend? Or is there maybe another option?
First off, do the chainstays need to be that far inboard? And are you able to offset the stays lower on the BB shell. If you move them out and down you’ve made your life a lot easier.
If I was forced to work with that fit-up, then I’d likely braze the seat tube on first. File the fillet smooth and then notch the chainstays to fit over the fillet and onto the seat tube. That would be a proper pain in the @$$ though.
To help avoid that double miter I like to drop the chainstays at the bb until the bottom edge of the stays is nearly tangent with the bb shell. It may not completely avoid the intersection but every mm helps
Unfortunately yes… Otherwise there would be too big of an overlap with the chainring and crankarm. I realise the bend of the stays is not ideal, but now I have them here so they will have to work
I’ll see how much I can gain by offsetting them to the bottom of the BB, but it’s not a lot…
Hmm I know… But I don’t have a T47BB, I don’t have a thread chaser for it and I don’t have the facing tool… So BSA it is !
Thanks for the encouragement
If it was easy, they’d call it football!
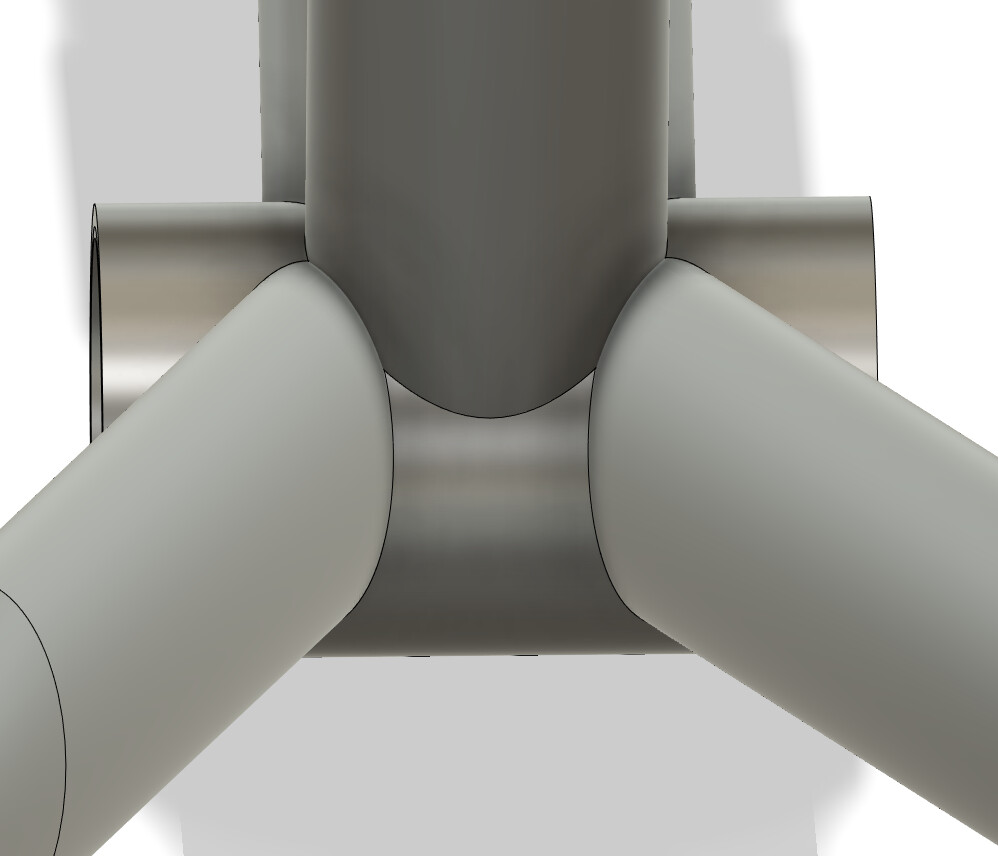
I have made two frames that had overlapping ST and CS. The first time I brazed the CS subassembly to the bb shell with a tinning pass, removed excess bronze from the joint, then hand-filed the seat tube to the chainstays.
The second time I had a horizontal mill, so I mitered the chainstays to the ST. I did a tinning pass of the seat tube first, removed as much bronze as I could where the chainstays landed, then filed the corners from the seatstay/bb miters.
I am partial to building the rear BB/CS/DO subassemblybecause that’s where I screw up most often and it works well with my fixtures. I tin it because I can do it quickly in my fixture and still ensure a good internal fillet. It isn’t necessary to"tin" or "lay a root"with the requisite skill and process. But I have found that I can tin first, then stack the overlapping part, I can remove less “corner” from my compound miter, and have less steel on bronze, which I like.
Like @Luniz82 , I’d like to continue this thread, rather than create a new one, as this is a continuation of what’s been said before.
I’ve completed my 1st frame in August and intend to build a lugged steel fork to go with the frame. I’m following the same process as @Johnmarmalade with the silver brazing training before attempting the fork. Not to mention binge watching Brodie videos + Chapman and @AlexM reels. (Thanks!)
For this process, I am using locally (Indian) sourced torch, local 46% silver, local flux and local 31.75mm (1.6mm thick) 4130 tubes.These may vary from the ones available in US.
Plus I’ve gone through the recommendations given here by: @Schonstudio - (adding heat to both surfaces, directing the heat at the plates to pull in the filler rather than push the filler and using gravity as a tool.) @manzanitacycles & @ElysianBikeCo & @scharencycles - reduced the tip size to 1 of my (local branded) torch and flame size along with it. Got to the point where the acetylene flame had a slight upward bend before adding the oxygen. Plus I’ve got shade 3 glasses and working in a relatively darkish environment.
And @Duanedr - increased the steel tube thickness to more than 0.058 inch (I was initially working with .035’ steel tubes with terrible results.)
A big thanks to all your suggestions and making life that much easier for the folks heading down this rabbit hole behind your steps!
Finished around 20 such practice pieces by now,
Yet…
Each time I am frying the flux and the penetration is not great. I’ve made a sizable investment in 46% silver. (So trying to work with it now and move on to 55% once this gets exhausted.)
Also not sure if the flux has a lower melting temperature than what’s needed.
Beyond all of this, I am not really sure if I am doing it right in terms of temperature control etc.
I am adding a video below.
Your comments would be super valuable in helping me reach the next stage🙏
One thing that I see in your video is that you are not heating the inside of the tube. I would flux this too and try to slowly get this part up to temp before going to the outside. I would also probably drown it all in flux, yours seems a bit minimally fluxed for my liking.
A couple things I see - not really in order of importance:
I prefer a little bigger and softer flame so more of the joint is heated - maybe try keeping the flame back a little and more pre-heat. it’s hard to tell as the video is sped up.
You need a gap that is more consistent. Looking at the end of the video there is a big gap at one side and almost no gap at the other and the filler will only follow capillary action into a gap so big before it flows somewhere else.
I see you cut and spread a cutoff from the same tube. I might cut it in half and then spread the halves to fit tight around the main tube.
Getting 45% to flow like this will be hard. Do you have access to brass/bronze filler instead? It should be cheaper and tolerates higher heat better. You’ll want different flux and bigger flame then though. Save the silver for other joins. It’s good for tabbed dropouts, braze-ons or other bits.