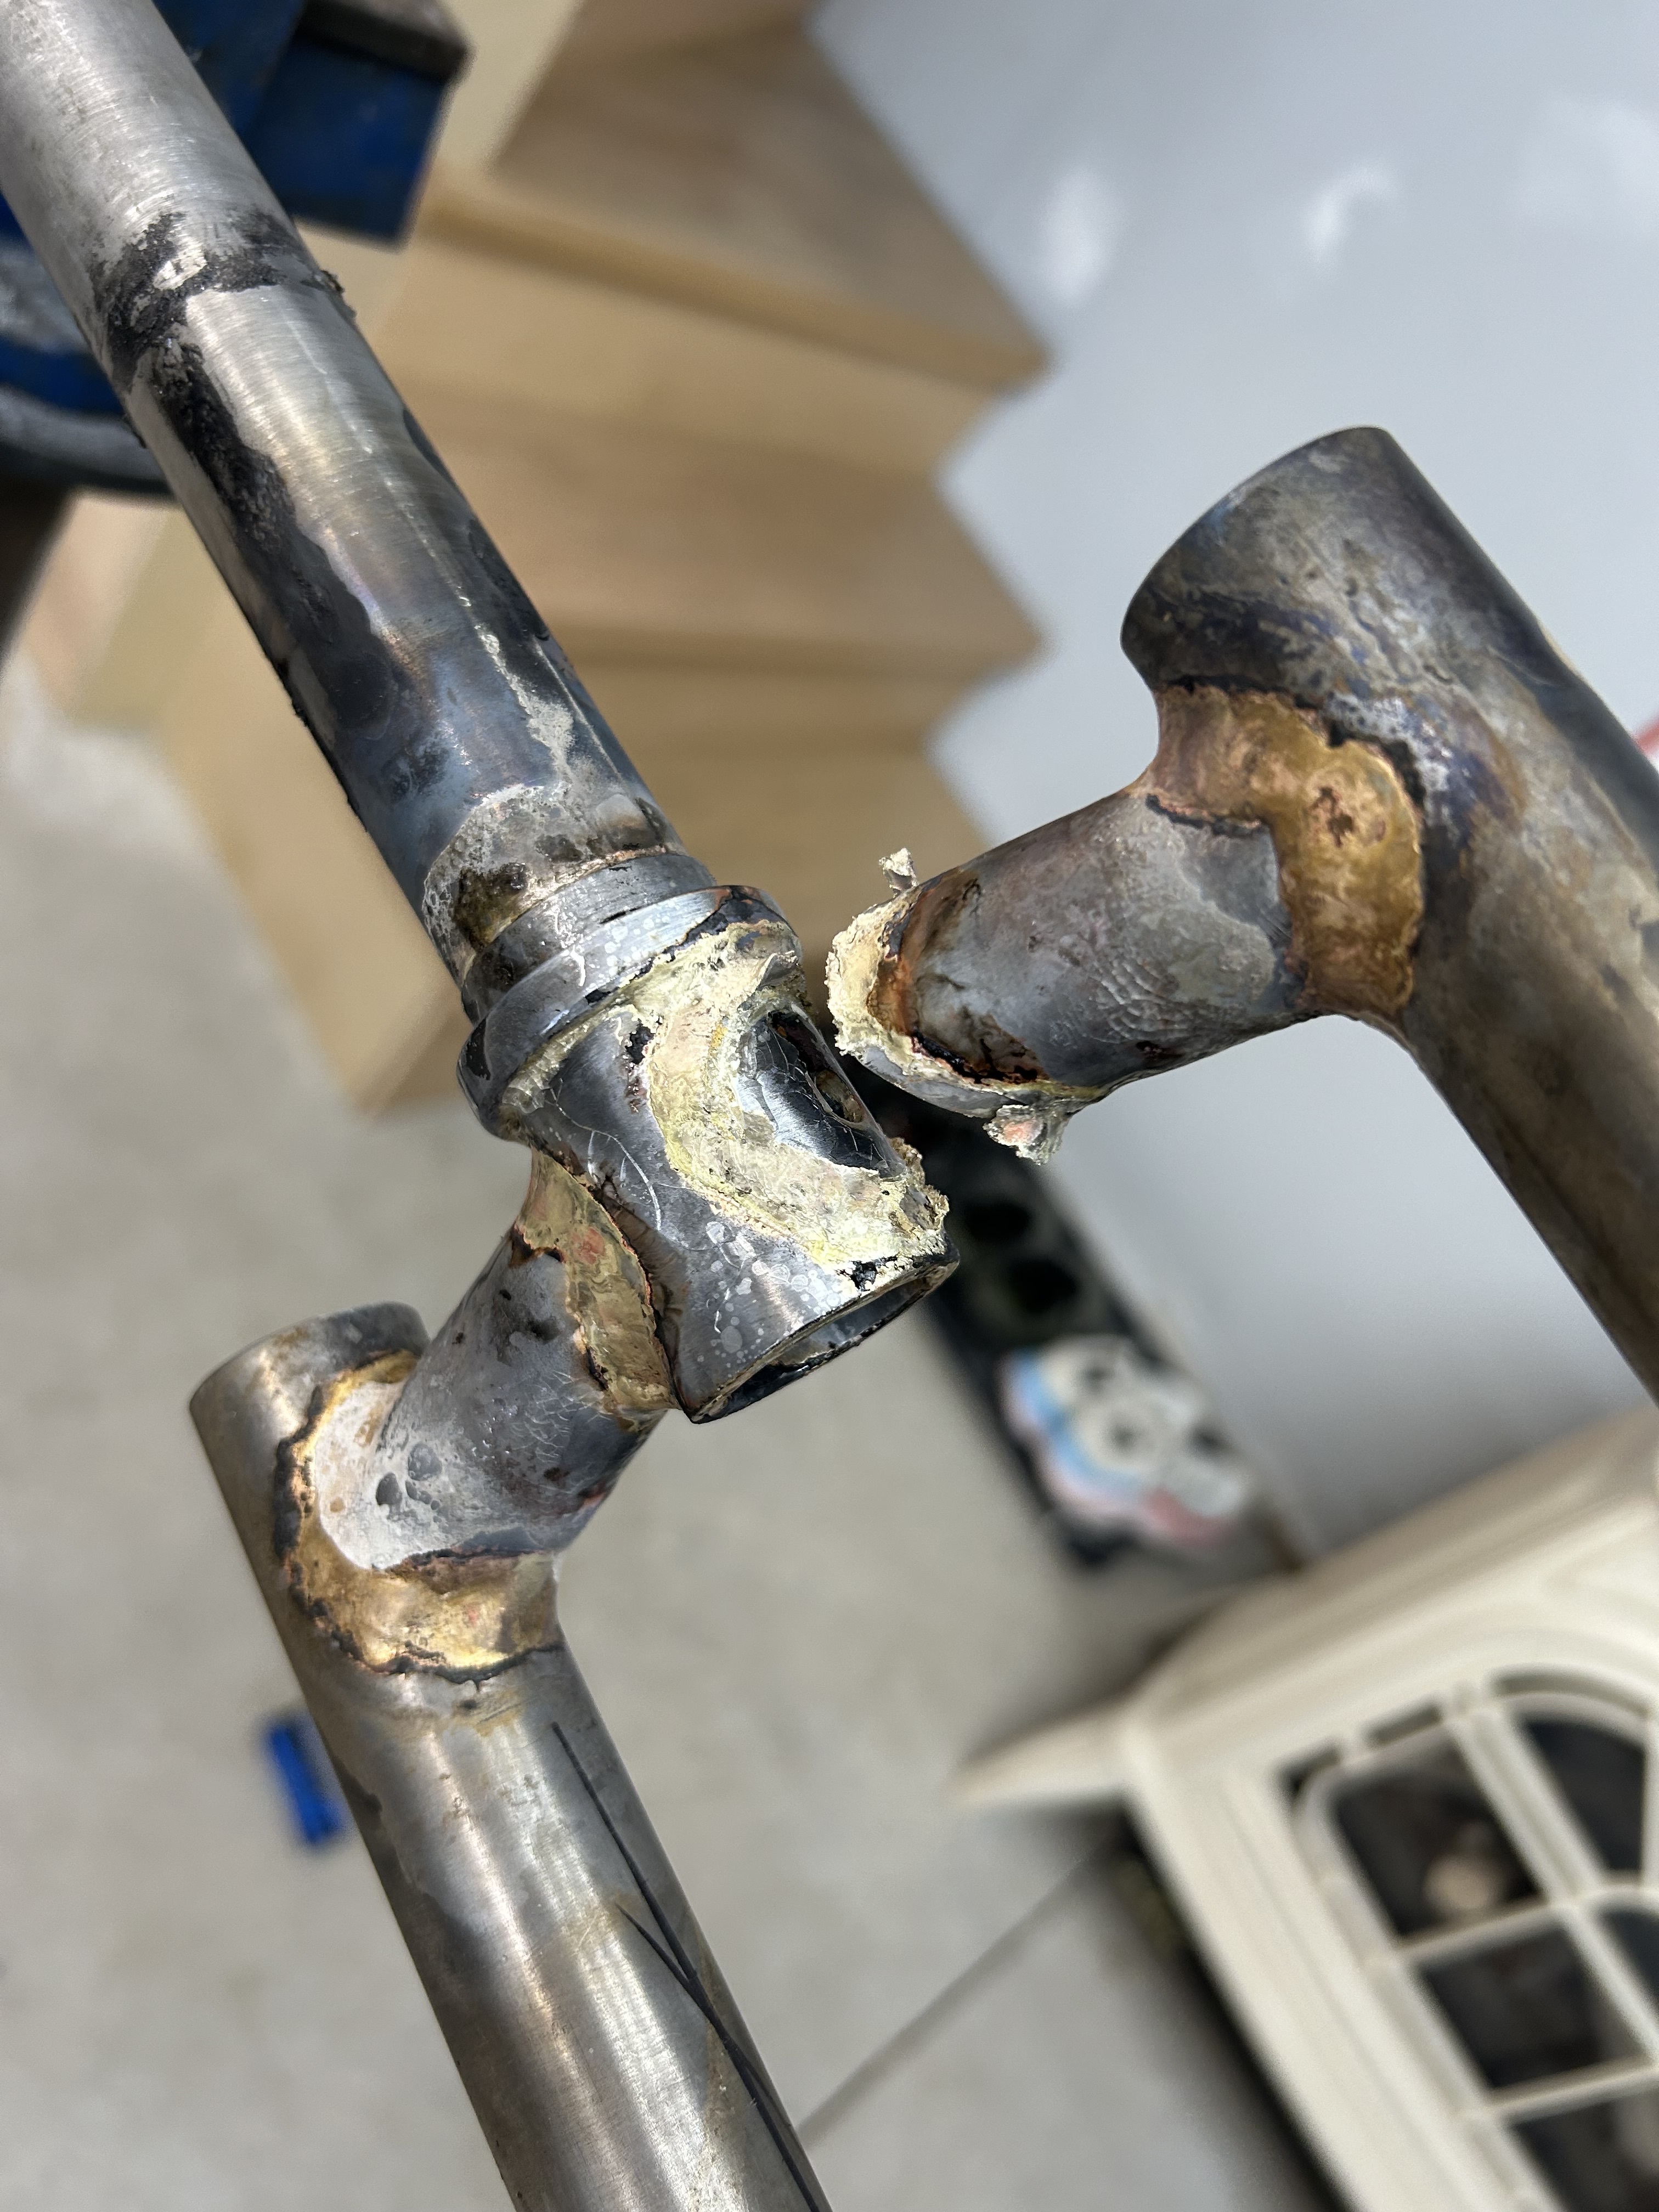
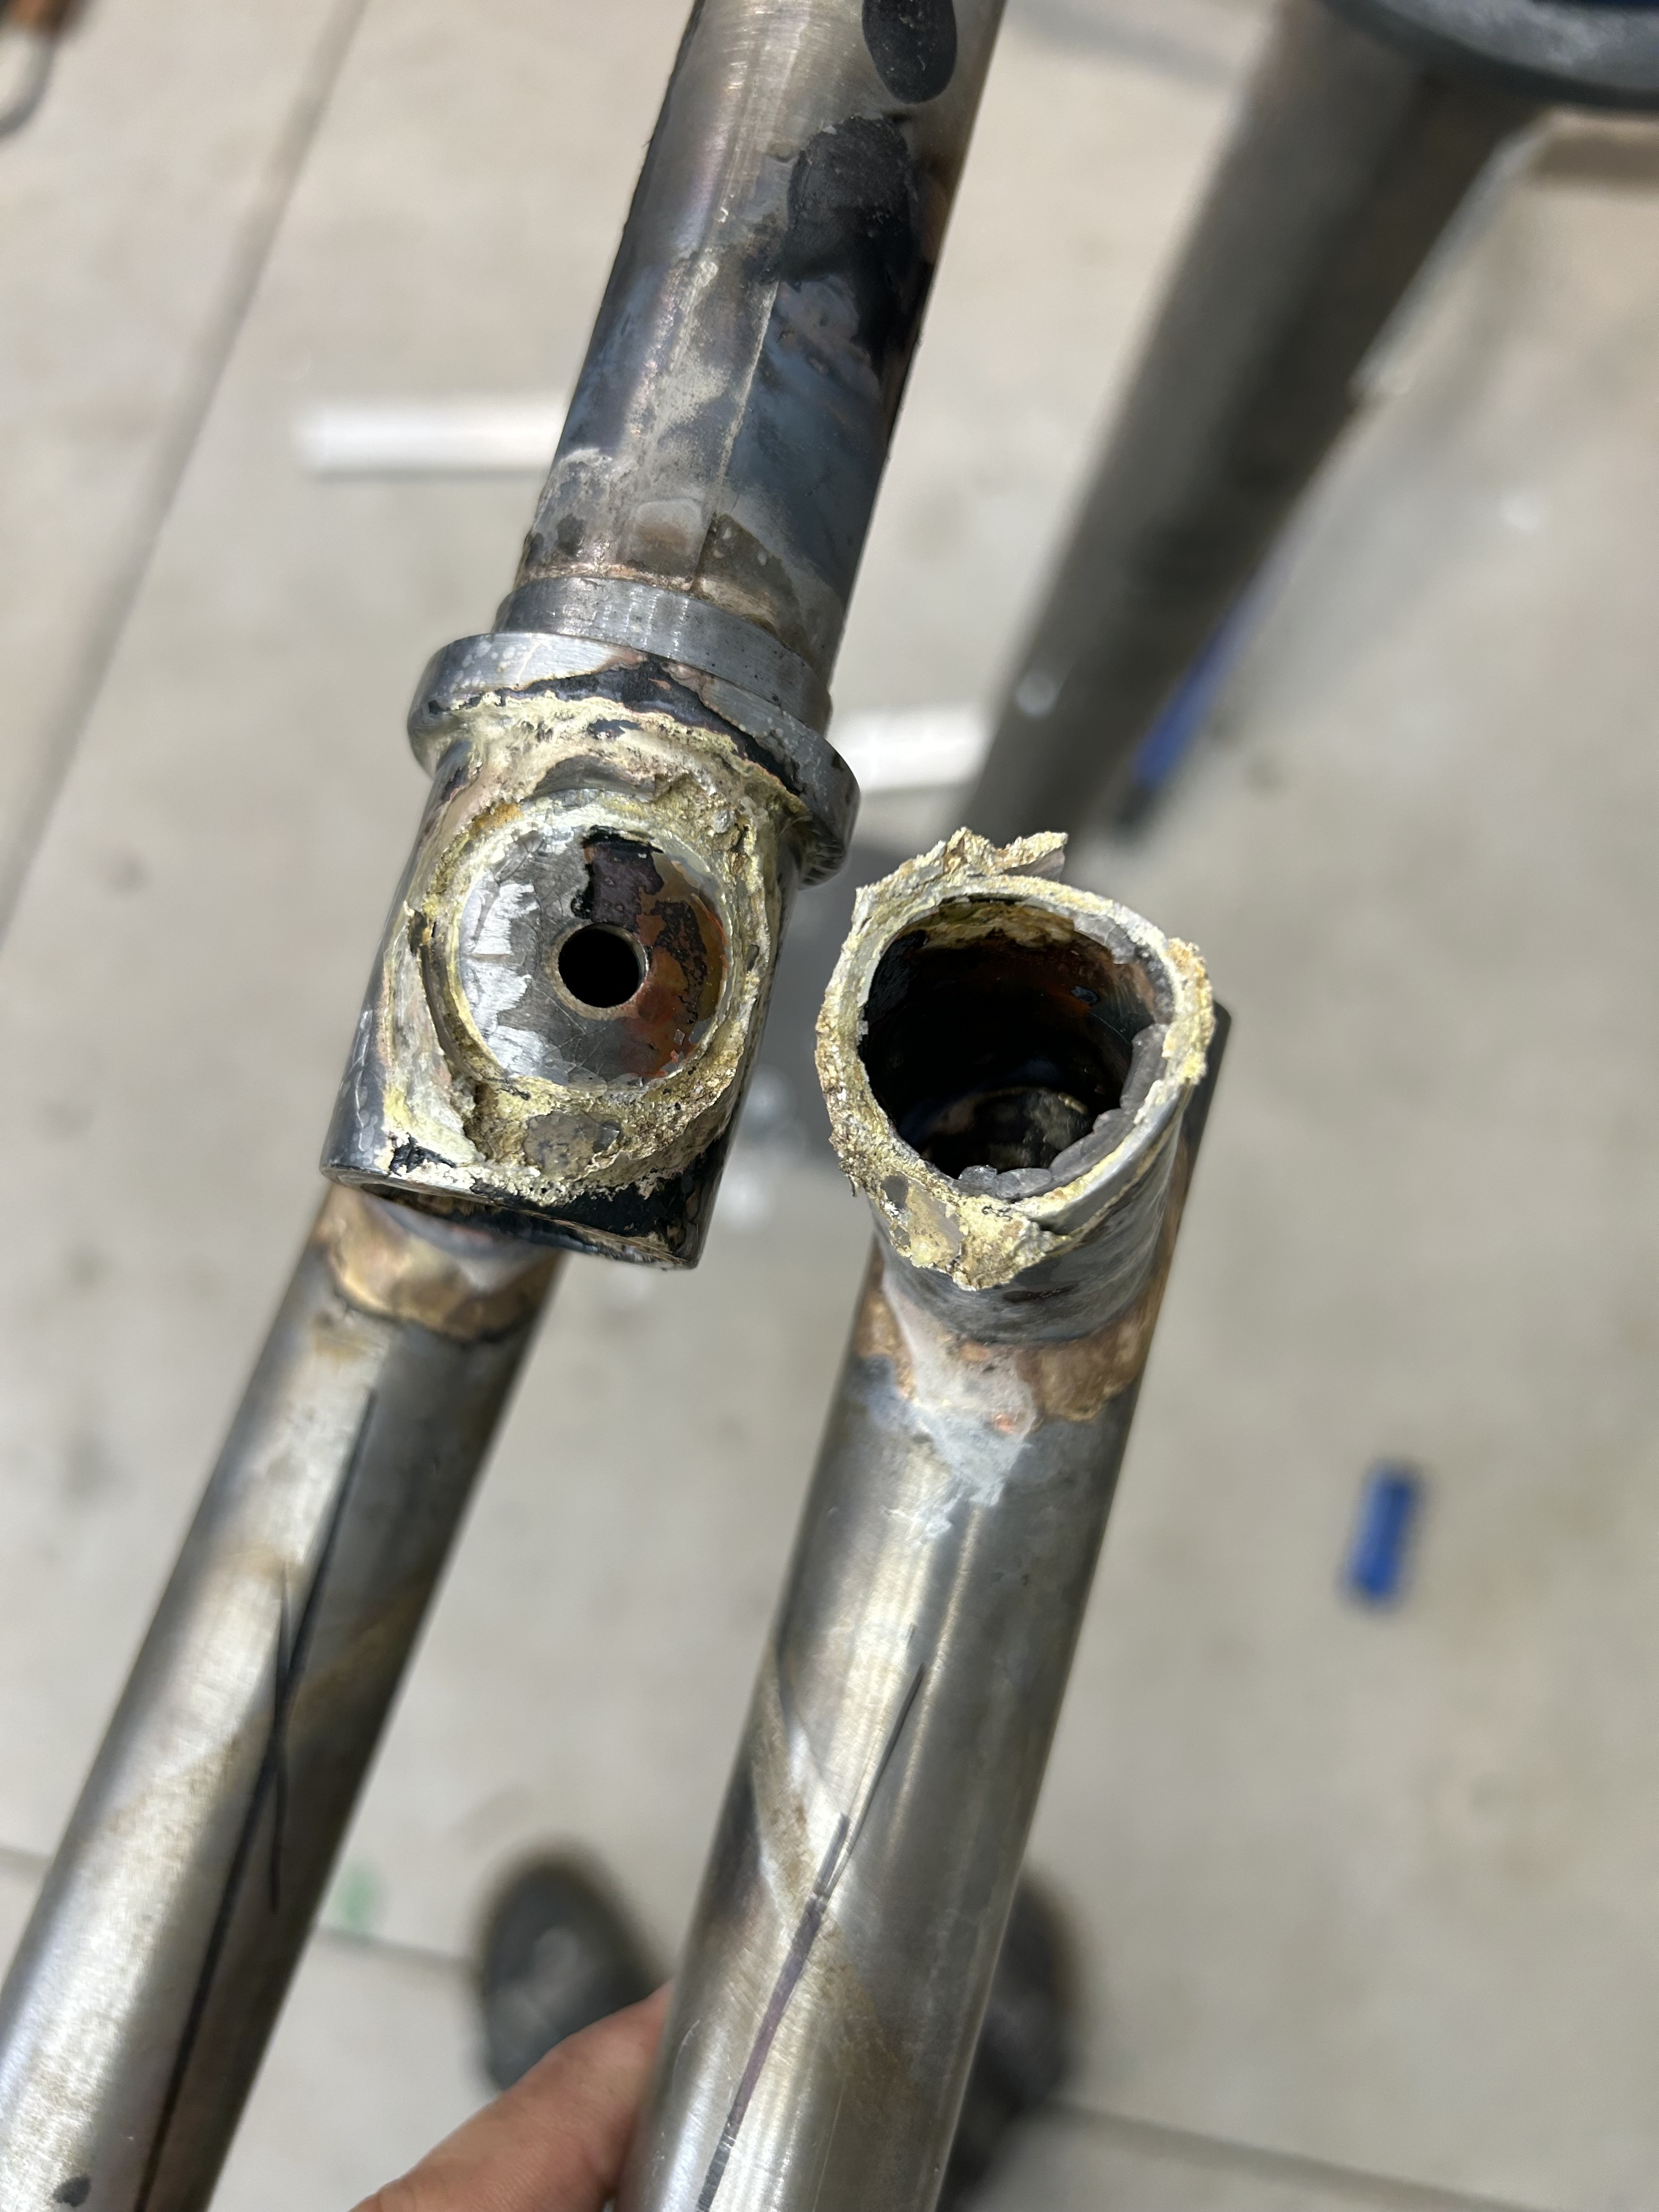
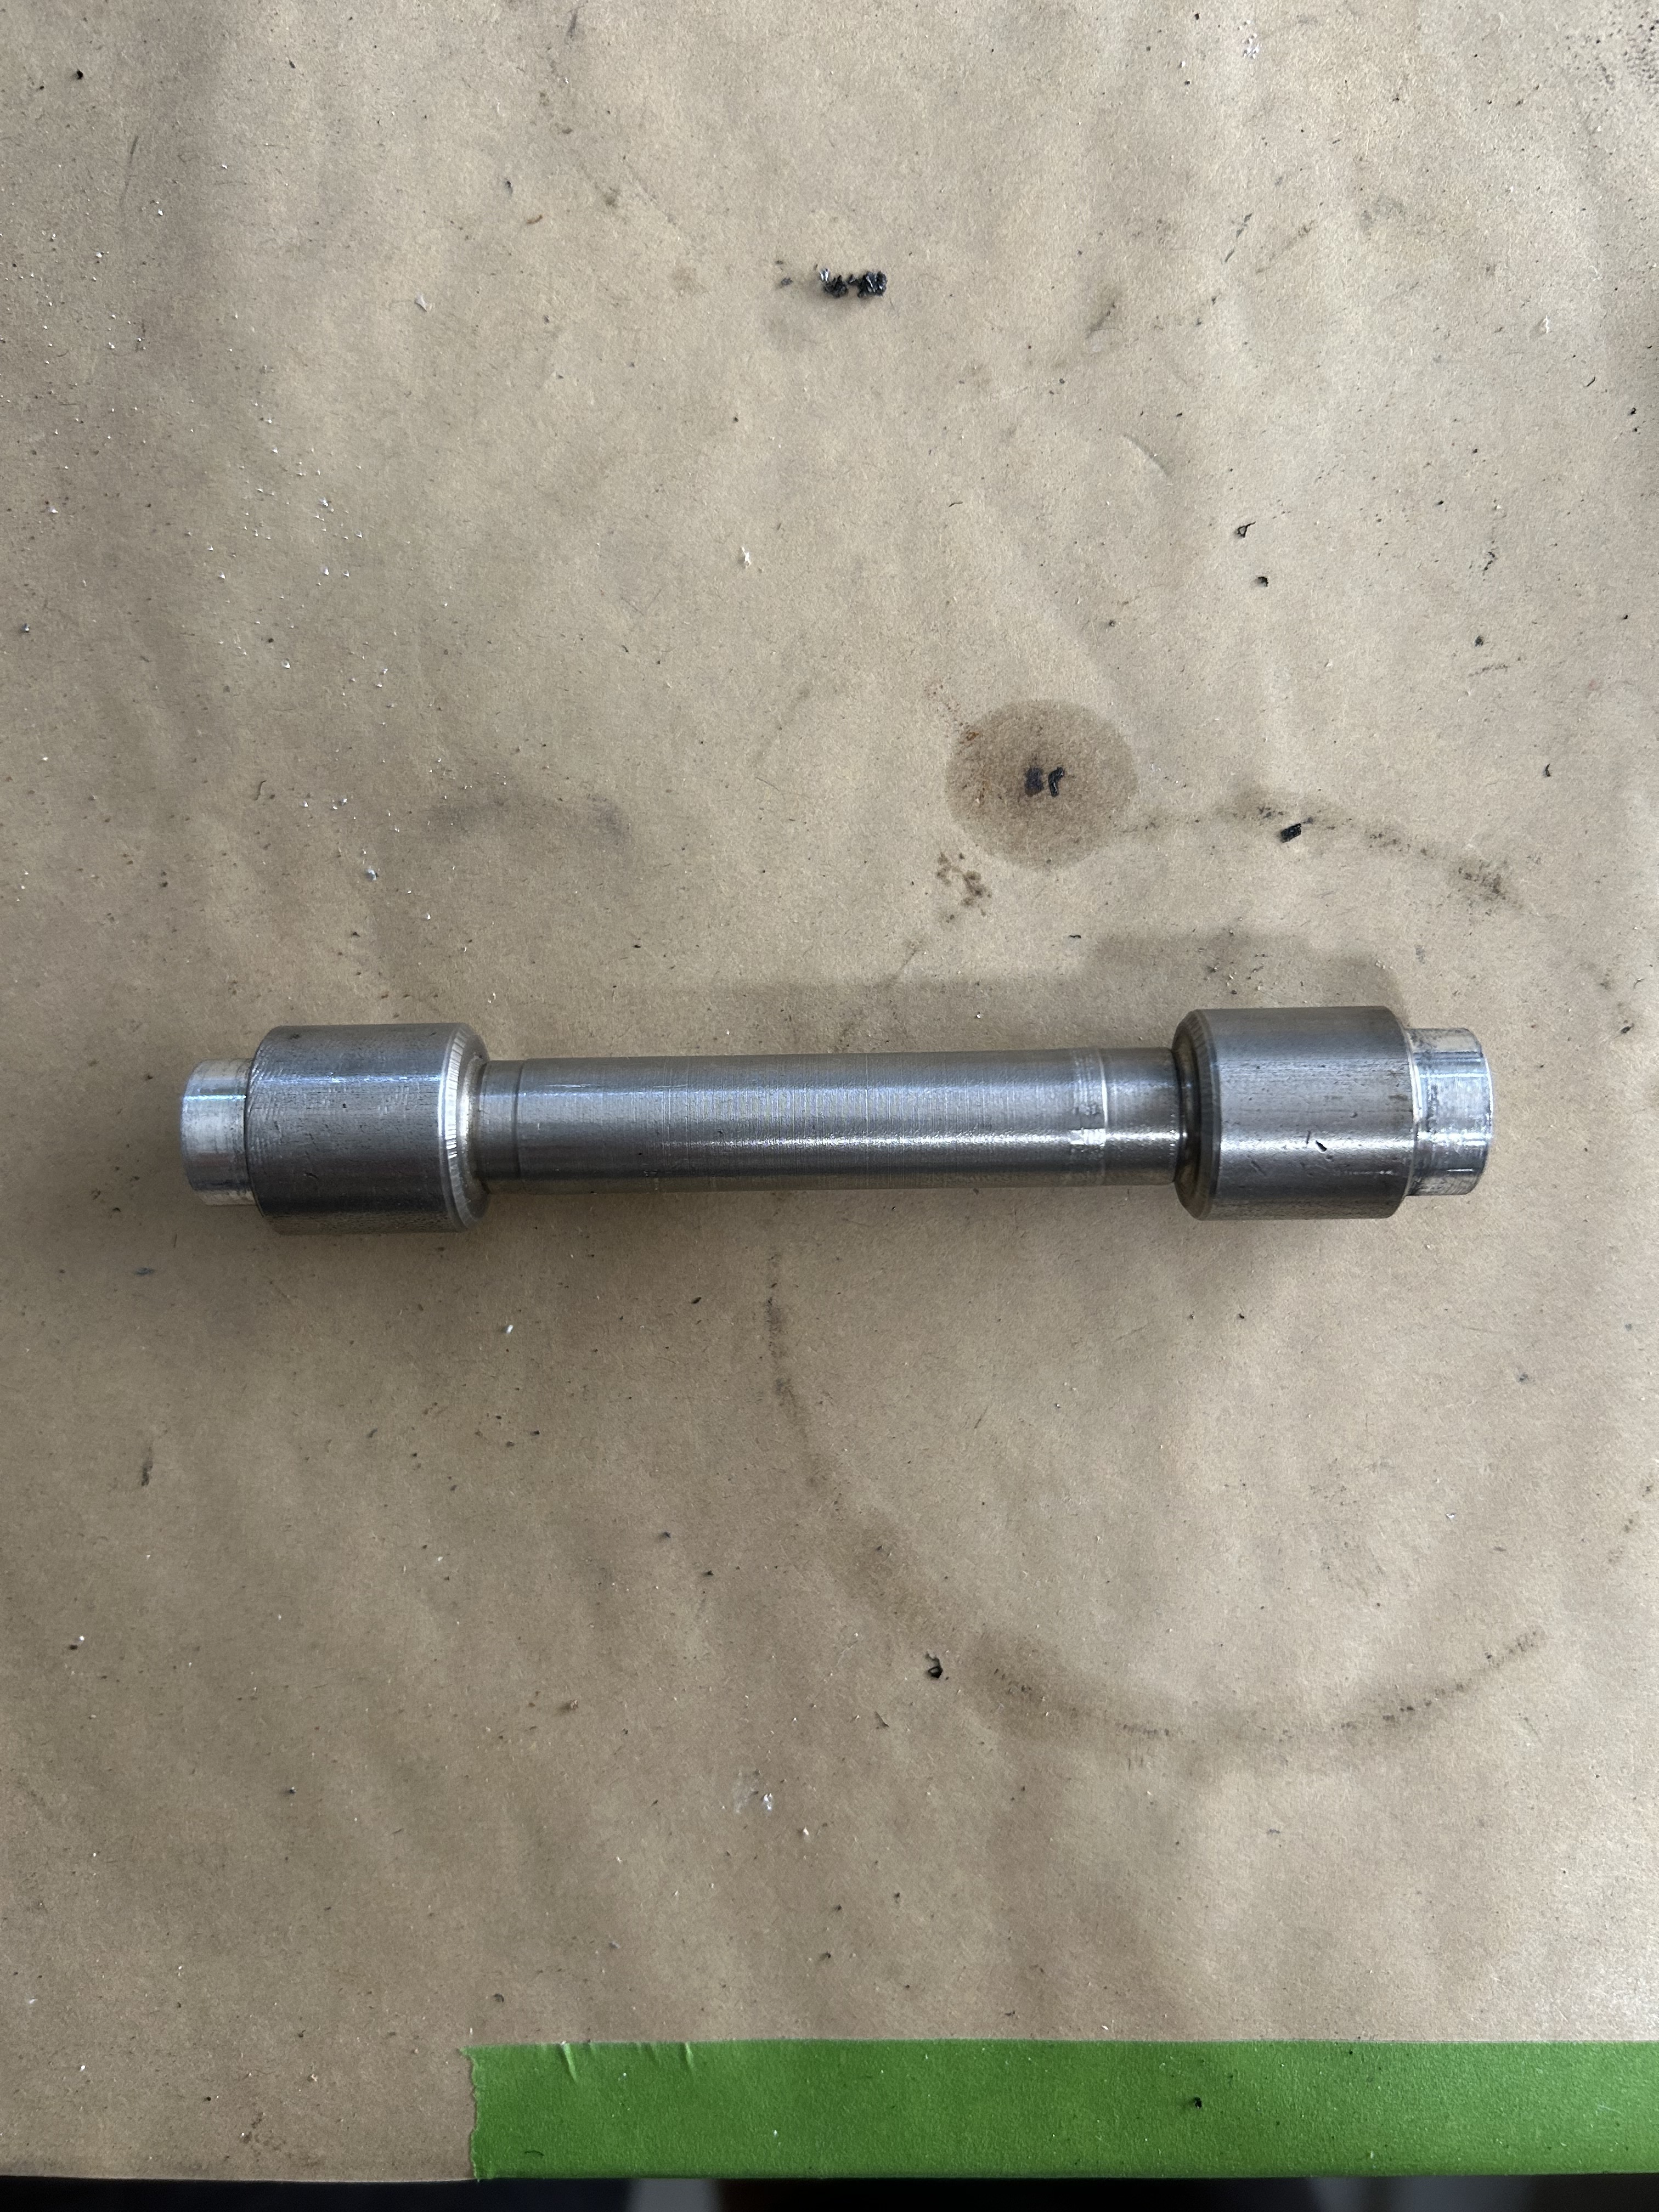
Hey internet, I have need for your wisdom! I am finishing up my 4th fork, this time for a cargo mini velo. I had finished brazing the fork at the steer tube when I had to remove my dummy axle. When the braze had cooled to the touch, I tried to remove the dummy axle (a modified 100x10 QR dummy axle) by spreading the fork legs. Admittedly, I had to put quite a lot of muscle into it to get the axle out, and in the process one fork leg cracked off at the steer tube.
It is a segmented design, built to be really tough so it can handle some weight. Here’s the tubing info:
320mm Axle to Crown
100x15mm thru axle Paragon dropouts
straight gauge 4130 28.6mm legs that are 1.5mm thick (1 1/8” x .058”)
BFS 1 1/8” steerer with a 31.8mm sleeve silver brazed to the bottom 2”
4130 25.4 x 1.5mm (1”x.058”) segments
Brazing process:
To prep ahead of brazing, I sand to bright metal with 120 grit, inside and out of each section, then wipe clean with 99% isopropyl alcohol and then with acetone. Everything is amply covered in flux inside and out. I tack the joint top and bottom, check alignment (it was good) then do a Bilenky style tinning pass all around the joint. Lastly I run good clean fillets around with 1/8” brazing rod.
So here’s the question:
Does this crack look like the result of a bad braze? Did I put too much force into the joint too soon, do braze joints cure for a lack of a better word? My theory is that the fork legs are so stout and short they had no flex, therefore the braze was kind of isolated in having to take the force.
Any insight would be most helpful, specifically how do you avoid the dummy axle getting stuck in a stout fork?
Sorry but I would say yes, a bad braze. I see what looks to be a porous braze and lacking even flow out of the filler. Were all the joints done in one set up? Or did you do one joint set up and brazing at a time? Did you tack in a fixture then flow out (what you call a tinning) out of the fixture? Did you check alignment with each step?
I did the fork leg to segment joints individually, mitered to the steer tube, tacked in fixture, checked alignment (it was good). I then tinned in fixture and then finish brazed out of fixture.
I’m suspecting the steer tube was too cold during the braze, it’s 2mm thick at the bottom, and with the sleeve it’s a total of 3.5 or so. I think it needed more preheat and I should’ve upped the torch size.
I can’t quite tell if the joint was porous or if that’s just the stress fracture of the brass. I don’t have any reference for what a cracked brass joint looks like so this is a guess.
Sanding to bright clean metal is enough prep. It’s fine to degrease with alcohol but the acetone is just wasting time.
You can see on the bottom of the steer tube where there was a pocket of flux under the fillet. You should really never have this. The only way I can imagine it happening is melting the filler with th e torch and dropping blobs onto the joint and then trying to smooth or tie it back in with the torch?
The torch needs to be pointed at the thicker section and closer to the joint. You should see the filler wicking into the joint ahead of where the puddle is. The filler is melted by adding it to the puddle. It can be hard to not overheat the whole thing and have filler running everywhere! You can see videos of heating the puddle and then quickly flicking the torch away to limit overheating.
You should file off all the filler from both parts and try again. This time make sure the steer tube is up to temperature(you can heat the inside/backside). Then try to break it again! You may find that the other leg joint is now your weak area.
I don’t have any experience of brazing with a gas torch (I TIG everything) but, with that proviso, it looks to me like the segment might have not got enough heat rather than the steerer.
There is a portion from about 4 o’clock to 6 o’clock in your picture where it looks like there was no braze stuck to the segment. But on the steerer tube it looks like there is braze stuck to the parent metal all the way around.
The lack of anything holding it together in that region would have weakened the joint enough for the rest of it to break.
The broken edge does look a bit porous but I don’t know what’s normal for this brazing material.
Forks will always pull in and need spreading. That’s actually a good thing because if none of the joints break when you do that you know they’re pretty strong
I’d agree with most on here that it wasn’t up to temp or, at least, not everything was up to temp at the same time. Normally, a telltale sign of temps being too low are where you see significant edges being built up rather than flowing into the tube. I see that in a few places. I’m also curious to know what flux you’re using, as I see lots of burnt flux along with a joint that looks too cold. This could just be that you have a flame that’s too hot and you’re getting localised hotspots due to dwelling in one place for too long rather than chasing an even heat. Or it could be a flux with a narrow working window that you’re exceeding.
The other thing that I like to look for when diagnosing problems like this is to see if I can tell what direction the joint has been brazed in. Or at least if it looks like there was some plan on how the joint was being brazed. If I were to be overly critical of this joint, it would be that it looks like filler has been added in a slightly random fashion, which might be in order to fill low spots or try to get more fillet consistency, but it doesn’t look like an even preheat and then a quick braze around the joint in one direction has happened. While that doesn’t necessarily make for a weak joint, it will give you some spots where the joint is too cold due to losing heat and others where you’ve dwelled for a time, got too hot and burnt the flux.
Copy on sanding being enough - I like the belt and suspenders approach. This is a hobby so time is on my side. The flux you’re seeing is more of a shadow in the image - it’s not there in person. I am learning but I’m confident I’m not melting blobs and smoothing with the torch. I will try again! Thank you for insight.
Haha fair enough! I know a good thorough preheat is needed now. The steer tube+sleeve is about 3.5mm thick - that’s the thickest tubing I’ve brazed so I think I rushed the preheat out of habit. Lesson learned.
This is a great insight - I think that I was impatient and wary of overheating the ears of the segments. I followed a similar approach to how I braze the main triangle, alternating segments and starting at the acute bottom of the joint, braxing 8-4 o’clock, then moving from 10-2 o’clock, then the ears. Everything is brazed in one go so there’s only one heat cycle.
I’d say this whole joint was maybe 5 or 6 minutes including the tinning pass. I’m going to upsize my torch tip and do a gentle but thorough preheat all over before I start the brazing.
On the next go around please take a video of your work. This braze is all those things that the other like Steven and Andy etc mentioned. This braze in particular shows signs of localized overheating and inadequate pre heating of the thicker members. The issue is that I don’t think this is localized to just the preheat and without a video you may not even know what it is that you are actually doing. This is the issue I see with self teaching in that there is no real-time feedback and poor technique can just go on being just that. I also have to mention that forks are serious business and something like that happening while riding can result in a very serious injury. It’s one of the reasons I shy away from segmented forks with students. They are harder, require better technique and there are extra joints for potential failure.
Great points all around. I cleaned it all up, upped to a number 2 torch and brazed again with a good long preheat, it all flowed much better. I had to spread the legs a bit to account for distortion and it took considerable force, with no scary cracks. I totally hear you about the advantages of learning in person, and a course is certainly in my future. I have a design, machining and manufacturing background - when the pandemic shut down my workplace I began my frame building hobby in earnest. I built all my own fixtures, tube benders and other tooling. I think I’ve learned a lot of what I do from YouTube university, and on the whole it has served me well. I agree the finer points of these techniques should be critiqued by an experienced builder. I really appreciate this forum and the open sharing of best practices, and the fails.
I learned everything from YouTube as well. It can be done. Not to disparage learning from a real person: that probably is much more efficient. But working things out for yourself can be satisfying in a different way. I didn’t attempt a fork until about my third or fourth build for safety reasons. I would recommend making some practice joints and testing them to destruction just to get some confidence (and it’s all good practice). I’d also be interested to know where they fail
The sequence of how you braze can help with the distortion. Heat the area opposite to where you finish brazing while the joint cools down. Also, tack the joints and take the dummy axle out, the dummy axle adds to the distortion.
I actually wasn’t suggesting that the OP learn in person although I do think it’s more efficient. I was actually suggesting that he post a video here so we could review his techniques during brazing. The feedback on what he is actually doing vs. what he thinks he is doing may be very helpful. I will also mention and this is not directed towards anyone here is that I have seen people who have been in this business 10-50 years who think that have it figured out and they definitely don’t have it figured out. I would equate it to any sport. If it was as straight forward as watching all the kick ass Ski videos on YouTube I would be the best skier in the world, alas I am not.
You might be well served to taking a brazing (or even jewelry making) course at a local tech school to better help you see and understand what happens when the tools, materials, and your time intersect.
That’s not a very nice thing to say about me.
/mostly kidding.
I have hesitated to build a segmented fork because I would worry about it. I have taken a hammer to some things that I have brazed and they broke. I did a lot of fatigue testing, and a hammer isn’t a good substitute for a fatigue machine, but it didn’t fill me with confidence. I would have to do a lot of practice fillet brazing before I built anything that was fillet brazed, much less a segmented fork. The design puts a lot of loads on the brazed joints. If I was building a short fork for a minivelo, I would figure out how to do it with a regular crown.
OBCA made a fork testing fixture, meant to qualify forks to the Euro standards I believe. I think it was a collab between Andy of Strawberry and Dave of Ti Cycles. ISTR it was meant to be a resource that members of OBCA could use. Does OBCA even exist anymore? Maybe Dave can test your forks for you.
Anyway, I strongly believe that almost no one should make segmented forks, because almost no one is qualified to test them. Any time you diverge from standards that have been time-tested over decades, you need to do your own testing, and it needs to be calibrated and documented or you’re asking for a big product-liability lawsuit. Not to mention the nightmare of knowing the fork you made hurt someone. How could you sleep at night?
Honestly, even with a crown and a completely-traditional fork design and building process, beginners will tend to make weak unsafe forks. The knowledge and skill to make them safely is being lost or diluted rapidly at this point, so maybe just slap a plastic fork from Taiwan on there. You probably won’t get good at forks if you only make a few, and making even “just a few” dangerous forks until you get good enough is going to end in tears.
Making 10 or 20 forks and destructively testing them all might get you to “good enough”, but I’ve never heard of anyone who actually did that. In a small (typically one-man) shop, it’s too expensive and time-consuming.
Forks are hard! I didn’t get to braze forks until I had been brazing every other part of the bike for about a year and a half, full-time. Apprenticeships like that might still exist, maybe in Taiwan? But that’s a bygone era in the USA or the anglophone world.