Frequent lurker/desk-jockey looking to make something with my hands here. I’ve been kicking around the idea of making a frame for years and I’m working through what the base-investment for tools/fixtures/etc would be to make a basic brazed steel frame (gravel/bikepacking oriented) using available tubing, dropouts, headtubes, BB’s, etc (no fabrication of components myself if possible, no means to do so on my own).
What I wanted to pose to this hive-mind is what do you think would be your bare-minimum “frame building tool kit” you think you’d need to create the aforementioned bike. Assume I have basic bike maintenance tools, some drills, basic hand-saws and files to start but nothing else including no brazing torch/set up. I’ve done a good amount of research in tubing/frame component sourcing and have a good idea of the frame geo/concept I’d like to tackle.
For reference I’ve got a degree in Industrial Design (don’t use that much…I’m an apparel designer), worked in a bike shop as a kid/young adult and have a decent mechanical aptitude. Otherwise I’m working with a 1-car garage/bike shop area, no kids and theoretically lots of time on my hands.
Addendum: I’ve got rudimentary CAD skills and have a basic concept of getting 3D prints and parts made by the likes of Sendcutsend for fixtures or tools.
Thanks in advance, this forum has been a great way to research and learn a lot!
Ryan
Welcome! 4 years ago I was in your same position, I’m lucky to work with @Neuhaus_Metalworks so I have a much better understanding of building and access to bigger machinery.
These two videos posted on the Seen on the Web thread have been inspiring to see how simple you can build a bike.
To me, the chainstay sub-assembly - the dropouts, chainstays, tire clearance, and chainstay length is the most difficult part of the bike. What frame details are you looking to do?
Thanks for the reply Daniel! I literally just finished up watching the first video you linked, besides the fixture that’s all eminently technically doable in a garage. I’ll check out the second video next for ideas.
I know you had a long DIY fixture thread going, would love your input on a super low-cost (maybe not as accurate as a real builder would prefer) fixture that could be modular/taken apart and stored and made for cheap moneys. Mainly to hold the tubes in plane and relatively aligned. I’m thinking like $200-300 max. A piece of MDF or plywood with printed or similar stand-off’s that can be affixed to the surface for a pretty solid fixture to set up and tack the frame.
Last I’ve got a business concept for you: a consumer-grade/design parametric printed lugset out of steel that uses a simple website interface where I can enter whatever necessary dimensions derived from bikecad (or someones CAD model), and I could hit “buy” and your model could spit out custom lugs with my dimensions and send them to me. Basically a modern plug and play lug concept. Still pretty niche, but if I could buy pre-bent stays and tubing and fit it together (perhaps the lugs align the CS/SS in the design, maybe include a nice BB/CS yoke for even more plug and play compatibility) and braze it up that would be a fun and attainable project. Sure it wouldn’t allow for a ton of personalization but it would be a fun project nonetheless and I could inject more personality with paint or other flourishes in finishing.
Instead of investing $ in a hobby you may not enjoy, why not take a framebuilding class? It’s likely more coin up front, but you’ll learn much faster, get a frame done within a week or two, and it’ll help you decide if you want to invest in outfitting a home setup.
It’s similar to learning a language. Sure there are apps on your phone to give you the basics, but nothing beats full immersion.
Doug Fattic, Dave Bohm, Koichi Yamaguchi and probably many others teach classes.
I think this is the best method as well. A 1:1 printout will be very accurate. I think the most difficult thing to figure out is how to hold the dummy axle.
I have thought about printing lugs, but I think they are very limiting. The whole point about building bikes is being creative. Plus, lugs don’t help with the rear end, and that is the hardest part.
In a way, the “website interface” is this forum. If you figure out more details of the build, I can help design chainstay sub-assemblies pretty easily.
One of the important decisions to make before you get too far down the road is whether you want to braze or weld your frame, especially if you’re considering a low-cost MDF/printed fixture. Brazing is arguably easier to learn, but I’d be hesitant to tack a frame in one of those fixtures indoors. Welding might be cheaper these days too? I think I paid something like $1300-$1500 for an OA set up last year (size 80 oxygen cylinder, size B acetylene cylinder, new Smith regulators, torch, flashback arrestors).
If you’re looking for inspiration, Factory Cycles has built some very impressive full suspension mountain bikes using that style of fixture. He’s even set it up for in-situ mitering using a hand drill.
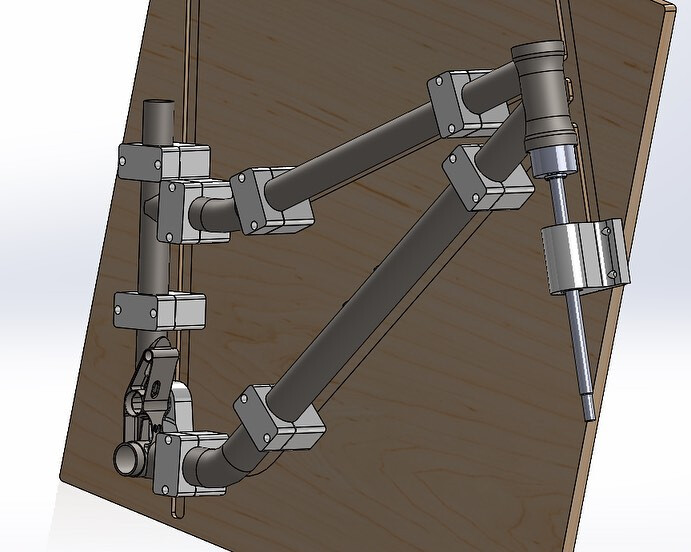
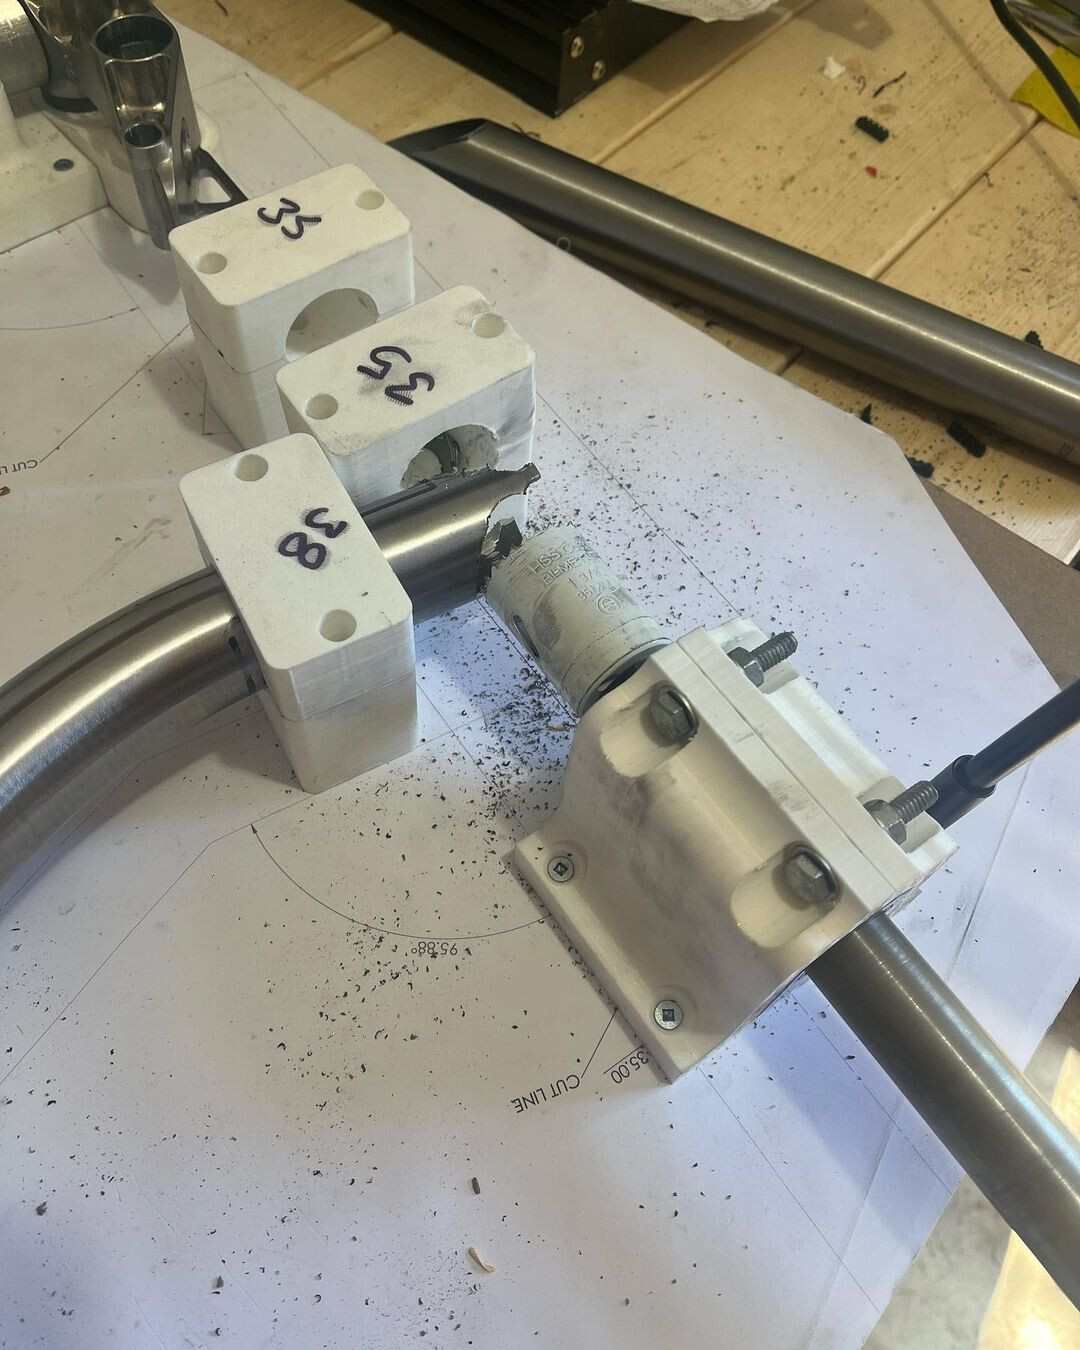
I’ve been slowly chipping away at my own frame building journey for almost exactly two years now, and in my experience it has been important to consider my motivations/affinities while puzzling through my process. There’s lots of ways to build a frame, and it’s important to choose one that will keep you engaged as you progress (the first frame is extremely time consuming no matter how you do it, and life gets busy/time moves quickly). Personally, I would rather file off my left arm than hand file a pair of chain stays and seat stays, so I’ve invested a pretty embarrassing amount of time into designing my own mitering fixtures. But, I enjoy tool design and it’s something I can chip away at in Fusion when I don’t have time to work in the garage, so I’ve found it worthwhile.
IMO hobby frame building is a different strokes for different folks type of thing, as long as you enjoy the process
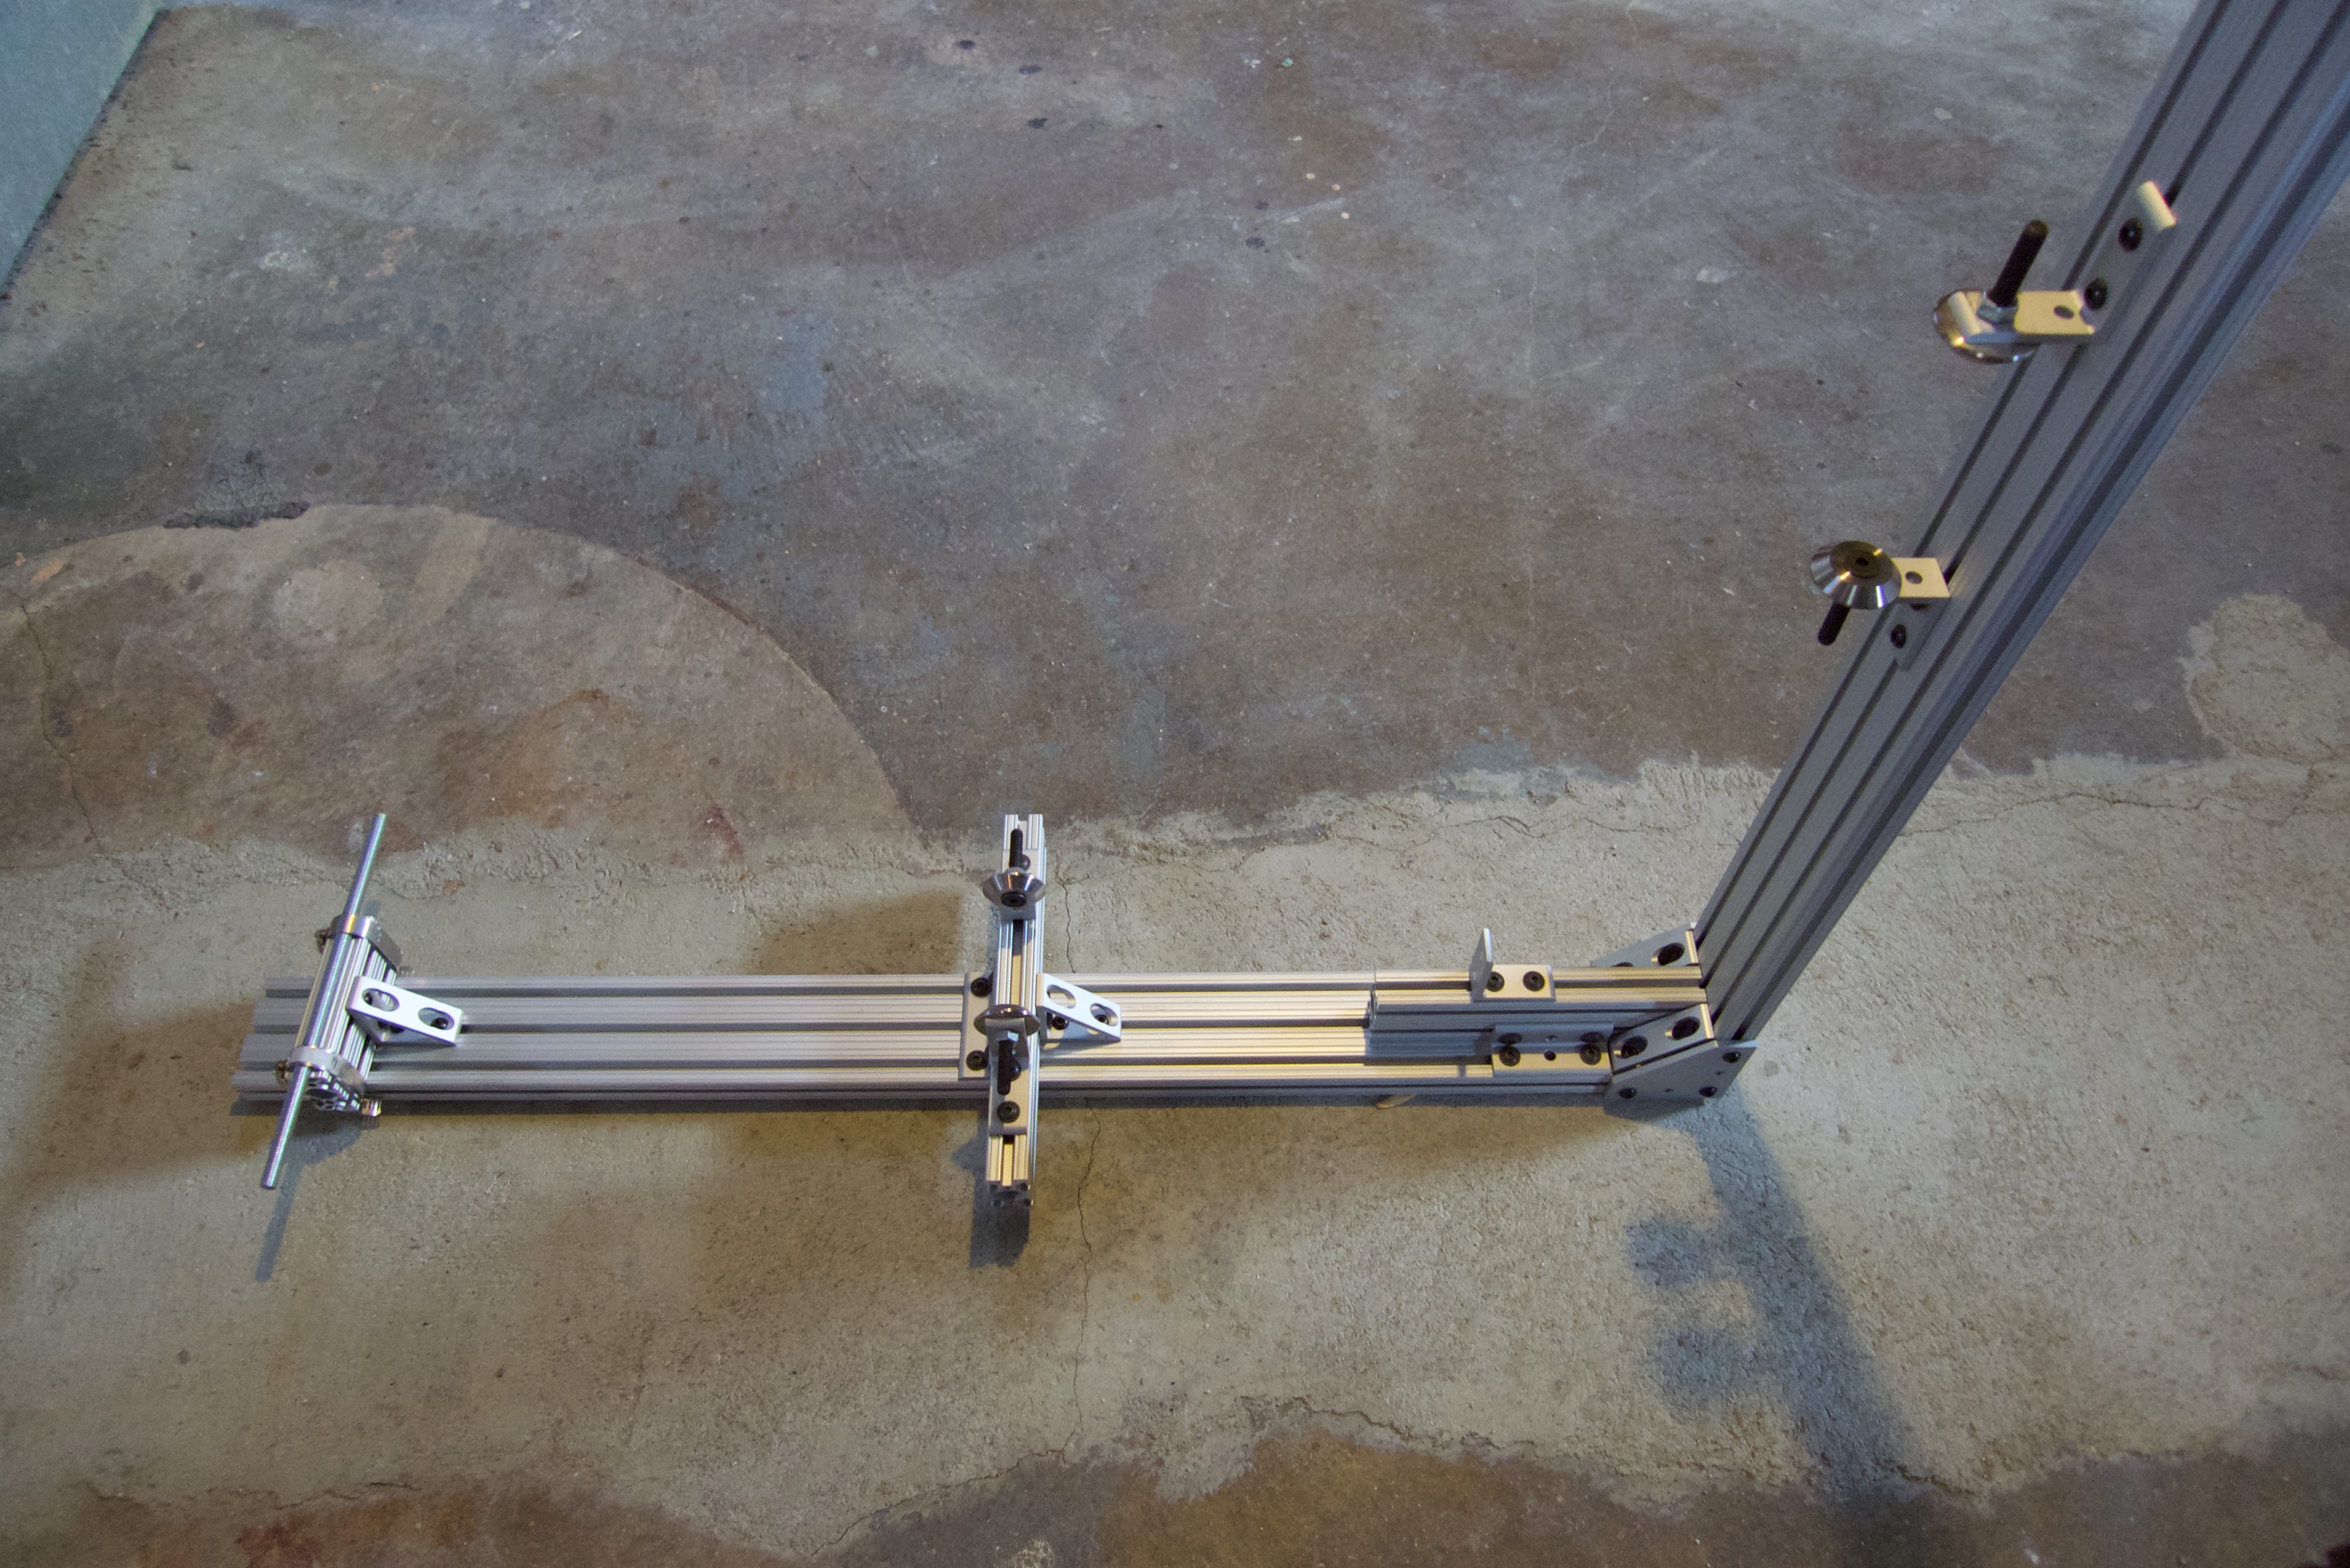
Here is a crappy pic of the first version of my 80/20 beam jig. Everything was store bought, no custom fab parts here. If you are wanting a simple 80/20 jig, it doesn’t get much simpler than this.
For a simple gravel frame there are plenty of lugs that will work already.
And you can build by the hockey stick method where you braze one joint at a time. There are even some video of nagasawa building that way!
Just use string and a ruler for alignment along with a protractor.
All the fancy tooling and jigs are about speed and efficiency.
Hahn Rossman
I agree learning from a pro would be ideal, and negate the investment in equipment. One of the builders listed is in CO, but I suppose I could solicit some other builders to see if they’d do a one-person class and see how much that would cost.
This is a great reply, appreciate the thought that went into it (seems to be your thing haha).
My initial question/inquiry was what would you as a builder think the bare minimum investment would be to make a frame and I hadn’t considered that a brazing set up cold actually be more expensive than a TIG set up. I suppose you could argue that if that’s the case it’s more logical, but it seems like TIG would be more difficult to master, maybe necessitating a class which is more investment as well (I’ve looked at classes at a local trade school, tempting).
That jig and mitre set up is fantastic and the exact blend of simplicity and clever engineering/problem solving I was looking for, I’ll look into Factory more!
Edit: Looked at Factory’s instagram, wow that’s impressive for a garage build!
Five years ago I went down this path and built a silver brazed lugged frame without much more than a torch, a piece of granite countertop, some string, a true wheel, and some nails to pin the joints together. It still took me about 6 months and was all I thought about during that time. It still came out crooked.
In the long run, the DIY approach has cost me a lot more time and money than taking a class would have.
I still make frames for myself, but I have a lot more tools. If I were to do it again, I’d start by learning Oxyacetylene welding on thicker steels rather than brazing with bronze and silver. It’s not directly applicable to making a bike frame, but it’s cheap and you can build a lot of cool stuff from 14 gauge square tube. I would have learned to work with and understand heat and the mechanics of melting metal with a torch much more quickly.
Thanks for the input. I totally get that it can end up being an accumulation of tools and money spent real quick, I kind of already have that factored in to an extent.
I guess what I’m learning real quick is “what’s reasonable” is very, very subjective and personal!
If you have a framebuilder in your area you can offer to pay them for some 1 on 1 time when you get stuck. I did that and it worked out pretty well.
Also, Konga Bikes in Finland sells a pretty neat/low cost set for fixturing in a flat surface. Brew bikes makes a basic jig lots of people start out on and then sell to get something better if they keep at it. I still use mine.
I lurk other beginner’s Instagrams a lot to see how they do things.
And yeah, if you have the power a tig welding setup can be a better investment. You can buy cheaper oxy acetylene setups on Craiglist, but the bottles needed to certified to get filled. Lots of short classes you can take too.
It’ll be more time and money than you think it should be regardless, but is still worth trying. The Cobra and Paul Brodie videos were super useful to me.
Do you have previous experience with other welding processes? I self taught myself to tig weld and while I’m still no tig master it took about 1 D cylinder worth of gas practicing to get a weld that was in the realms of acceptable.
I think it might be due to spending a lot of time using mig and a bit of time doing oxy welding and arc, the main thing you need to learn is how the puddle behaves regardless of what process you are doing. If you have done other welding processes I think Tig comes a bit more naturally than for a total beginner.
I used about 10l worth of gas practicing on 1.5mm tubes and after finishing welding my first frame (20l bottle), I feel like I’m good enough to actually weld a frame. No welding experience and youtube was my teacher.
Back to your question of minimum investment/tools:
Measure and cut
straight edge, calipers are helpful
hack saw, files, drill
sturdy bench with a vise
tube blocks, wood, metal or 3DP
Clean
belt sander, emory cloth, scotchbright pads
acetone or alcohol
deburr tool
Hold
frame jig, lots of options from cheap to expensive
dummy axle
Connect
braze or tig. Lots of options from cheap to expensive. Also lots of accessories and consumables. Once you decide which route you’re going you should ask this part again.
Other helpful things
a collection of clamps and magnets
angle finder
dremel
aviation tin snips
all the safety gear.
sharpies
Probably some more helpful things, but outside of the welding/brazing stuff and the frame fixture you really don’t need that much.
This is what I’m talking about! This is a great way for me to start getting my head around costs (obviously this can be hugely variable depending on source, quality, etc) but a nice starting place.
Many moons ago I did some TIG but for all intents and purposes I have no skills. Just from this thread I’ve done more research and determined it may actually be more useful to just take some MIG/TIG classes (most places make you start on MIG it seems) and maybe join a maker space to get some experience welding without having to invest in the equipment yet
With your background, I think you are more than capable of learning on your own. $3500 and 1-2 weeks of your time would go a long way if you invested that into yourself.
There are plenty of very friendly frame builders who lurk on the forum and would be happy to answer questions. Including me - almost every week I have 1:1 meetings with builders to exchange information.
Small sanding drums (to get the mill scale off the inside of the tubes)
Acetone/IPA
Fixturing:
I think if you set realistic expectations for frame tolerances, have accurate miters, and some critical thinking, you can get away without specialized equipment. see this thread
")