I’m in the process of designing the first frame I would build on my own (the only other I did was in a class) and I wouldn’t hate having the opinion from experts to confirm my choices and help with some unanswered questions!
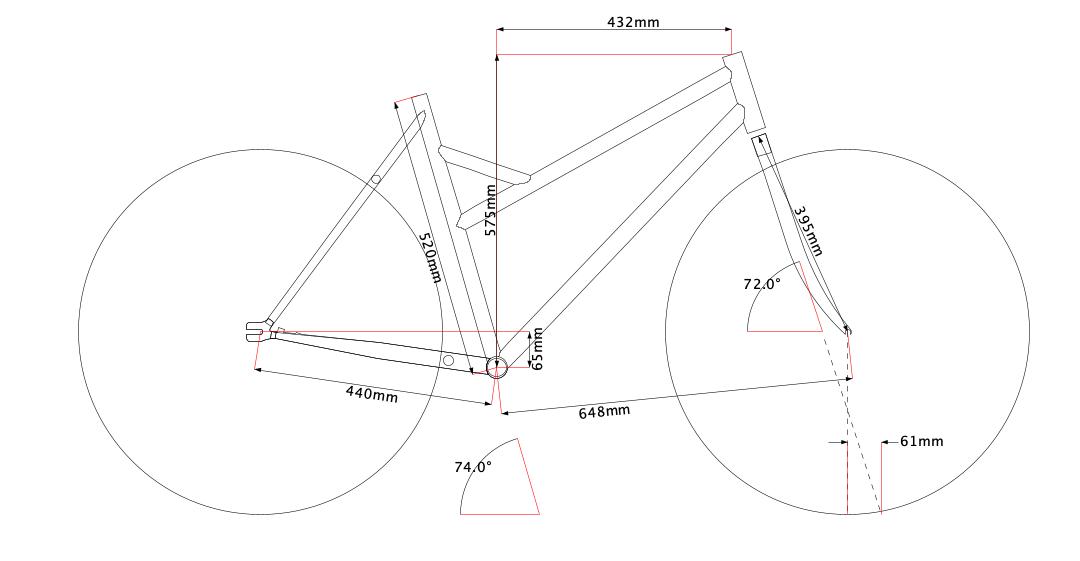
Basically, it will be my everyday bike, year-round (which includes winter over here), so singlespeed, 26x2.2” with fenders, rim brake and it will often be front loaded running errands and carrying groceries. I’m thinking 135mm rear spacing, 47.5mm chainline, 42t max chainring and 68mm BSA BB.
The frame will be TIG-welded, and since it’s my first frame I’m not looking for anything fancy for the tubing and would like to keep the cost as low as possible. The selection I have so far is based on what I could find, what seems to be workable for me and what’s currently available, but any tips on more affordable or simpler solutions to my issues would be greatly appreciated.
For now there are 3 things I haven’t been able to figure out (you can find below the geometry, tubing selection, and specs needed relating to my questions):
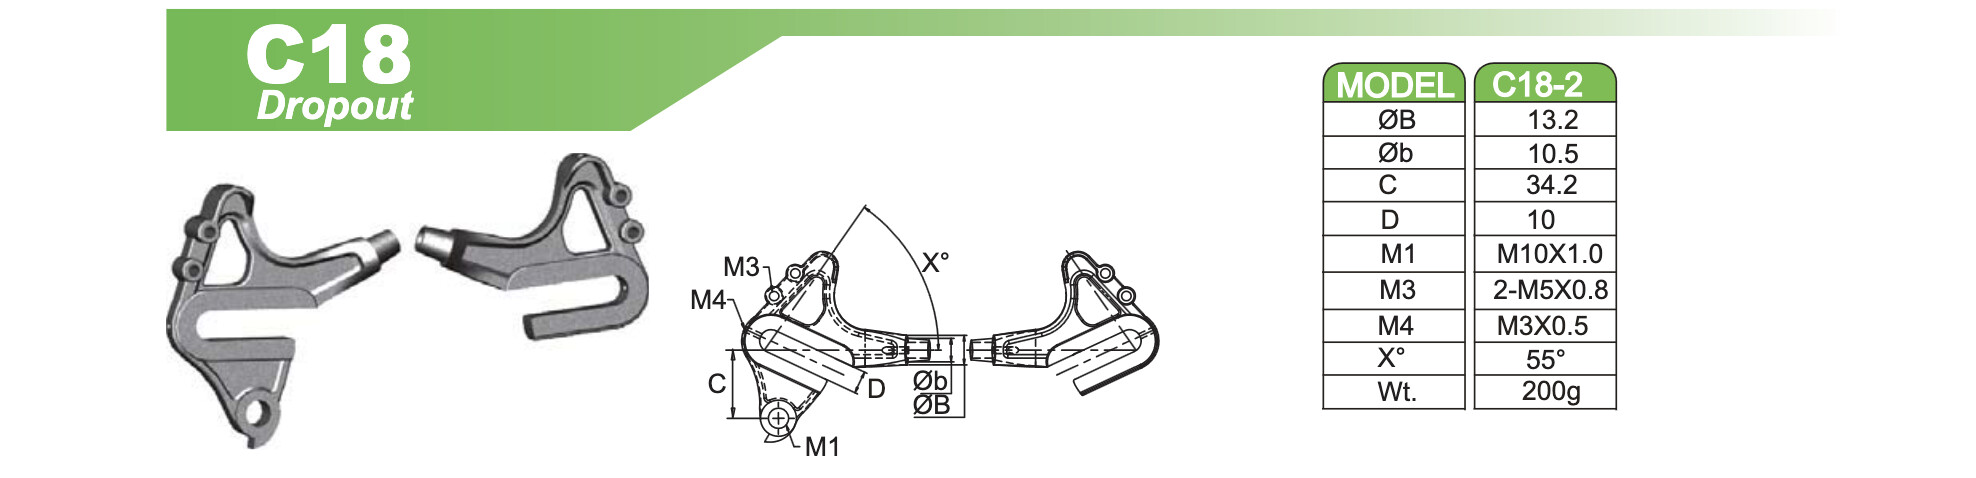
I’m pretty adamant on using these dropouts because in my opinion semi-horizontal dropouts are the simplest solution for singlespeeds with fenders, and these are the only I could find that matched my design. The first issue is that the dropout chainstay plug is 10.5mm and the chainstays are 11.8mm ID. Without a lathe is there a relatively simple way to make a sleeve to fill that 1.3mm difference? Or any solution a novice like me wouldn’t know about?
Second issue with the dropouts, the upper flange for the seatstay is 13mm wide, and the seatstays are 11mm. Is 1mm on each side enough for a proper weld? It’s really the smallest stays I could find that seemed to work with my design.
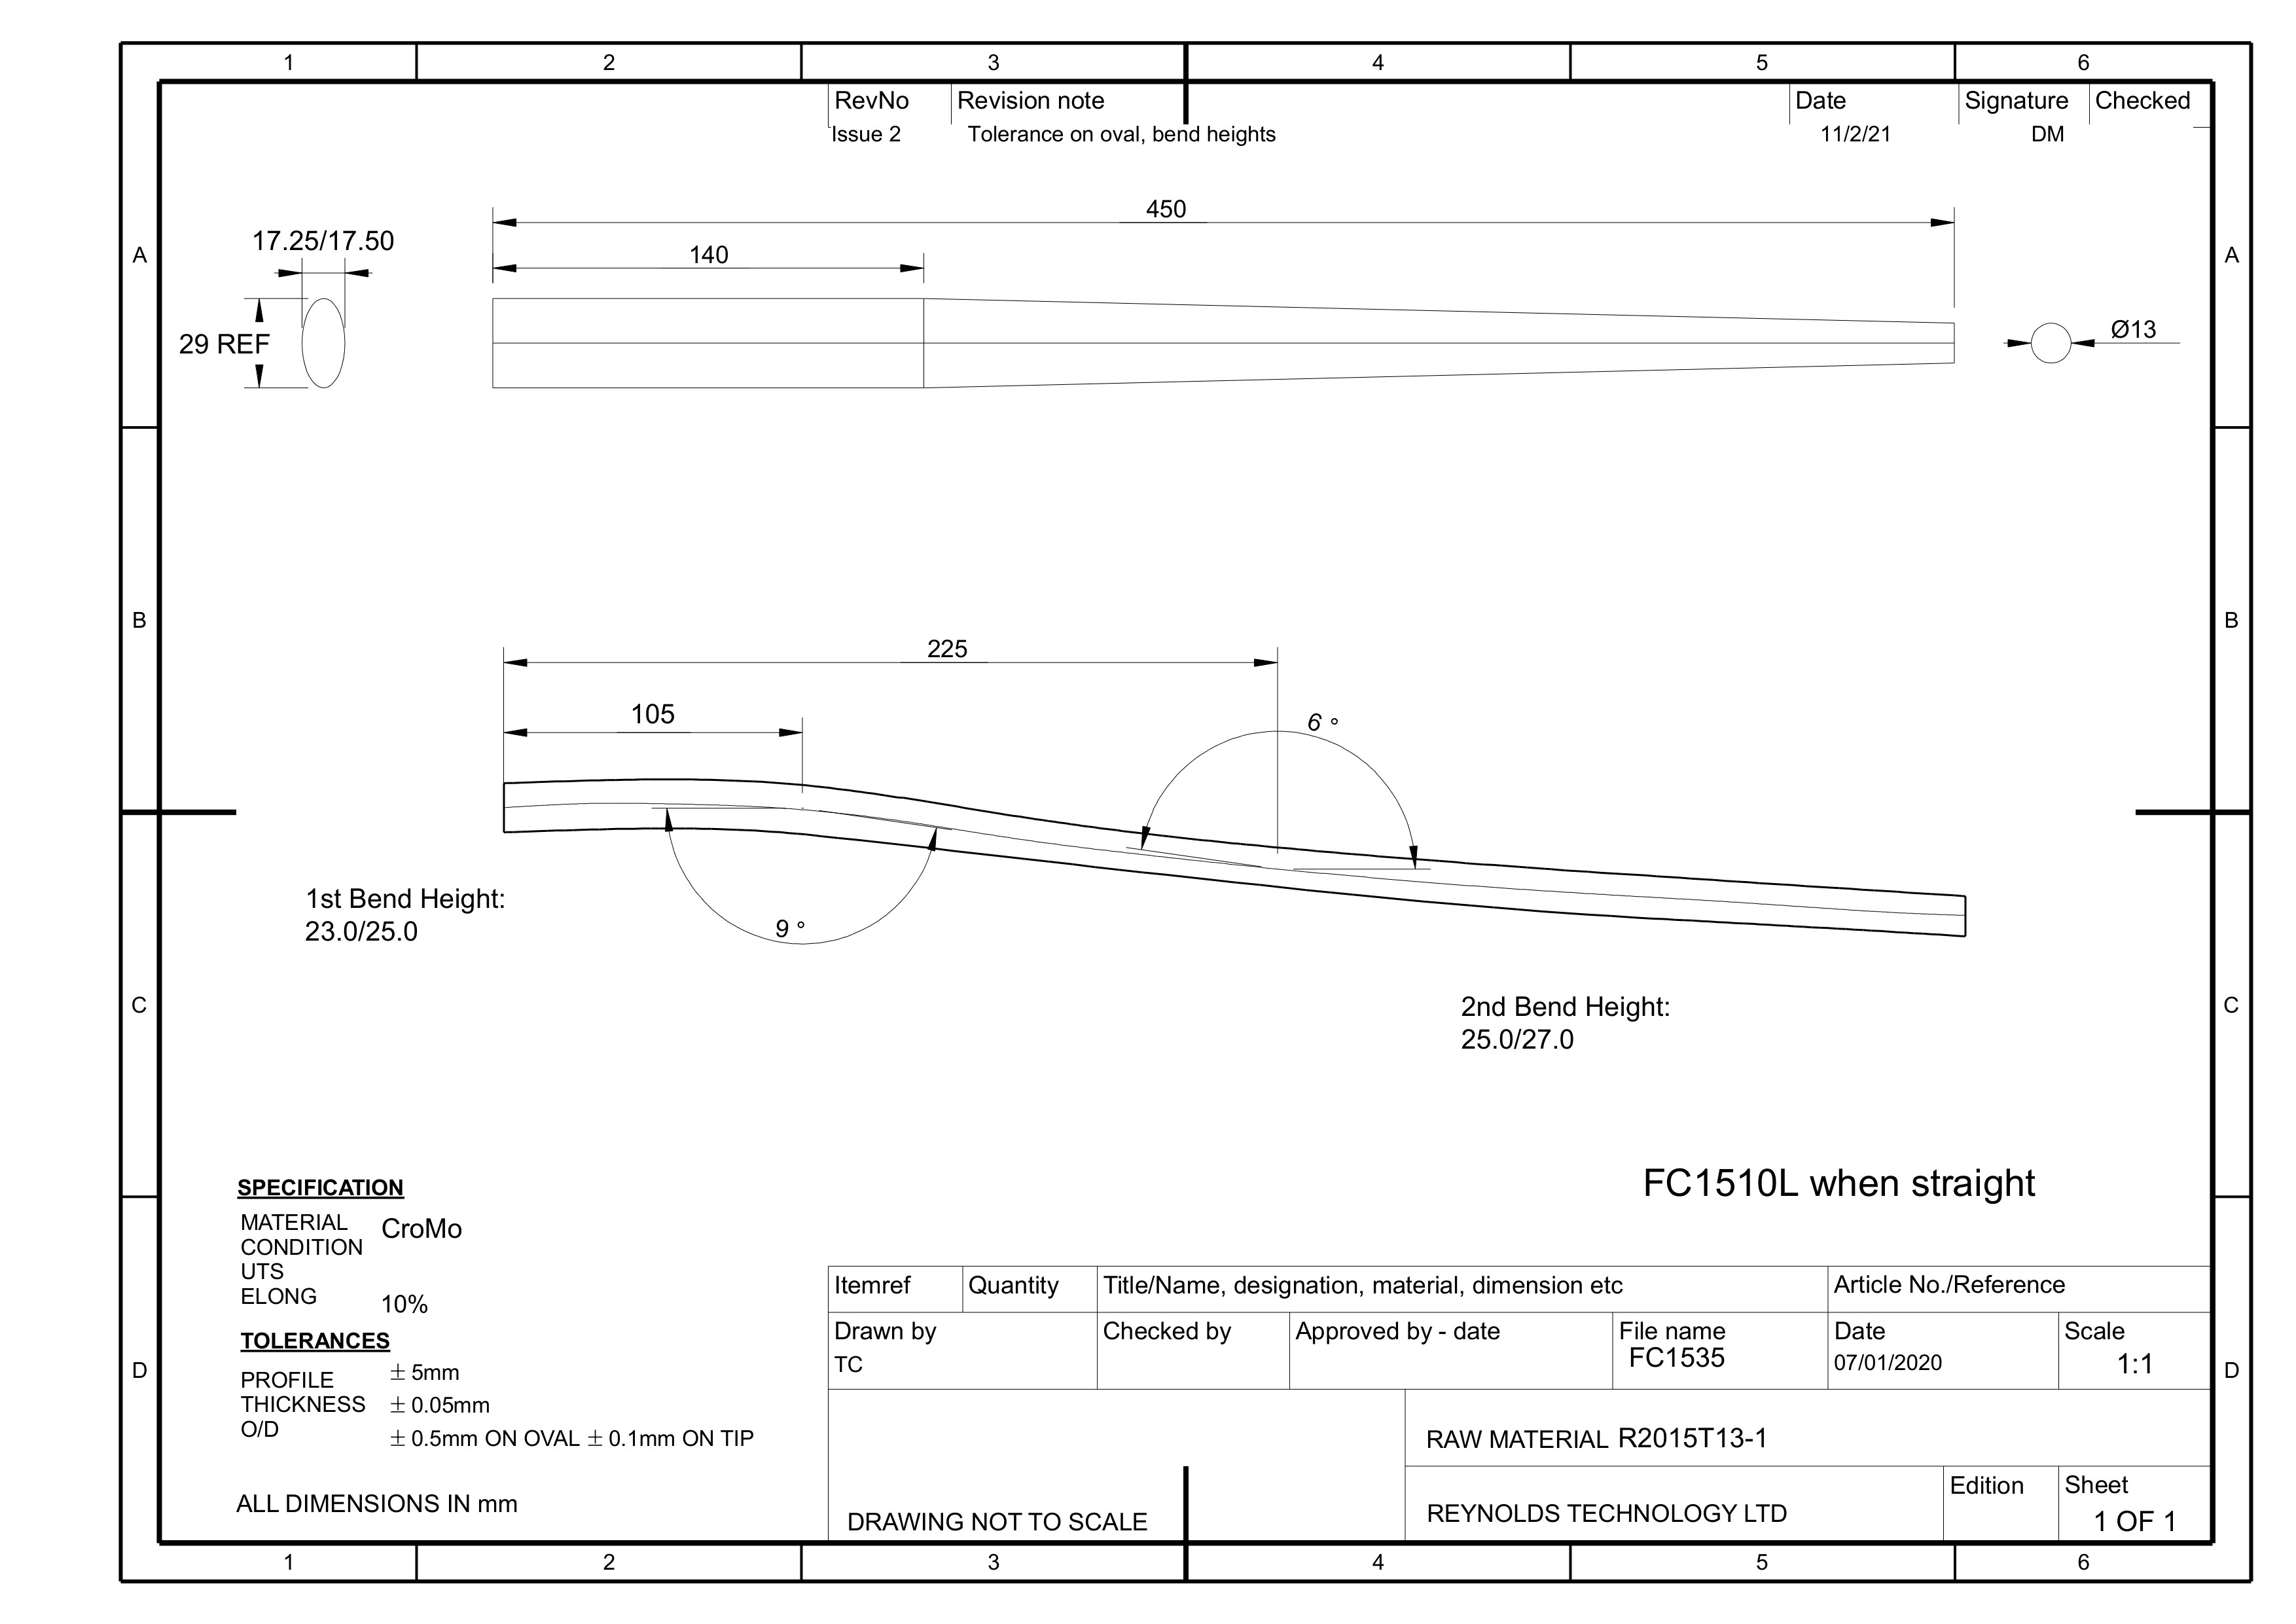
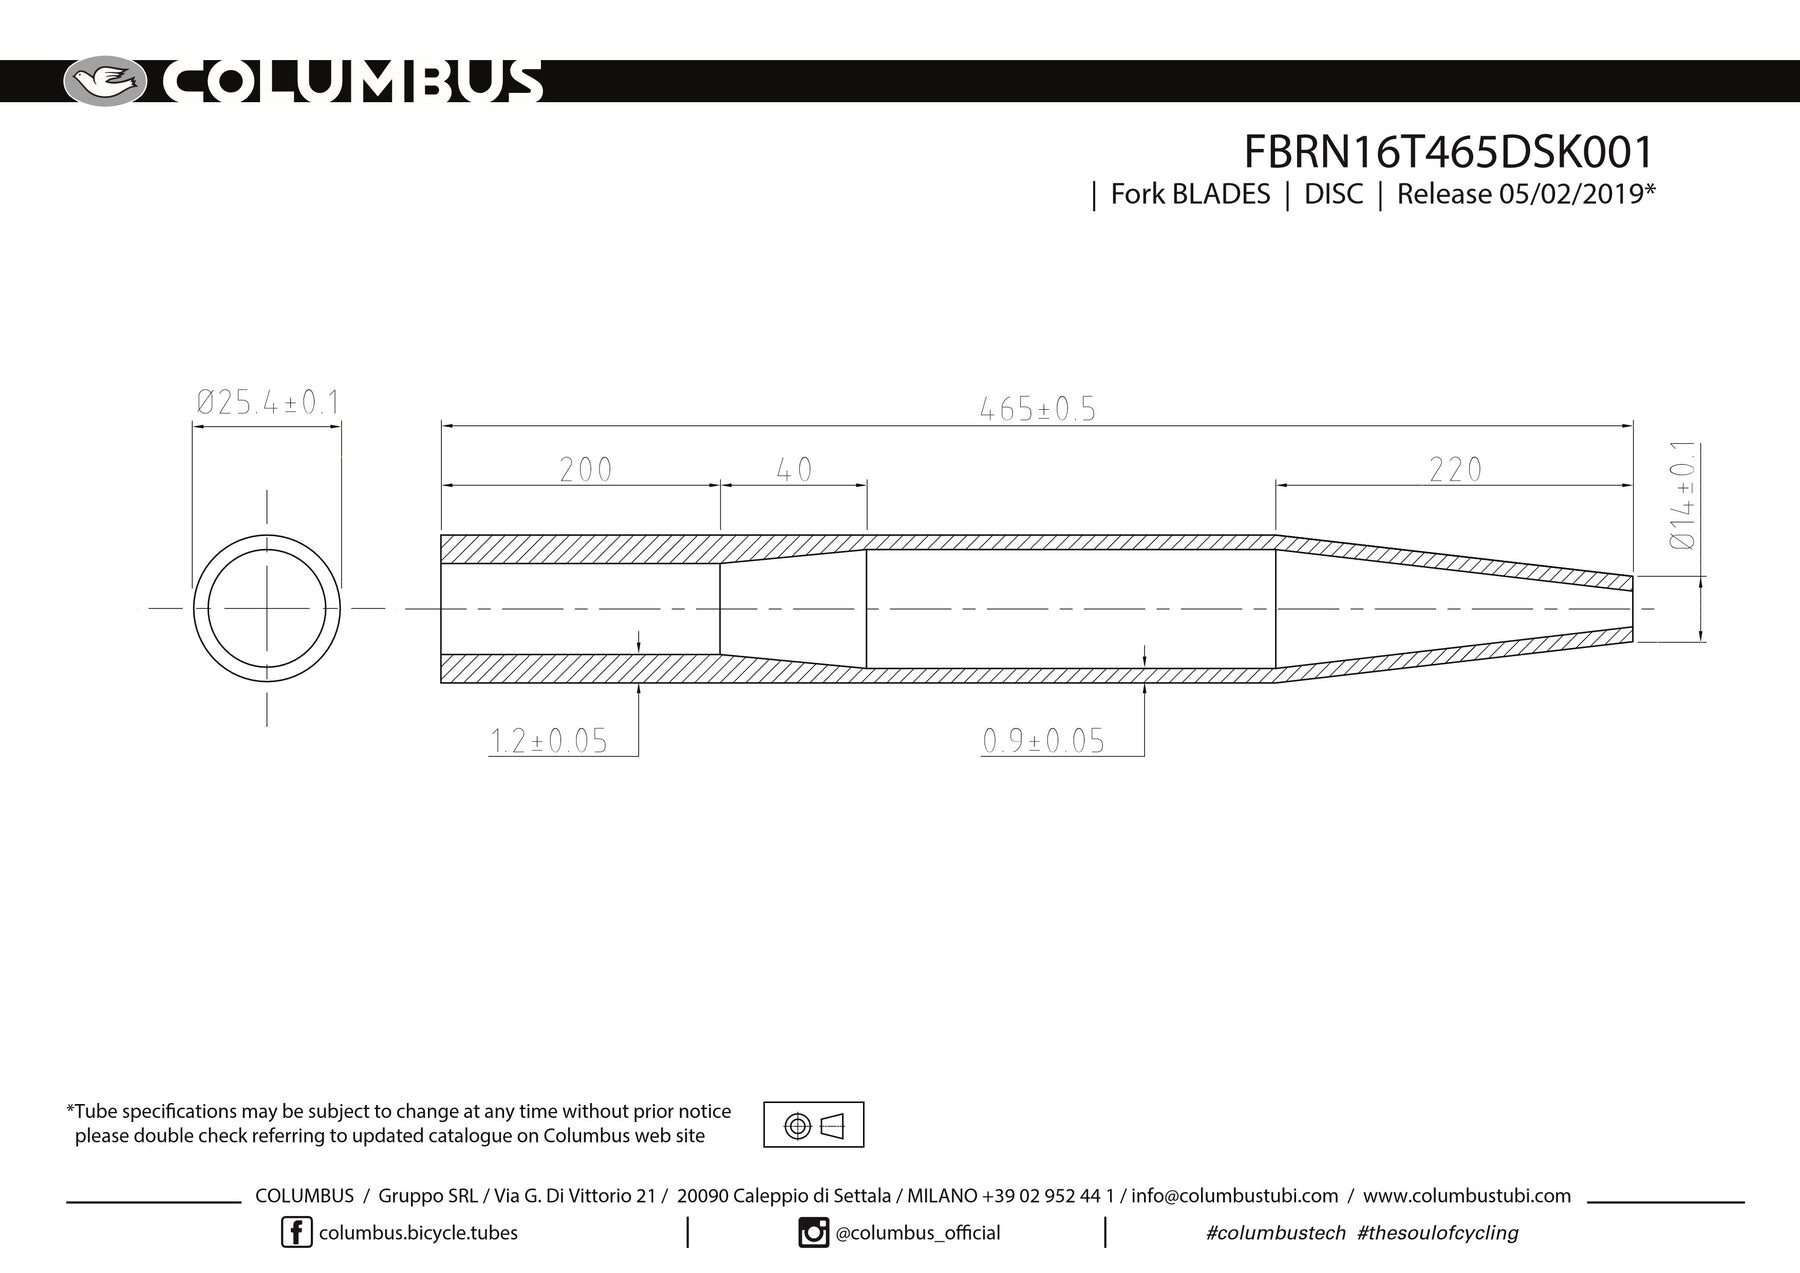
For the fork I intend on using Columbus 25.4 Disc straight blades, ovalize and bend them. I did a test with 1mm thick tubing with acceptable results, I’m just wondering if I might struggle a bit with these blades at 1.2mm? Do they have some kind of heat treatment I’m not aware of? At this price point I’m a bit afraid of messing them up and I wish I could find another option but somehow I didn’t find any other 25.4 tapered fork blades. I’m entirely open to go a different way with this design, but so far it’s the only crown I found wide enough and that isn’t the Pacenti MTB (I already have it on one bike and intend on using it on another one so I’d like to switch things up a bit).
Any commentary, suggestion or tips about anything else regarding my design is also greatly encouraged and appreciated, thanks!
A 1.3mm diameter difference is only a gap of 0.65mm all the way around. You can easily just fill that in as you weld it.
I think the 1mm there is fine because the dropouts are quite thick. You can just tie the weld into the edges of them if necessary (just make sure you sand them back to shiny metal before you start). I’ve often had seatstays that almost cover a hooded dropout and there’s no problem there.
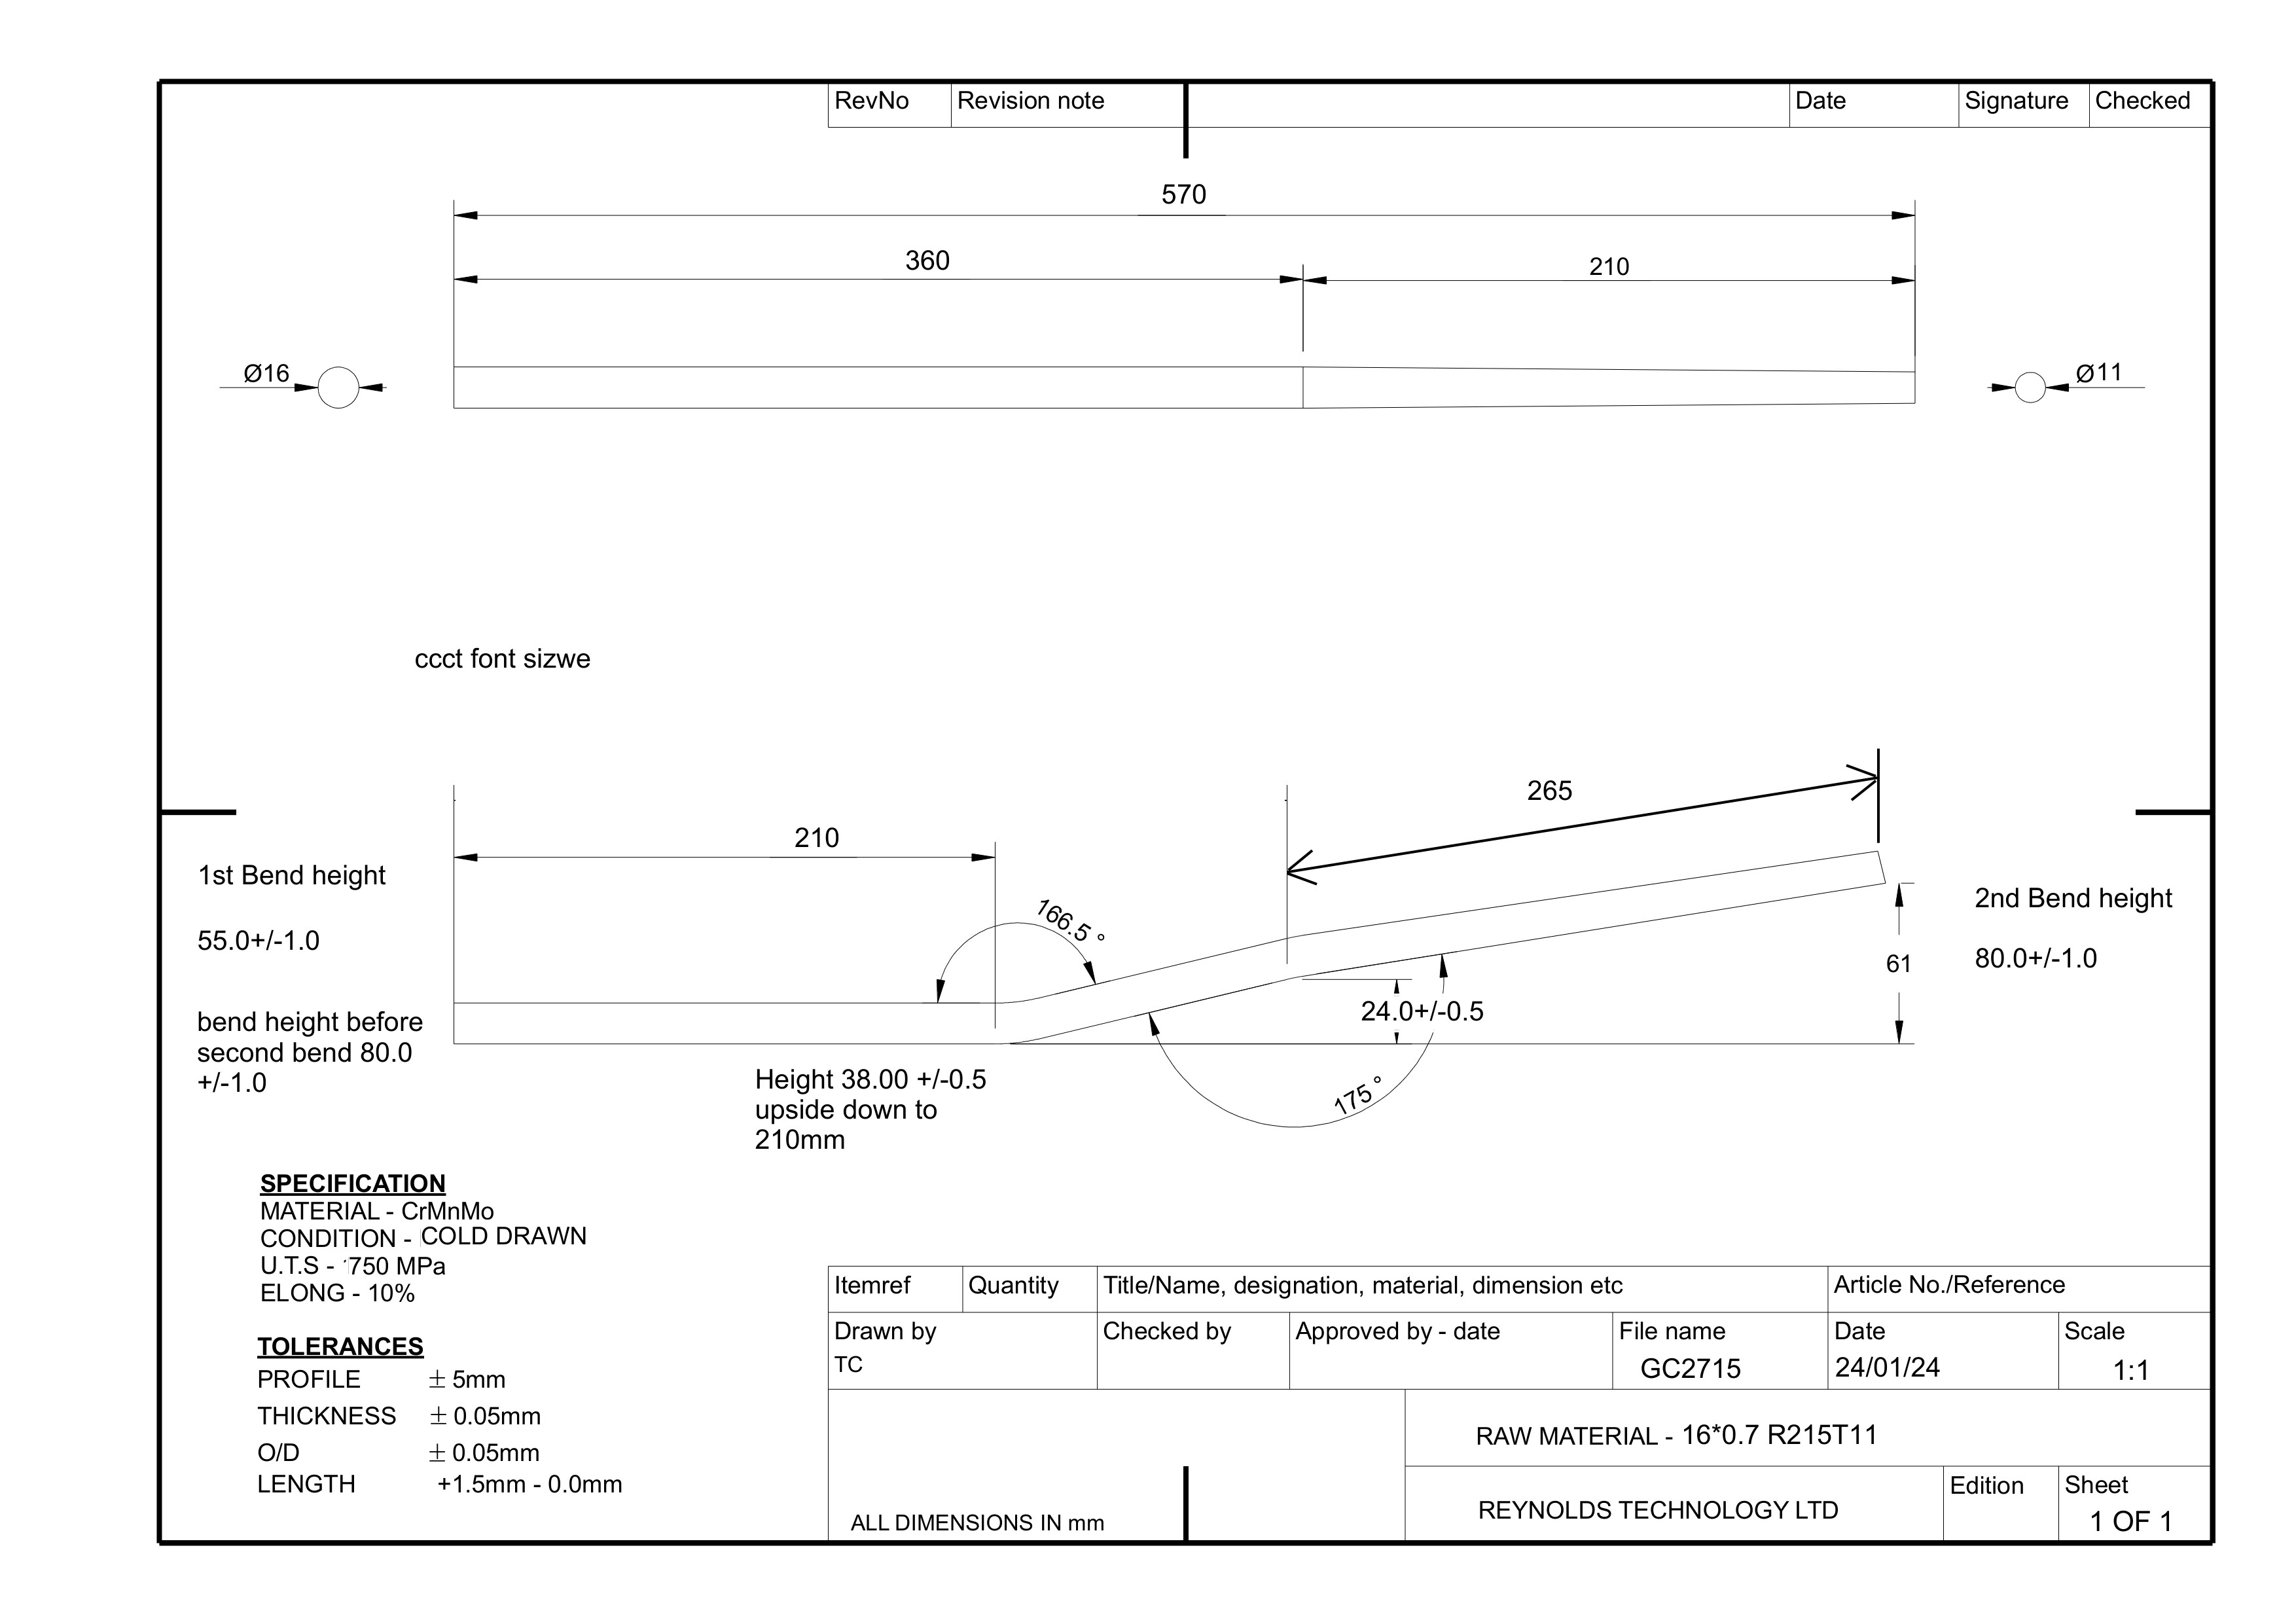
Even if your blades aren’t heat-treated, CrMo is getting on for twice the yield strength of regular mild steel. They will be tough to be bend. Since you’re Tigging, why not get some Reynolds curved blades and make a segmented fork? This is the style I usually do (see below)
68mm BB shell. I find 73mm often better for 135mm rear spacing and 47.5 chainline. But check with the components you’re using. Usually the BB comes with spacers so you can use a 68, but why not leave them off and use a 73? Then you have a bit more metal to weld to and more options about how to fit everything in. Basically I think it’s “road” cranksets that require you to use a 68. MTB ones are 73 (or 68 with spacers). But my knowledge is probably very out-of-date on this, so definitely fact-check what I’m claiming here!
I thought about a building a unicrown fork first. I personally prefer unicrowns with straight blades but I don’t have the machines to do that compound miter, and I heard that filing it by hand would be a real pain in the neck. And then I love segmented forks but my fork jig is rather rudimentary so I’m no sure I would be able to properly fixture it. I heard mitering the small segments is also a bit tricky if you don’t have special tooling like the Sputnik one?
I thought about using a 73mm BB if I struggle too much with clearance. I’d prefer 68mm because as my year-round bike I want to be able to use as many spare parts I have when needed. I will be using a square-taper crank, so at least I’ll have some wiggle room if I mess up the fitting of the chainring.
Unicrowns are hard to mitre by hand it’s true. I usually use paper templates (which are very accurate) but you can’t wrap those around unicrown blades properly because it’s all curved right where you need to put them.
I’ve made two unicrown forks. On the first one I did just mitre it by hand with no template. It didn’t fit up as well as I would have liked (but I welded it out fine and it’s got quite a few miles on it now with no issues). For the second I made a simple mitring tool using the arbor from one of those cheap tube notchers (which I bought but don’t use for anything else). That was fine.
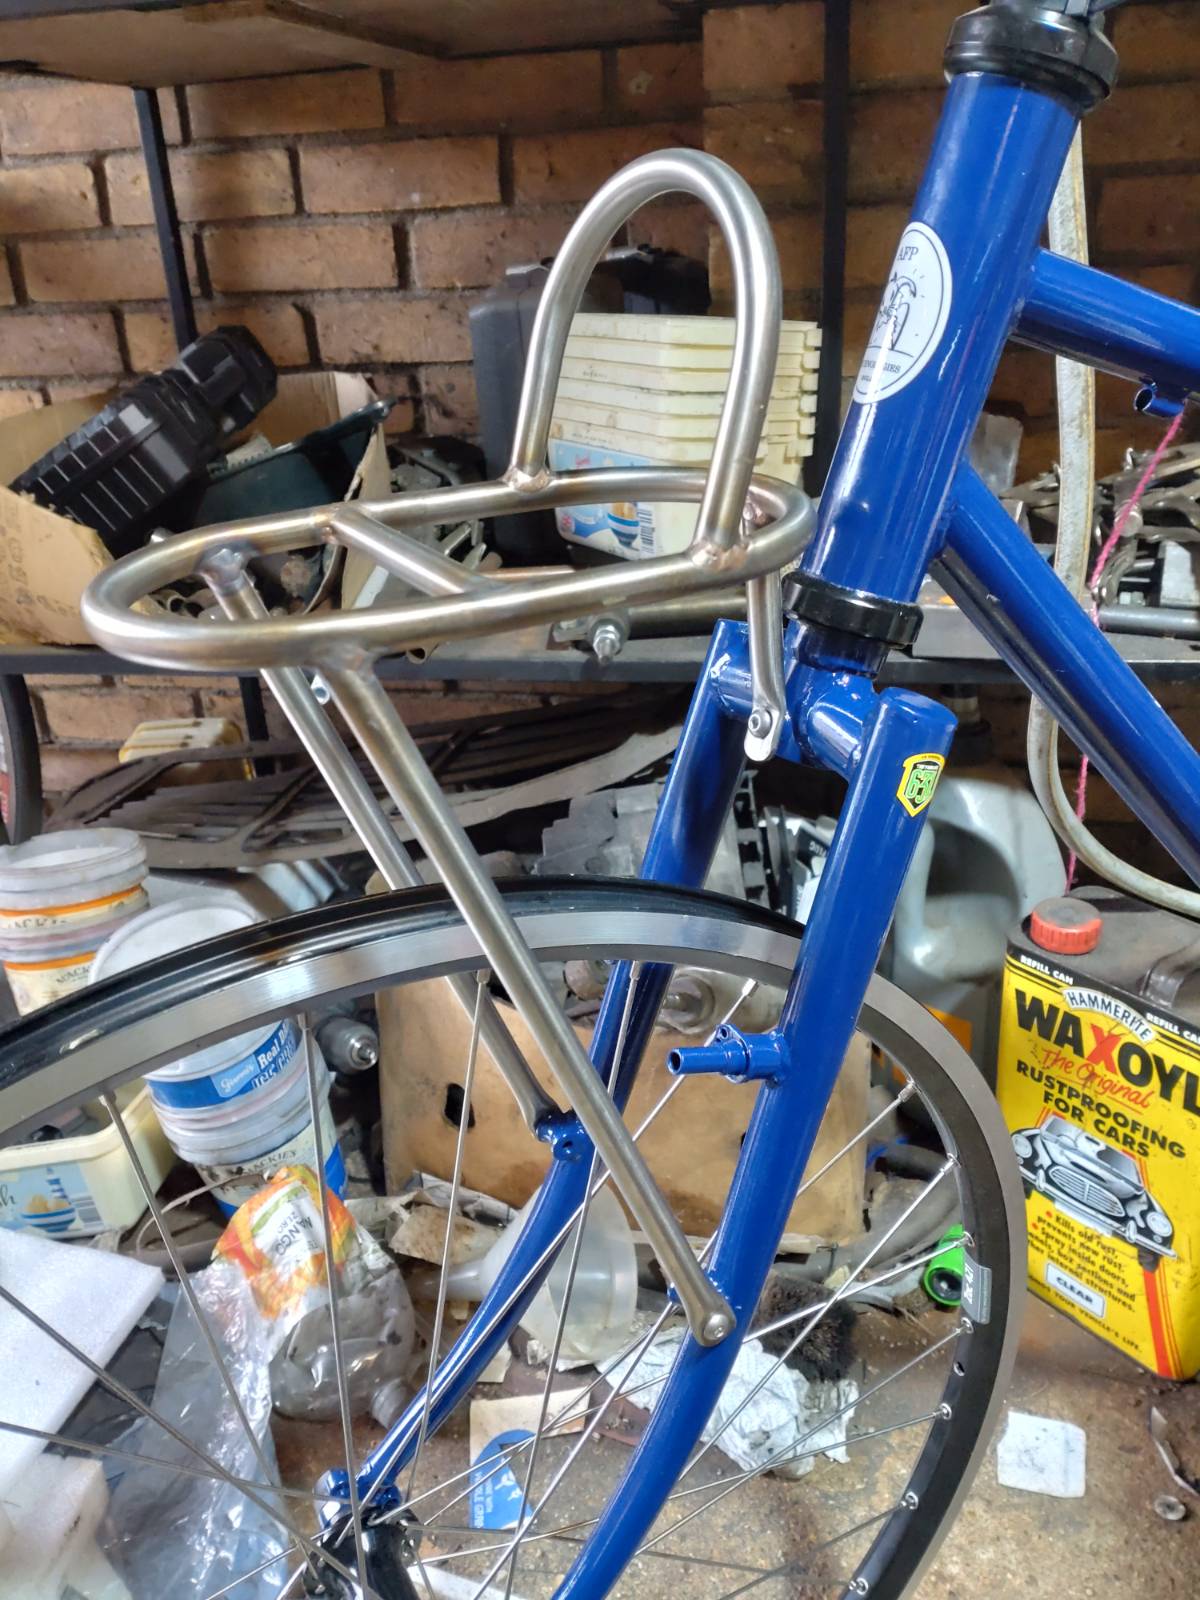
Since then I’ve made segmented forks. The first one was because the guy the bike was for preferred it (it does look more “deep custom”) and after that I also found I liked the look myself. You also get much more choice of blades to use than with unicrown (and I really like curved blades).
Since I already have the mitring tool I made, I still use it: I attach the “crown tubes” to the legs first, weld those all the way out, and then mitre the middle part with the tool.
But if you didn’t have the tool you could use paper templates on a segmented fork easily, because the “crown tubes” are just straight tubes. Do all four mitres with paper templates before tacking anything. This is how I do segmented seat stays which I’ve done on a couple of builds, and they’re just like forks, only at the back (and with much thinner “crown tubes”). In many ways it’s easier because you can make sure the two little tubes are exactly the same length more easily if you can hold them in your hands before they’re attached to anything.
As for fixturing forks, I found the tool I describe below to be the key. With that you can get away with a less than perfect fixture. You can anyway (it just takes more patience).
Thanks! I’m not entirely sure this will come out the way I want, for now I struggle to find a top tube with a butt long enough on the seat tube end, because for now the reinforcement tube rests at the end of the butt taper and I’m not sure my welding skills are on par to weld .7mm wall tubing haha
Also your seat tube is butted? You don’t want to be joining another tube to the thin bit (whatever your welding skills I would try to find a plain gauge seat tube if you want to make that design.
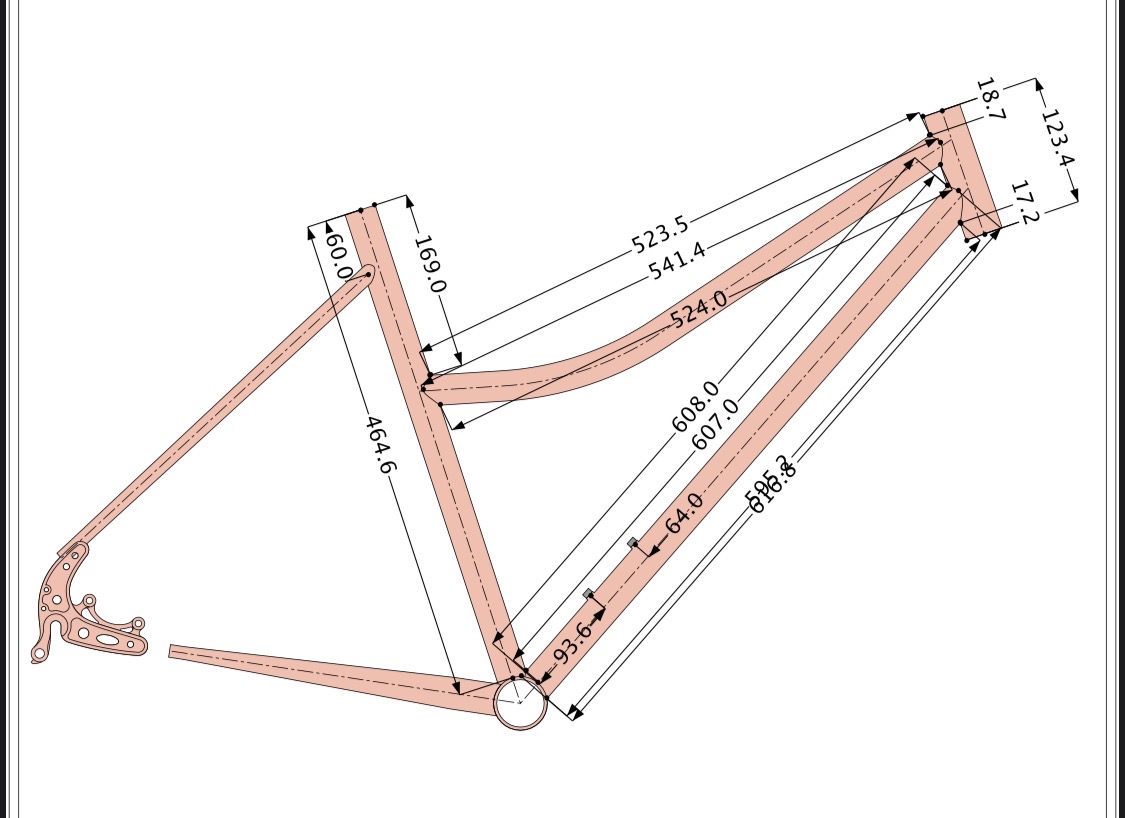
That’s the issue I’m facing currently, I haven’t find a top tube with a butt long enough. The top tube is 590mm center-to-center, and the reinforcement joins the top tube 160mm from the center of the seat tube. The positioning of the reinforcement is mostly just aesthetic for me, so in the end I’ll probably have to change it’s position so it lands on the butt of the top tube if I can’t find a suitable butting profile.
Related to this, if I have to shorten the top tube, what would you say is the minimum butt length I should leave?
I meant where the TT joins the ST. The ST will only be about 0.6mm there.
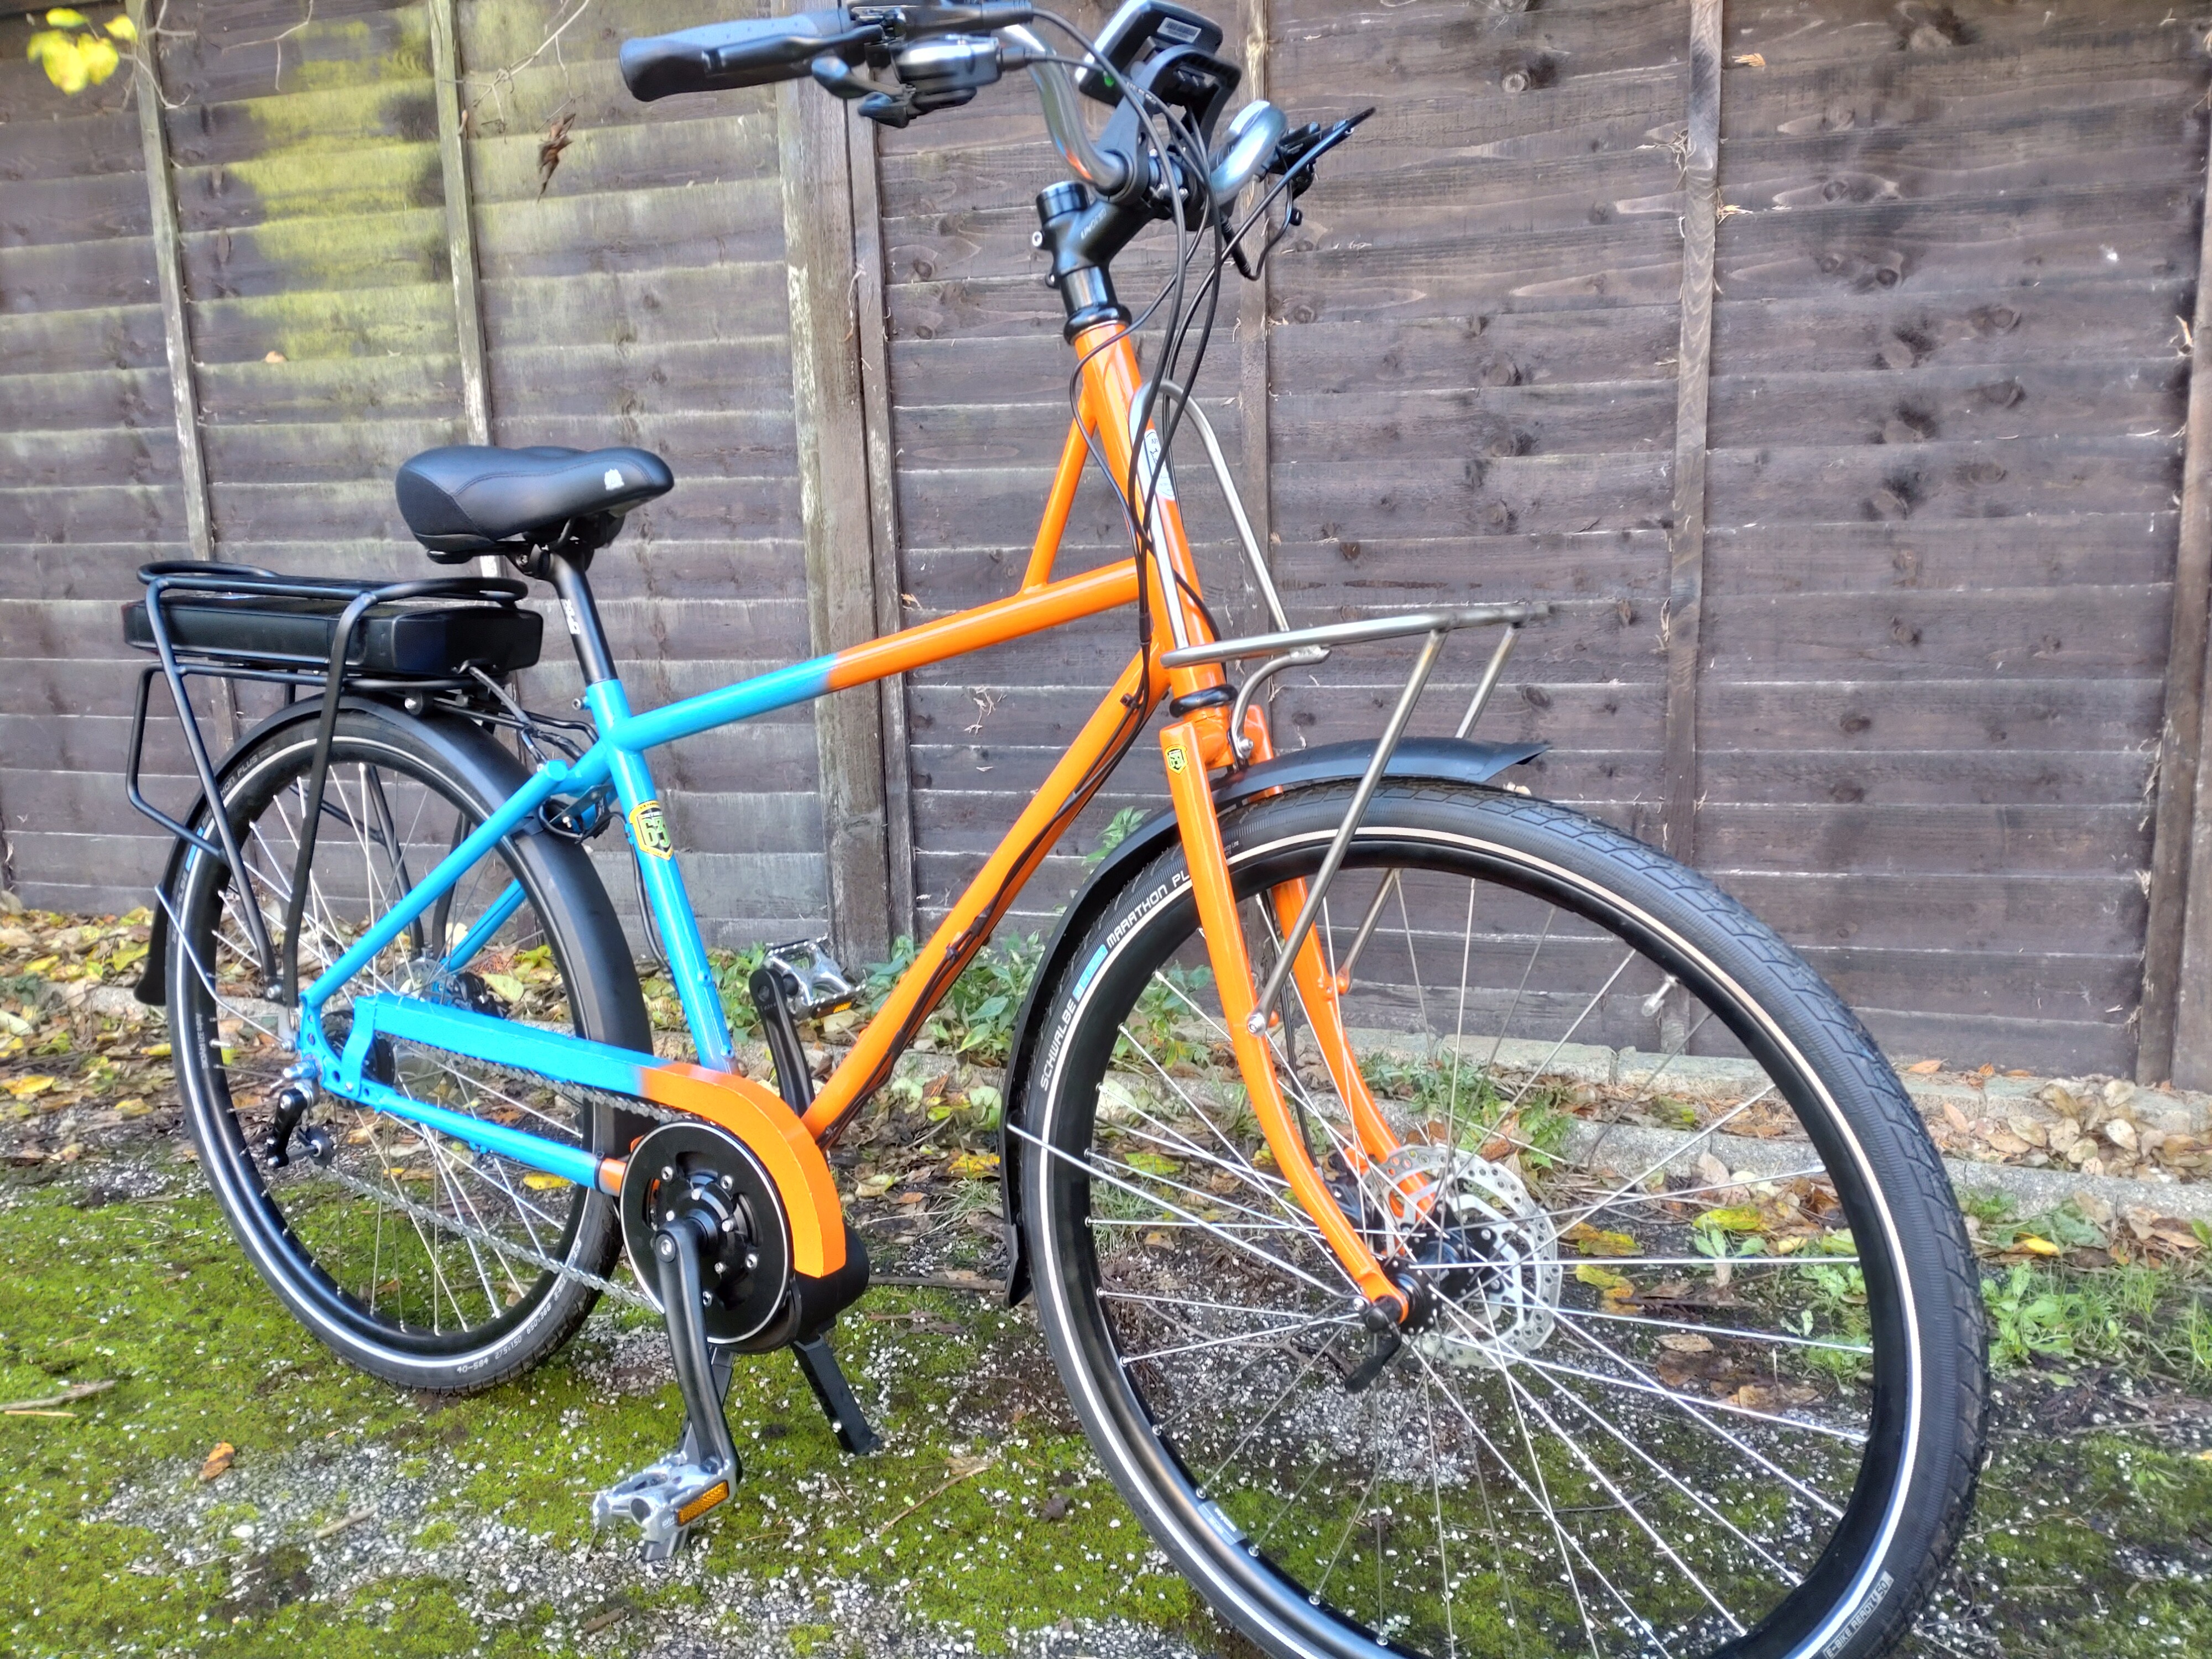
I have made some frames with similar “gusset tubes” (except at the front, because of the high stack on some of my more rad designs, see the e-bike below) so ran into the same problem. On this bike the TT c-c is only 547, so a bit more room to play with. I left the butt at the ST end as short as I could get away with (I reckon about half an inch clear of the HAZ) and then sized/angled the gusset tube so that it would hit the end of the butt at the front. Those gusset tubes don’t really matter a lot so just put them in whatever space you have available.
If you can’t make it all fit then I would prioritize having a proper butt length at the actual main tube junctions, and TIG weld those. If you have to attach a gusset tube to the thin part of another tube, I recommend TIG brazing. I use TIG brazing on chainstay and seatstay bridges for example. Seatstays can be very thin (and aren’t usually butted). Although you can weld those junctions perfectly well, brazing them gives you more piece of mind that you won’t have compromised the strength of the main tube, which matters much more than that of the bridge tube (which is often basically only a fender mount). OK a gusset tube is structural, but you still want to prioritize the main tubes.
Wow I somehow completely overlooked that detail! Thanks for pointing it out and sorry for misunderstanding.
Well I might have to go back to drawing board then. I wanted this frame to be as simple as possible but sourcing the right tubing has been a bit of hassle, either because of my specific requirements or because of availability. I might reconsider the stepthru design altogether, it was just for aesthetic reasons anyways
Step-throughs actually quite hard to make with butted tubing. I have heard of people brazing sleeves around the ST lower down in order to have a bit of a thicker piece of metal to tie the TT into. But you can just go for a reasonably short ST and then a sloping TT. That usually gives you enough standover. I was a bit worried about that bike illustrated above because she’s putting a kid on the back, so you can’t swing your leg round the back in the usual way. But fortunately she had no issues getting on and off. A step-through might be better for kid-packing. But on the other hand, you do want it quite nice and stiff with all that weight on the back.
Bikefabsupply has a “low geo” externally butted seat tube with 250mm of butt instead of 100. I was able to use that to make this step through. It looks like it’s out of stock though.
Regarding BikeFab, originally I wanted to order the tubing from them but everything I need has been out of stock for months, and I see it’s the case for many of their tubings. Do you know how often they tend to restock?