Thanks @earle.b its definitely a frustrating lesson to learn, but at the same time pretty interesting to feel what the overly progressive bike from the graph feels like.
I have a bit of an issue with how leverage ratios are typically described. A lot of the bikes out there are only described as having x% progressivity, but this is really only a relative measure of leverage progression. For instance my first concept for a linkage had ~25% progression, but the absolute scale was way higher than what shocks can typically handle. I think it was around 5.5 to 4.1 or something like that and I was only looking at % progression at the time. I got way too far through the design before I realized I had made a dumb mistake. At the same time an average leverage ratio doesn’t tell the full story either. Can we come up with an all inclusive metric to fully define and describe the leverage of a bike? Am I just missing something here?
It seems like we could improve the resources for full suspension designers to clarify things a bit. I wish there was a more comprehensive guide for designing a full suspension bike. Something that could have some guidelines for all the different parameters. Honestly with access to programs like linkage its pretty easy to design a halfway decent bike. It seems like most of the resources out there are for people analyzing commercially made bikes, but nothing specifically targeted to designers. This could be a great thing to crowd source with all the bright minds in this forum.
2 Likes
When RS first launched their metric shocks they shared some info how the shock is ideally run with a starting leverage about 3.0, that’s it’s happy place. But unless someone has been digging deep in the available info and comparing a whole bunch of bikes it’s not intuitive. Best thing one can do is study a whole bunch of well reviewed bikes in Linkage. These days more and more bikes are converging on similar numbers for LR and AS.
It’s certainly a process to dig through all the different info to bring it together.
1 Like
First, thanks for sharing! Interesting read and bikes.
To me, the LR curve is the metric, tells you what you need to know. Distilling all that information into a single number means you’ll always lose Information. A picture made of a thousand numbers(sample points), if you will.
I also feel that dual suspension design is perhaps a bit too complex for a typical walkthough guide. It’s goal dependent, and things like what is a good number for what just comes from either knowledge or a little bit of calculation and nouse.
An additional challenge is that assessing suspension design quality beyond pedalling performance requires a (riding) skill-based assessment. But if we were all WC level riders then we’d probably have no time to design let alone build!
To summarise, suspension is just a hard engineering problem. One of the smartest guys I’ve ever met (mech eng) was deciding which part of the uni race car project to work on for his big final thesis. He initially wanted to do suspension design, did a bit of reading and said: f*ck that, and did power train instead. It was too much of a ‘dark art’! XD
2 Likes
I hear what you’re saying and you’re right, the LR curve is the metric. Just stating % progressivity alone is like giving a slope of a line without a y-intercept. The curve itself references absolute values for the progression and tells the full story. Similar to what @earle.b referenced, it would be helpful to state a bike is 25% progressive starting at 3.0 for example. Realistically even this is more complicated than what most people want to hear in a bike review, doesn’t paint the full picture, and is redundant if a graph is given. I suppose what I’m really looking for is just a few guidelines for us framebuilders.
Suspension design can definitely be an extremely difficult problem but I don’t think it has to be. Most modern full suspension designs are converging on pretty similar numbers, most of which are pretty well documented. I just want to lower the barrier to entry and help people get in the right ballpark to making a halfway decent bike. From there they can iterate to give the bike the desired feel.
I see the dark art side of it to be a positive. There is no correct suspension design and there never will be. There are an infinite number of input variables between rider size, weight, riding style, rider ability, terrain, suspension tuning goals, etc. As long as the bike was designed to be in the right ballpark then a decent shock tune can bring ride characteristics closer to nominal. It blew my mind when I first heard that Sam Hill (I think it was Sam Hill) would run lower air pressure and compensate with increased compression damping. That really opened my eyes to having multiple suspension tuning methodologies to solve the same problem.
2 Likes
To your last point, I know guys that ‘ride the spring’ and others that ‘sit on the oil’.
End of the day, it’s 80% the rider, 20% bike. Personally I’d say 95% rider but that gets controversial ![]()
Literally, different strokes… haha.
I try to remind myself to not nerd out beyond the fourth or so order effects… but even that is hard! Build on mate. ![]()
2 Likes
Awesome build. My full sus bikes so far have both been very linear single pivots. I think the tuning approach is very different between linear and progressive bikes. I have just started messing around with shim stacks to get things working a bit better.
I think linear bikes need very little low speed compression due to the support at early and mid stroke and a heap of high speed damping to get things under control before running out of stroke on bigger hits.
Still experimenting and learning though, will probably start a thread later on and see what people here have to say. Mtbr suspension forum has some clever people but is a bit contentious for my liking
3 Likes
Hehe, been there, done that. I’ve not been smart enough though to go powertrain, I stayed in suspension… And I must say that car suspension is a lot easier to grasp than any two wheeler. First, your CoG doesn’t change too much in a car, because the driver is bolted to the chassis. Second, your vehicle coordinate system doesn’t change its orientation wrt ground too much (unless you have excessive body roll). And third, everything is more or less passive. On a bicycle, the rider is actively anticipating stuff on the ground and moving the bike accordingly, representing 80-90% of the mass of the complete system.
Car suspension is a bit mor tricky in terms of kinematics because it moves in more dimensions, but this can be figured out more easily than this monkey climbingf all around the vehicle ![]()
5 Likes
Oh I like this, I’m going to steal this one. And your point about 80% the rider ties in nicely with @Luniz82’s comment about:
A dynamic CoG at this mass percentage is crazy to account for in any calculations and inherently relies on some hefty assumptions. One of the things I don’t think is talked about enough is the human element of the suspension. Looking at the tiny BMX frames and seeing how people absorb >20’ drops to flat on pavement is wild. It’s one of the reasons I wanted to minimize the standover height of the Processor to allow for maximum body-travel.
3 Likes
This is really interesting. I’m still a novice when it comes to the the finer details of shock tuning. How much of these tuning differences are caused by typically using lower volume shocks on linear bikes vs the leverage rates themselves?
I’d love to see a thread dedicated to this topic!
1 Like
I don’t really know, I don’t really like air shocks hahaha. I have a coil on my 3% progressive single pivot bike, its pretty stiff off the top due to needing a high spring rate but very supportive through the stroke.
I had an air shock on it for a while and found it was worse in all ways except bottom out resistance. More sticky off the top then would blow through travel til you hit a wall of ramp at the end. It seemed like you would go off a drop and hit the end ramp, then riding down the trail you would ride over a stick or something and use the same amount of travel somehow. That might just be the particular shock I had more than air shocks as a whole though.
I will post up what I have been doing when I have some time, I have built a spreadsheet to compare shim stacks and wouldn’t mind a bit of feedback from some of the more mathematically inclined people here. I think its getting fairly close to something that can reflect changes in a given stack but there is a lot that it doesn’t take into account that I have no idea how to quantify so still very much guestimating.
1 Like
That initial stiction on air shocks is really rough to break through sometimes. Too many dang seals getting in the way. Between that and the mid-stroke support deficit I’m starting to become more of a believer in the coil, at least for the right application. I’m excited to see what you’ve come up with.
April 2024 Update:
Processor Updates:
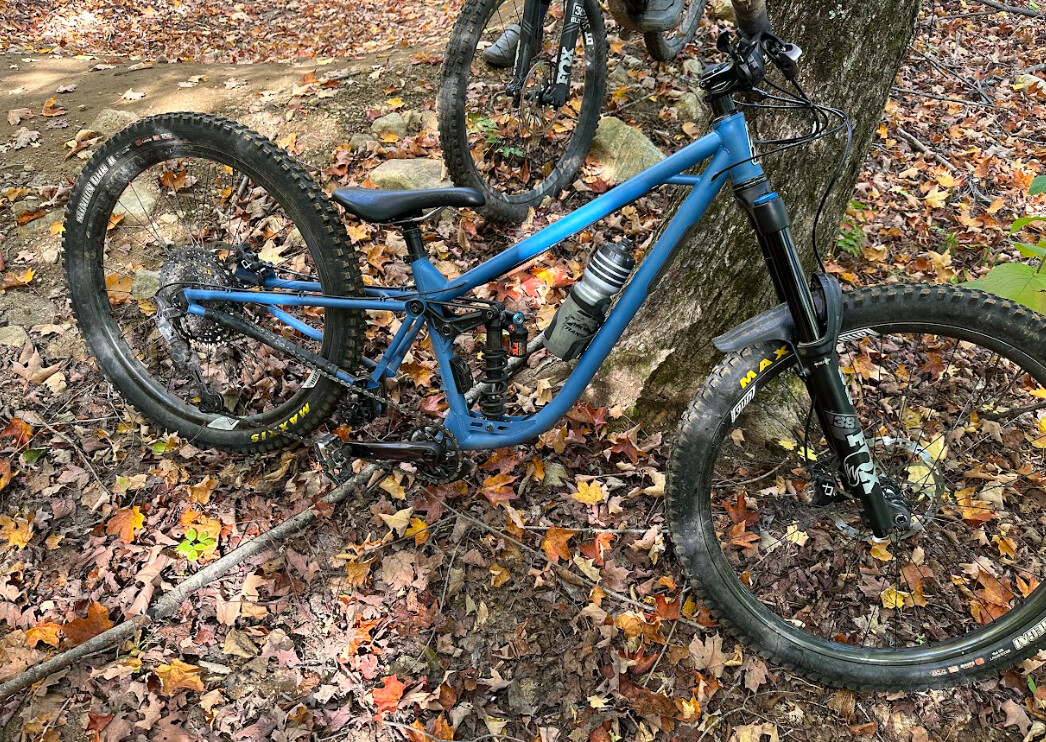
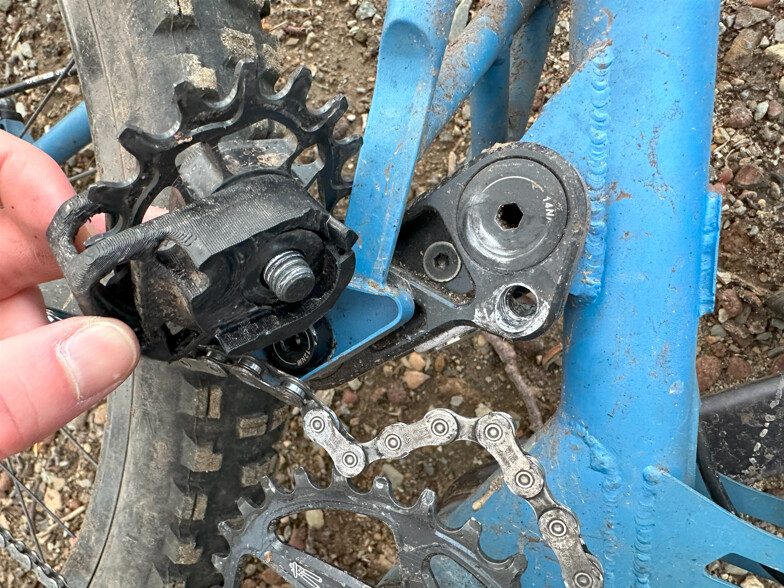
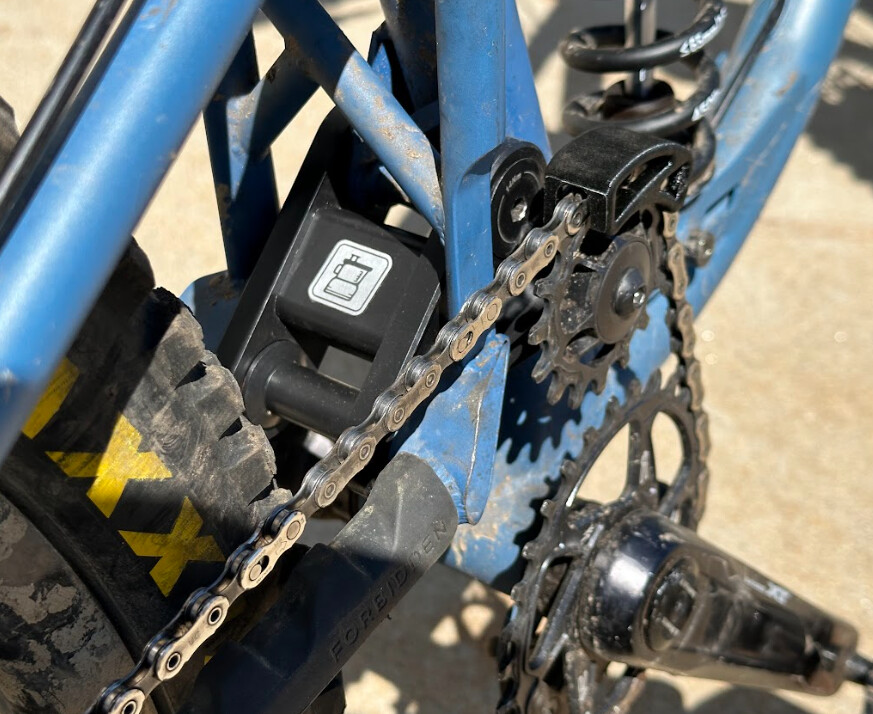
I have been riding this bike really hard and just beating the hell out of it. Overall the bike has been awesome to ride. The bike pedals great and the suspension actuation is super smooth to the point where I'm able to compress the suspension with just a finger on the saddle. I suppose that can mostly be attributed to the minimal stiction in the coil shock though. I've had a few hiccups with it along the way and had a frame failure, so back to the kitchen I go.First Issue - Broken Idler Pulley Shoulder Bolt (~100mi):
I had to pass someone on the trail coming the opposing direction from a complete stop. I was heading uphill and really hammered on the pedals when the idler pulley exploded off the bike and shot into the woods. I sheared the shoulder bolt at the threads. The forces on this pulley are significantly greater than my eyeball-engineering anticipated.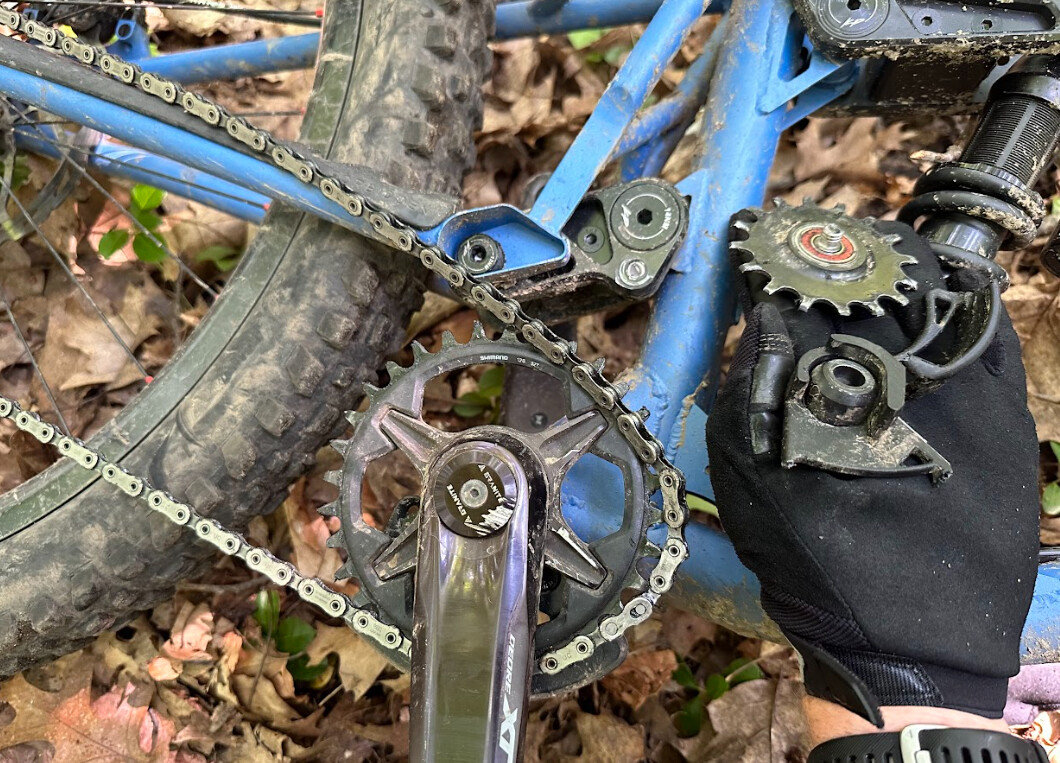
When it broke it also bent the chain, chainring and a single tooth on the idler pulley pretty bad. I replaced the chain, bent the chainring and idler pulley tooth back into position. Looking for a lazy/quick fix I replaced the shoulder bolt of a stronger alloy and tapped the threads for M10 vs the original M8. I figured this should hold me over until I can machine a new link plate with a boss extending to the idler attachment point and support the shoulder bolt from the shoulder and also take the threads out of shear.
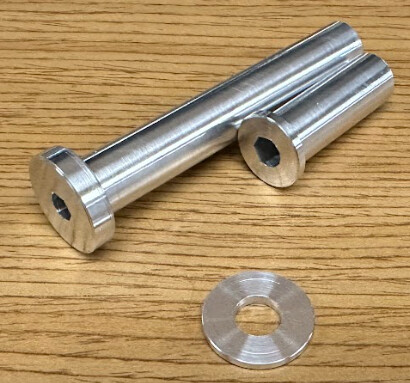
Original shoulder bolt:
New shoulder bolt:
Second Issue - Broken Idler Pulley (~105mi)
About 5mi into the next ride after replacing the shoulder bolt I managed to rip a tooth off the idler pulley. My assumption is that the missing tooth was the one that I bent back into place, but I didn't track it well enough to confirm. Either way this idler pulley was toast. Luckily I had a spare ready to go. This idler pulley was machined from 7075 Al with a 6900-2RS Enduro MAX bearing.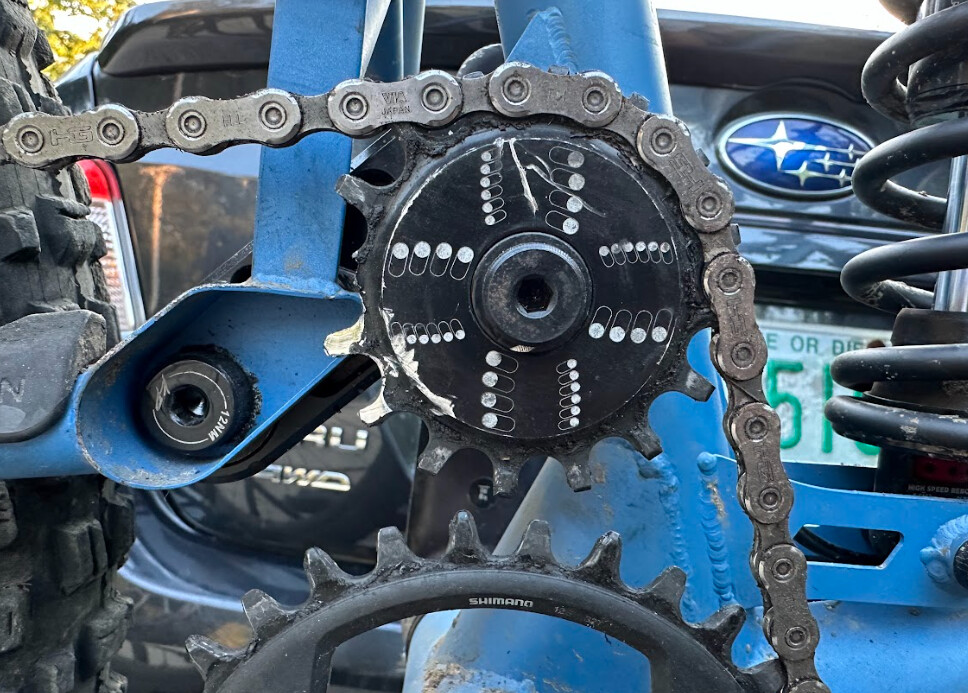
Third Issue - Idler Pulley Popped off Bearing. (~200mi)
Again, this issue happened when I was in my lowest gear putting a lot of power down while climbing from a near stop. This seems to be the max loading condition for the idler pulley which makes sense.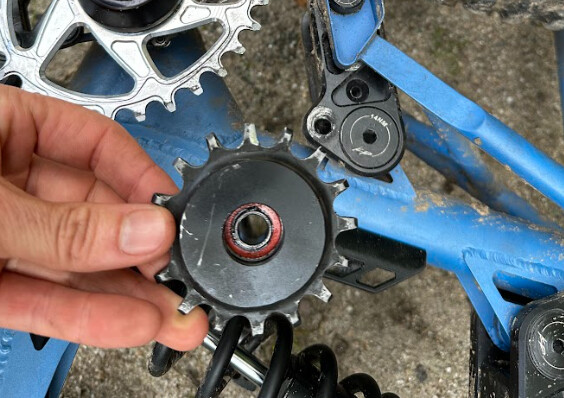
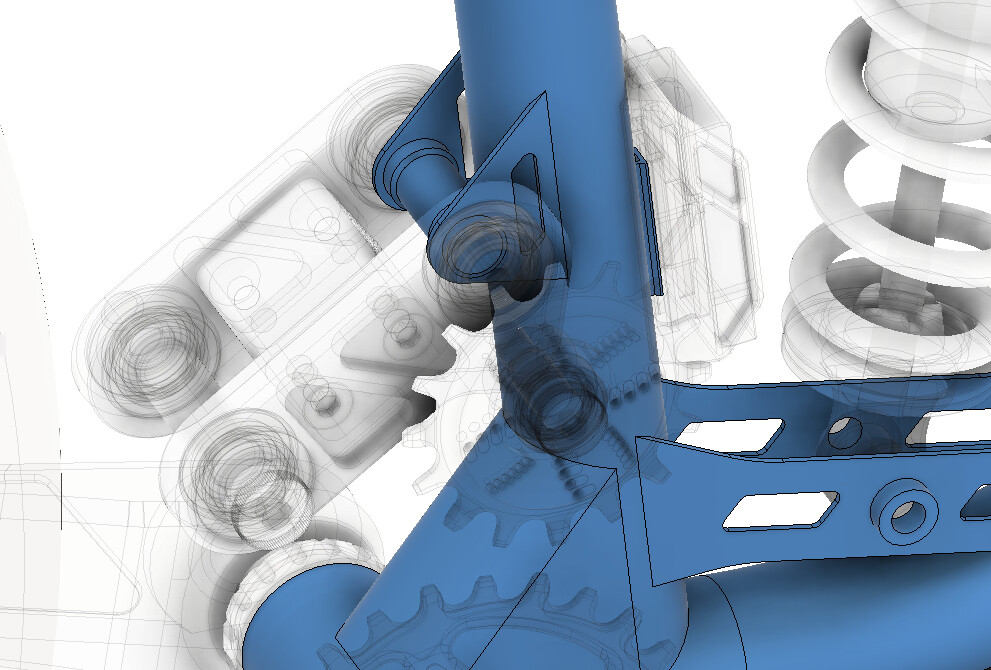
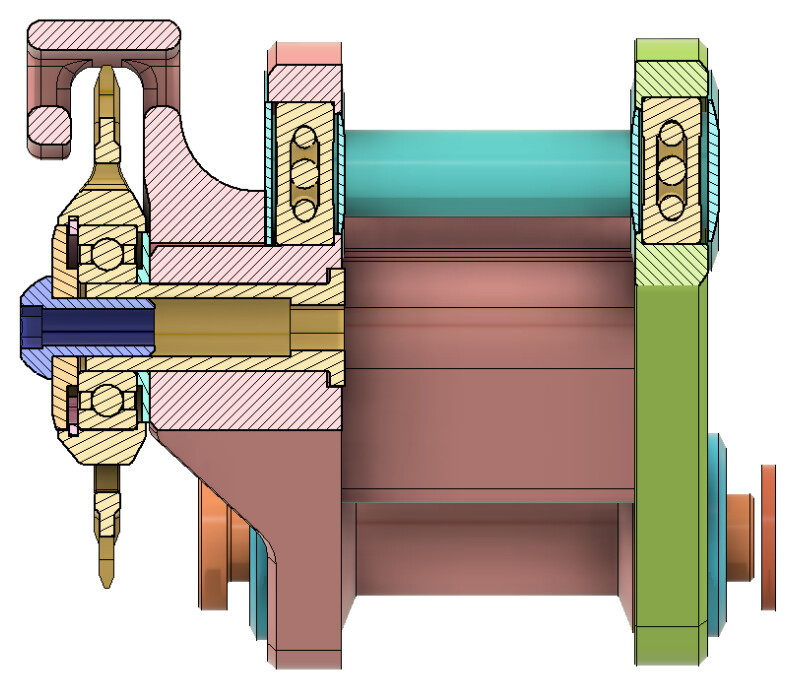
So here’s where I realized I had made another mistake. Admittedly, the idler pulley design was rushed and not as well thought out as I now wish it was, but I digress. The bearing was only supported on one side of the pulley where the outer race sat on a counterbored shoulder oriented on the outside of the bike.
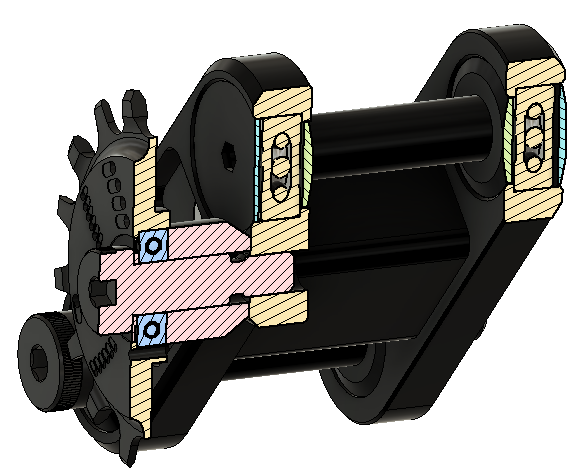
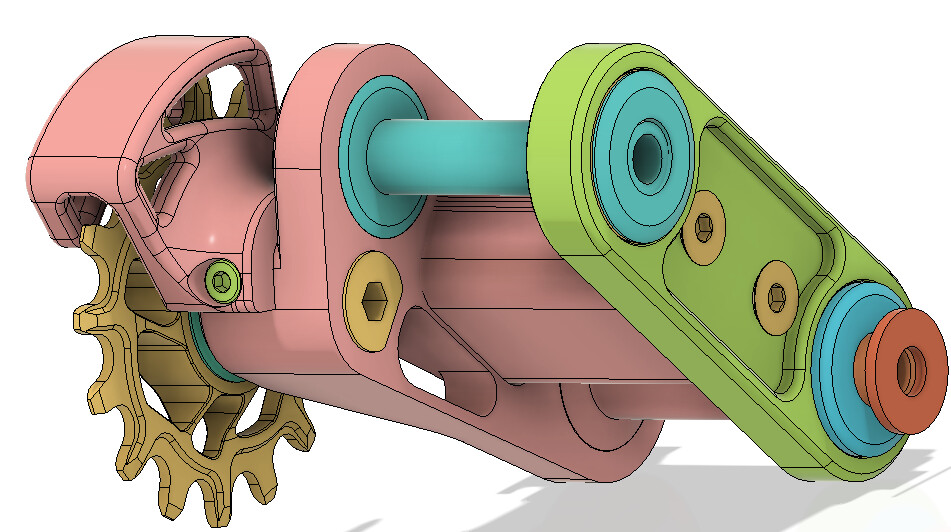
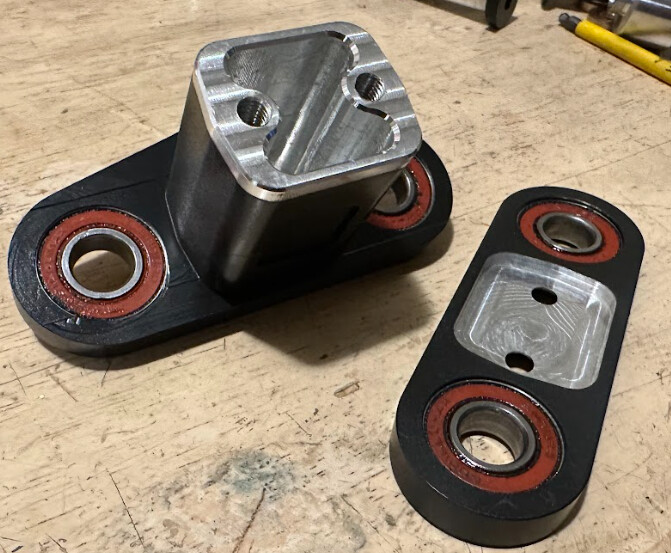
Cross section of original idler mounting configuration.
So I decided to machine new idler pulleys from some annealed 4140 I had leftover from a previous project. I made these to accept a larger 6001-2RS bearing with a snap ring for retention. The counterbored shoulder was designed on the inner, link-facing, side of the pulley.
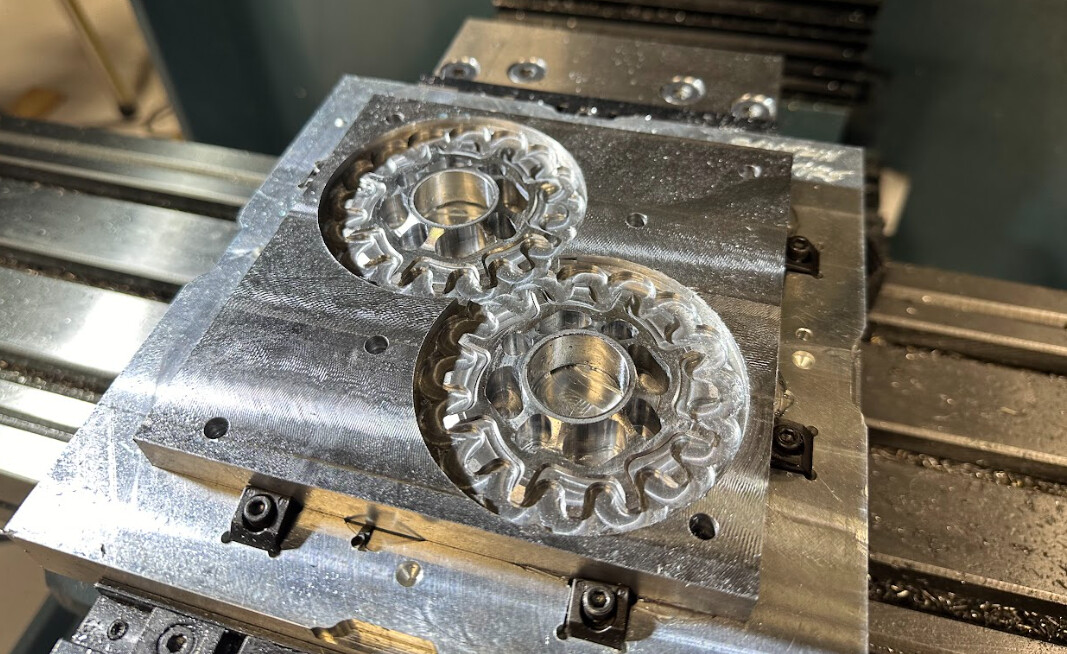
Machined first side. I ended up using a keyseat cutter to machine a snap ring groove and it came out great.
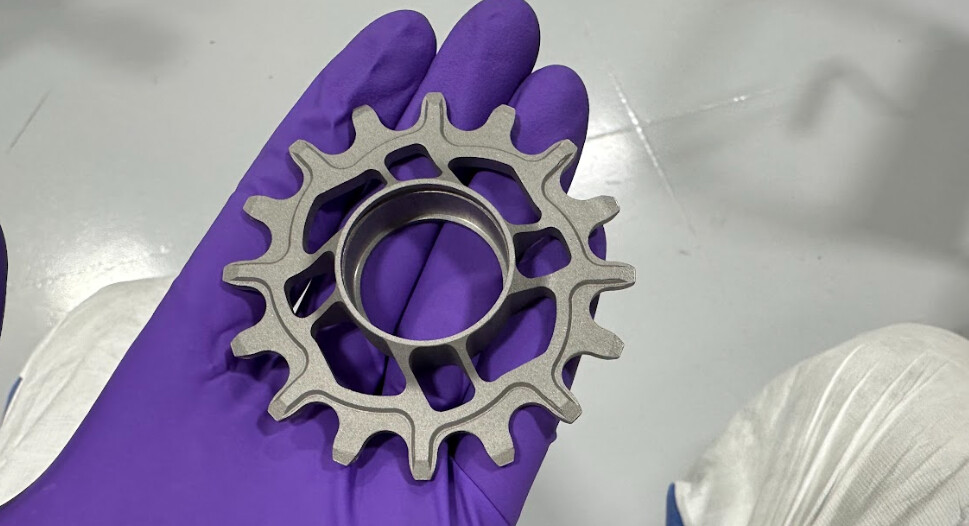
Sandblasted finish always looks amazing.
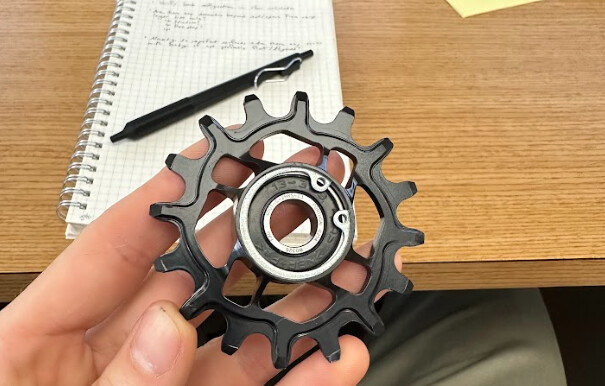
Shown with Cerakote Elite Series coating. I went a bit heavy on the coating in places. I much prefer the look of these idler pulleys to the original laser etched “shredding disc” design even if it means deviating from the processor theme.
Issue 4 - Broken Pivot Mounting Bracket (275mi)
It happened, I had a catastrophic frame failure. I was riding a blue jump trail at Sentiers Du Moulin and cased a small jump. The gusset snapped and I smashed the pedals in the ground and went down. Looking at it now it all seems so obvious. I originally intended for these brackets to be 0.080" thk, but the only 4130 sizes available from SendCutSend were 0.0625" and 0.125". I went with 0.0625" as I thought it would be easier to weld to the 0.035" WT seat tube knowing the thickness might be an issue. With this in mind I should have eliminated the neat looking cutouts. Since I’m not a great welder, I ended up dumping a lot of heat into these joints which likely extended the heat affected zone into the thin portion of the brackets. After 275mi of hard riding the fatigue got the better of them. I flew a bit too close to the sun.
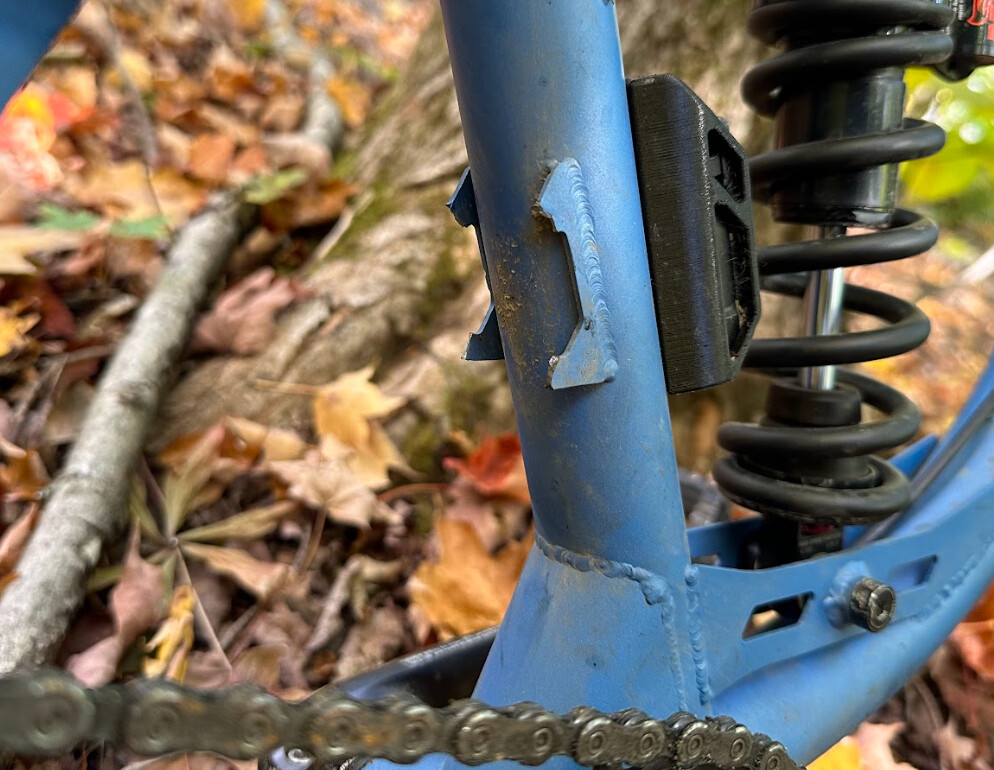
One thing I hadn’t considered was the additional fatigue/strain as a result of the roll moment caused by the tension on the idler pulley. The failures of my idler pulleys tell me this is pretty substantial. The image below shows the first iteration of the brackets.
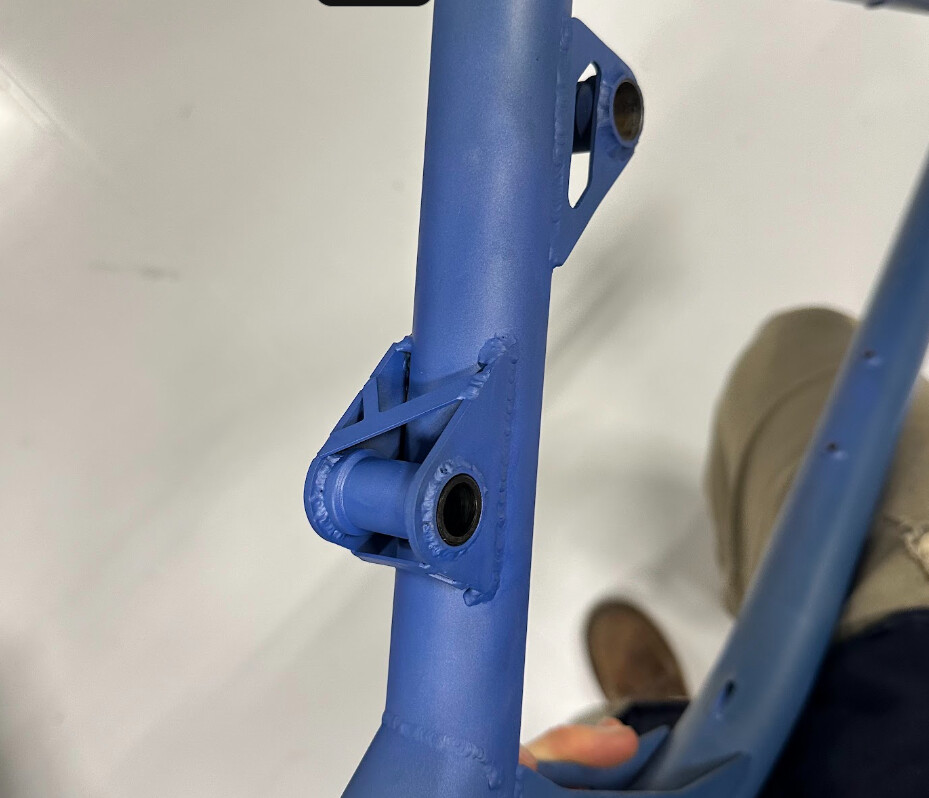
I filed the broken tabs off the seat tube and welded on some thicker, .100" thick, brackets that extend further up and down the seat tube. I also welded some asymmetric cross bracing to the vertical brackets to limit lateral/torsional play and reduce fatigue. This was probably unnecessary and looked a lot cooler in my head than it does on the bike.
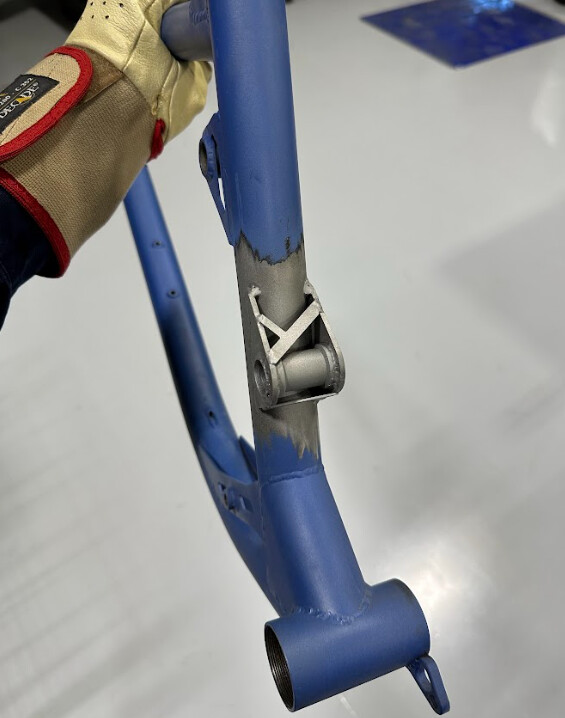
I also increased the size of the pivot support tube and added a delrin insert. This worked out pretty slick and I plan to continue with this method on future frames.
Issue 5, Idler pulley strikes again (~320mi)
After the last few issues with the lower link/idler pulley assembly, the threads were pretty worn out. Had another instance of pedaling slowly uphill (high loading) when the idler pulley bolt tore out the existing threads. The link finally died. Thank god. Time to go back to the drawing board.
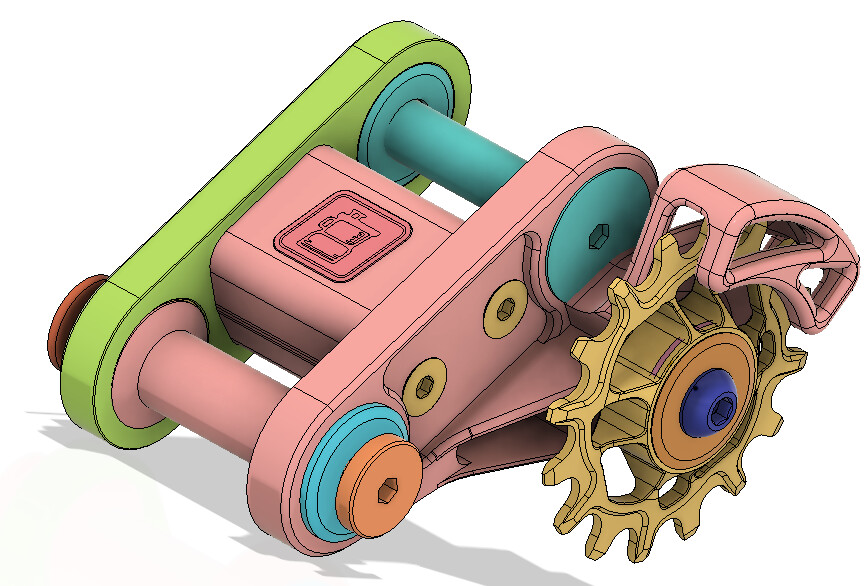
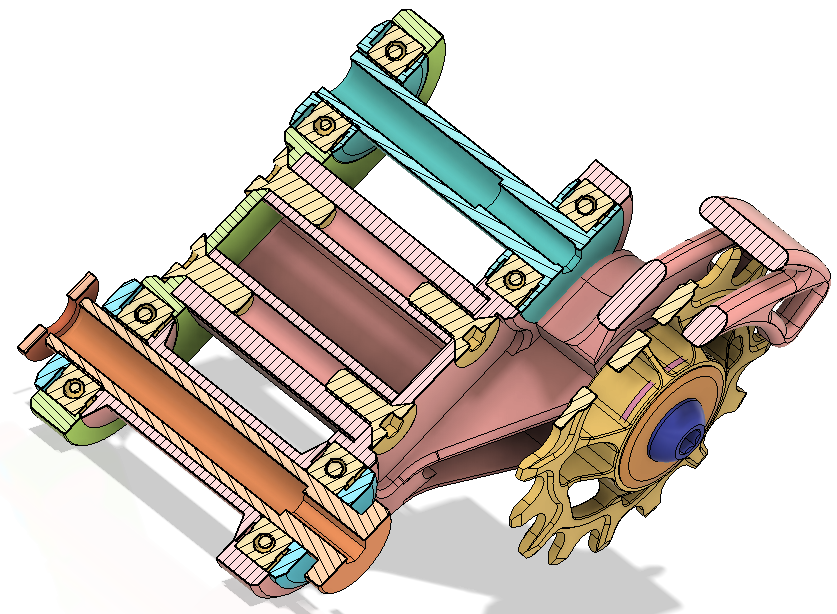
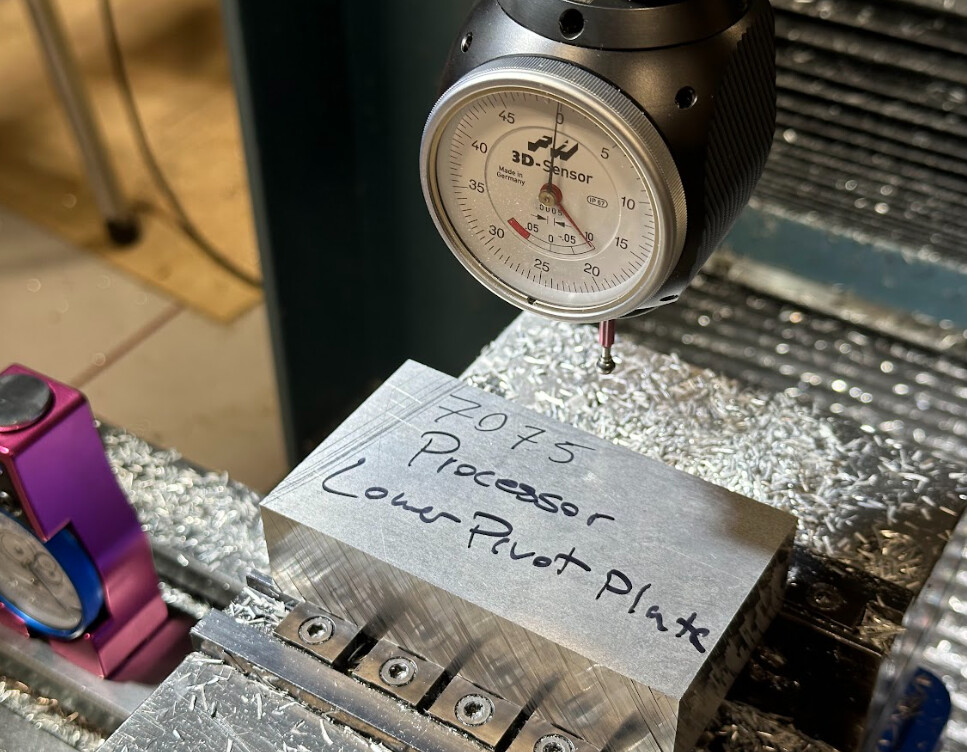
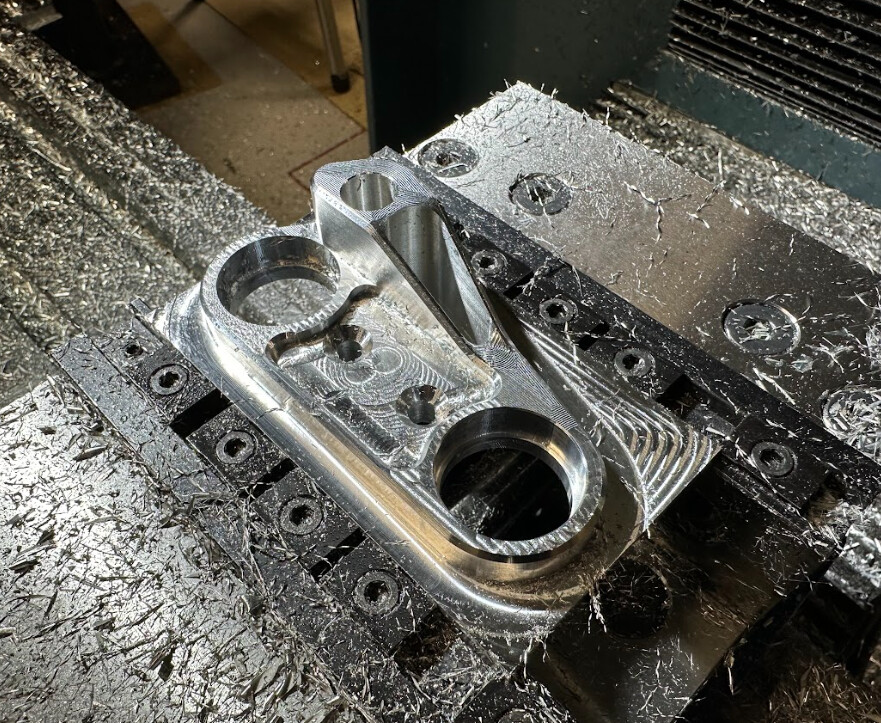
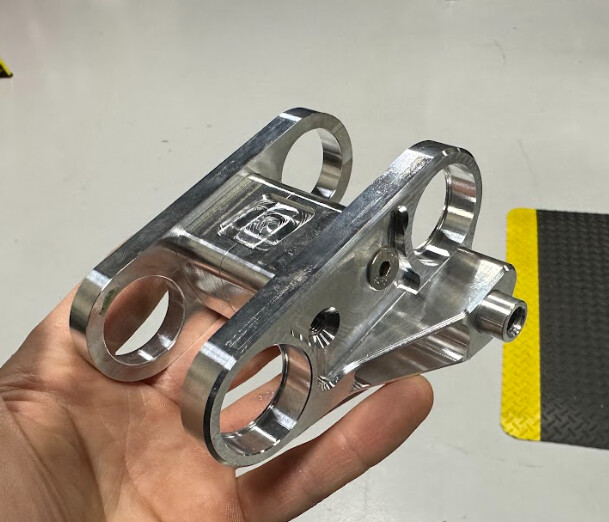
Here’s what I came up with. I re-designed the full link and made a few key changes. I machined the drive side plate out of 7075 and featured an extended boss that better supported an idler pulley axle that I turned from 7075. I cut a flat on the bolt head that sits in an internal pocket because access to this area is very limited while installed. The SS shoulder bolt axle for the lower link was also replaced with a 7075 machined axle for weight savings. This new link has milled pockets for the center bridge to locate and transfer the majority of the shear force. I also milled a small pocket on the top of the bridge and laser cut a processor badge that I bonded in at the end. This design should be a lot stronger and lighter than the original iteration.

Hopefully this redesign prevents any idler pully assembly failures for a while.
Lessons Learned
- When possible avoid loading fastener threads in shear.
- Forces on chain/idler pully are a lot higher than I anticipated.
- Sweet spot for 4130 pivot mounting bracket thickness is around .100" +/- 0.025" thick.
- 4140 sprockets are very abrasion resistant, but heavy.
- Some bearings need to be fully constrained, snap rings work well.
- All issues aside, this bike is pretty awesome to ride.
- I’m having a lot of fun making all these improvements.
18 Likes
This is the content I am here for!
2 Likes
This is all so excellent! Thanks for documenting this so well. Fantastic work! Also for future reference, Oshcut has .08" and .1" 4130.
3 Likes
Oh good point, I actually ended up using Oshcut for the replacement brackets!
4 Likes
Yes! It will be fine as I am digging for information “how works different types of suspensions - single pivot, horst-link, etc…, which is best for my purpouse”. I would like to build good climbing bike, mostly oriented for long rides on flats and uphils. Exists somewhere documentation about it? After creating road bike I am in process of planing full suspension carbon build. If someone could post some information it will be realy helpfull. Thanks:)