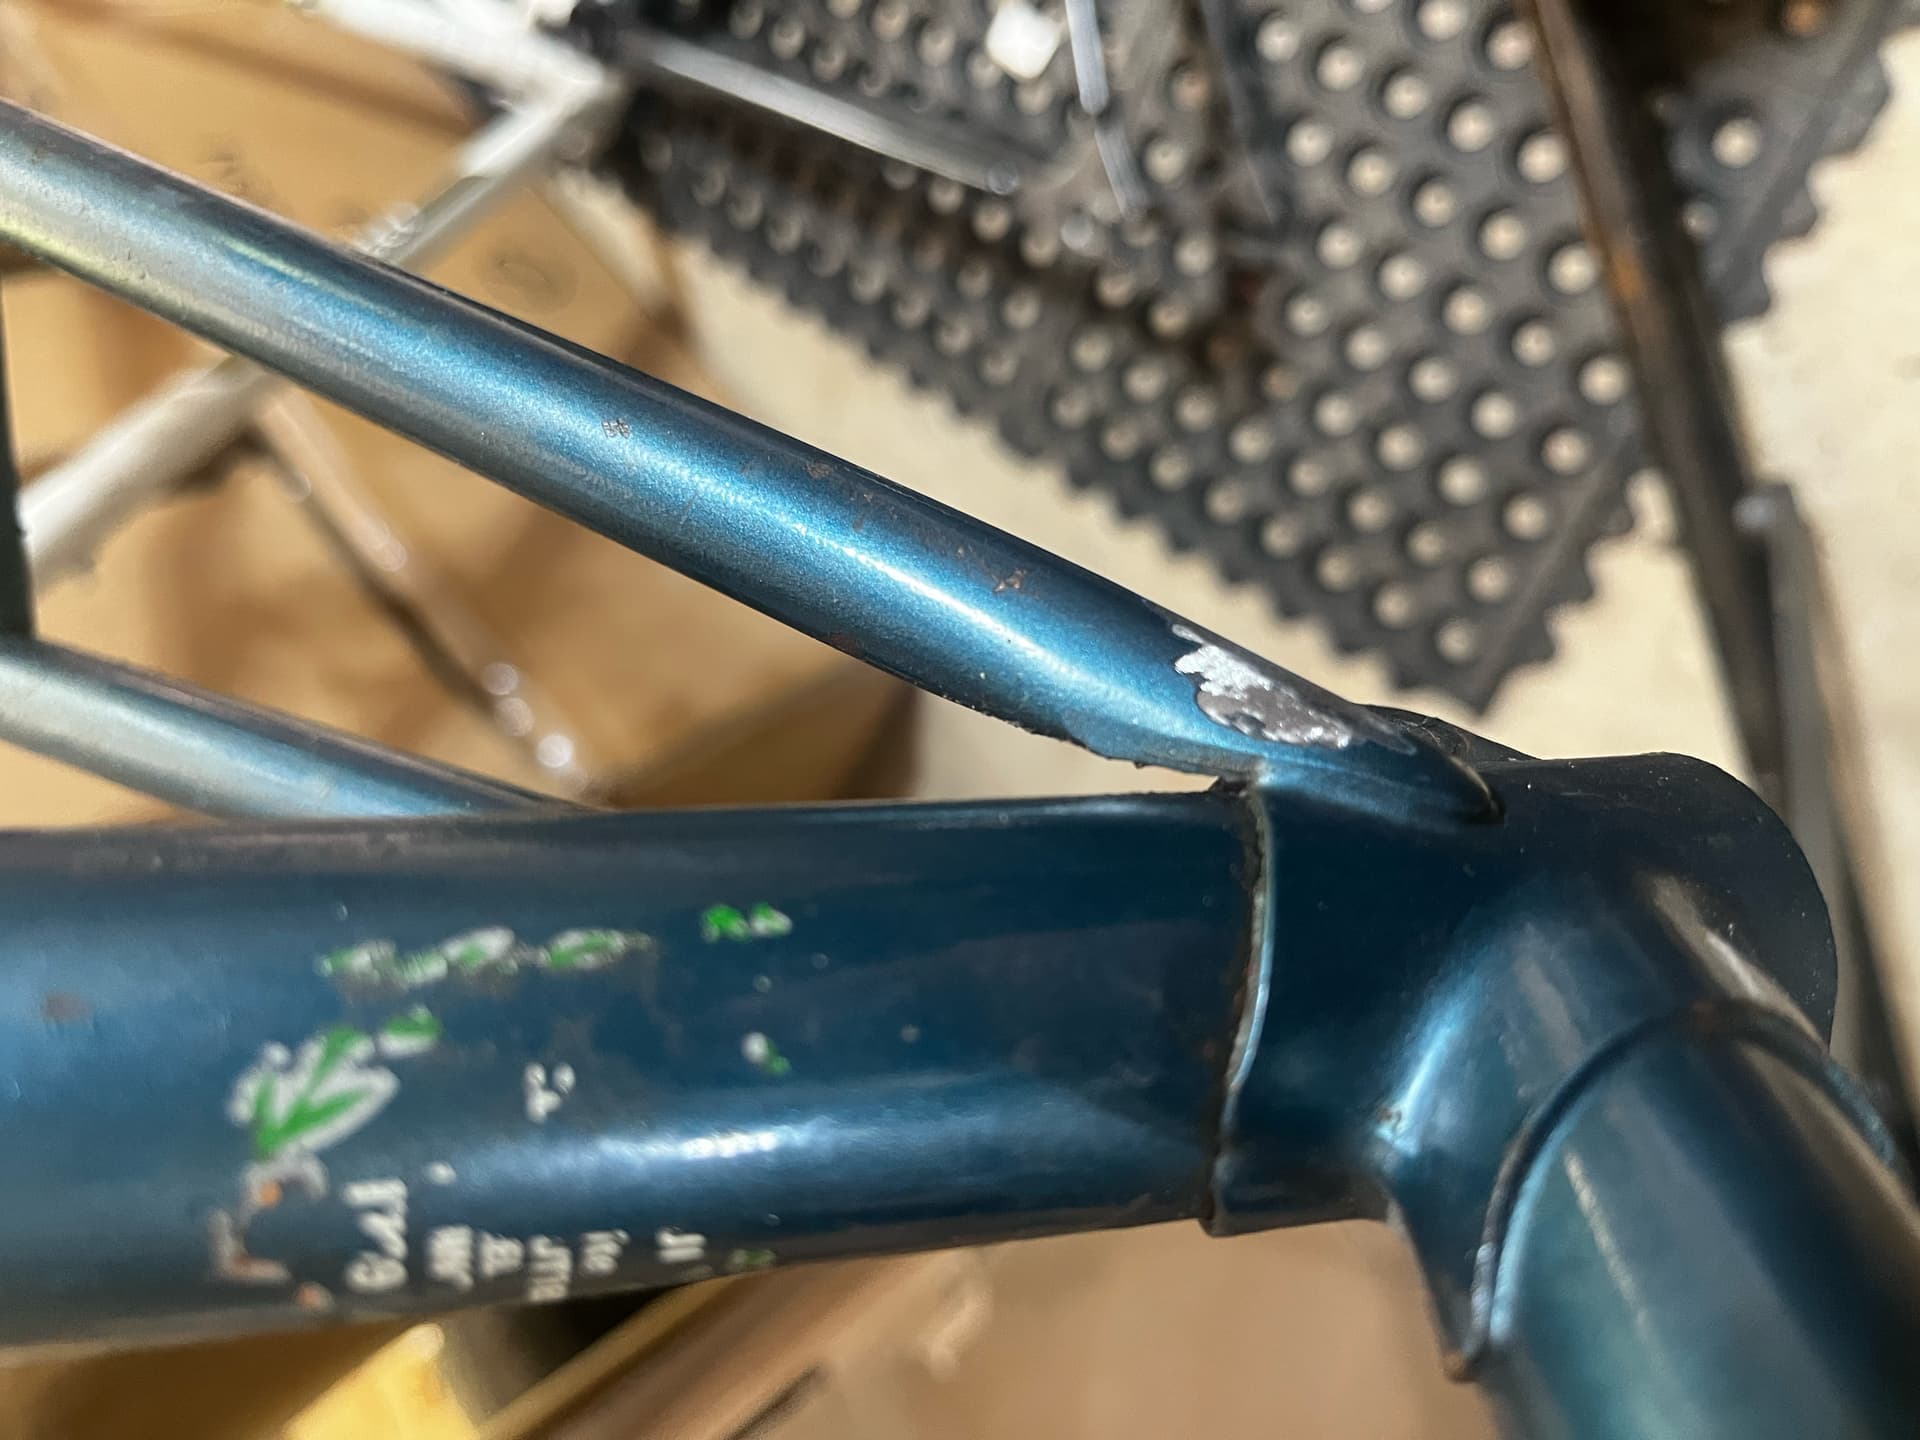
I’ve been toying around with making repairs/modifications to old frames to get some practice with brazing - still feeling relatively new but happy enough with how things are progressing. A buddy of mine dropped off this Fuji frame with cracked seat stays looking to have the stays replaced/repaired. Looking more closely at where the stays attach to the seat tube and looking for advise on the best approach to recreate this joint.
From what I am able to tell, the stay is mitered at an aggressive angle and a flat cap is brazed to the mitered end of the stay, sealing the tube. The capped tube is then brazed to the seat tube.
Where my bit of hesitation comes from is the composition of the joint and my lack of intuition around the strength of the stay → cap → seat tube layering. Looking for confirmation that this is the general right direction to go with recreating this joint, or potential other methods to achieve this.
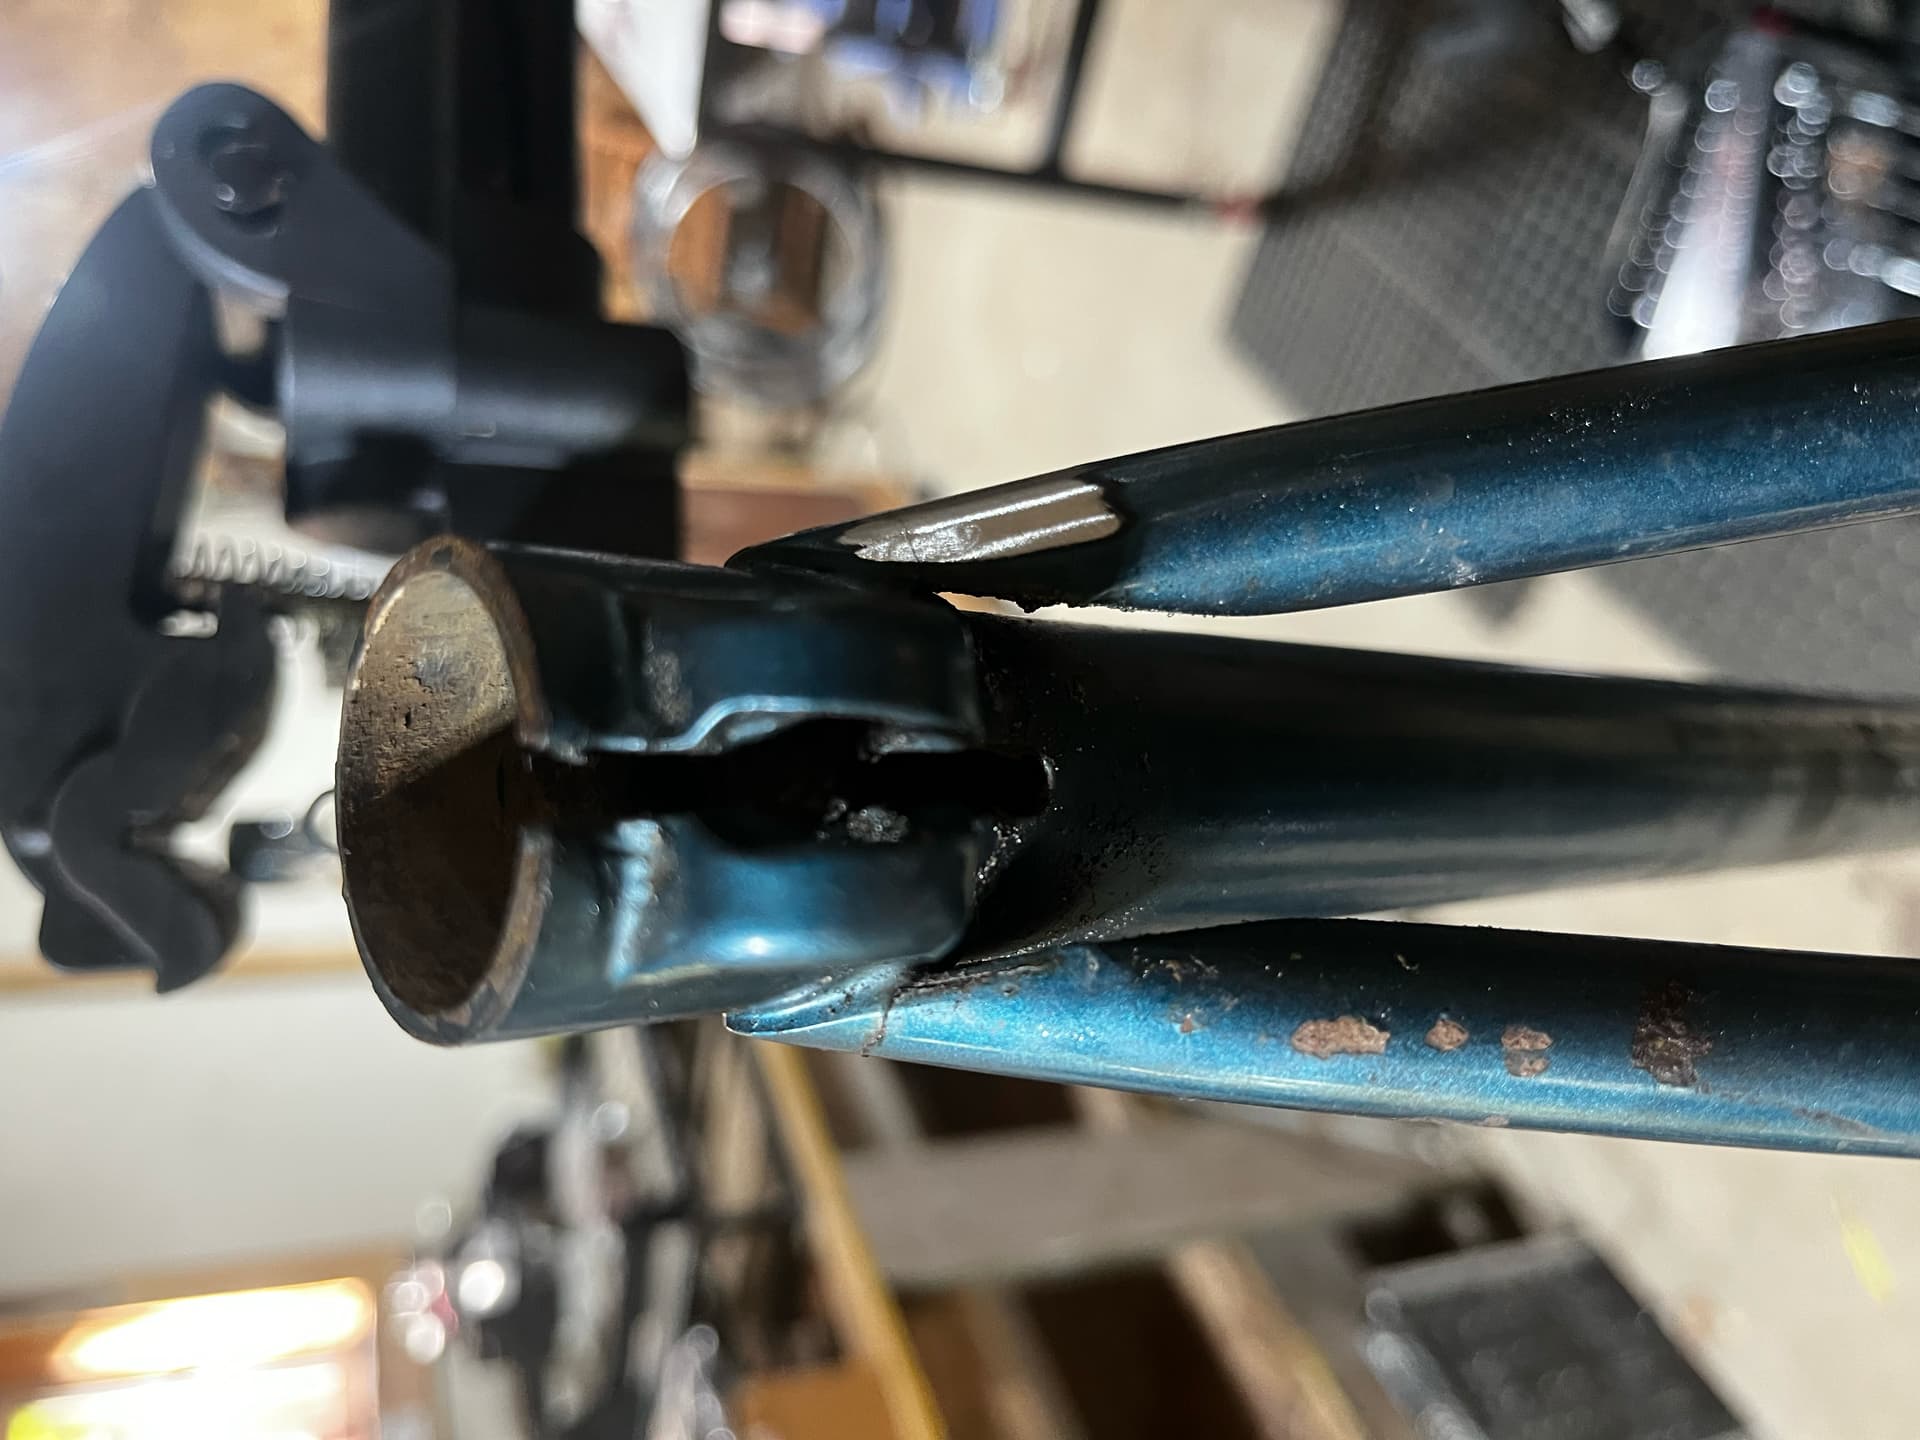
There is no cap or separate piece at the top of the pictured seatstays. Just a budget job of stamped closed and then brazed to the lug.
I am very surprised to see some sort of failure here on a Fuji. Those frames were IME
way-the-hell heavy and over-built. This looks like an ancient S-10-S or S-12-S, some of Fuji’s less-expensive bikes.
I’m guessing those seatstays are up around 1.0 - 1.4mm thick, maybe more ?
Interestingly, both stays failed in the exact same way in the exact same spot. Sanded down the paint on one of the stays and verified it is in fact cracked through. The way the stays cracked is was led me to believe there was some sort of cap on the tube.
Frame has certainly been through a lot and is showing its age, but inside of the tubes look good otherwise and all rust appears to be just surface and not structural, so overall not concerned outside of the seat stays.
Pic of the failed stays, one sanded down and other left as-is.
@LemmyHerse is right, there’s no separate cap on the one in the picture. If you want to do the capped style, that would be an upgrade IMHO.
I just want to comment on where @LemonBar said “sealing the tube” — you don’t want that! You need a small vent hole so hot air can escape during brazing. Two vent holes is recommended because the best way to get the flux off afterward is a hot-water soak, and having two holes lets the water drain out quickly. I believe you’ll find two holes in each stay on that frame currently.
One way is to braze the cap on with brass (aka bronze) and also use brass to attach the stay to the lug, being careful not to re-melt the first braze. But that’s difficult, most beginners will melt out the original brass while doing the second braze, causing an unsightly gap, or even allowing a crack to form there later. Like this:
A more beginner-friendly method is to braze the cap on with a filler that melts at a higher temperature, then braze to the seat lug with a lower-melting filler. For example brass for the cap and silver for the stay to lug. Trouble with that is silver should have more than a single point of contact, for strength, so file a notch in the lug that exactly fits the stay, for some decent contact area. Then use filler with a somewhat low silver content, say 38% to 45%, which allows you to make a fillet. (High silver-content like 56% is too “runny” to make a fillet, unless your skill is godlike.) There is no silver that’s great for making a fillet though, you’ll still have to keep it smallish even with low percentage silver, thus the need for the filed notch in the lug.
Another (maybe best) option for the cap is nickel-silver — which contains zero silver, melts hotter than brass — followed by brass to attach to the lug. You can use the same flux for both nickel-silver and brass. Their melting points are close to the same, so you’ll still have to be careful not to re-melt the cap braze, but brass is forgiving and easy to learn in my opinion. Some people find silver easier but I believe you have a higher chance of success (reliable joint) with brass.
Oh y’know, I left out probably the most beginner-friendly method, which is solid plugs for the seatstay tops. Often called “top eyes”. Like this Top Eyes
That’s Ceeway in England but you can get them stateside too, lemme know if you can’t find any, I can send you some.
Then the stay-to-plug braze is far away when you braze it to the lug, unlikely to re-melt. And the plug, being solid, is easy to braze to the lug. You’re unlikely to harm the solid plug by overheating. A hollow stay with a cap is much easier to overheat, sometimes to the point of cracking while hot, or maybe later miles down the road…
@bulgie with the “top eye” approach would you suggest still replacing the whole stay, or would it be reasonable to cut the top/damaged portion of the stay out and braze the plug in place?
I would try to cut off the existing stay at the right height for brazing in a top eye, 'cuz I’m lazy. That will be less work. Your stays are a bit narrow, so you may need to bend them out wider slightly, they’ll bend at the brake bridge, probably not a problem.
If you fail at that then you’re back to having to replace both stays and the bridge, but there’s no harm in trying it the easier way first.
I’m attempting a similar repair and I’m wondering if I need to worry about the roundness of the seat tube after the braze. I assume it won’t need to be reamed again afterwards?
It’s unlikely in my experience that you’ll distort the seat tube when you do this, but you should definitely check it afterward! This is also an excellent time to evaluate the condition of the seat binder and fix that too if it’s less than perfect.
As @bulgie mentions above, I’ve done this more than once by using a top eye and leaving the rest of the structure intact. As it happens, I even did it on a Fuji once and I found some top eyes that were mitered right/left with a pretty deep cut out so the stays didn’t need bending. Anyway… let us know how it goes!