cheers! and good point re drivetrain wear too. Keen to see this one when it’s done!
1 Like
I had a little bit of fun recently. Cue maniacal laughter . . .
From somewhere online I found someone suggesting a steering ratio of about 1.2, so that’s what I went with. The fork steers 55 degrees in either direction while the handlebars steer 44 degrees. I should probably check if 55 degrees is sharp enough but I don’t own a cargo bike. Anyone care to weigh in on steering angles? I can probably get a little more steering angle with a few modifications if I need to.
It is a 68 degree head tube angle and a 25mm fork offset. That’s about 75mm of trail. I’m open to critique, but I think this’ll work. My goal is to be able to assemble everything without any special machine tools. I should be able to braze everything together and include a few nuts and bolts to attach the linkage arm.
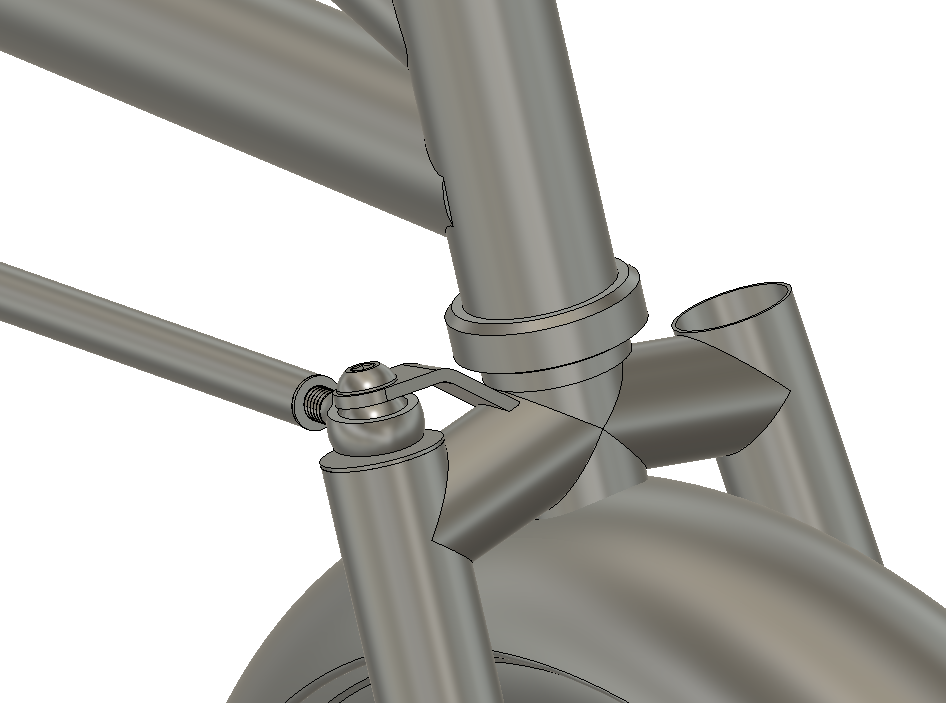

I also added fenders, but these are just a placeholder until I can find a suitable choice. I doubt there are too many 20x2.4" compatible fenders. Though, I’m prepared to be wrong.
5 Likes
That’s so good! Great modelling.
I would say 55 degrees feels bordeline but hard one to know for sure. You’ll get more of a turn if you have the steering rod offset futher from the centreline. Omnium uses 70mm at both ends for a 1:1 ratio. Pics below. Obviously a bit less clean and the fork needs an offstand but it works. You’ll notice there’s holes at the handlebar end to increase the ratio but I’ve never played around with them.
And this shows the steering at full lock.
Geo wise I think you’re far too high with that trail number. Remember this is a front loaded bike so you probably want to be looking at a low trail design to keep the handling responsive. And that means either a steeper HTA or more offset. Again, using my Omium as an example it has roughly 30mm of trail based on my modelling and ride great loaded or unloaded. 73.5deg HTA, 298 A-C, 45mm offset. BikeCAD file below as well if you want.
Omnium Mini-Max_Large (Ti).bcad (338.3 KB)
Another bike I rode a lot before the Mini-Max is a Crust Clydesdale’d Surly Straggler. Not a linkage design but a front loaded cargo bike with a low trail design, measured at around 40mm of trail.
Hope this info helps a bit. Nothing I’m saying is fpor certain either, just my experience.
4 Likes
Oh and as far as 20" fendes go maybe check out 60mm SKS Bluemels. I’ve used them with a 2.35" Odyssey Aitken Knobby on a 20" Velocity Cliffhanger (25mm internal) and there was just enough clearance for it to work. They’re super cheap and very durable. The pic below is from 2019 I think. A mate owns the bike now but the same fender/tyre combo is still going 4 years on.

If you want to go all out and guarantee a 2.4" tyre then Frances Cycles sells Japanese made 20" Tanaka fenders for the trailers they make. Super nice looking, 70mm wide and pretty good value at $65 each. For a custom build that’s probably the route I’d go down.
3 Likes
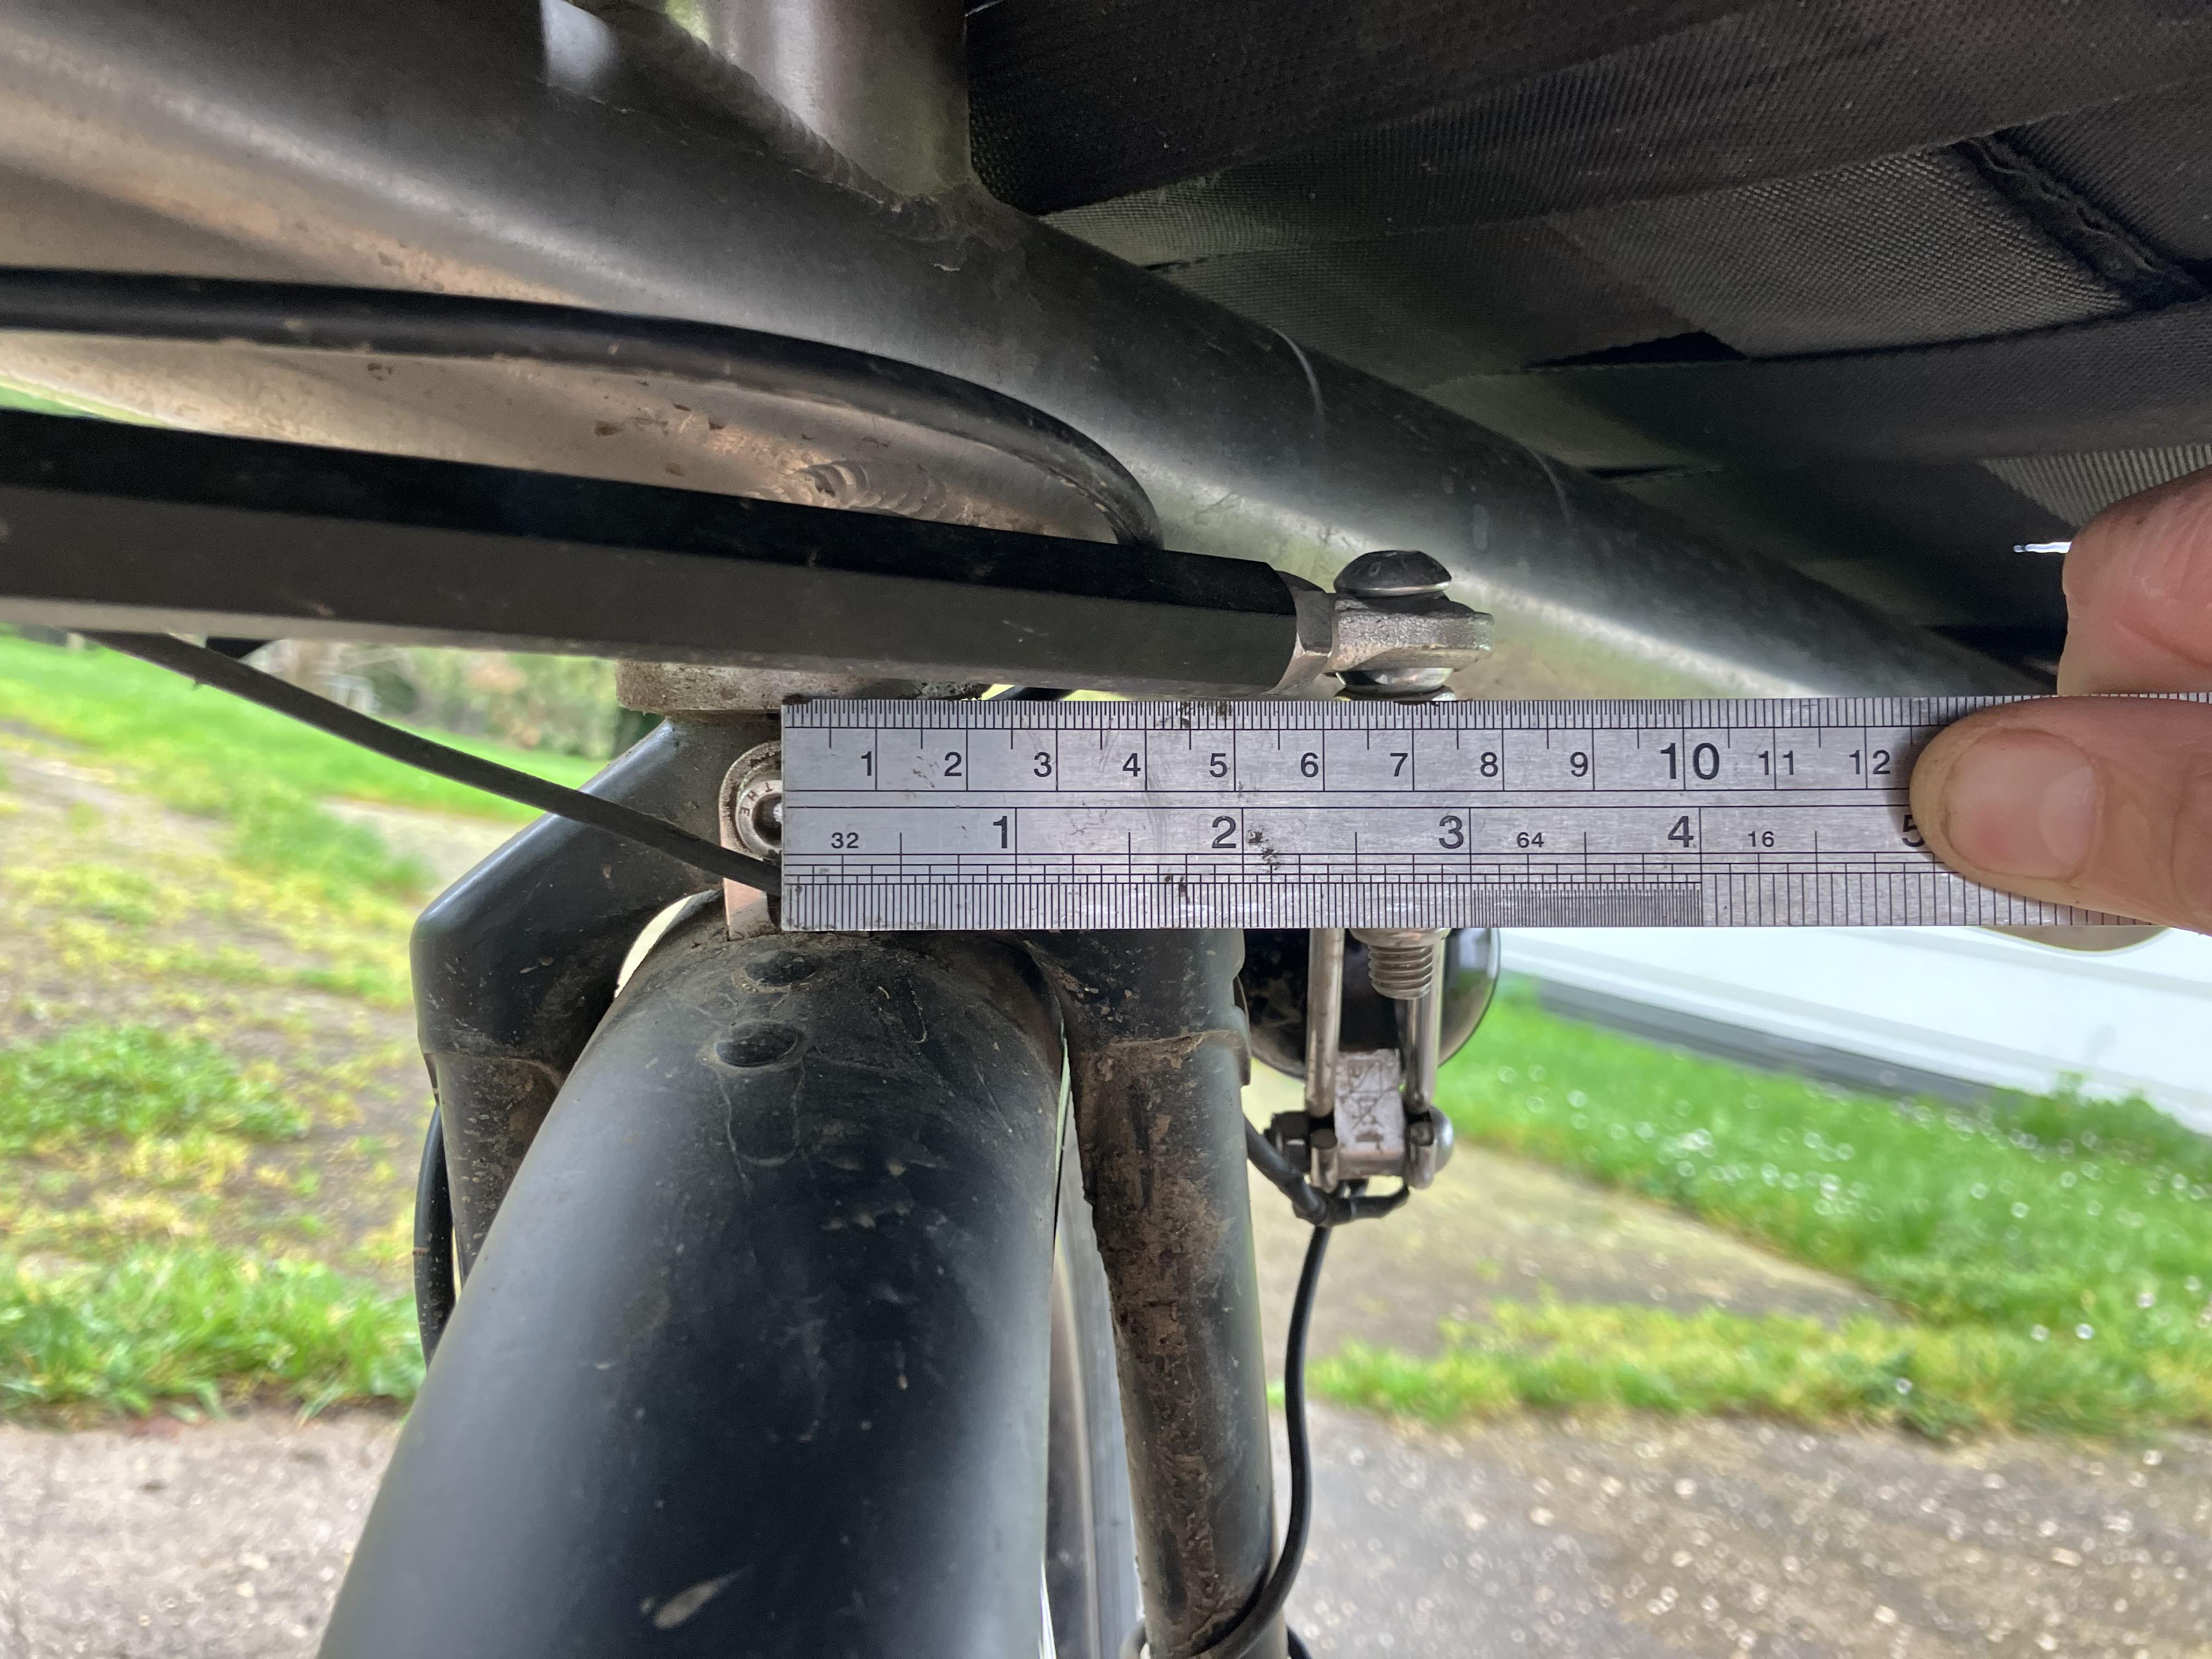
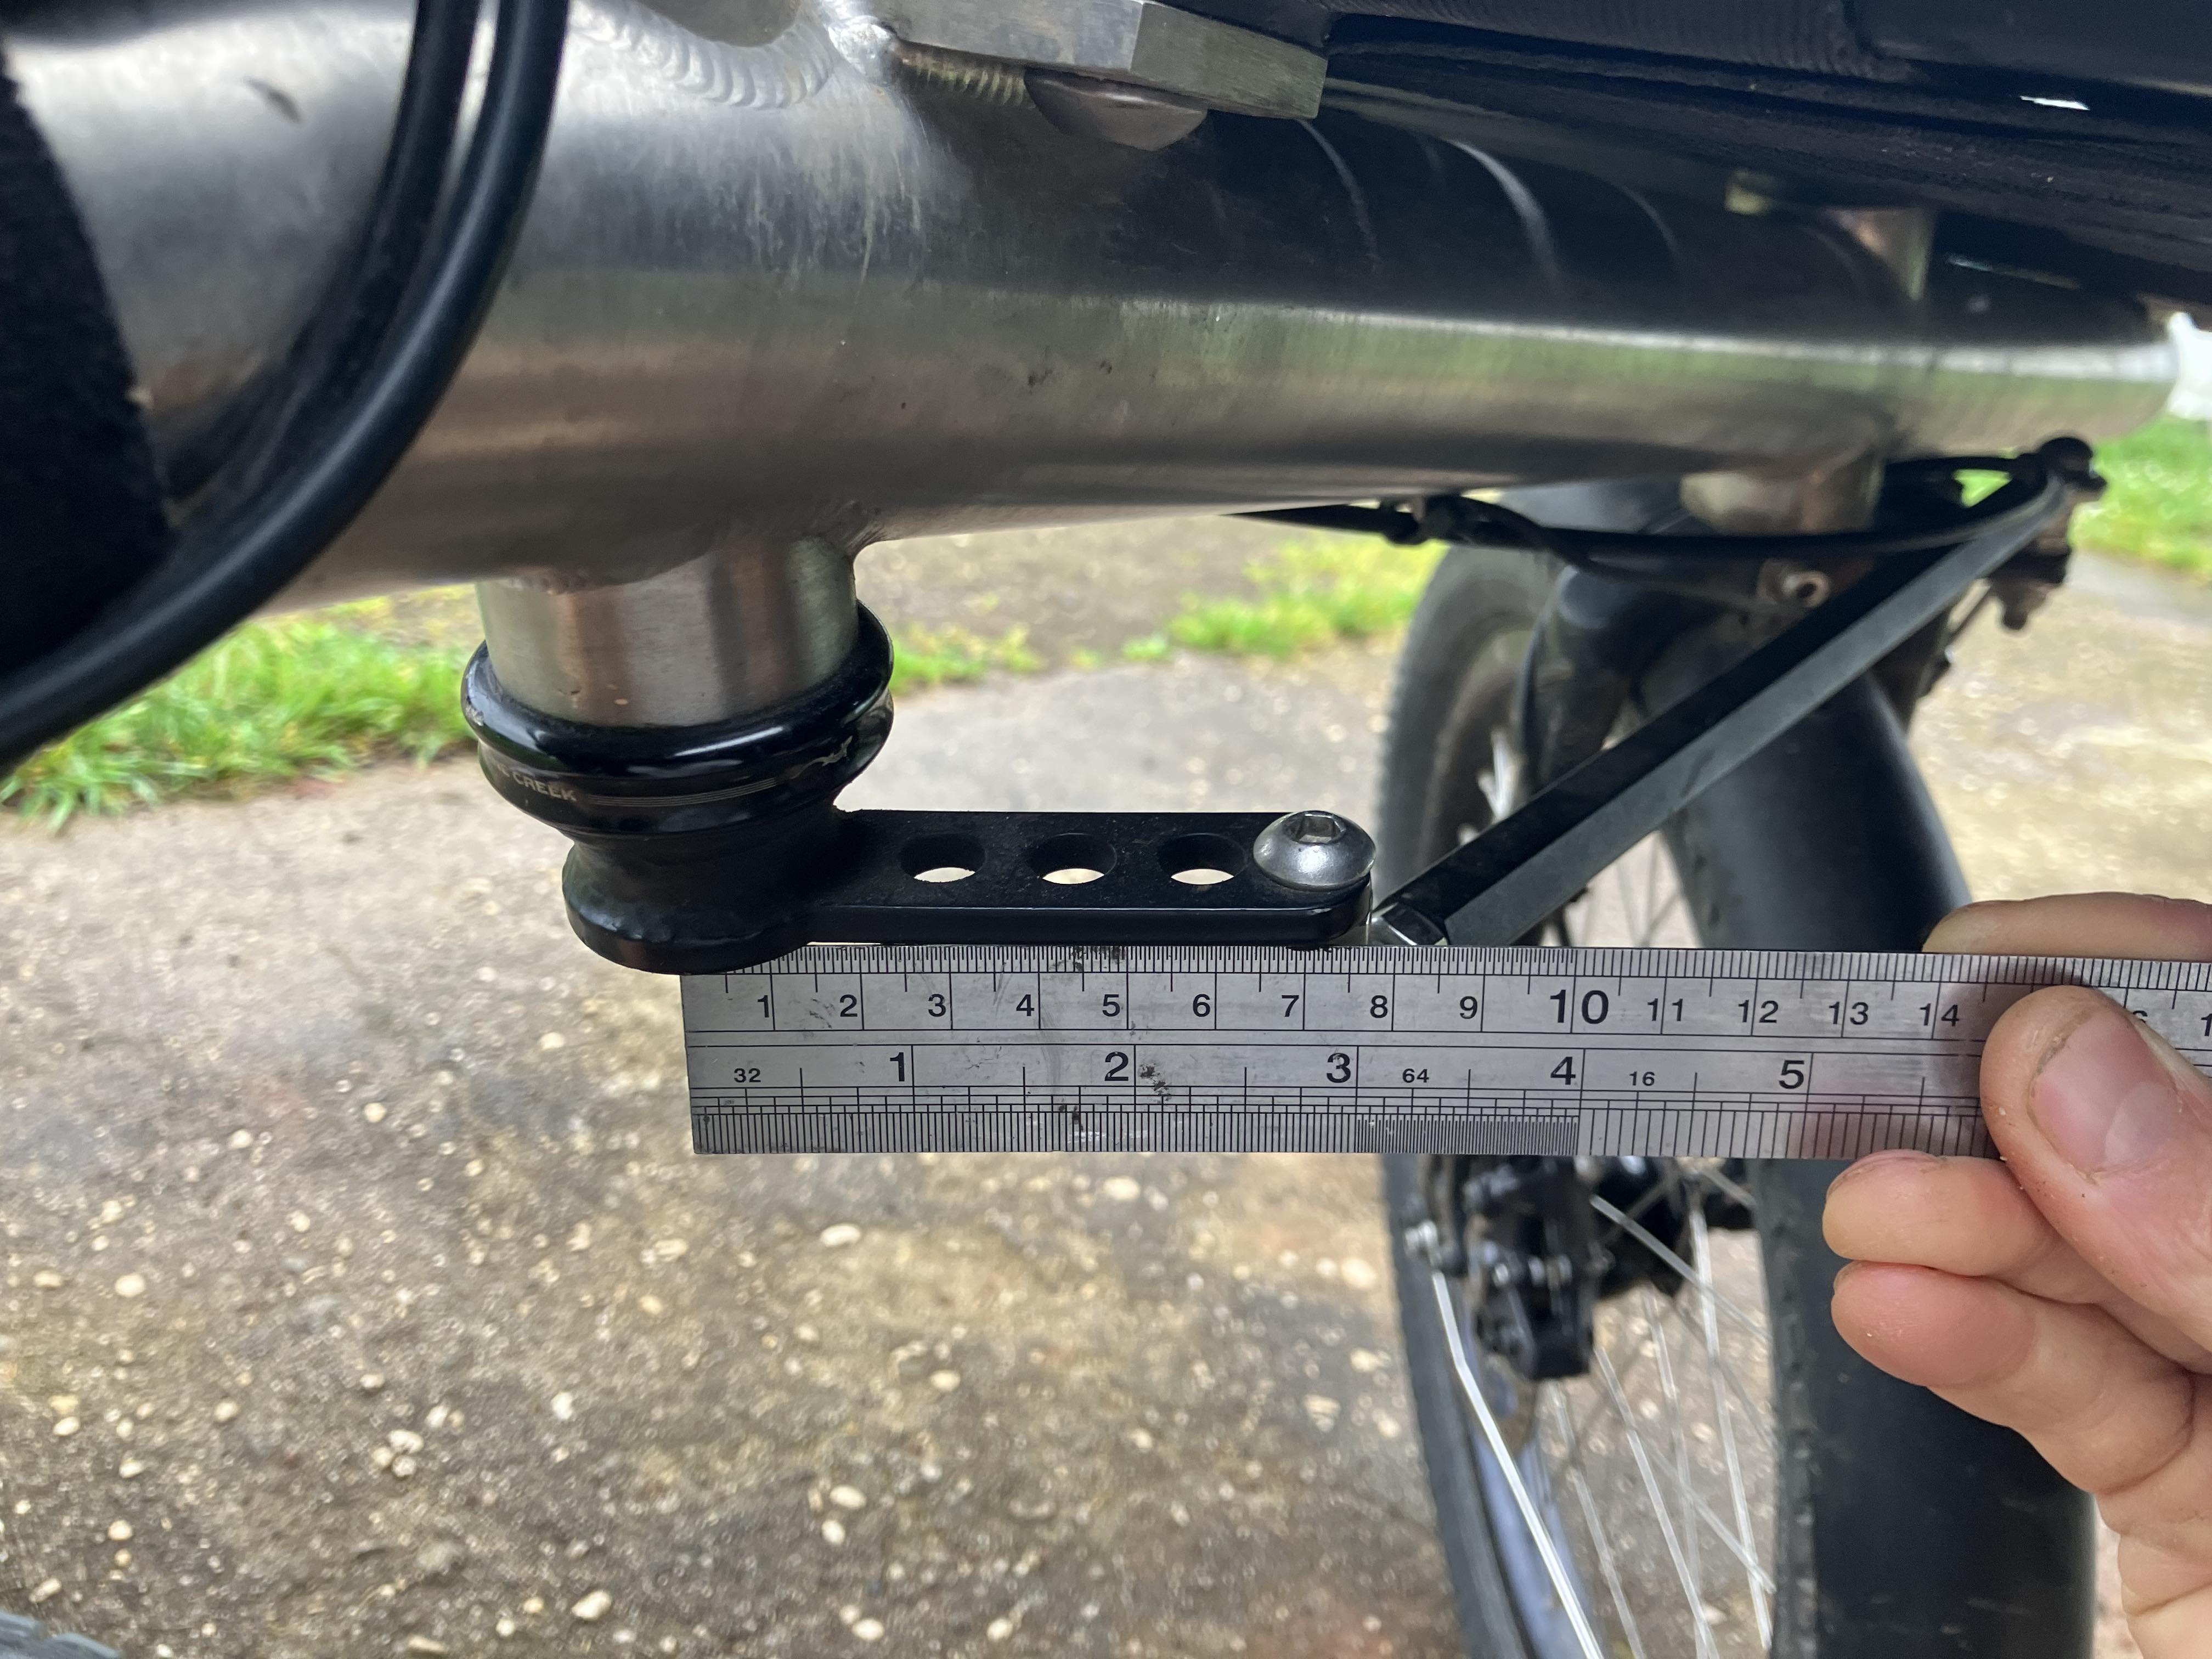
I made my own version of the Clydesdale fork with 42mm of offset. Rides great loaded and unloaded. I used the same fork offset on the upcoming cargo bike with a steering linkage.

Thanks for the steering rod linkage offset number!
7 Likes
Mad! Love the curves. I think I measured the Clydes at around 44mm of offset so seems like theres a bit of convergence data there. Fun bikes aren’t they!
And let us know if you need anymore info on the Omnium. Love seeing all these custom cargo builds so happy to help if I can.
2 Likes
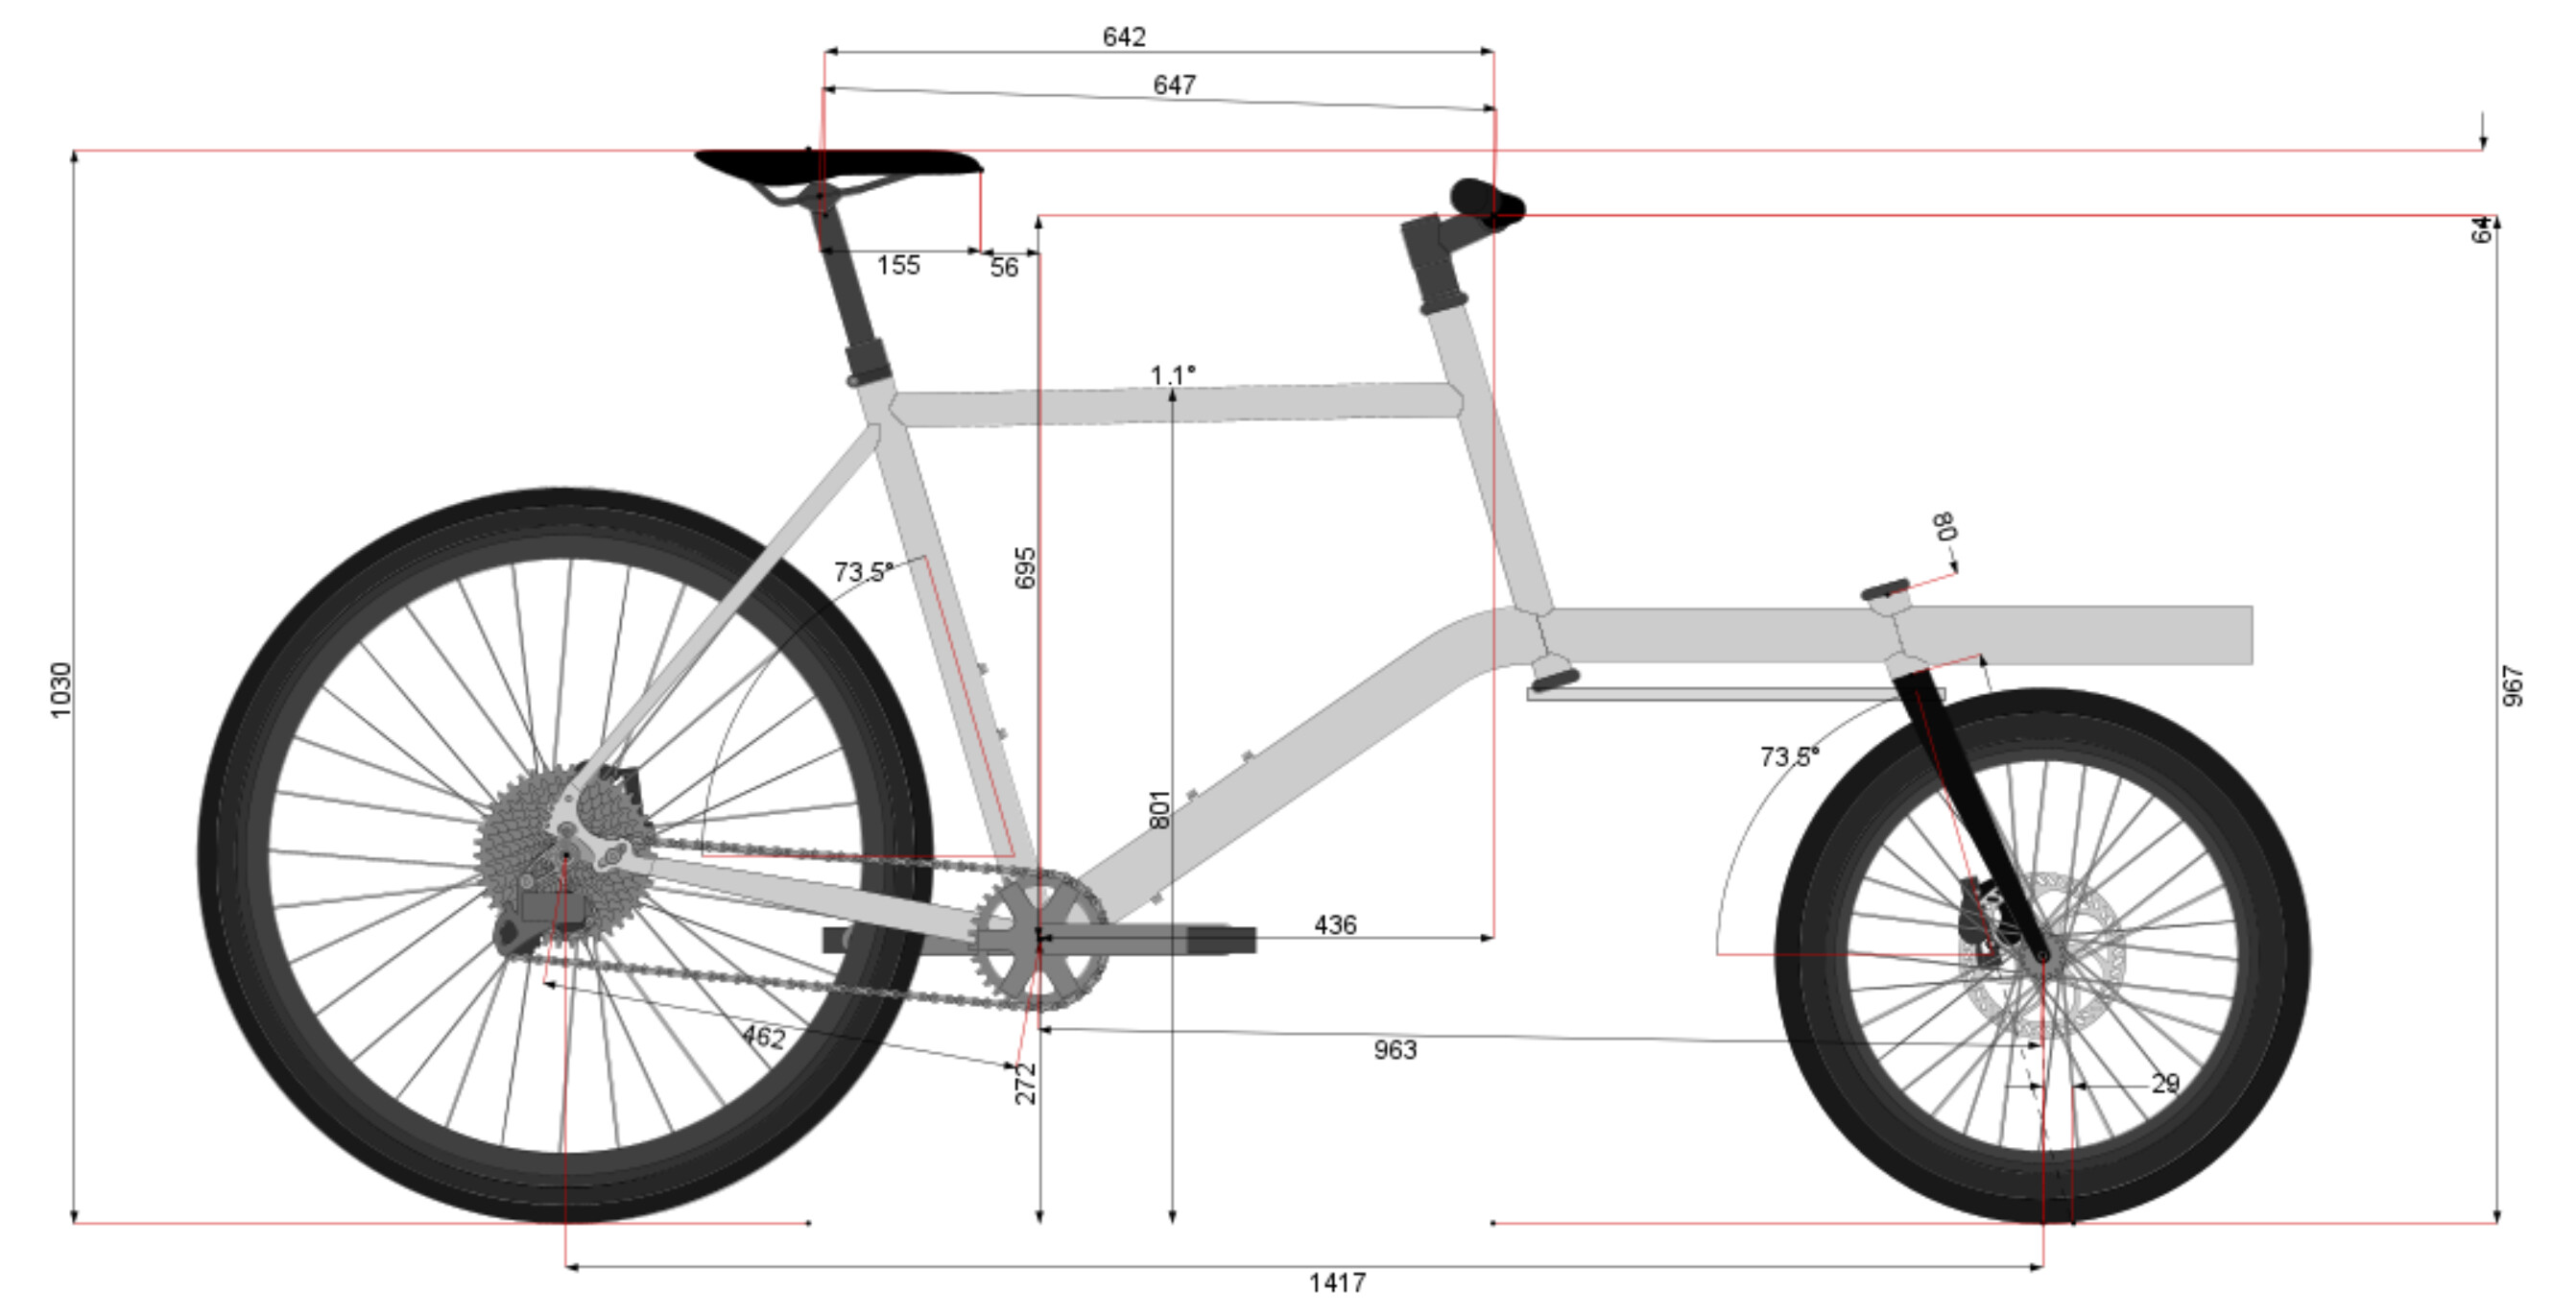
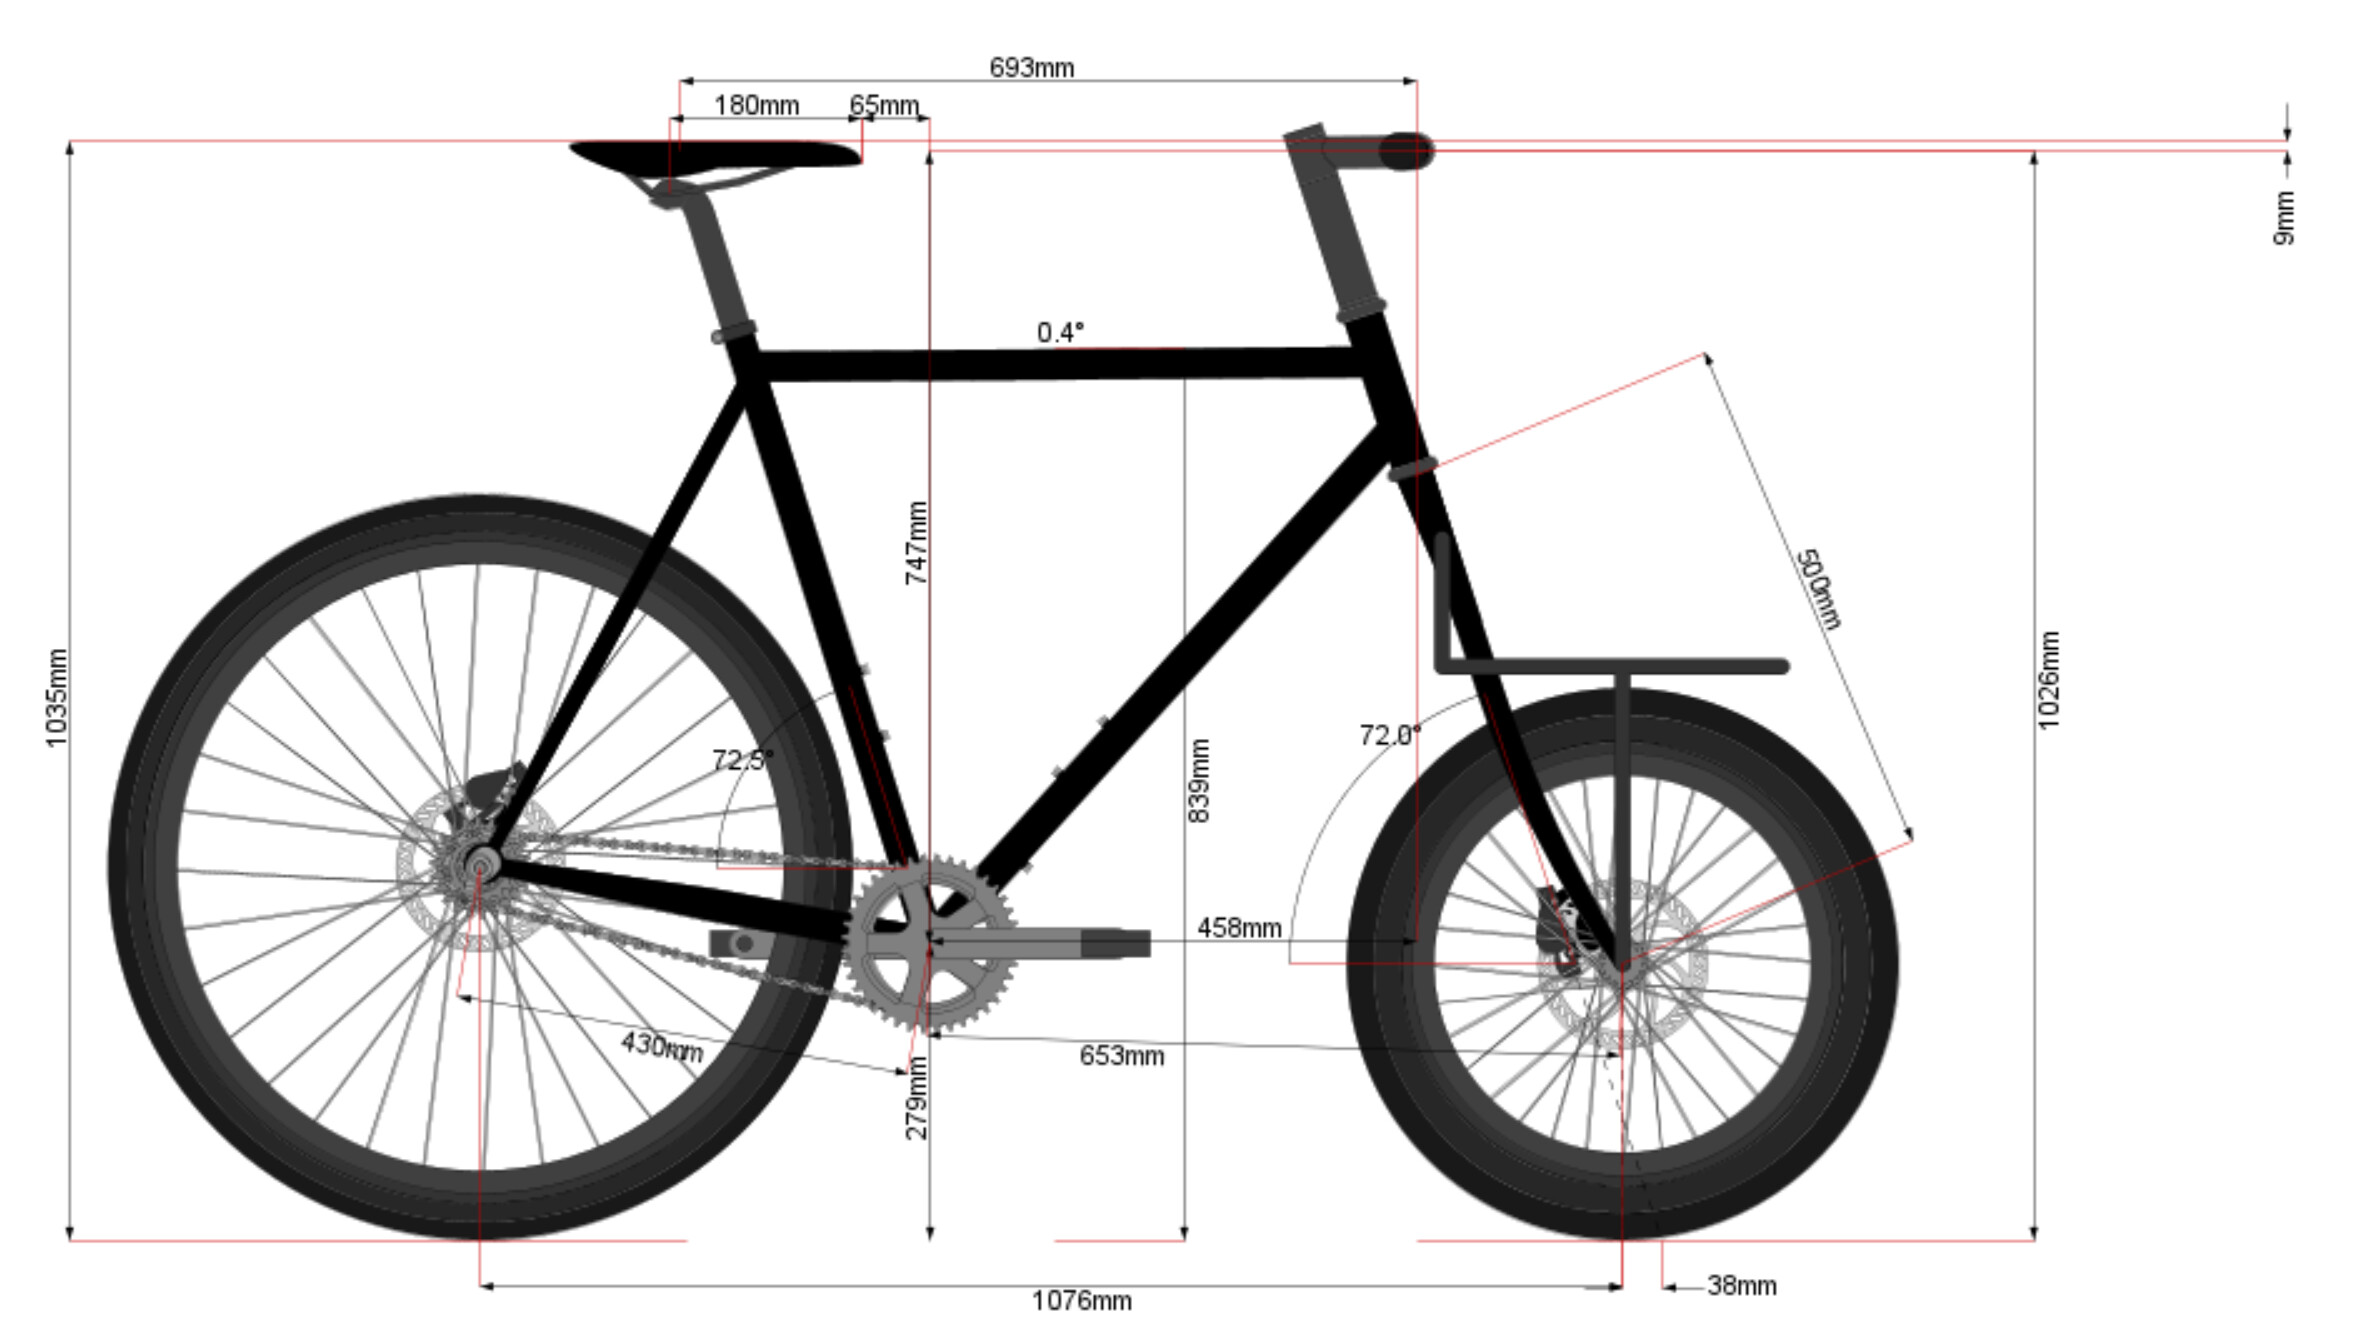
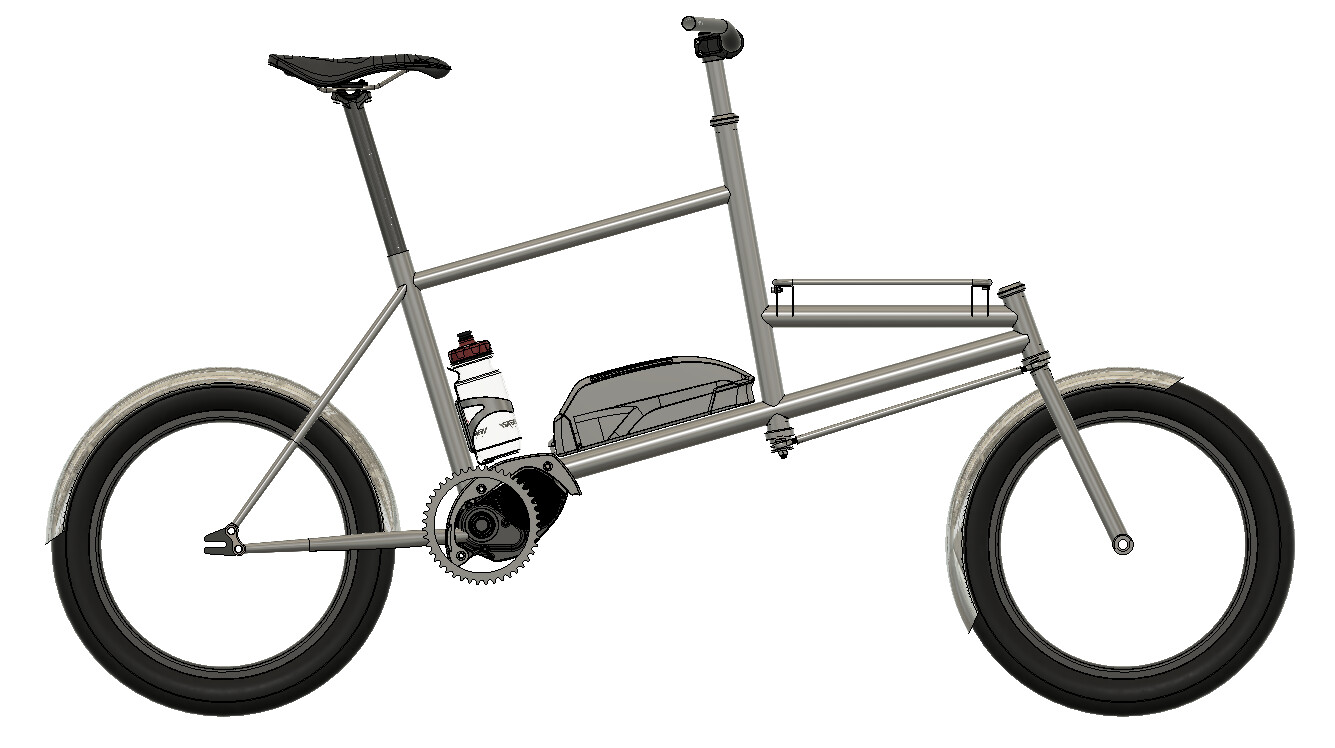
@bushtrucker @TDotBikes You guys are the best. I’ve steepened the head tube angle a bit. I’m still a little bit stubborn so it’s 70 degrees instead of 68 with a 28mm fork offset. I figure that with the linkage ratio and the short stem I have planned, they might cancel out the high trail? I adjusted the width of the steering arm both front and back so that it now has 67 degrees of rotation at the front before the linkage contacts the fork. I also made enough room to experiment with linkage ratio if I want to. I’m gonna start with 1:1.2 but have the option to do a 1:1 or something in between. Just depends on how many holes I want to drill.
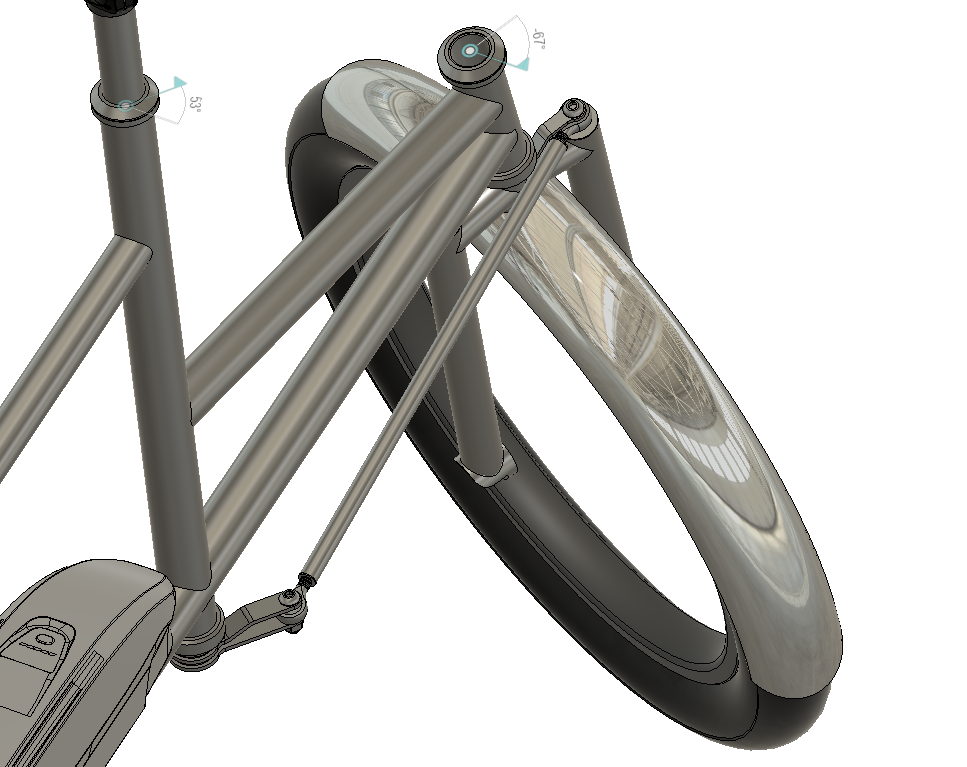
I shifted the downtube up a little bit to better position the battery. If you’re wondering why the taller head tube is steeper, it’s so that there is more room for storage up front and keeps the weight more towards the center of the bike instead of cantilevered out over the front wheel.
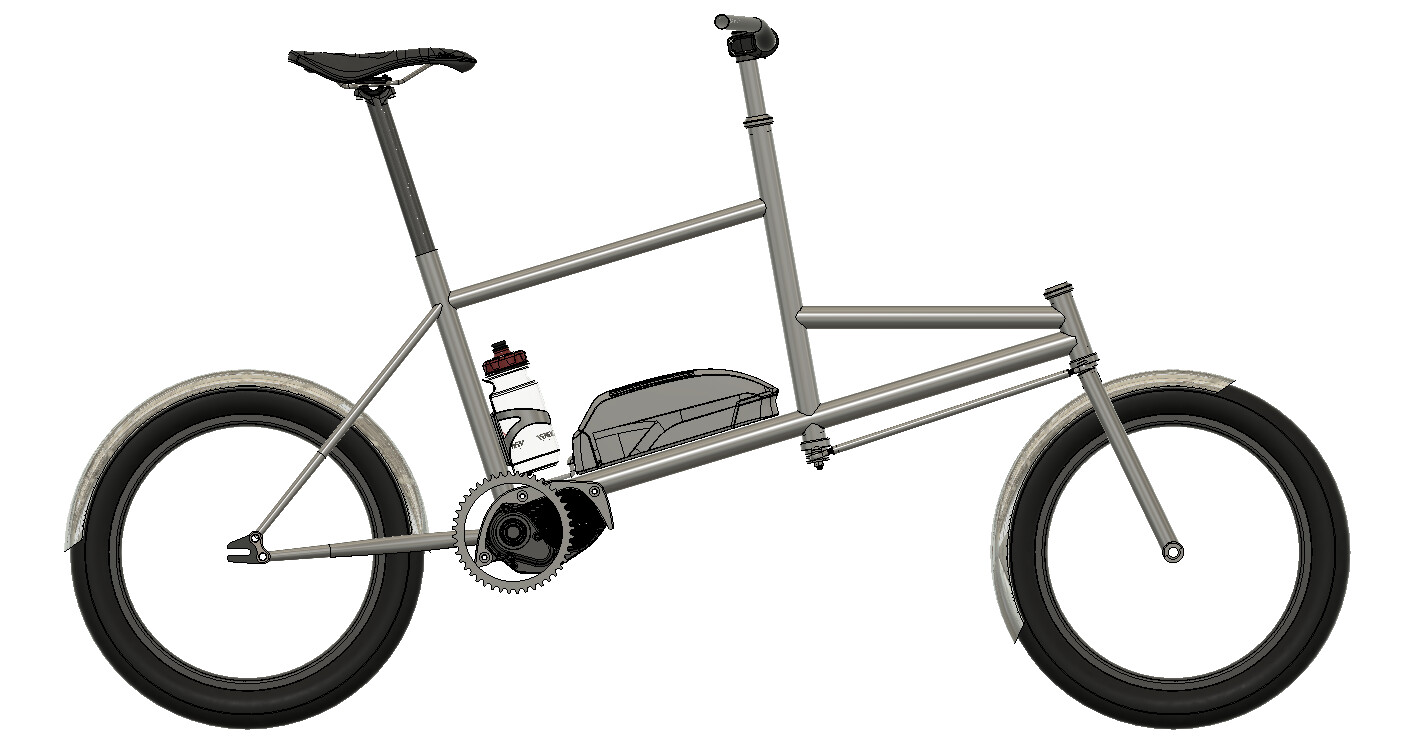
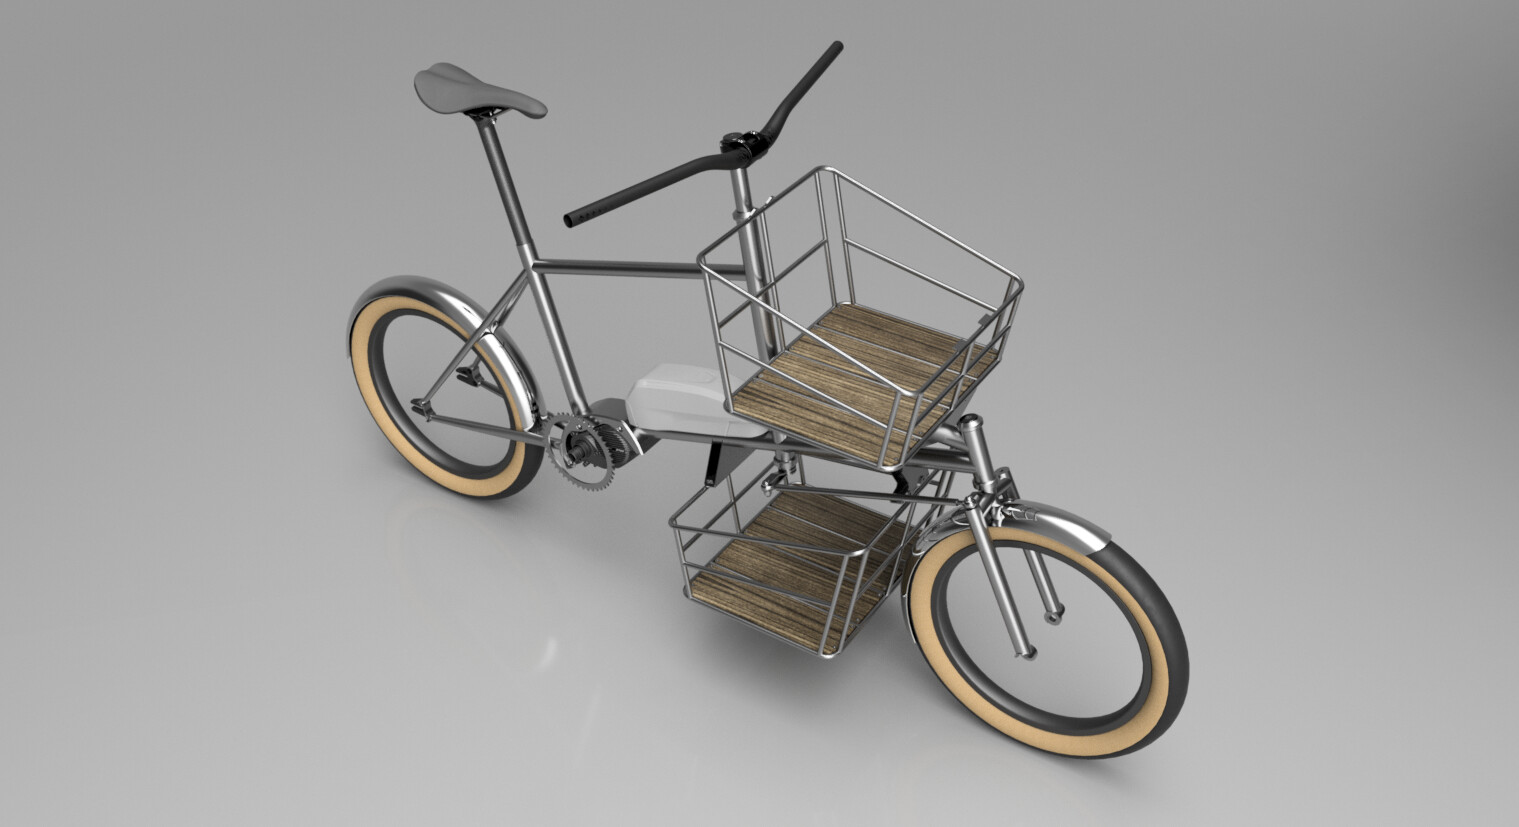
I have been thinking about the storage solutions and I would love to figure out a way to make the whole system modular to mount either a basket or a platform up front, or below. But ideally the system works in either scenario. I.E. the same parts can be used even if it’s in a different orientation. Quick fun renders of the aesthetic goal.
6 Likes
Tony at framebuilder supply sent us cad when we asked if I recall correctly. I’m mid move and don’t have access to all my models, I’ll try to remember to upload a step file in a couple weeks. Anyway here is a pdf of the drawing of the e8000 motor cabinet if that helps!
E55 drawing.pdf (18.7 KB)
2 Likes
That does help. Immensely. I’ll reach out to Framebuilder supply too. Thanks!
Edited to add: He did have CAD for that part. Super helpful. thanks again.
2 Likes
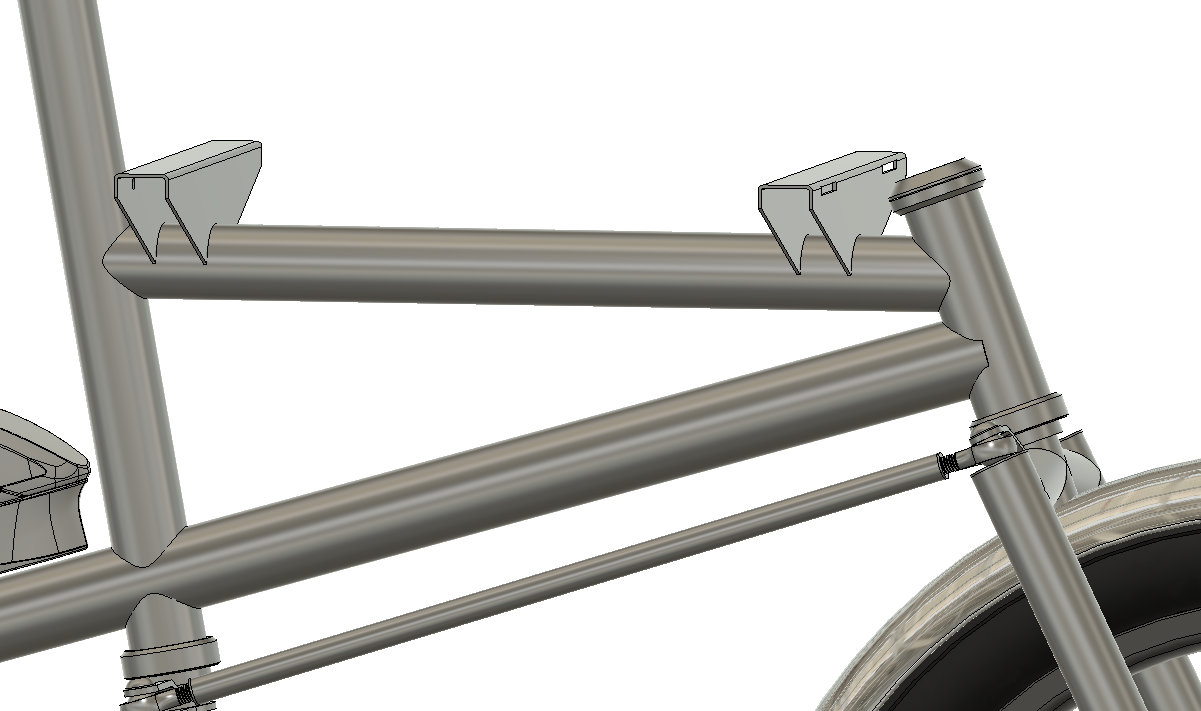
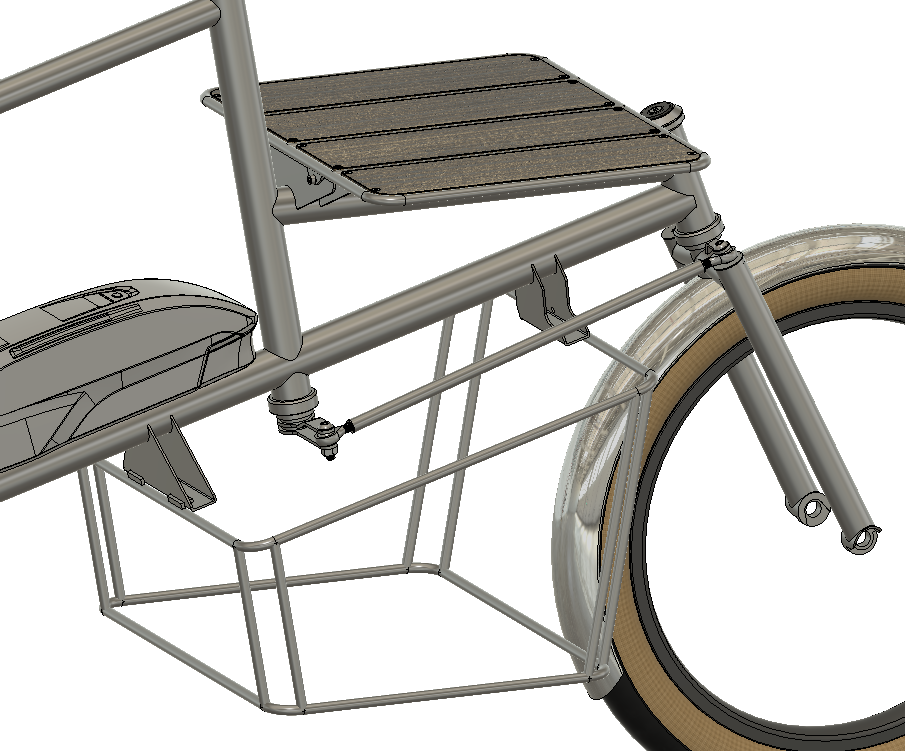
I was able to put the CAD file for the motor cabinet into place, and now I can more confidently make adjustments to the BB area and downtube and battery positioning. I decided to position the motor in a way that keeps the downtube attached to a (mostly) flat surface of the motor cabinet for easier fit up. This also helps there be more room for the battery on the downtube without changing the handlebar head tube. This places the battery a little higher, but it also makes more room for the lower storage basket. I think that’s a reasonable trade-off.
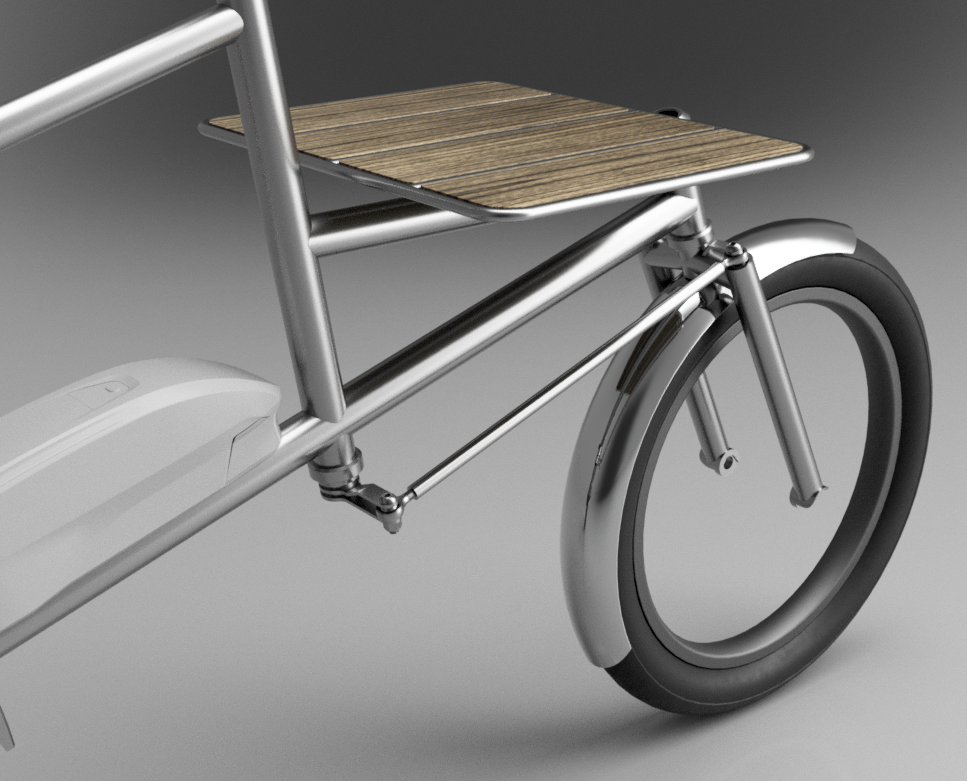
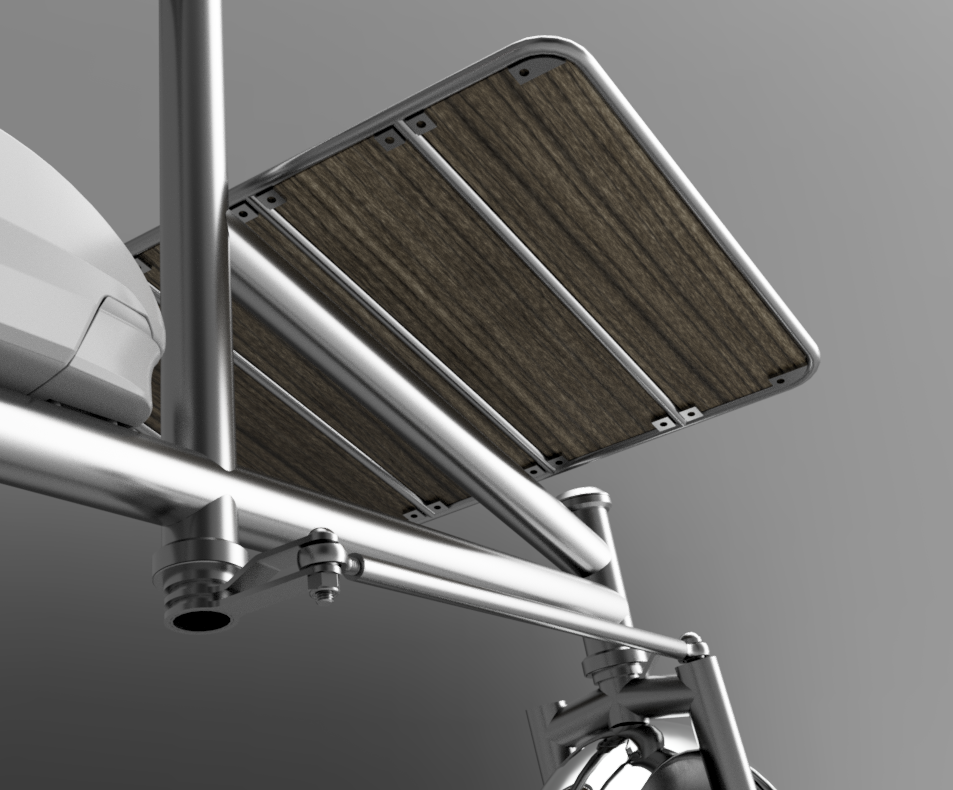
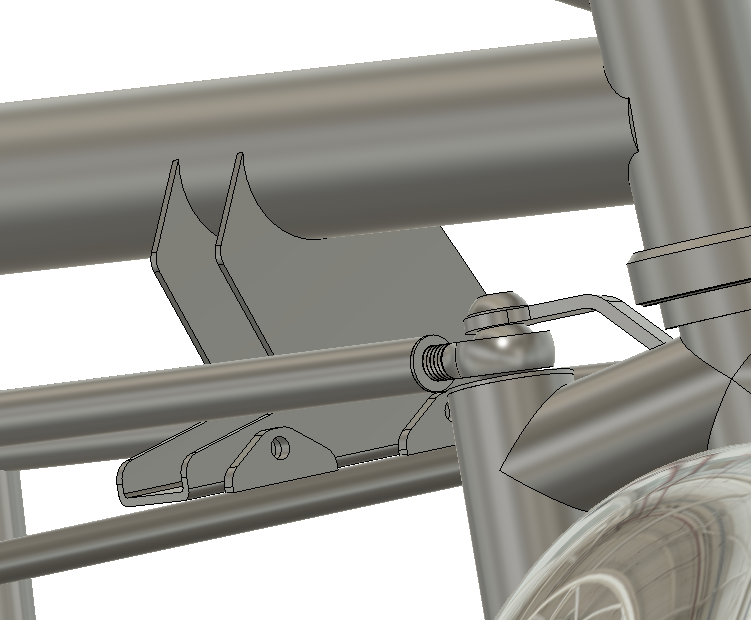
I also spent a little bit of time with the rack attachment. My idea is to have some tabs that slide into some slots, then the other end of the rack can pivot down to be bolted in with 2 bolts. This seems pretty modular to me and I think that I can design other attachments that would work the same way.
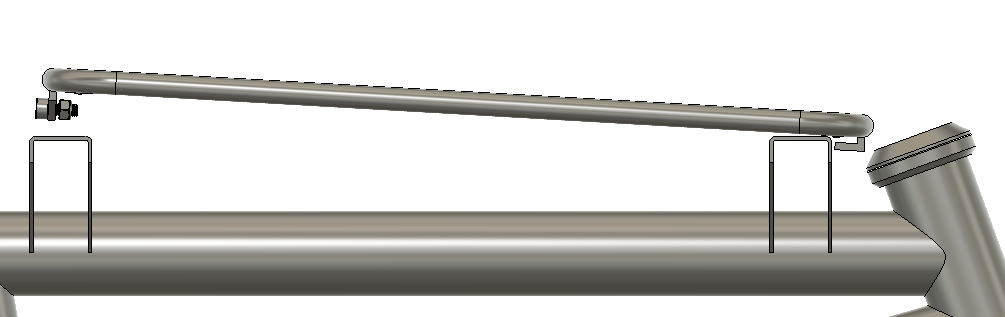
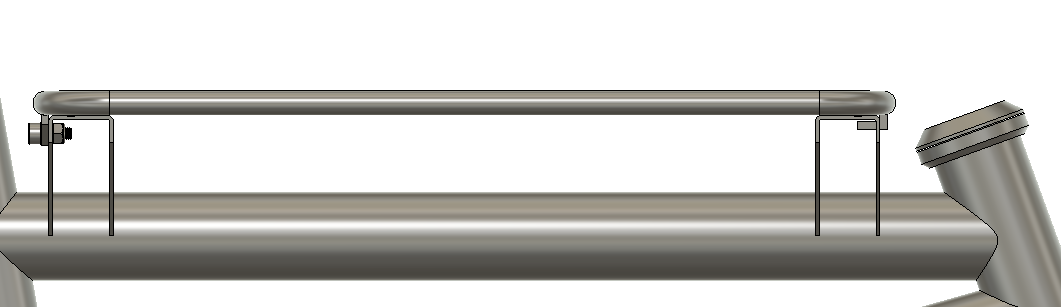
To make the supports, I plan on getting some rectangular steel tubing. The width and height don’t really matter all that much. It’s just easier than trying to design and cut and bend something out of flat sheet.
I think I can use a similar system just upside down for the lower basket. The support brackets might be a little weird shaped to clear the linkage steering, but I’ll try to figure that out next.
4 Likes
I found that the front bracket for the lower basked doesn’t have to be as weirdly shaped as I thought. though after thinking through this, I am probably going to redesign how the lower basket attaches to the frame. It seems like a lot of weight on the tabs in the slots.
Not really much of an update, but I started the design for the basket. I have realized how basket and rack design is an art. I’m trying to figure out how best to make a basket that is sturdy but light and not impossible to build.
Any recommendations?
My current plan is to use 3/8" tubing for the main pieces of the basket and then fill in the rest of the big holes with whatever thin rod I can find at the hardware store. what wall thickness do people use for racks and baskets.
1 Like
3/8 .035 chromoly would be a good choice. Strong enough to withstand the weight and it will take the daily abuse of a cargo bike. I’ve used stainless hydraulic tubing but I find that it’s soft and not conducive to a bike that gets hammered around town.
1 Like
You’ll want tubing that can withstand plenty of knocks, especially the top rails of the bottom basket.
2 Likes
lunch break render
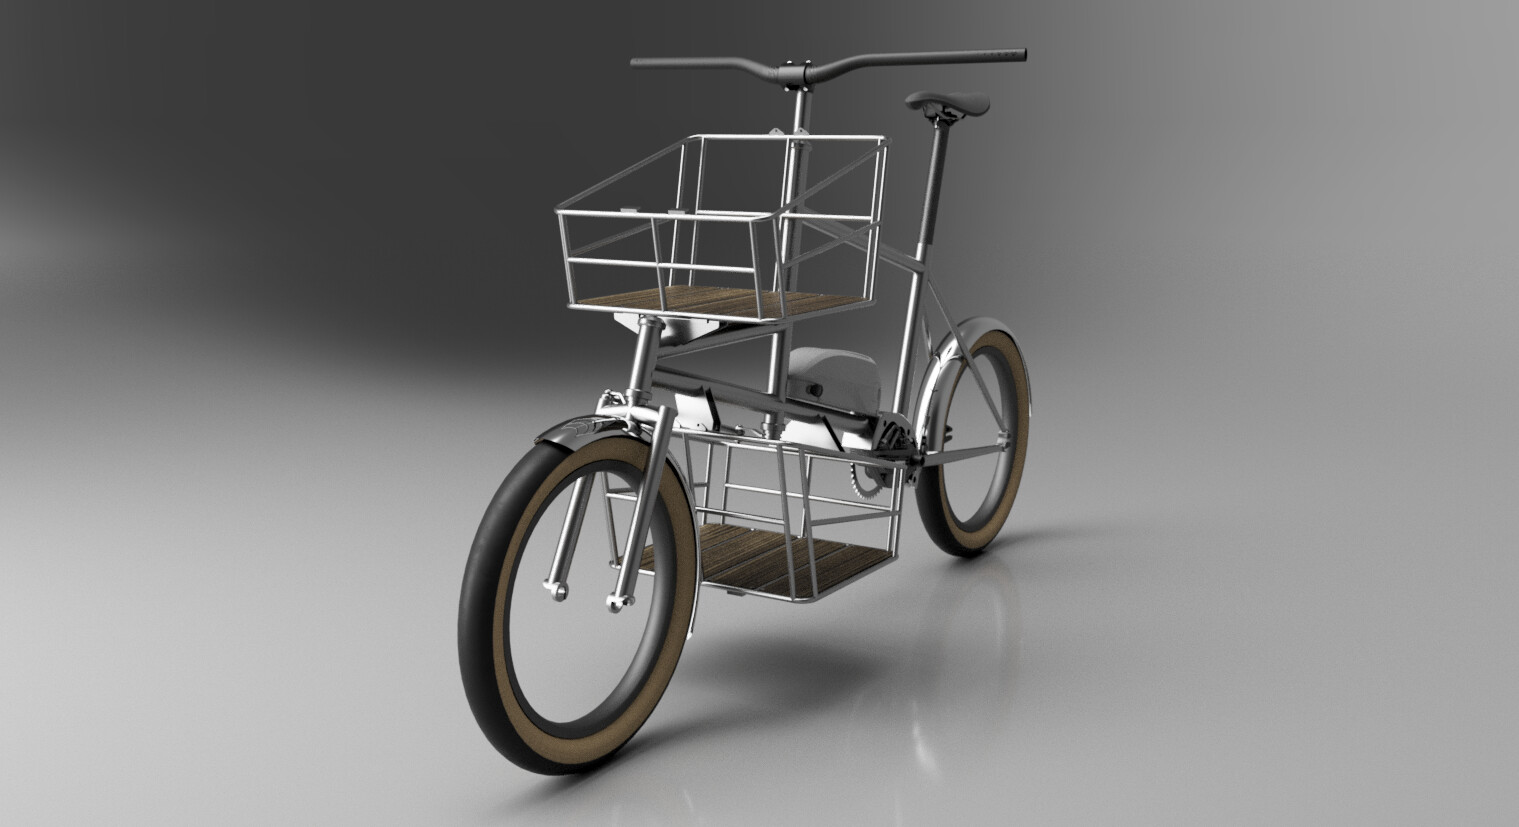
I took a few shortcuts to making the baskets. They are identical to each other so they have both mounts on top and bottom. (I was a little lazy) But it looks like they will fit how I expect them to.
It seems like everyone has different opinions on how much side braces to include in the basket. It’s good to stop things from falling out of the basket, but too many supports add weight. I may sew up some custom bags, but I also don’t want to be forced into always using bags. I welcome any feedback (engineering or aesthetic)
3 Likes
Dang this thing is looking cool. I’m jealous already!
If it were my job to design the baskets, I’d think about what I would regularly put in them that wouldn’t be in a bag. For a grocery-getter this makes me think bulk beverage containers (spindrift/beer box, etc) and bulk paper products. I’d gather some nominal dimensions and construct my minimal set of braces to ensure that those items can’t just slide out of the baskets while riding. I’d also try to construct the inside dimensions of the basket such that those items fit nicely inside with minimal room around them. That way I wouldn’t have to carry around a ton of voile straps for everything.
As a professional designer you probably already know about this, but I think Erik Nohlin’s trick for building models and rendering them while still in the design stage is pretty cool.
2 Likes
Thanks! I hope that I can actually build this. I don’t have the budget to build this bike at the moment (Hopefully this winter I’ll be able to work on it) so I’ll just spend my time working things out in CAD.
Thats some solid advice. I had actually considered inserting a 3D CAD model of a gallon milk jug and other grocery items to see how it all fits. I didn’t think of beer boxes or other weird shaped items. I think a 12 oz can should be put on that list as well. There is no harm in taking my time at this stage. I think now that I have the geometry settled, I’m more inclined to add more details to the 3D drawing. I had tried to keep it simple so that it was easy to rebuild as I made changes. Since I have no experience in mini Velo or cargo bikes, I have made a lot of changes up to this point.
I have a few really cool renders of work bikes complete with fenders, small front rack, dynamo, gears, chain etc. but since the bike is still in the prototype phase, I can’t show you. But I also agree that is a very useful trick. Time consuming for sure, but really helps. Maybe I’ll make that a goal for this bike. A fully built bike render.
1 Like
Love this design of bike, and hope to build something similar for grocery trips sometime ‘soon’. ![]()
I’m sure you’re ahead of this, but while you’re doing that packaging excersise, double check you can load the bigger things in/out of the lower basket.
Ideally you’ll want the heavier stuff lower, and heavier is often bigger - it’d be frustrating to design around a beer box or milk jug which fits in but won’t go in past the basket frame / steering linkage, for example…
(For context, I work in automotive design, and have seen several times some really neat crash helmet storage behind the seats in supercar early design phases, which on closer inspection you can’t actually feed a helmet into… ![]() )
)
4 Likes
Yeah, haha. I almost got in trouble at work for designing a prototype that you had to compress the shock to install it. Thankfully, you can install the shock with the reservoir to the rear but not to the front. I learned my lesson on checking to make sure that things not only fit but they can be installed.
For this grocery bike, you can easily fit 2 milk gallons in the bottom basket towards the front.
Yeah “soon” is a relative term. lol
That sounds really fun. Tell me more.
Cool - sounds like you’re on the case! ![]()
Yeah “soon” is a relative term. lol
Definitely! It’ll get built for sure, but maybe after an MTB and a couple of road bikes… ![]()
That sounds really fun. Tell me more.
I’ve spent my career bouncing back and forth between Lotus and McLaren, working in the design studios turning the designer’s ideas into digital surface models. Kinda cool, but building bikes is way more fun!
I decided to take a quick tangent due to some suggestions From Peter Verdone about ground clearance. Figure it’s best to know that sooner than later. I had thought slightly about it but he suggested modeling up a curb to go up or down. So, I’ve done a quick curb and speed bump in 2D. They are both 6 inches tall.
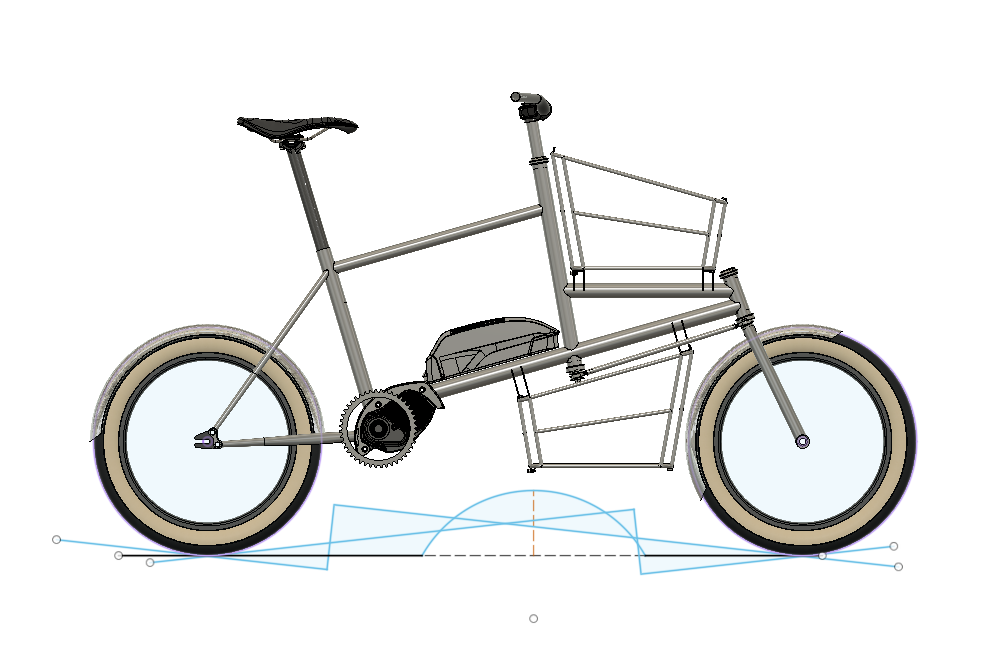
I think that’ll be enough room.He also suggested testing with 15-20 degree tilt in case you hit a bump while turning. I don’t know how I’ll do that just yet, but I’m sure I’ll figure something out.
I didn’t have a ton of time, so this is only a quick update.
4 Likes