I’m contemplating a wood bike frame build. I understand that most of you will be working in metal, but I think there is a lot of overlap and I hope to learn from you all.
There are a lot of people out there building wood bikes, usually by building in two halves, hollowing out the center and then gluing the sides together. Often, the dropouts, and any bearing interfaces are made with metal inserts which can better handle the forces needed to hold headsets, bottom brackets, seat posts, brake calipers, and hubs.
I believe I have the woodworking expertise to figure out the wood portion, but am struggling to source a good dropout solution. I would prefer not to have something custom machined, but as most frame building suppliers are counting on their parts being welded or brazed rather than epoxied and bolted to wood, it is difficult to find good solutions.
If anyone has helpful suggestions, I would love to hear them!
What sort of dropouts are you trying to build around? If you want to start simple, I think you can easily laser-cut some track dropouts and bolt/bond them to a wooden frame.
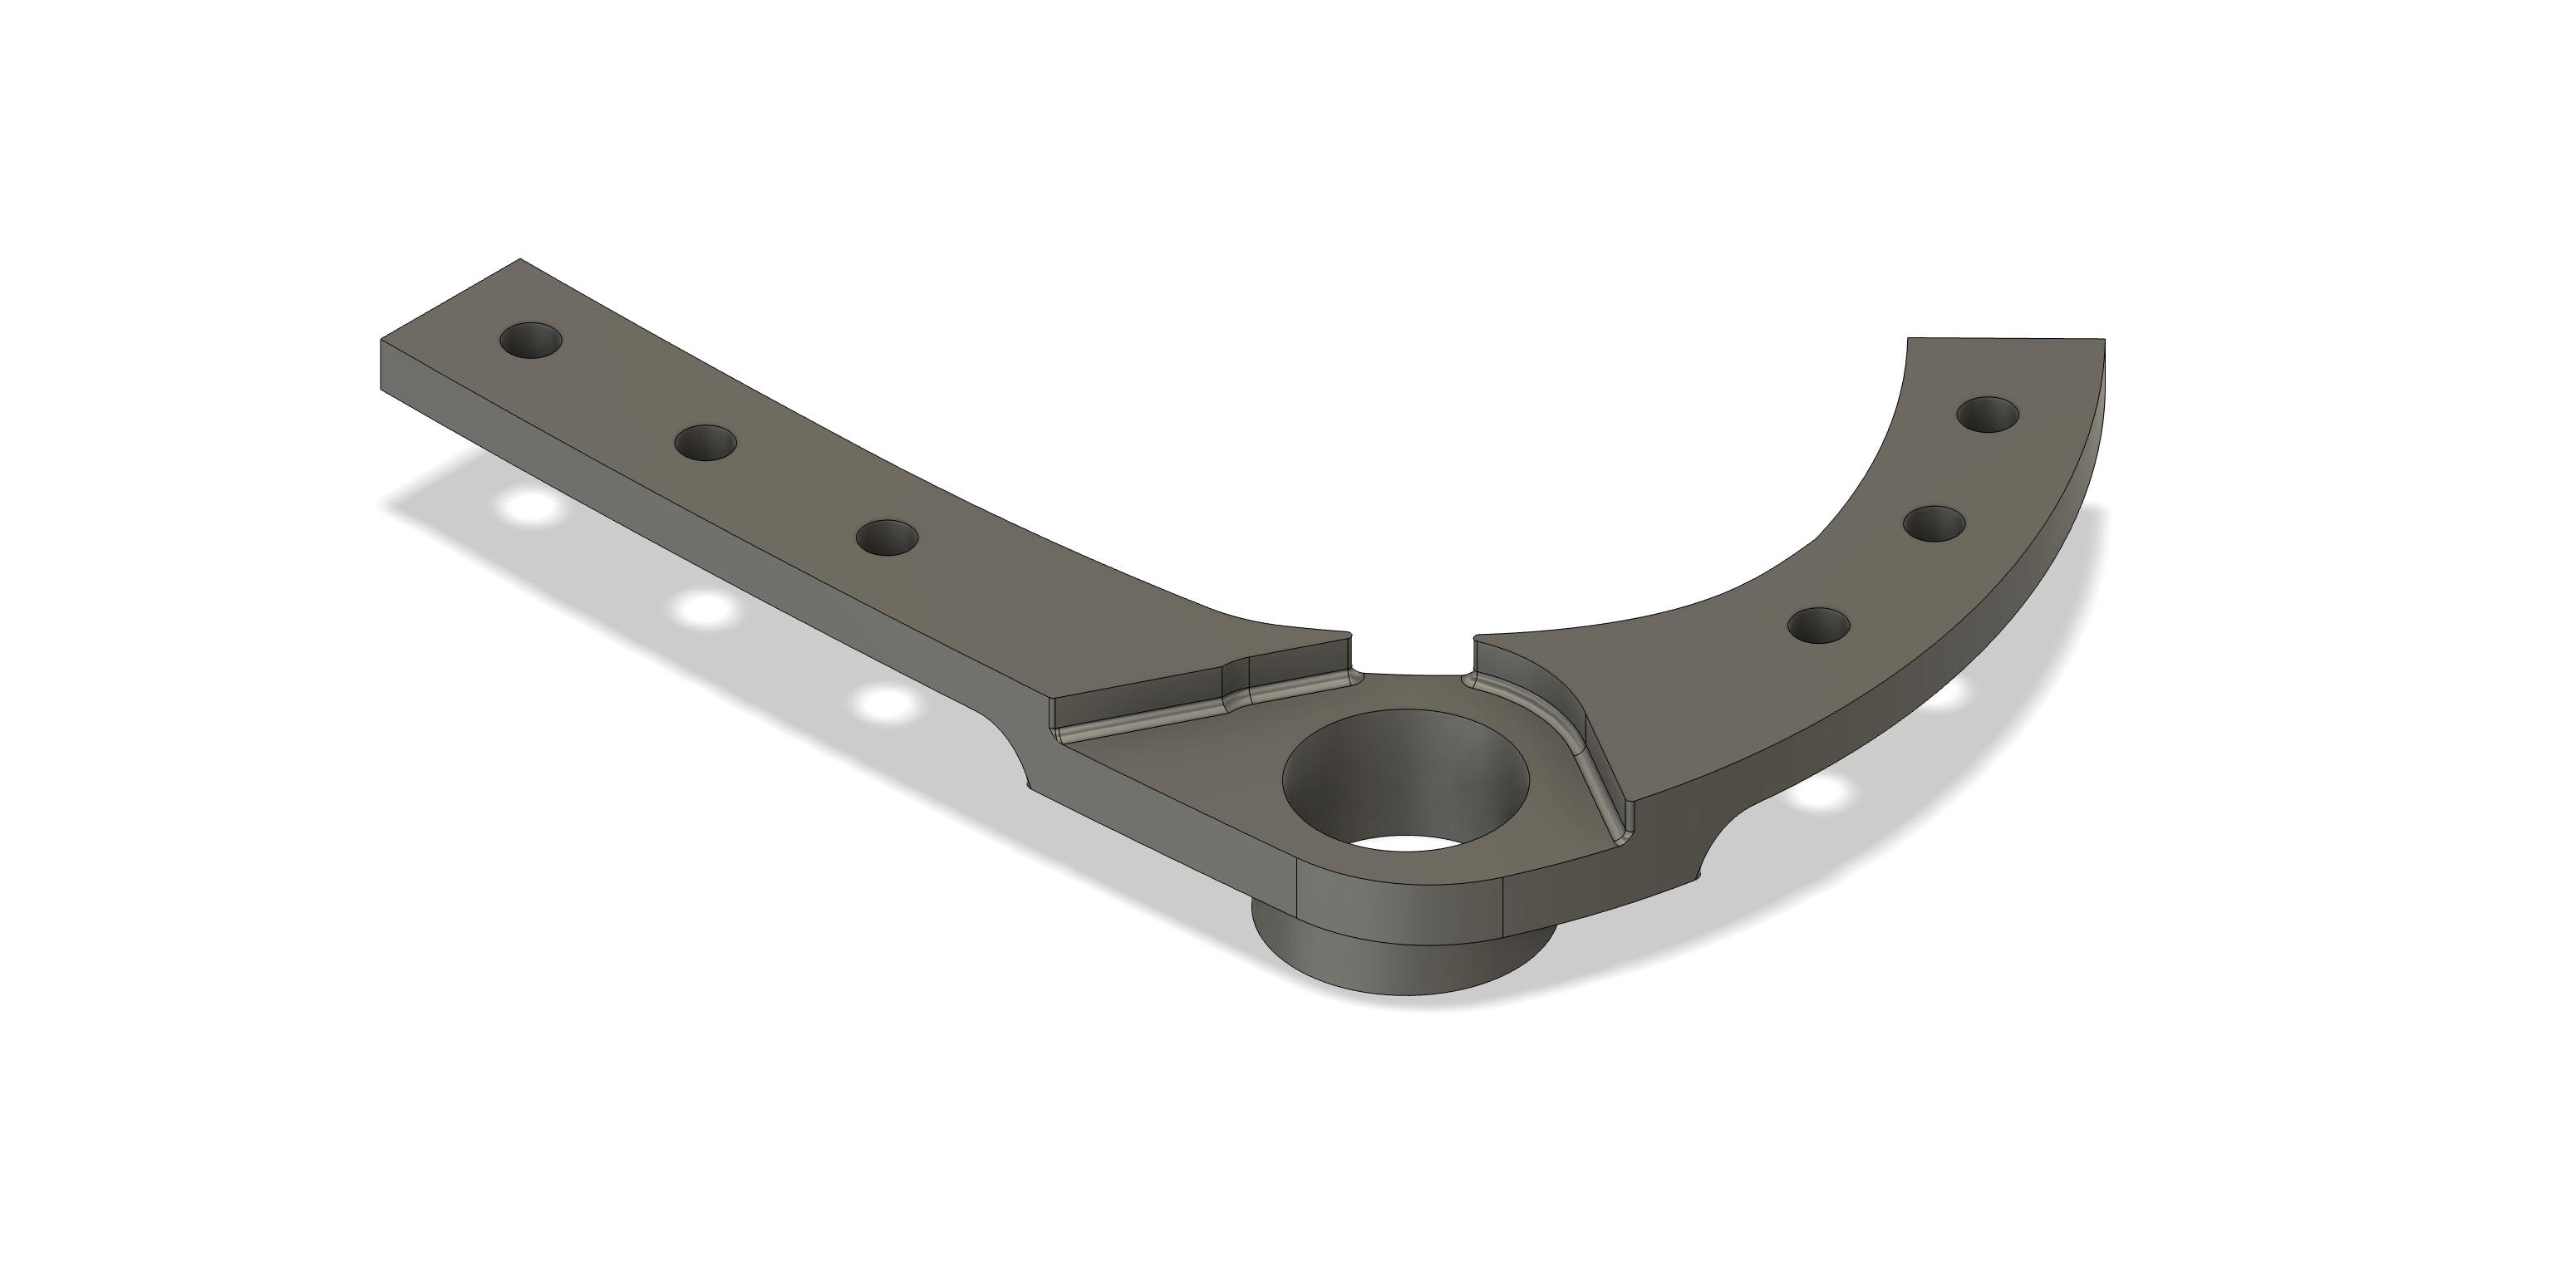
I’ve seen a lot of solutions like these and I may have to resort to something like it. Quite a few builders have used rocker or sliding versions as sen in your picture, but to my eye they seem large. I was hoping for something more elegant that I could nearly completely embed in wood, but that seems to require much more complex machining. I played around yesterday with sketching new parts based off of Paragon Machine Works flat mount UDH dropouts, borrowing heavily from their part but creating longer mounting tabs that could be drilled out for a bolt on interface. Not sure what it would cost to have them cut. I’m also not sure how they would feel about me essentially cutting and pasting their intellectual property. I’ll try to post a pic later when I get back to my computer.
What are the considerations when choosing a bottom bracket shell?
The build is a gravel-style frame trying to maximize tire width while still using road-style cranks, perhaps in the newer wide standard.
I am leaning toward using T47 but am stuck on how wide I can get away with. They are commonly available in 68, 73, 83, 86.5, 92.5mm widths. Are there any of these I should rule out automatically? Are there advantages to going wider or narrower? On a typical wood frame design, the chainstays will attach to the bottom bracket area by being continuous all the way forward through the BB shell area, with a bore for the BB shell to pass through. This creates the largest possible bonding surface between the stays and the shell region. This means that the stays are approaching the BB junction perpendicular to the crank spindle.
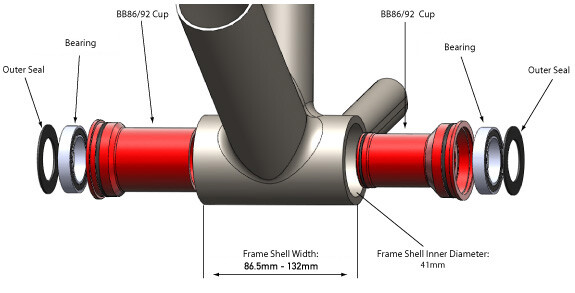
BSA BB shells for road/gravel bikes are 68mm with external bearings. Carbon bikes needed more space on the BB, so they invented the BB86 (86mm wide pressfit) bottom bracket which moves the bearings inside the shell.
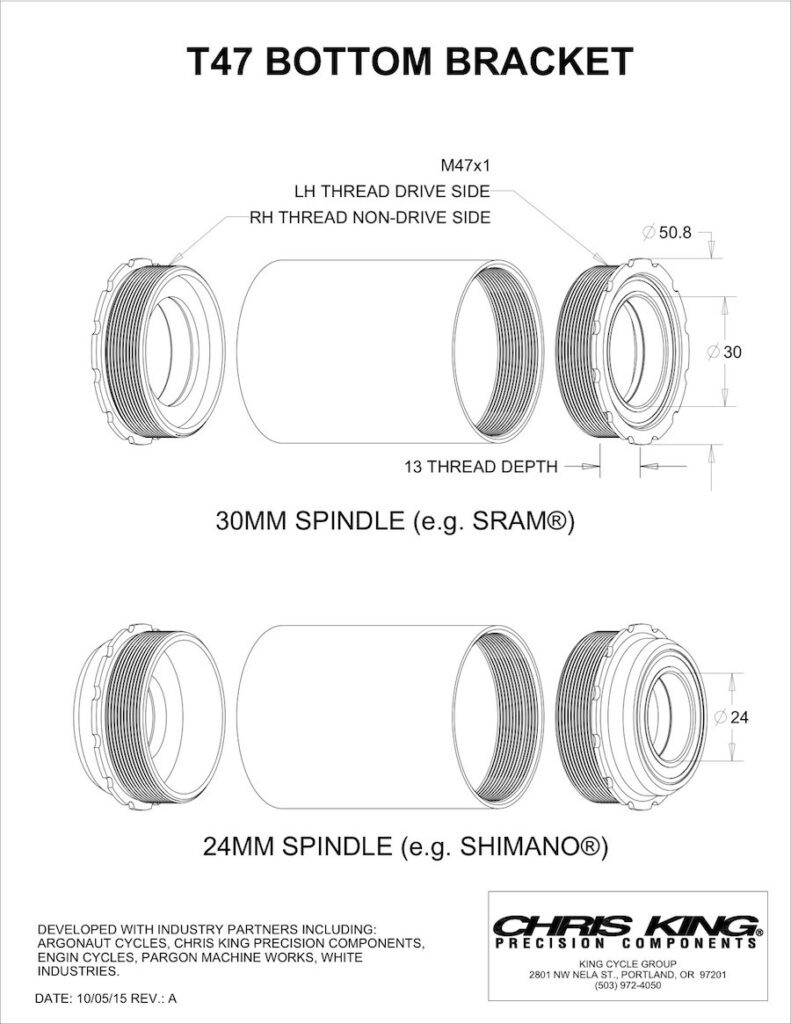
T47 came along, and you have two options, external (68mm wide) and internal bearings (85.5mm wide). The industry also decided to make T47 85.5mm wide to make the wrench splines thicker:
From an engineering standpoint, I think BB86 would be the best standard for your bike. The BB shell is wide and only 1.5in diameter. This gives you the most flexibility to build around the BB shell. However, no one believes in this standard except for Canyon!
Thank you. All very useful info. I love your chainline chart. It put a lot of info I’d been looking for into one place. Your comments on BBs make a lot of sense. I wasn’t sure if the 85.5 would even work for gravel frames, so I appreciate hearing it is a solid option. I may pick up a T47 shell and add the texture manually for bonding purposes.
I agree on the gravel 1x. Both of my other bikes are 1x already (CX and MTB), and I rarely miss a double in the front except on spirited group road rides. I’m hoping that defining these clearance points will help define the curves. I don’t have access to many bikes to measure from, so these numbers are very helpful.
True. Especially if running a chain catcher. Still, I’ve managed it without a chain catcher in a bumpy CX race. My chain was a couple links too long though, and after shortening it to the proper length, I never had another problem with it.
I was going t make a wooden tandem, partly to get around setting up for welding and having trouble sourcing tubing (I live in Beijing, China)
I have made a few dozen steel frames. I have over a decade experience in professional cabinet shops, along with some boatbuilding. I currently build guitars, basses, and ukeleles, both acoustic and electric. So, I think a wooden bike frame is a reasonable project for me to take on.
Here are some of my thoughts:
I don’t like the usual dropout solutions, either. I think a laminated wooden dropout of katalox, bloodwood, or something similar would work fine, especially for a through-axle. Put a threaded insert in for the axle, and some thin stainless washers on the inside faces. Compare a very hard epoxy laminated plywood to aluminum or carbon fiber, and I don’t think there would be a problem. It would also make it easier to bond the stays to the drops.
Make laminated bent chainstays.
The usual BB solution, in my opinion, does NOT give more glueing area for the chainstays. That big hole for the BB gives ZERO glue area.
I was going to make square tubes, with a hardwood outer layer, and maybe some balsa inside. The BB could then be made by laminating pieces that extended into the tubes, where needed as plugs, i.e. internal lugs.
I’m a horribly slow typist, so I’ll stop here. If you want more of my ramblings, let me know.
BTY, I’m working on my jig. I will be building with stainless steel for my tandem.
I see what you did with your name there! In college I studied in Beijing for a semester. Unfortunately, I retained almost non of the Mandarin I learned. I would love to go back some day.
I’ve been thinking about your comment for a few days now. Thanks for a great reply.
I do think you might be onto some good ideas. Do you think a multi-directional lamination of dense woods would provide enough strength at the dropouts to handle the forces experienced there? Maybe using three layers at 60 degrees? Most derailleur hangers will incorporate the threaded engagement point for a thru axle. I suppose that the wood on the drive side could be machined to take a UDH dropout which clamps itself to the frame and wouldn’t require any secondary mounting strategies as seen in some other hanger solutions. As for mounting the laminated dropout piece to the stays: both the laminations for the stays and the laminations in the dropouts could be done at the same thicknesses and finger joint together to create a large glueing surface. A simple lap joint may also be sufficient. Are you aware of any issues glueing up super dense/oily woods? Would an epoxy be the best way to achieve a good bond?
What are your thoughts on doing the same for creating the mount for flat mount disc brakes? Would making that out of wood be strong enough? A simpler option might be to bolt on a metal ISO mount, but I find flat mount to be more elegant if it can be incorporated/hidden in the chainstay.
I had the same idea to make bent lamination stays. A lot of others are doing the same and it is the strongest solution as it leaves continuous fibers along the length rather than creating shorter grain sections that go from one side to the other across a bend. I know some have added carbon fiber layers in their laminations. I’m not sure I want to go that far, but the idea is intriguing.
For attaching the chainstays to the BB junction, I think that creating an oversized BB area that extends behind the BB shell can create a larger glueing surface. Also, having fairly tall chainstays that flare above and below the BB shell should help. I like your idea of internal lugs for the connection as well. It would need to be executed as a fairly short lug as the stay needs to thin out a lot in order to make enough room for tire and chainring clearances.
My plans for the front triangle is to laminate the entire thing, creating overlapping laminations where the tubes join together. As these are not bent laminations, they do not need to be overly thin. I will build it in two halves, routing out large portions of the center of each tube to lessen the weight, leaving enough to keep the strength up, especially around junctions. The two halves will then be glued (epoxied) together. I’ll use metal BB shell, head tube insert, and seat tube insert.
Again, thank you for your insights. I appreciate any feedback you may have on this post. And good luck with the tandem build!