Looks nice, you could consider the fixshock (if shipping makes sense)mounting hardware to compensate for the misalignment. https://dhsign.it/en/17-fixshox-family
1 Like
I’ve got an update and question for the peanut gallery.
The bike has not broken, and rides great. There is an odd knocking sound on choppy high speed bumps I haven’t managed to diagnose. I’m reasonably certain it’s just chain slap at this point.
Odd question - under heavy breaking on high grip pavement, I get some violent shuddering on the rear wheel. I think it MIGHT be the rear tire snagging on the chainstays. Admittedly the chainstay to tire clearance is much tighter than I’d like, and I see some evidence of rubbing. I dont think I can feel or hear it during normal riding.
Do you think it’s possible the heavy breaking load twists the rear end in such a way that the tire tread is snagging on 1 side of the chainstay? Is that a thing?
No comment on the chainstay rubbing.
Maybe check your rear rim and the underside of your trailing crank. On my current MTB I get an insane amount of chain slap and it flicks and marks both my rim and the underside of my cranks on the trailing foot. Both are significantly worn, you can see the links on the crank!
1 Like
Looking at the design, both sides of the rear triangle are quite individual. If you would have a regular shock instead of the trunnion, the shock pivot would do better job of interlocking the different sides.
Usually there is some connection piece under the shock between the “shock stays”.
Do you have MAX bearings? On my first bike I had issues with the integrity of the rear triangle, and swapping to regular SKS bearings helped a lot!
Spoke tension has effect too…
@nikomi good questions.
Pivot Bearings: I am not using bearings branded as ‘max’. I am using these linked below. I ended up with that product because it was the only 1/2” ID bearing available from RWC. I am using an oldschool Santa Cruz Heckler pivot axel+hardware, and needed a bearing to match. Do these look OK to you?
Fun fact- Santa Cruz sold/sent me the WRONG bearings twice. I gave up on them and found the correct size myself at RWC.
Trunnion shock: I went with trunnion for the shorter length. It just helped me fit 2 water bottles and + place the shock at the angle I wanted to kinematics. That said, I think you are CORRECT. A standard eyelet could give more stiffness connecting the 2 sides of swingarm. Note the 2 sides are connected with a chainstay yoke bridge, but I am thinking of adding a second brace on the ‘shock stays’ or trying to squeeze something in on the seatstays. As you point out, most single pivots have a second brace somewhere connecting to the 2 halves.
Rear wheel: My rear wheel is pretty flexible, and that is not helping. I may need to check spoke tension. Good idea.
1 Like
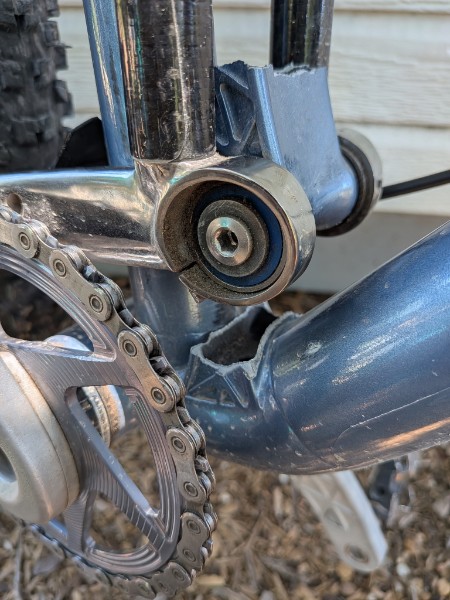
I broke it!
i figure I should share my failure. It broke right across the main pivot '“pylon” on the front triangle. This was a 3D printed Aluminum Lug.
Why did it break?
1) No FEA used - The structure that broke was not designed strong enough. The material quality and construction method was OK. The design was bad. I didnt use FEA to check this part of the design because I didn’t have access to an FEA tool for this homebrew project!
2) Late design change - I made a dumb late change to the design. I added a hole for internal cable routing. I didn’t sufficiently reinforce the area where I added the hole in the printed design. It looks like the failure initiated right across this hole. I never even used this hole for cables! I ran the brake fully external.
3) Insufficient fatigue strength - The alloy and manufacturing process I selected (printed AlSi10Mg, heat treated to SR2) doesn’t have very good fatigue life. So, if you use it close to yield… its gonna break after awhile. I’d put in a couple of hundred miles into this frame with hard bottom outs and real use. It broke from a small hop off a 2ft rock. Fatigue killed it. If I had opted for a different heat treatment it may not have broke, or at least may have lasted longer!
6 Likes
Bummer! Thanks for sharing the data though.
2 Likes
Bummer but a good learning experience.
2 Likes
Hi Hank,
sorry for your loss 
But on the other hand, we will likely see another awsome build from you now 
-Thom
2 Likes
Thanks. I’m going to wait a beat, but I may be able to print front triangle in 1-piece here in the next year. I’ll build another frame eventually. TBH I was pretty happy with this first effort right up until it broke. lol.
1 Like
I wonder if tying the main pivot into the seat tube a little bit more would have been enough to prevent that failure? I am no expert on 3D printed aluminum, but I do wonder if the force in that area ended up pulling the part apart?
Sad to see such a beautiful bike see it’s untimely end. Hope to see a new front triangle soon.
1 Like
Bummer to see this bike fail. Thanks for sharing your experiences!
I wonder if tying the main pivot into the seat tube a little bit more would have been enough to prevent that failure?
I’m sure that would have solved it. But would also result in a bigger printed part or a shorter bonded joint, or in a weirdly notched downtube before bonding.
That being said i think just visually I think the bonded joint is longer than it needs to be.
Another solution might have been to have the shock mount as a double lap joint extending over the tubes to brace them a little better. I think the whole part would be beefy enough that the bond line wouldn’t really be loaded in peeling. Not sure.
1 Like