Thanks, Pax! I was originally looking at Oshcut before I discovered PTL. I believe PTL laser miters tubes for several different frame builders, so they’re familiar with working with thin wall 4130 tubing. The laser’s chuck needs around 6" of grip length on the tube - butted tubes may be difficult but this method is great for straight gauge tubing.
I used Weldmold 880 for all the joints, and it felt like I was welding a dirty casting. The butt joints were particularly difficult for me. I’m in awe of how clean and consistent the 3DP welds are on the Neuhaus frames. Nick has his process dialed.
I had not seen the earlier posts on you kinematics software. Great bit of work. I can’t count the hundreds of hours I have spent in Linkage moving pivots a mm at a time trying to get the curves to look the way I envision them.
Great work! I really like the use of the printed parts and laser mitering to speed up the process. Glad it’s riding well. It looks like there is very little if any fork rake. I suppose with the little wheels this results in similar trail numbers to a big wheel bike?
I want to build a similar mini cargo bike, but I am thinking of using a suspension fork (our roads here are super bombed out in some places) to compensate for the small wheels. Looks like you have some wide tires on that should smooth things out.
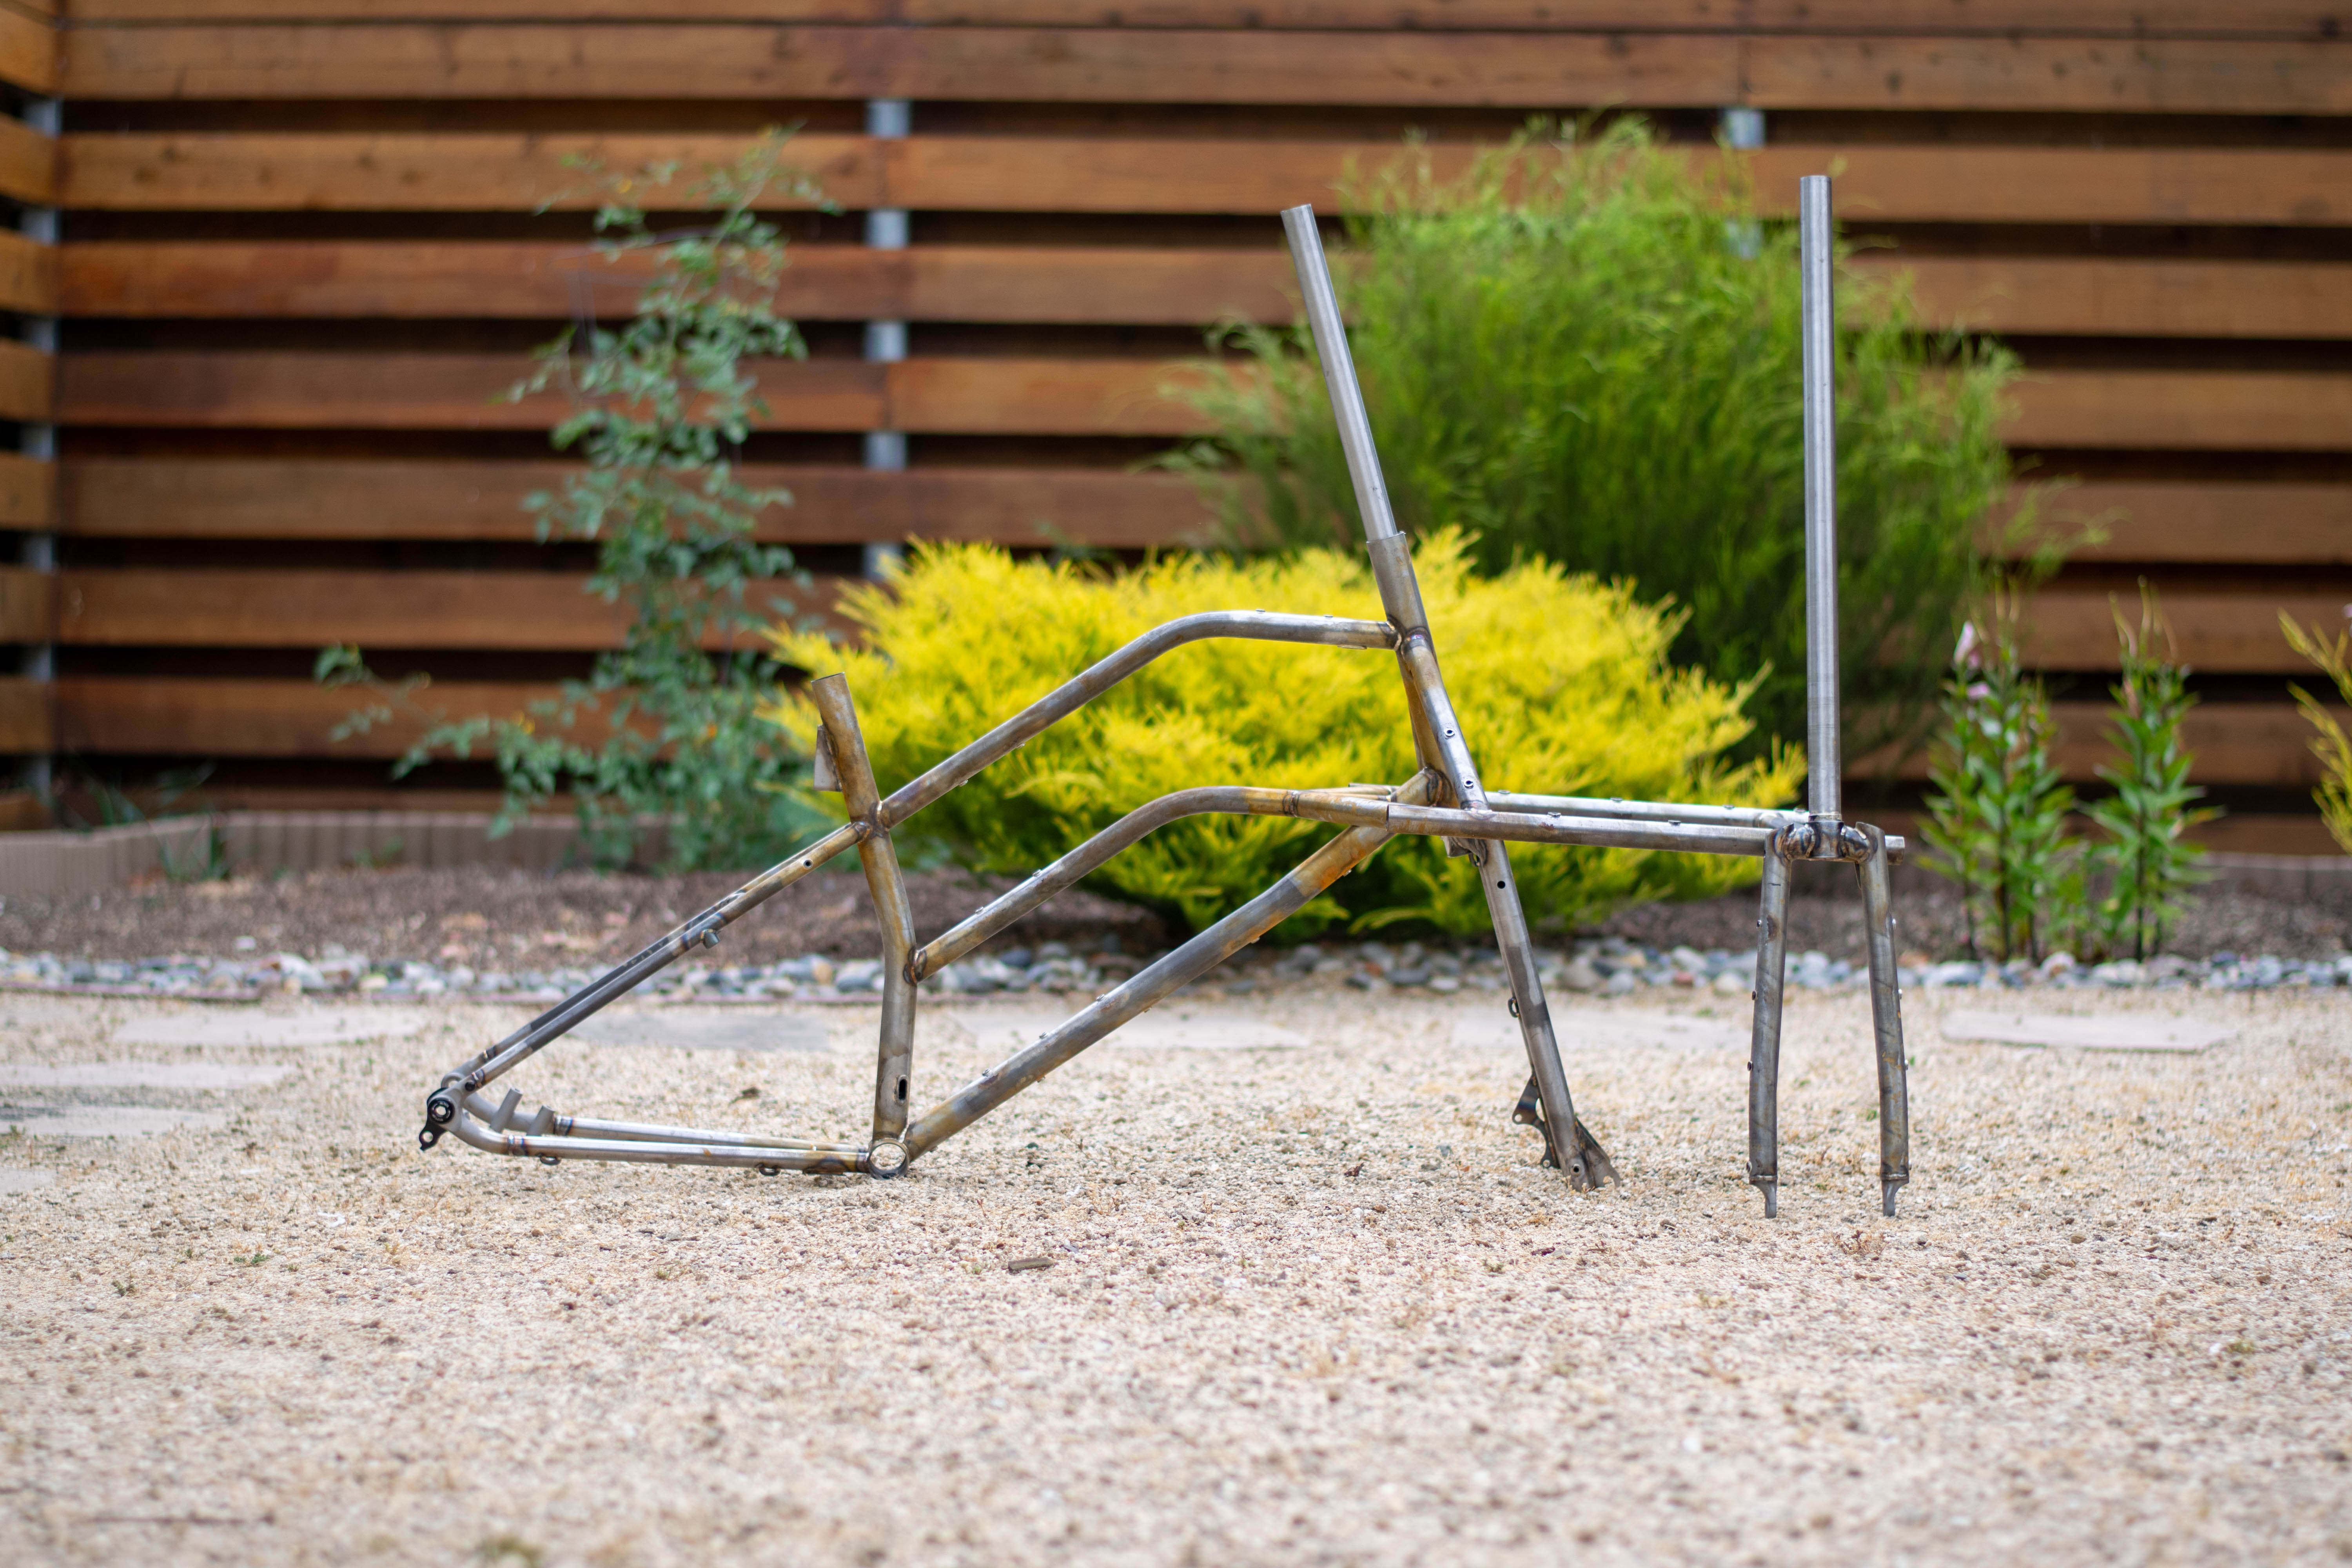
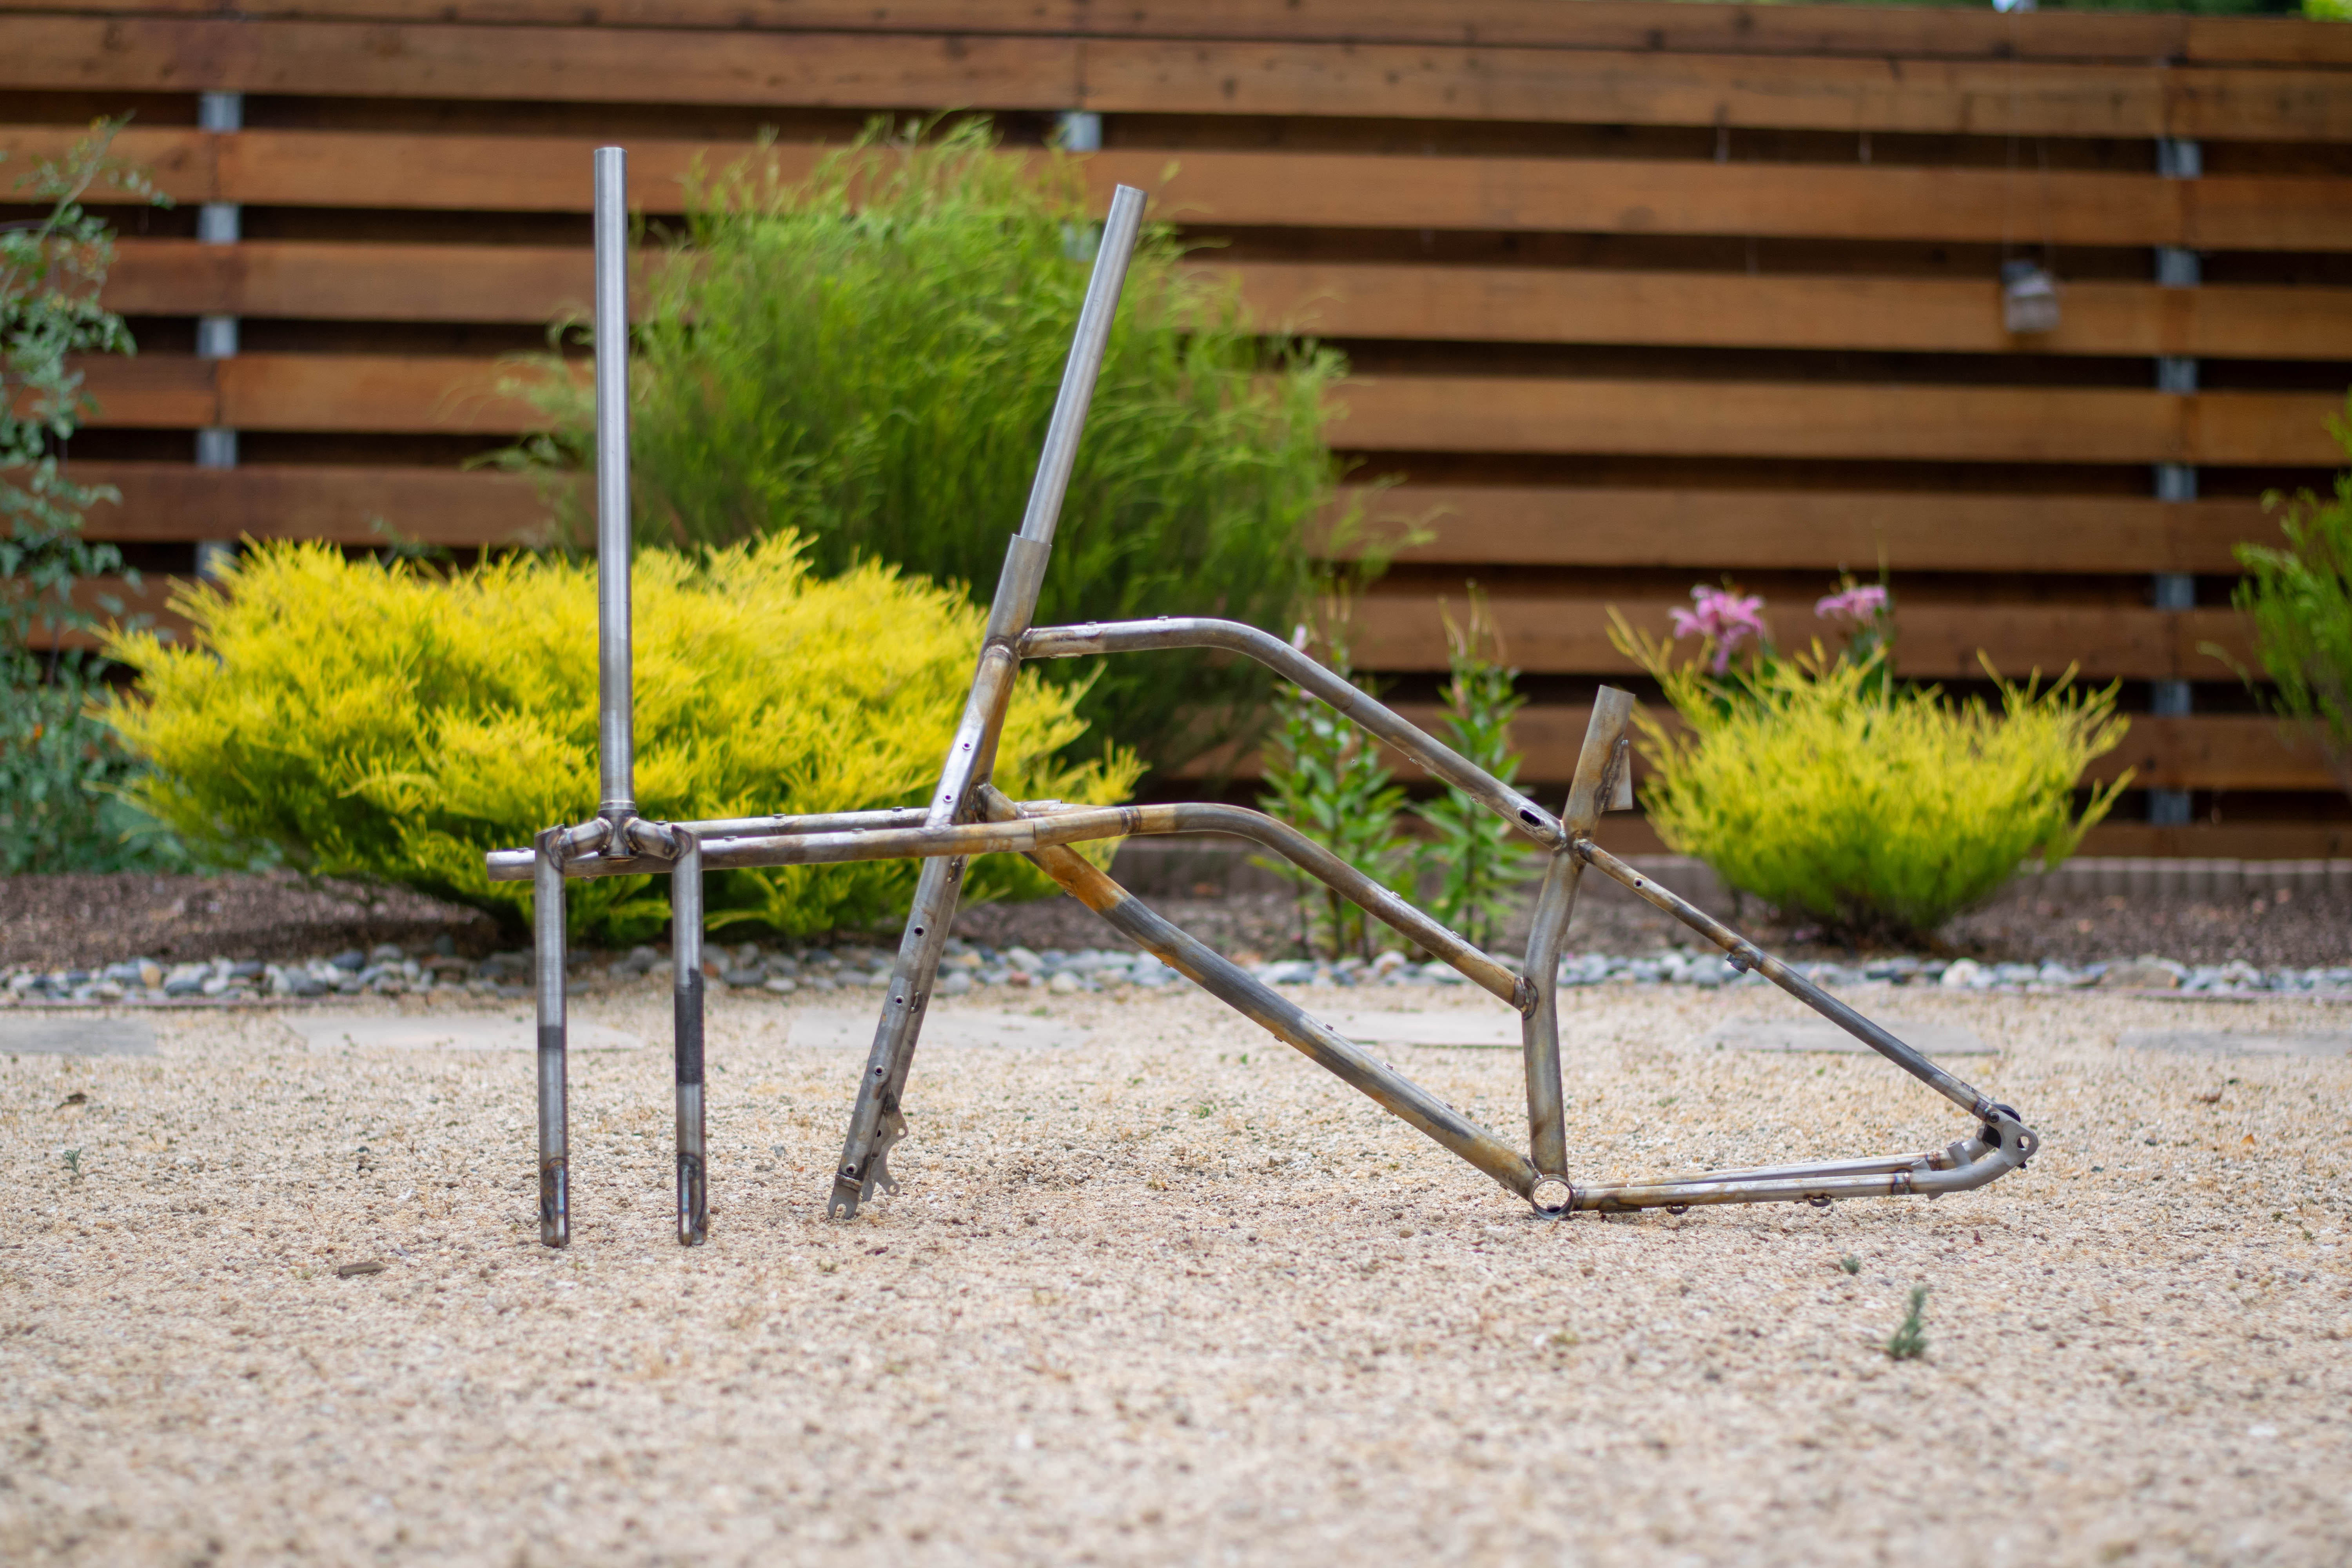
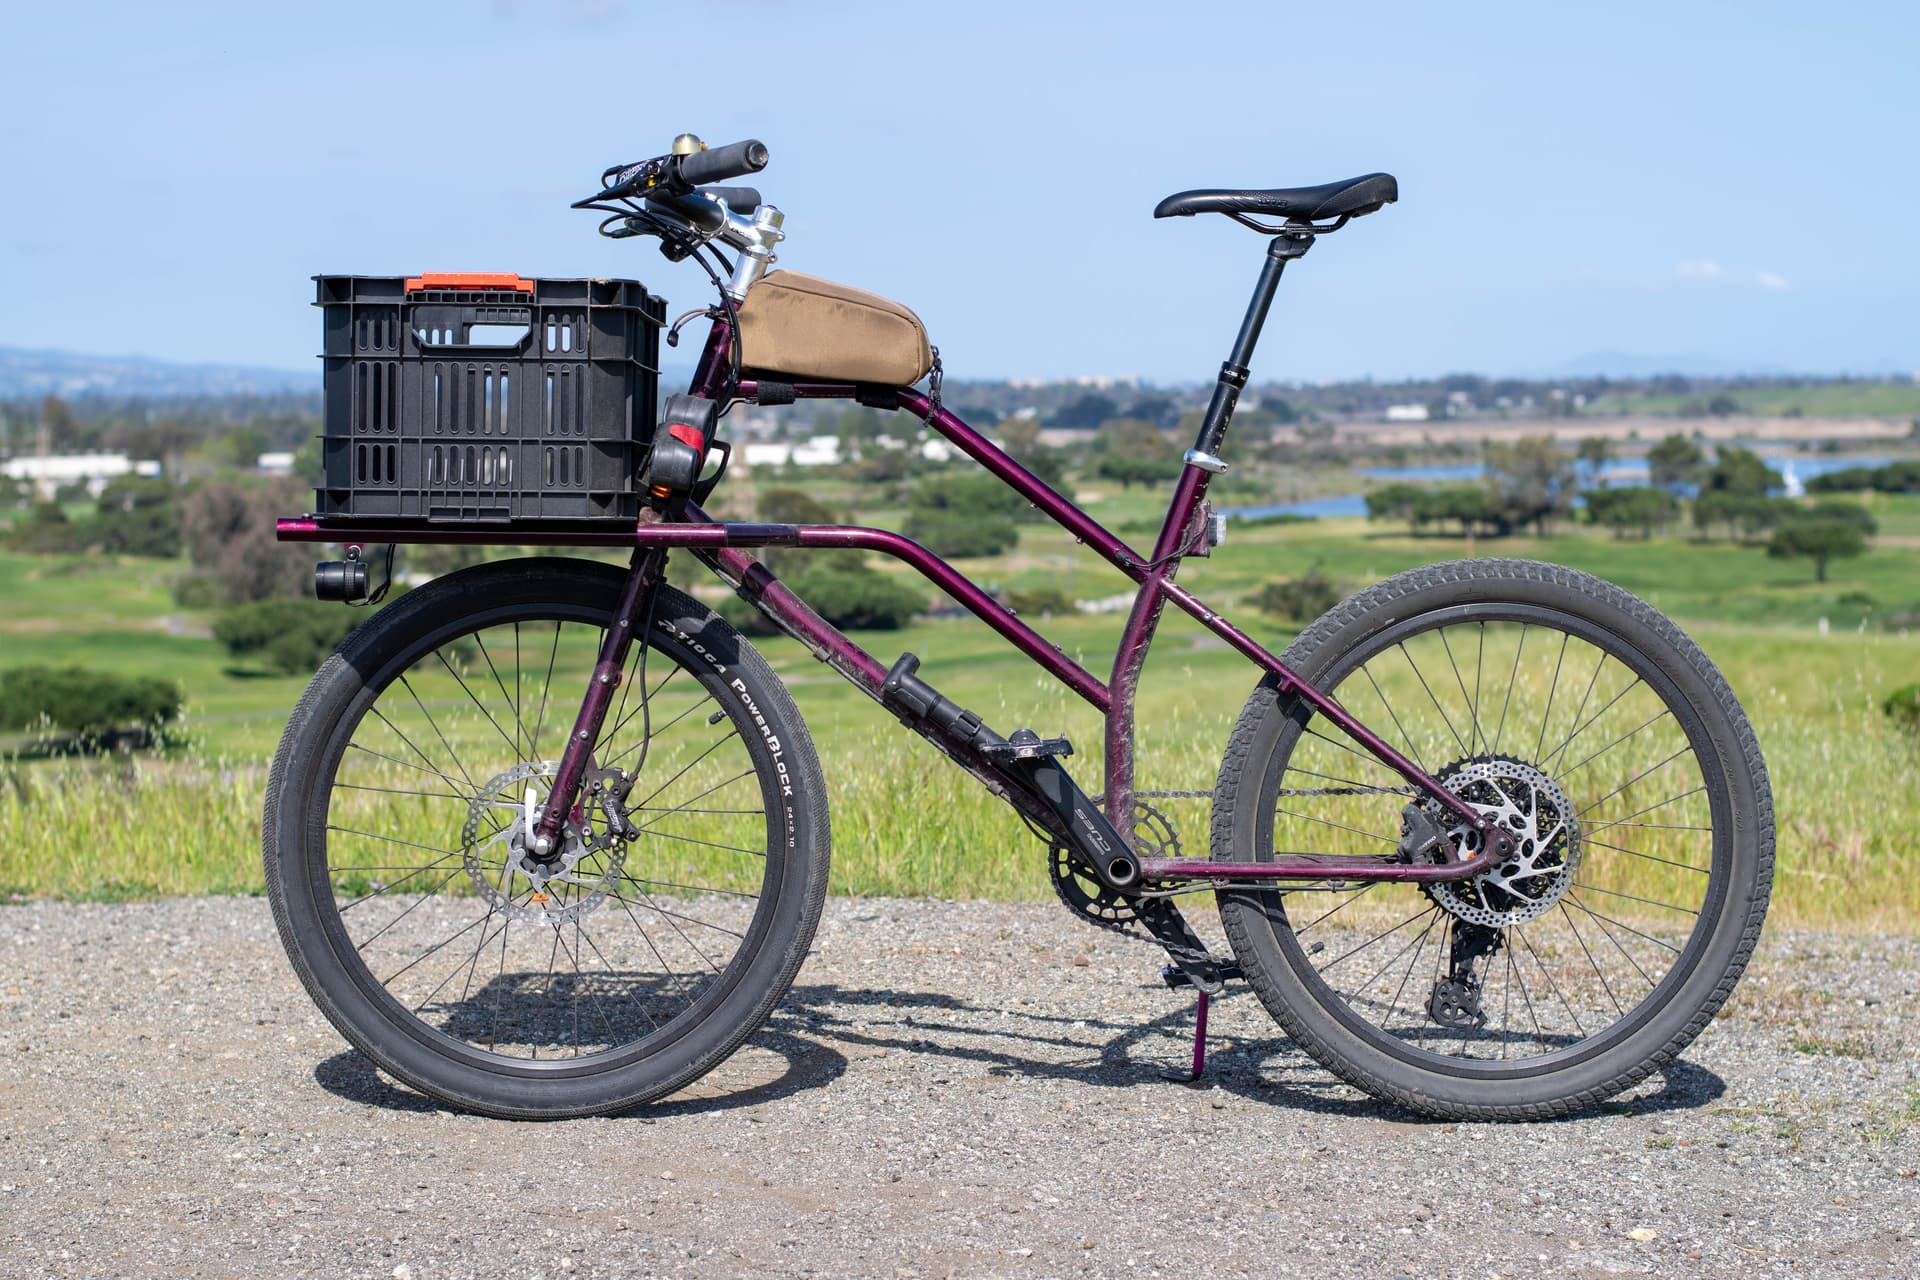
Reviving the thread! I just wrapped up a new 24" mini-velo cargo bike and will be dropping the frame off at powder coating tomorrow.
This frame is primarily an exploration/continuation of my previous 20" cargo bike. Having ridden that bike for the past few months, I’m excited to try a few new things this time around:
Larger wheel size
Integrated front/rear dynamo light mounts and internal wire routing
Bosses for Abus frame lock
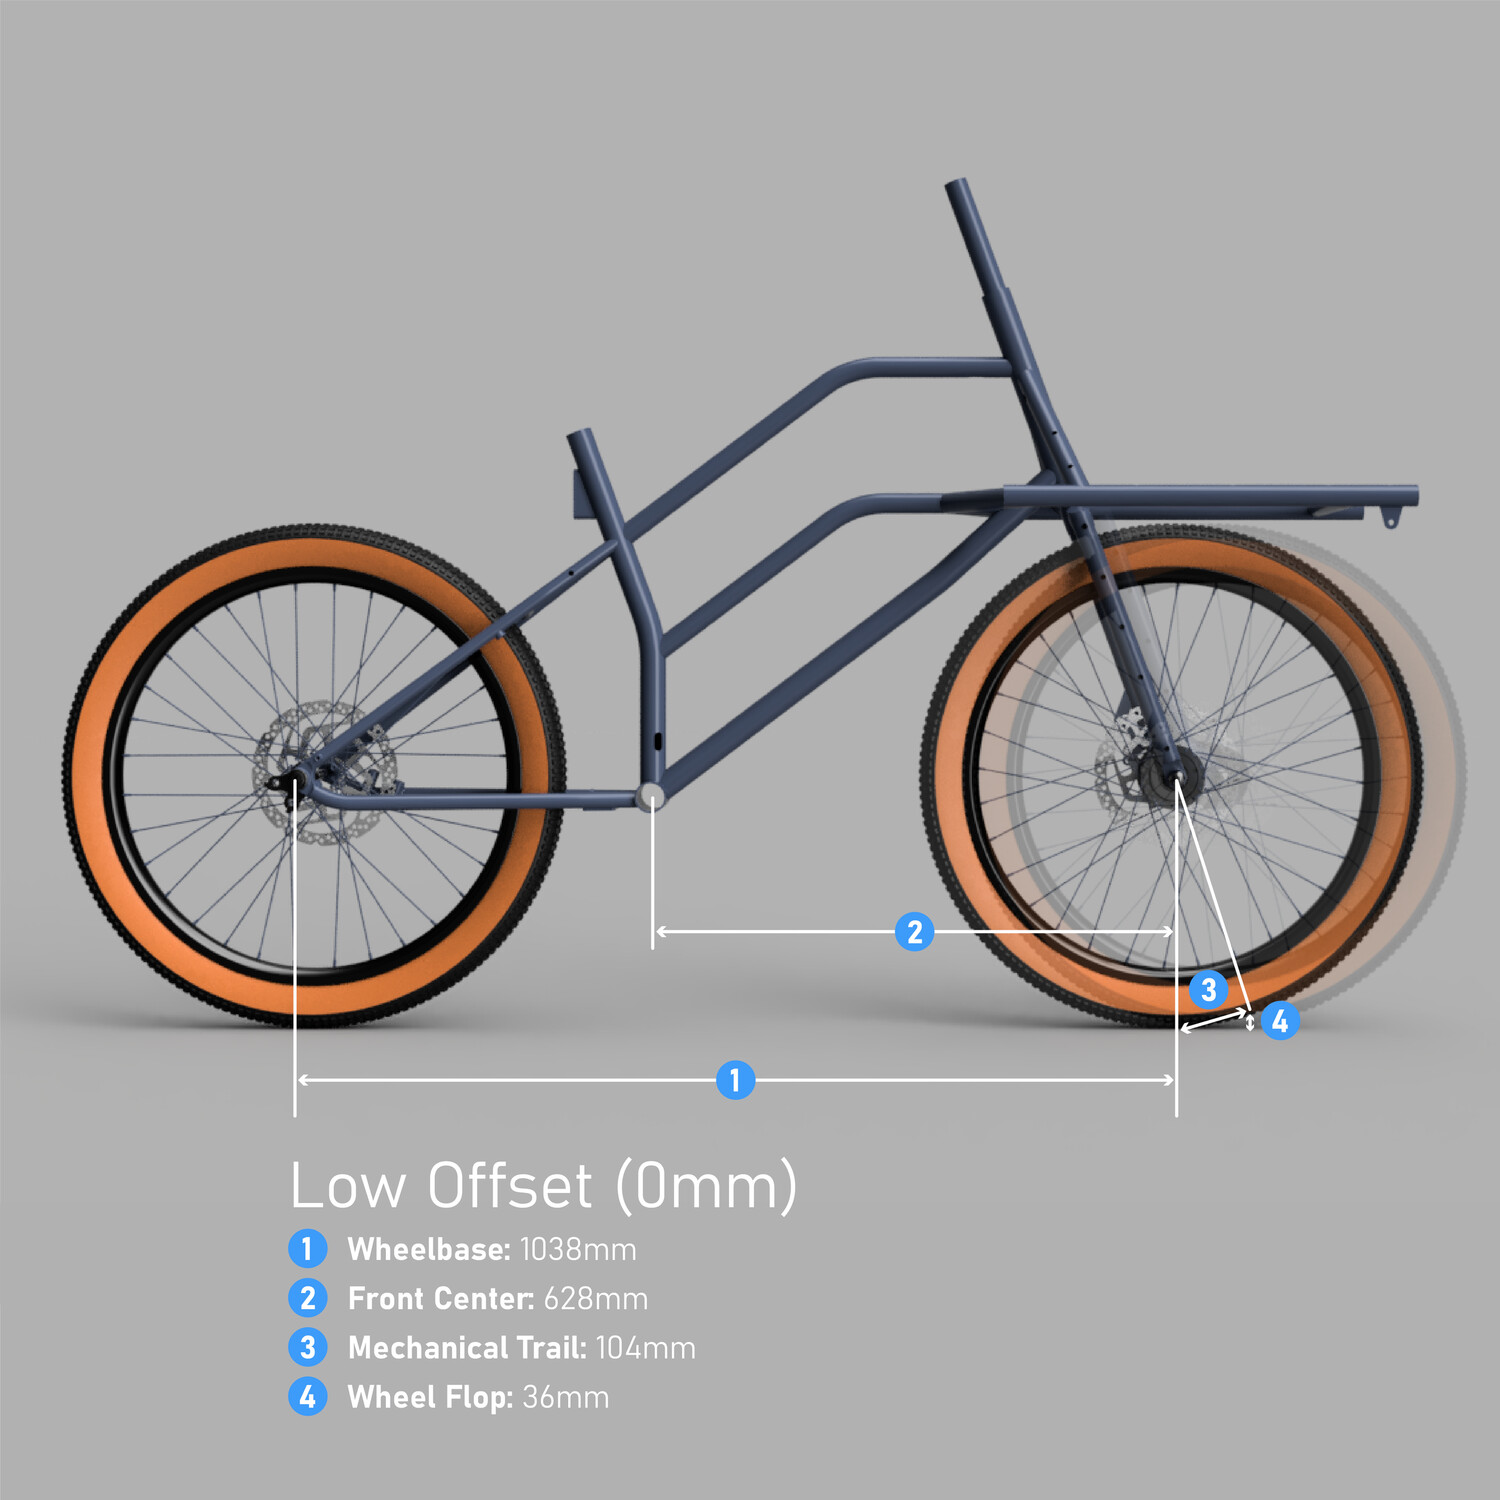
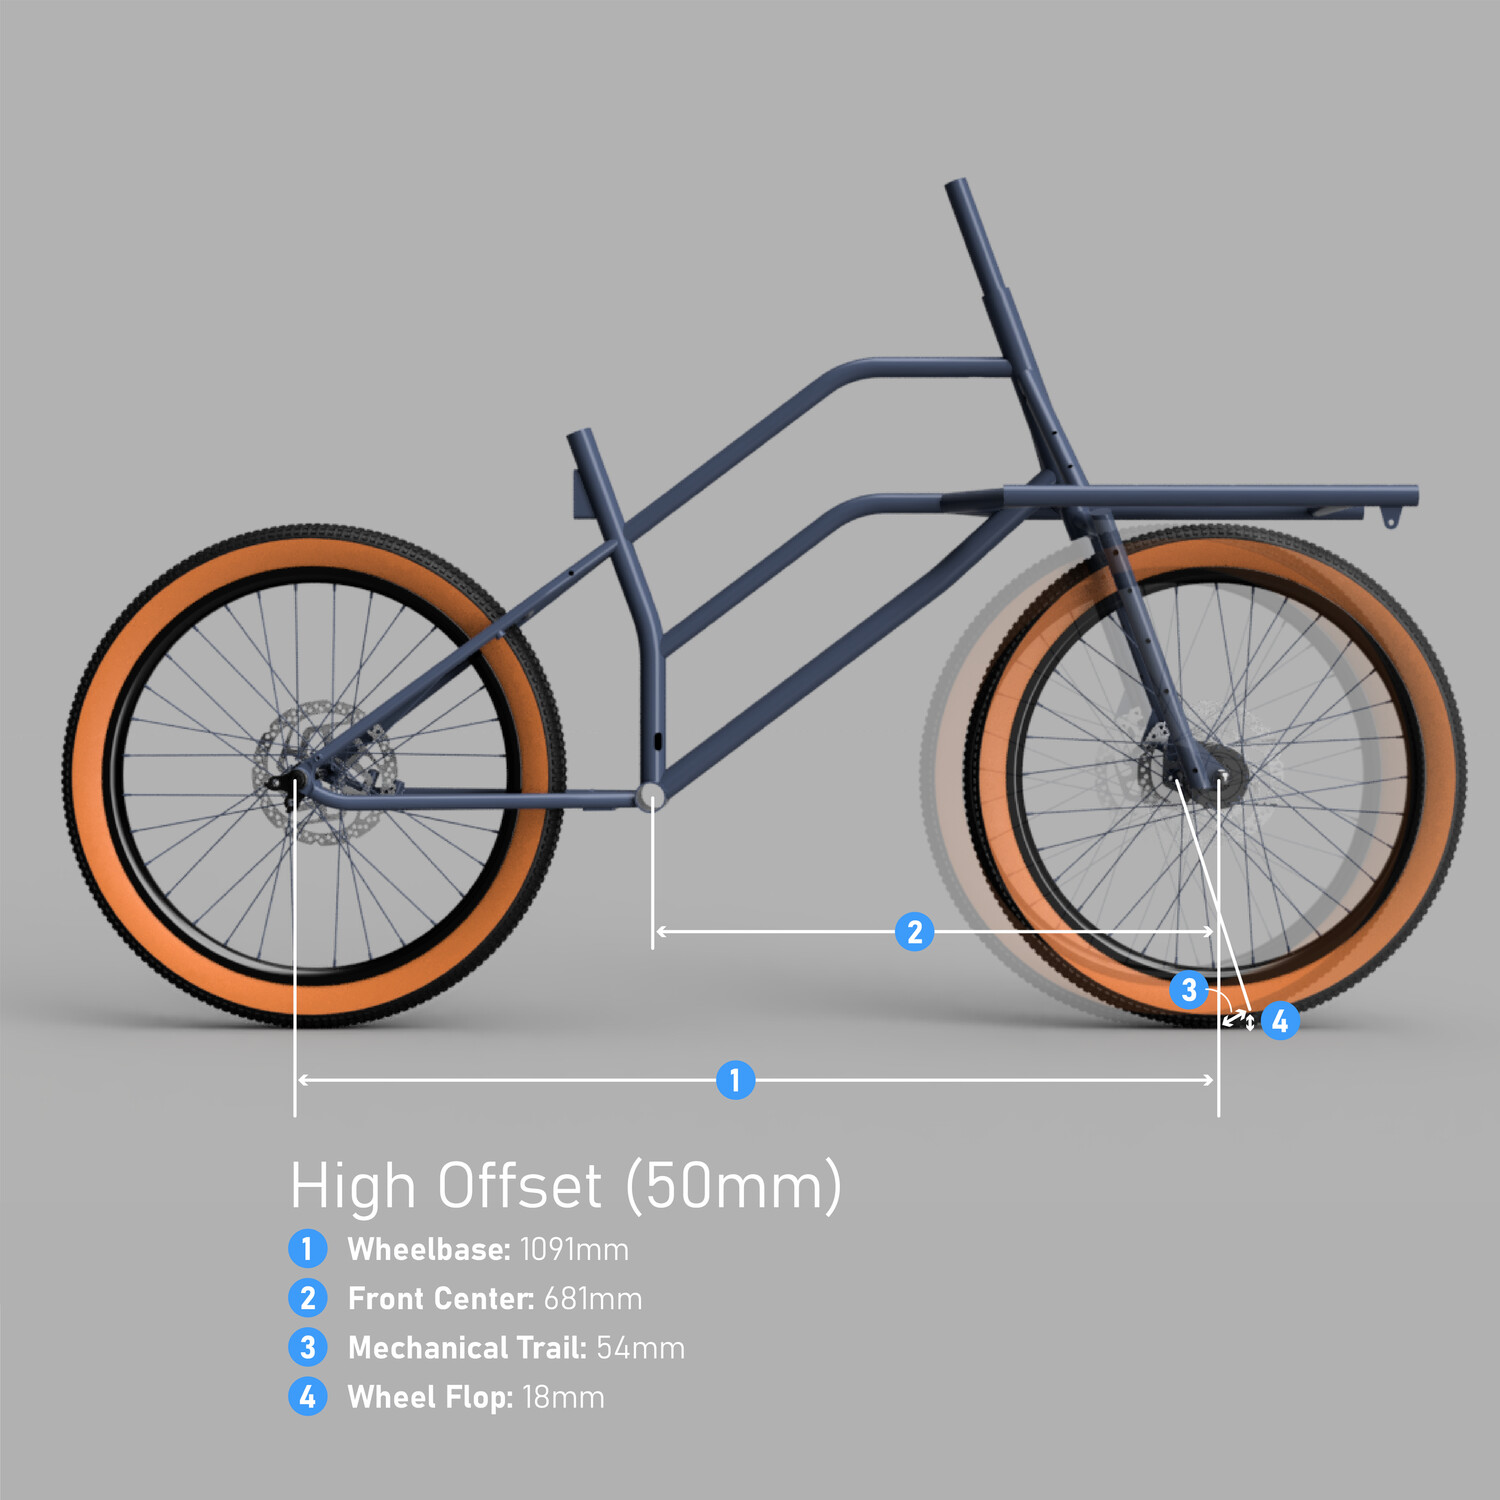
Two forks (high/low offset) to compare handling with and without loads
Steeper seat tube, dropper port, and slightly reduced reach + increased stack. My saddle is currently slammed as far forward as possible and I still find my position a little uncomfortable.
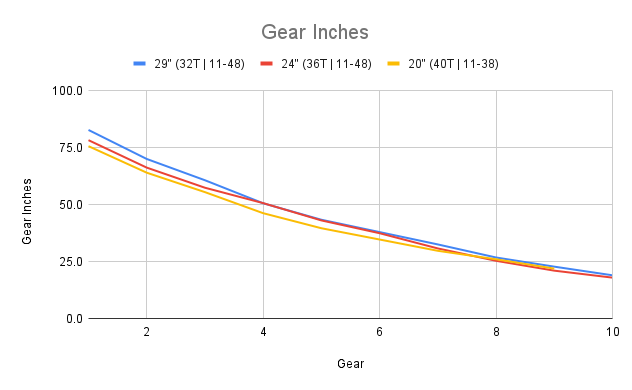
Drivetrain: I’ll be re-using a Microshift Advent X setup from another bike (11-48T cassette) with a 36T front chainring. This should give me similar effective gearing to my current 20" setup with a slightly wider range on the low end. (numbers based on 2" tires for 29/24" config and 2.4" for 20" config)
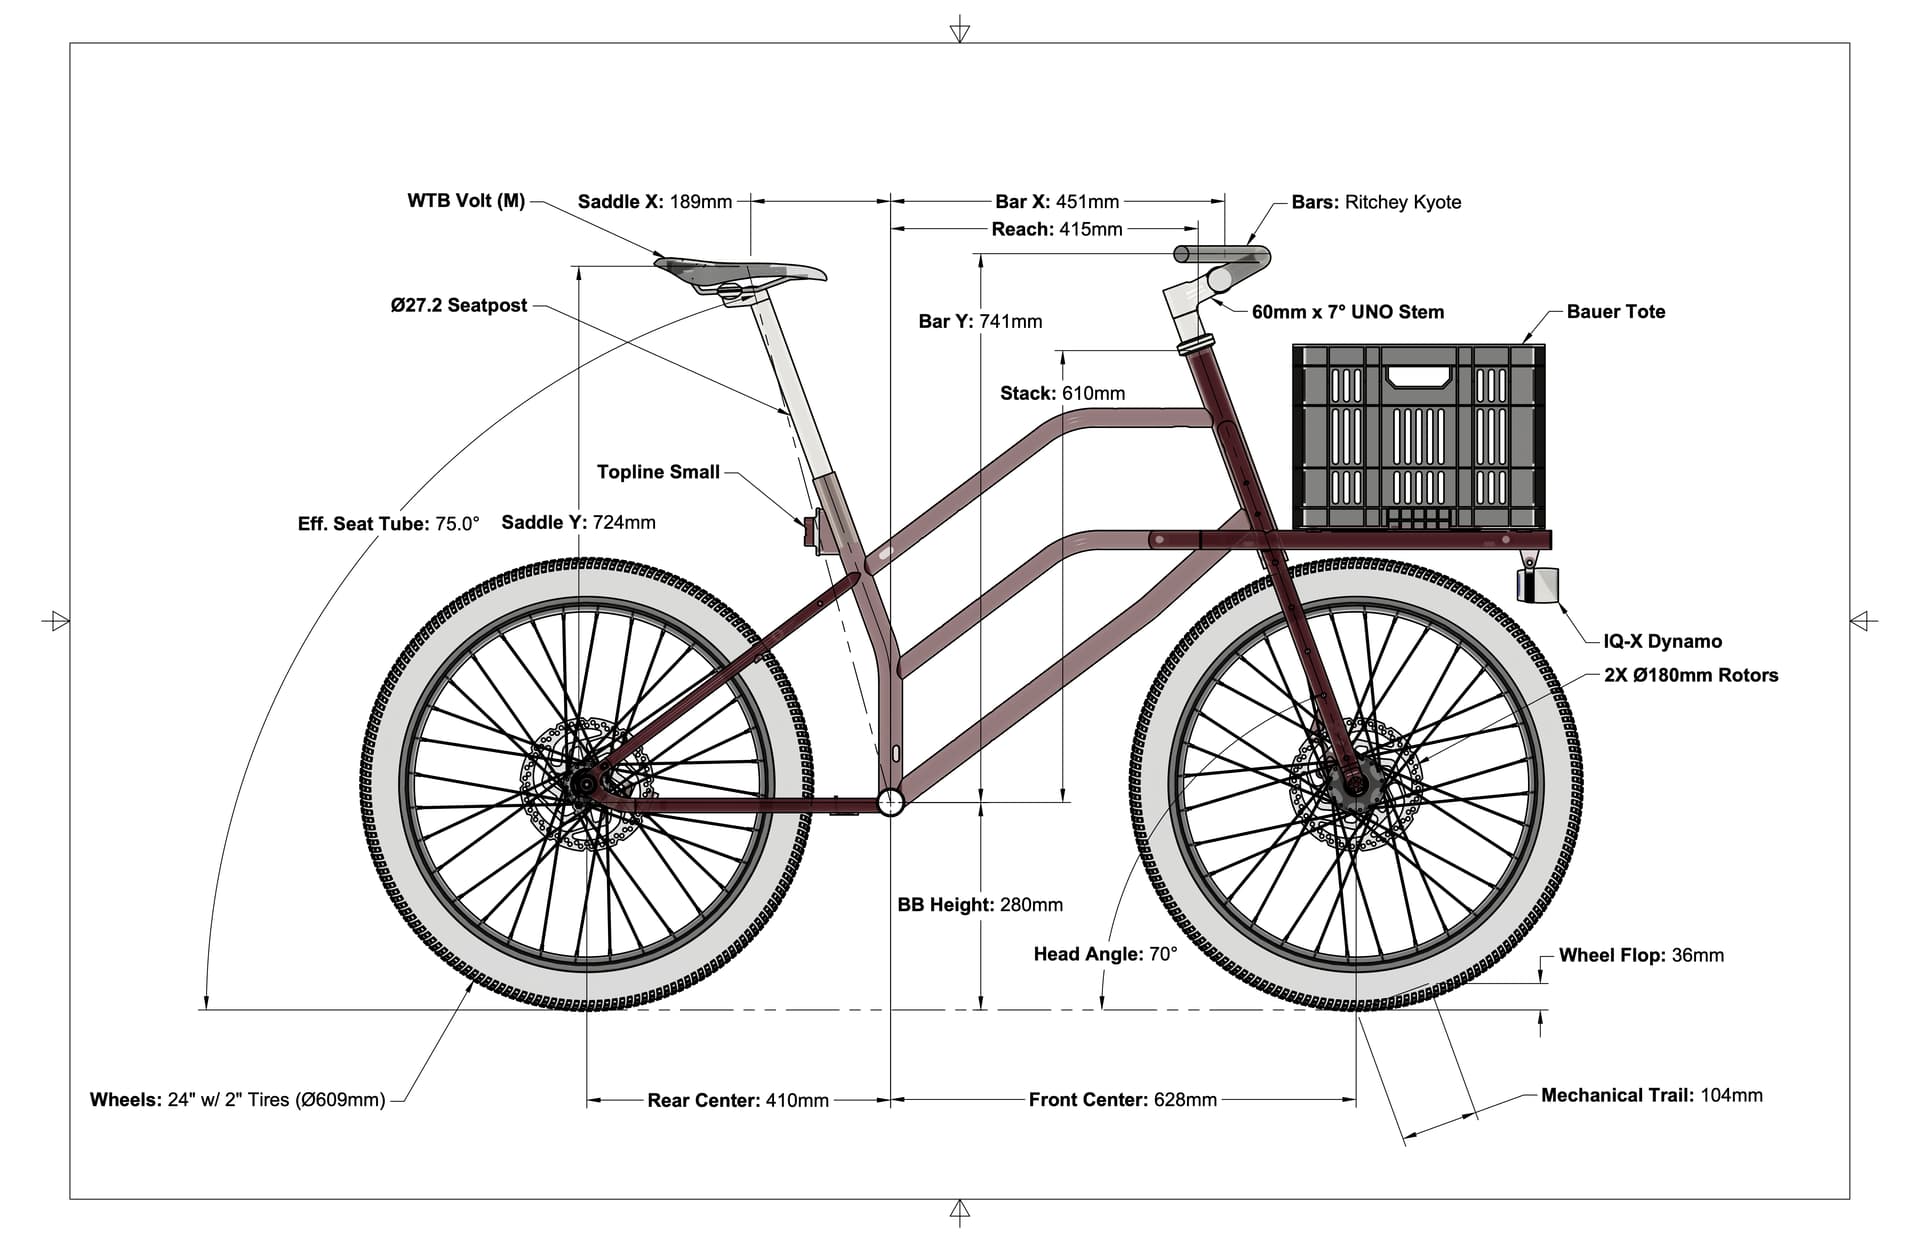
Hi/Lo Offset Fork: I’m investigating a large (around 104mm) and small (around 54mm) mechanical trail by using two different forks. I’m excited to test how sensitive I am to this geometrical change and compare it against my original 20” design which has around 77mm of mechanical trail.
Man that looks sweet. Keen to hear ya thoughts on the forks! Based on my experience the large offset/low trail option should be noticeable better with a front load but I’ve never done a back to back test.
Fun projects for my university’s energy conversion class!
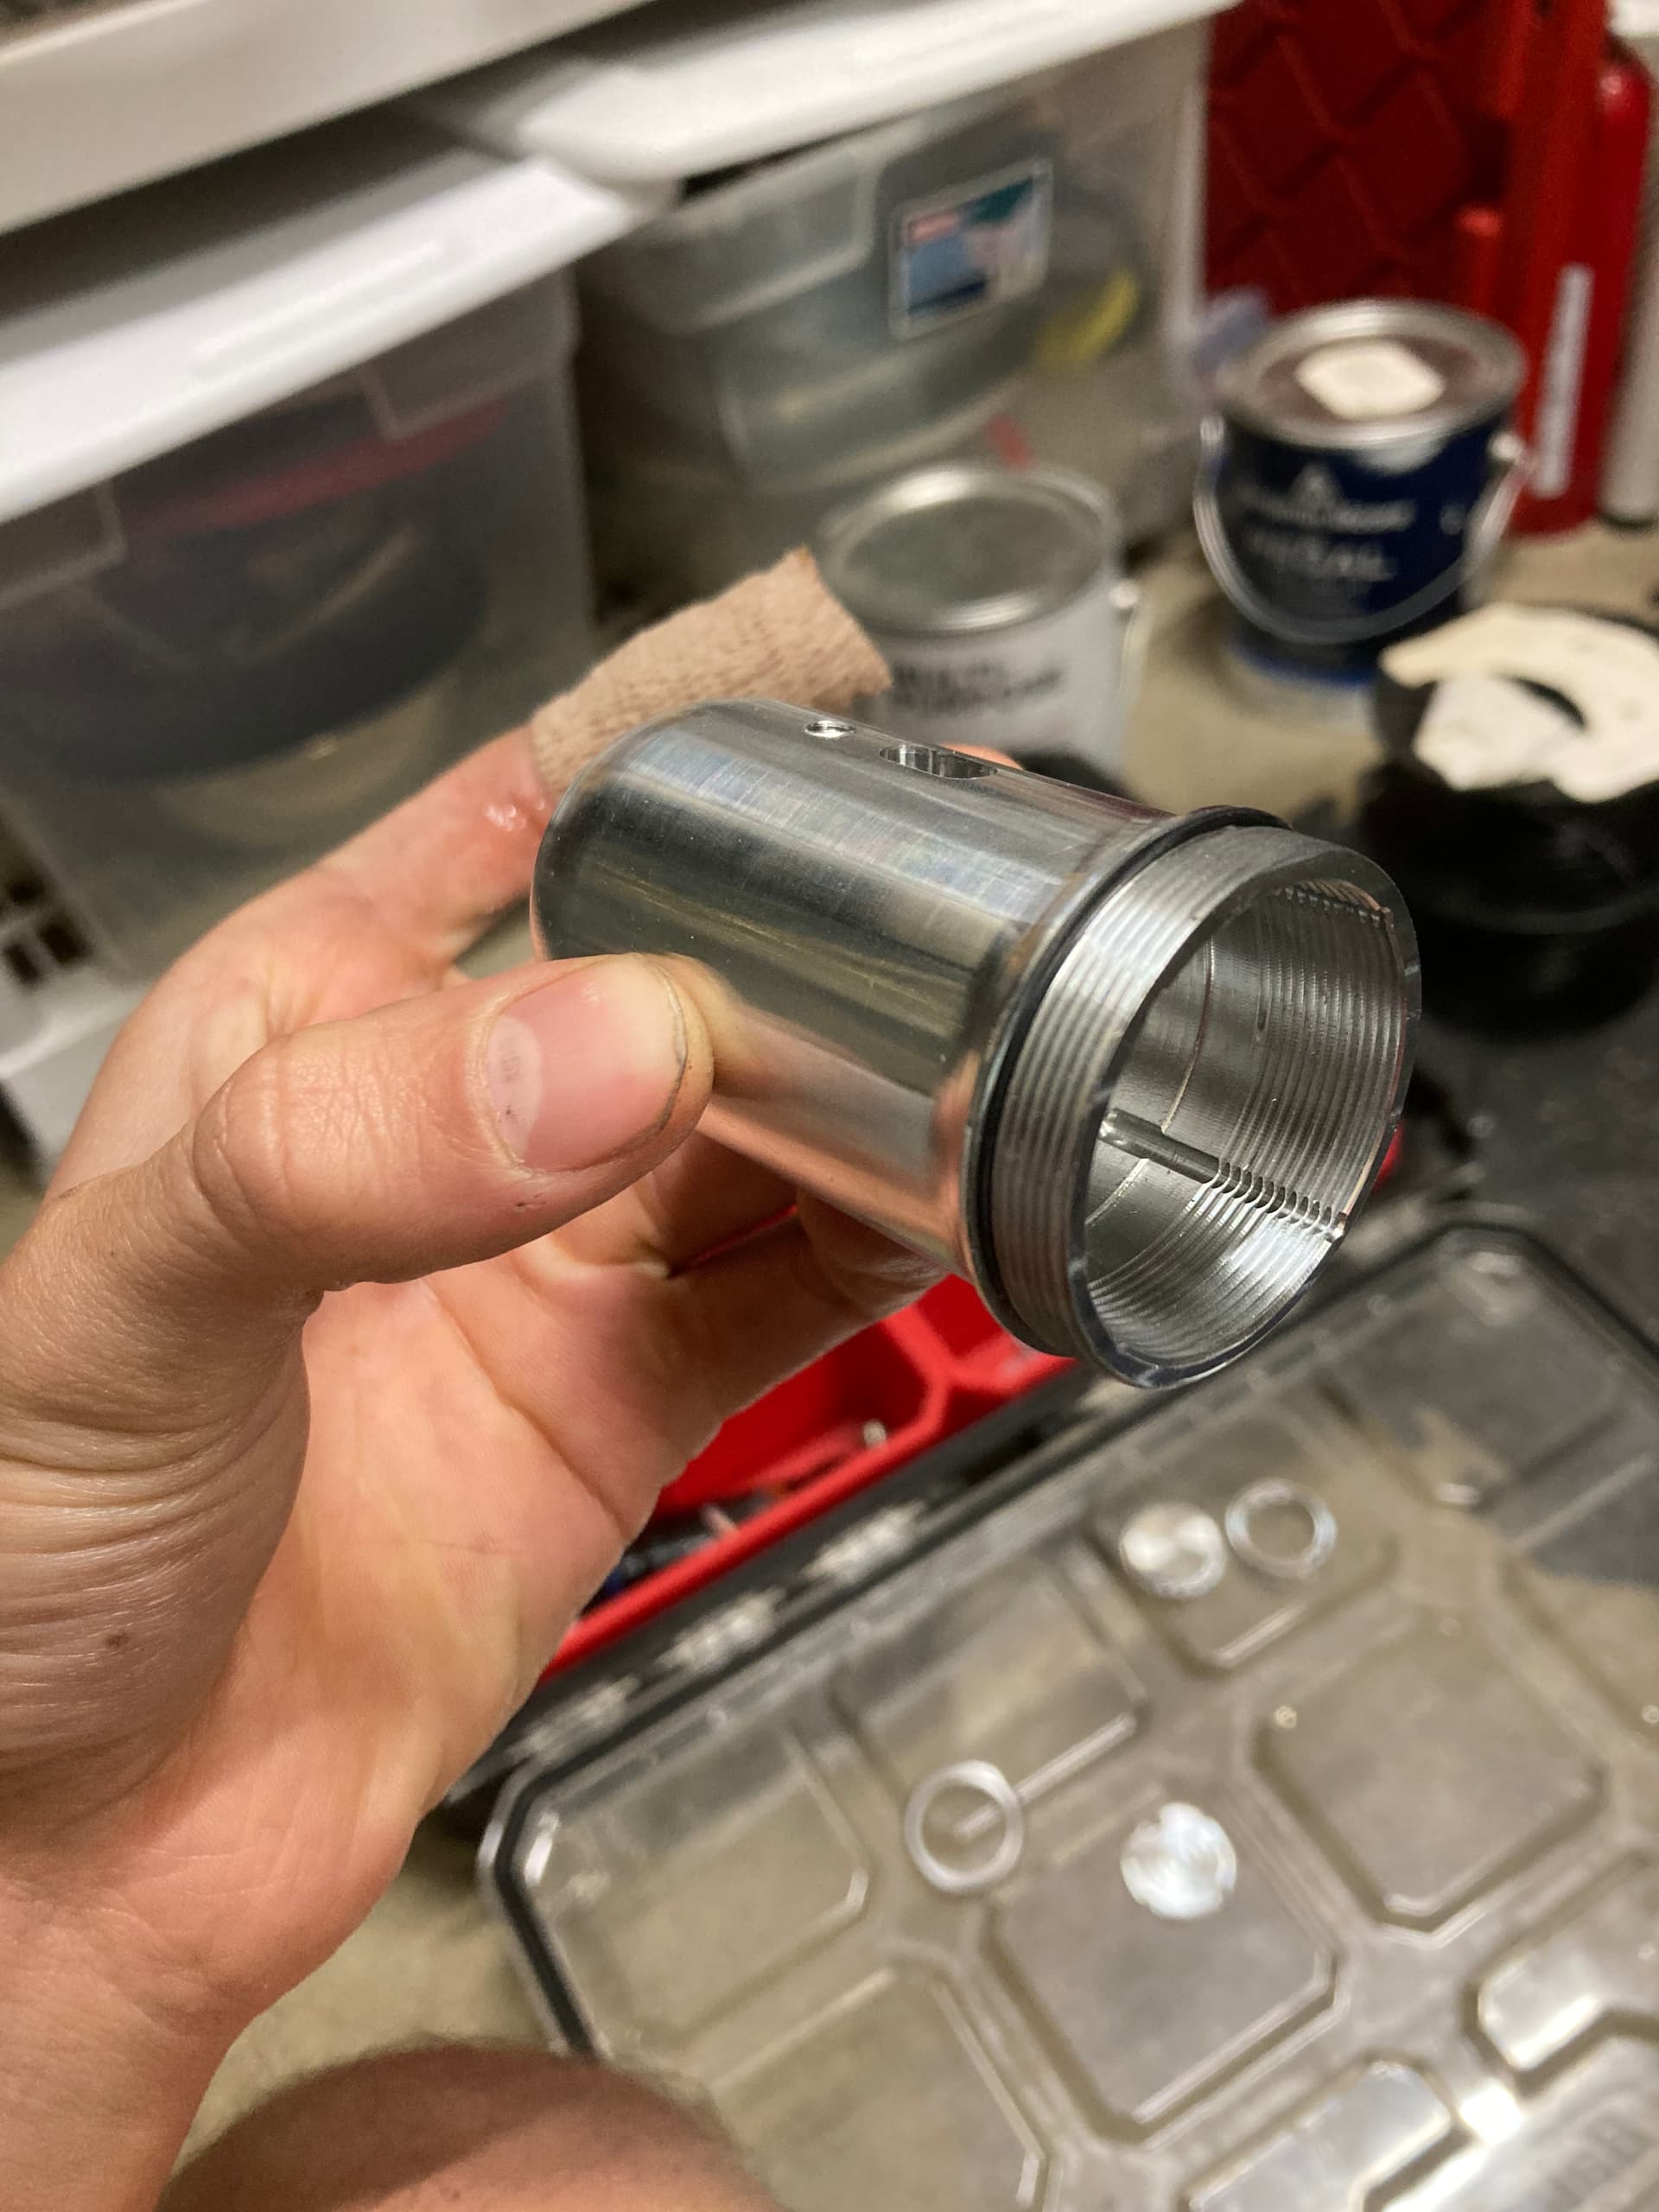
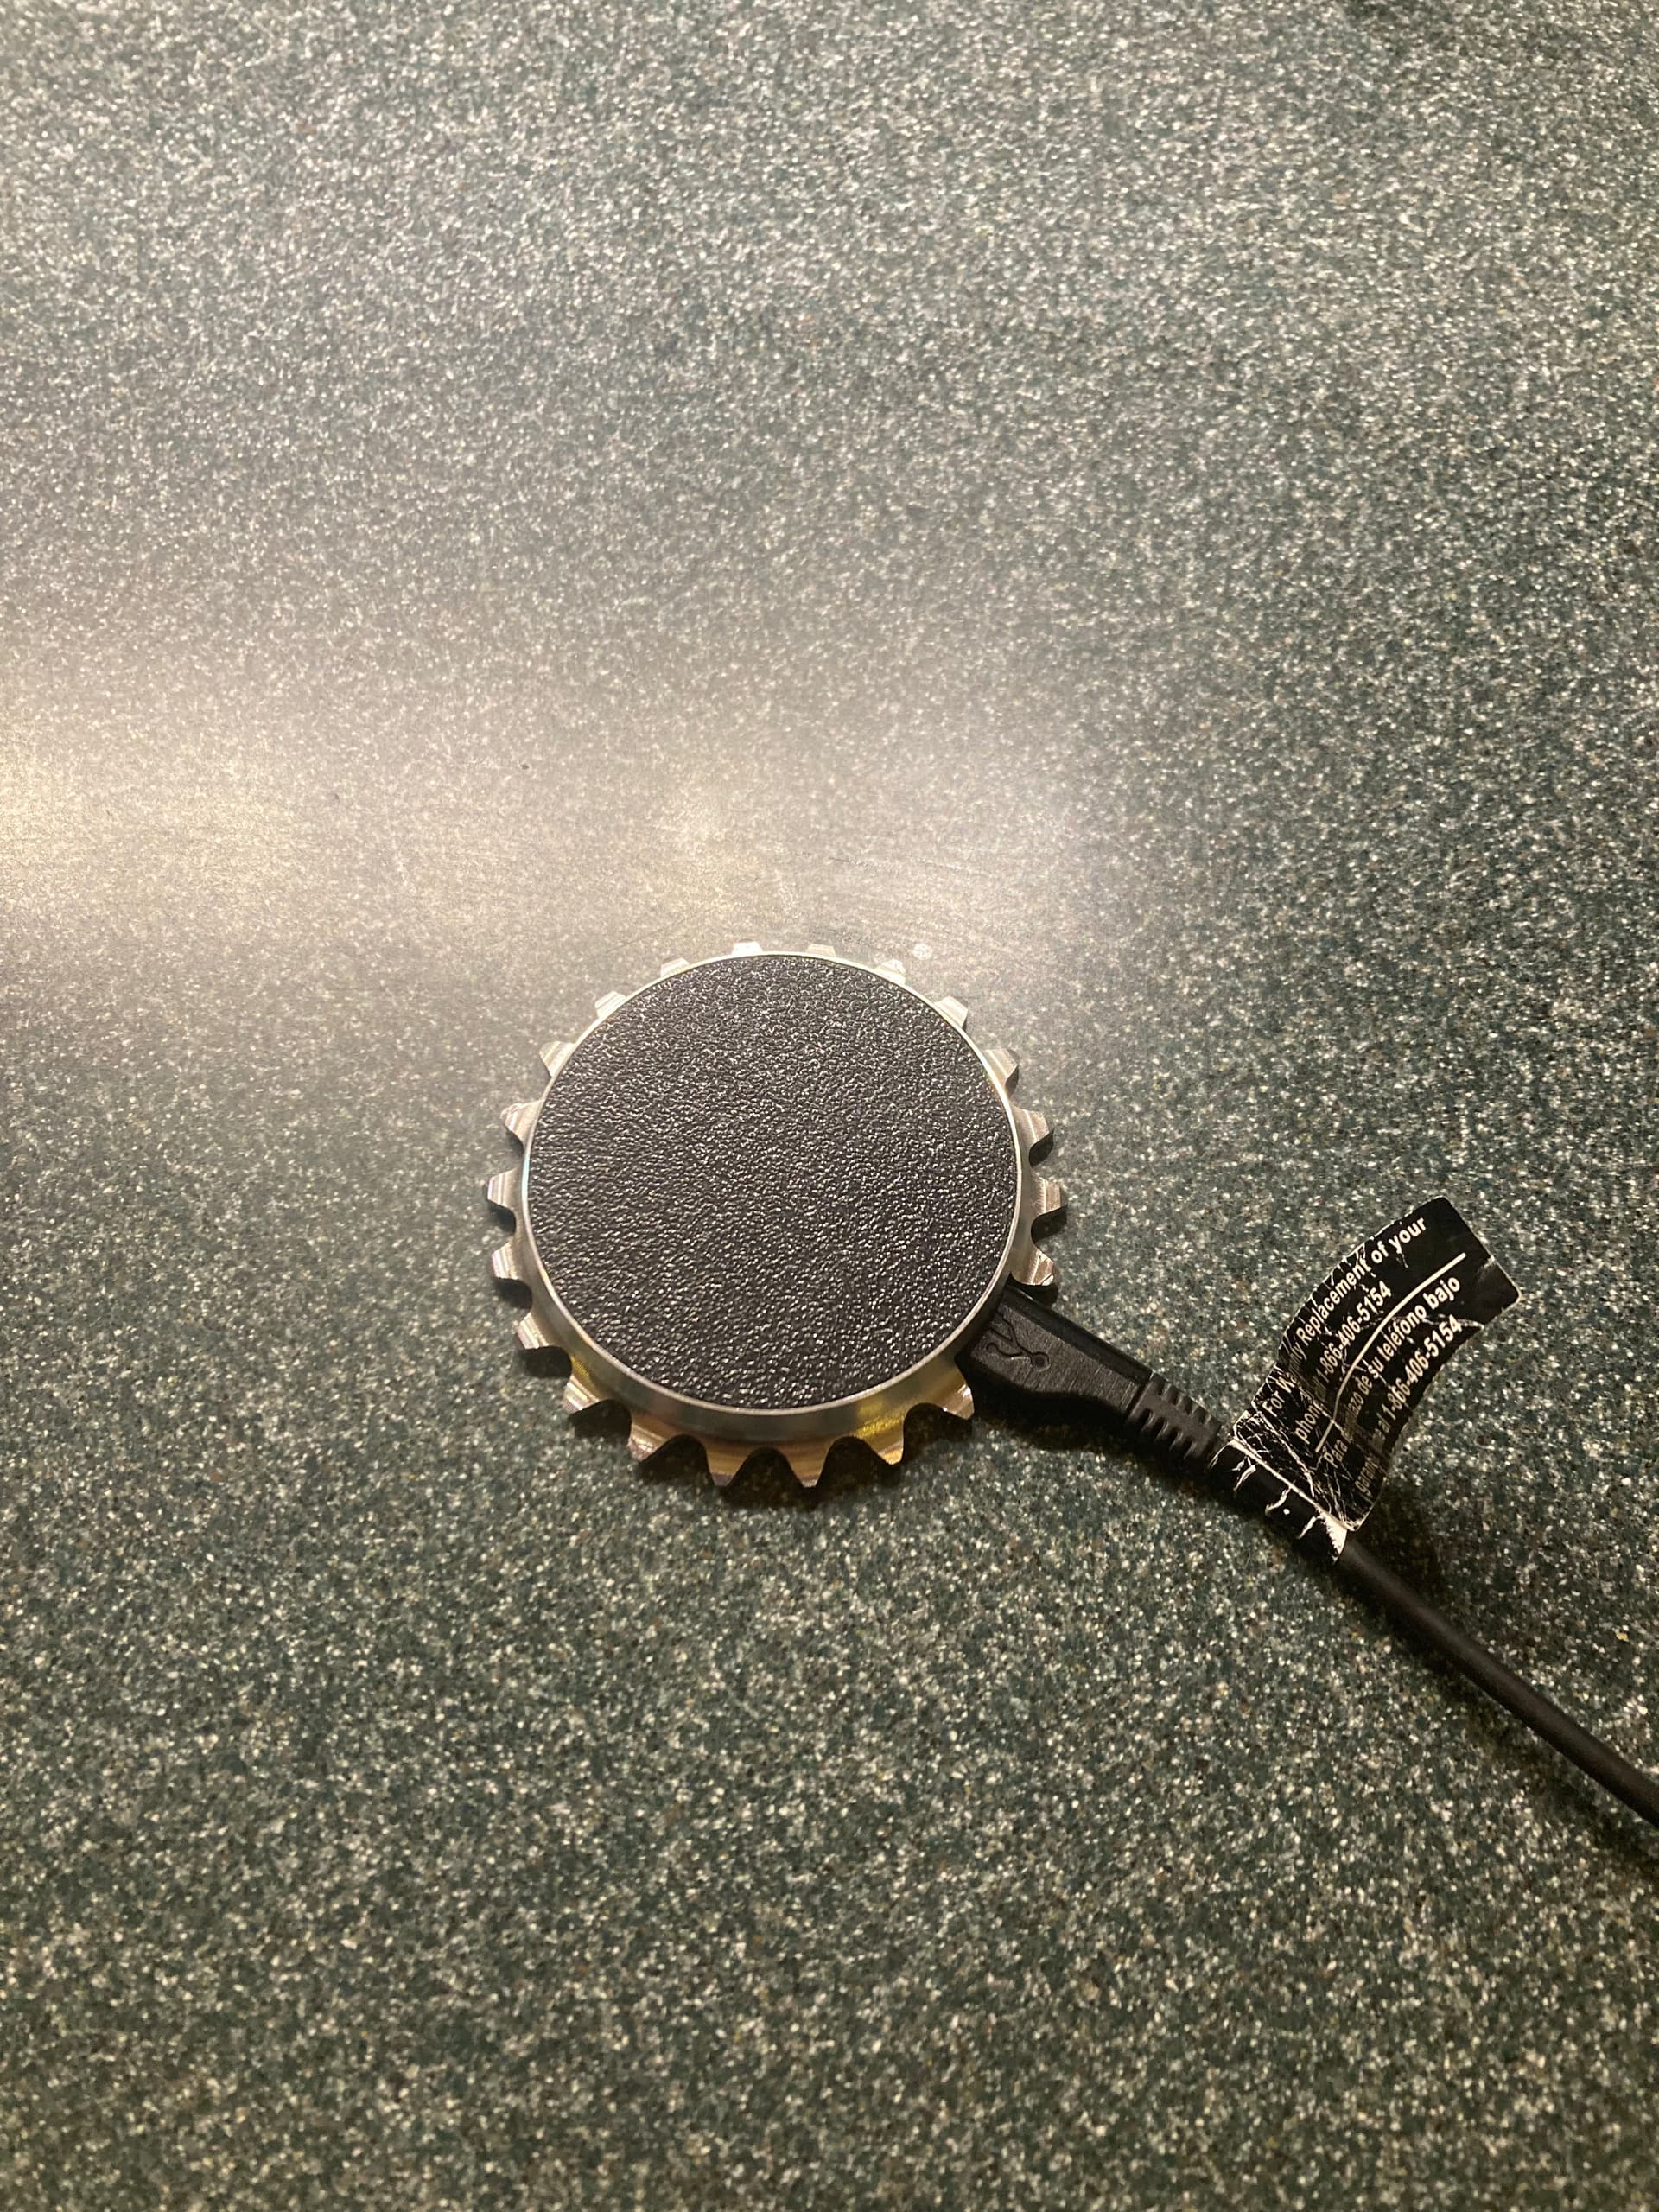
Dynamo Light
Dynamo light in a pill-shaped housing with a single CREE XM-L2 power LED and LEDiL EVA lens. The dynamo uses a full-bridge rectifier to convert the AC output of my Shimano hub dynamo into DC that is either sent to a supercapacitor charging circuit or buck-boost regulator set to 5.5V output. The supercapacitor and regulator outputs run to an ideal diode controller which sends the higher (voltage) of the two signals to the LED driver.
To my surprise, the light works pretty well! It has minimal flickering at low speeds, likely due to the large smoothing capacitor connected near the rectifier output. However, there are a few things I’d like to change for the next version (hopefully with more time to work on it!)
Revise supercapacitor charging circuit and/or move to lipo/li-ion battery. I had a few weeks for the design/build of the light and didn’t do breadboard testing of different supercap charging circuits/currents. I sized the circuit based on the supercap IC (made by TI) datasheet for a ~30 second charge time, but in practice, the supercap charges slower and discharges faster than I anticipated. I need to do a lot more work/research here to come up with an efficient circuit.
The LED driver is driven by one current setting resistor. I want to redesign the current set circuit component to allow for brightness/current changes based on wheel speed and user input.
Move to 3-element LED. The single XM-L2 LED is good for urban illumination and okay for nighttime rides without streetlights. I want to try a 3-up LED next, similar to the Sinewave Beacon.
This one was a lot easier than the Dynamo light (I didn’t have the motivation for another intensive project, lol). I was originally going to make the charger housing a 28T chainring but couldn’t find stock in the right size… I settled for a jockey wheel instead. The charger works well but has faint, but audible, coil whine.
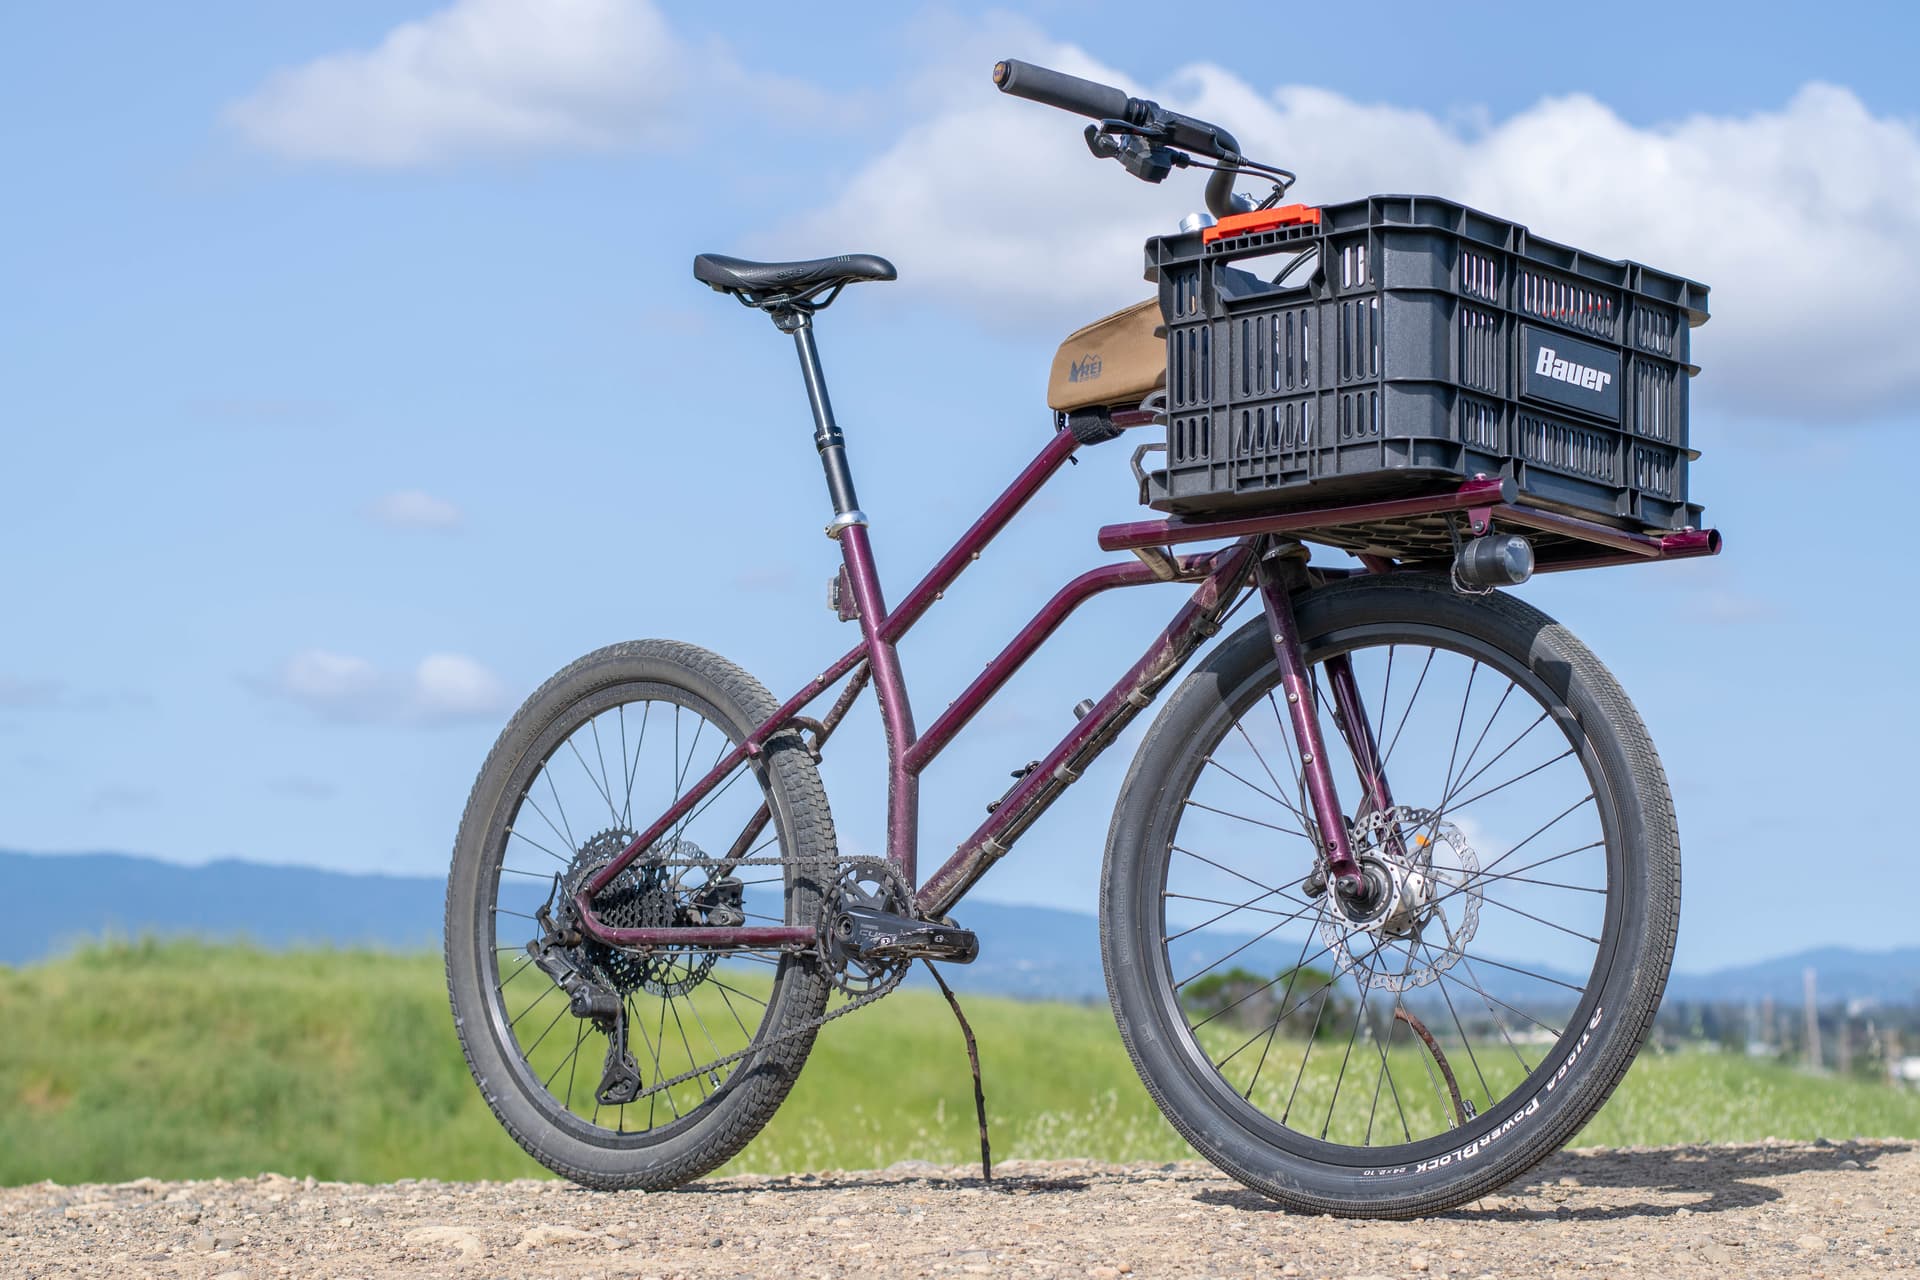
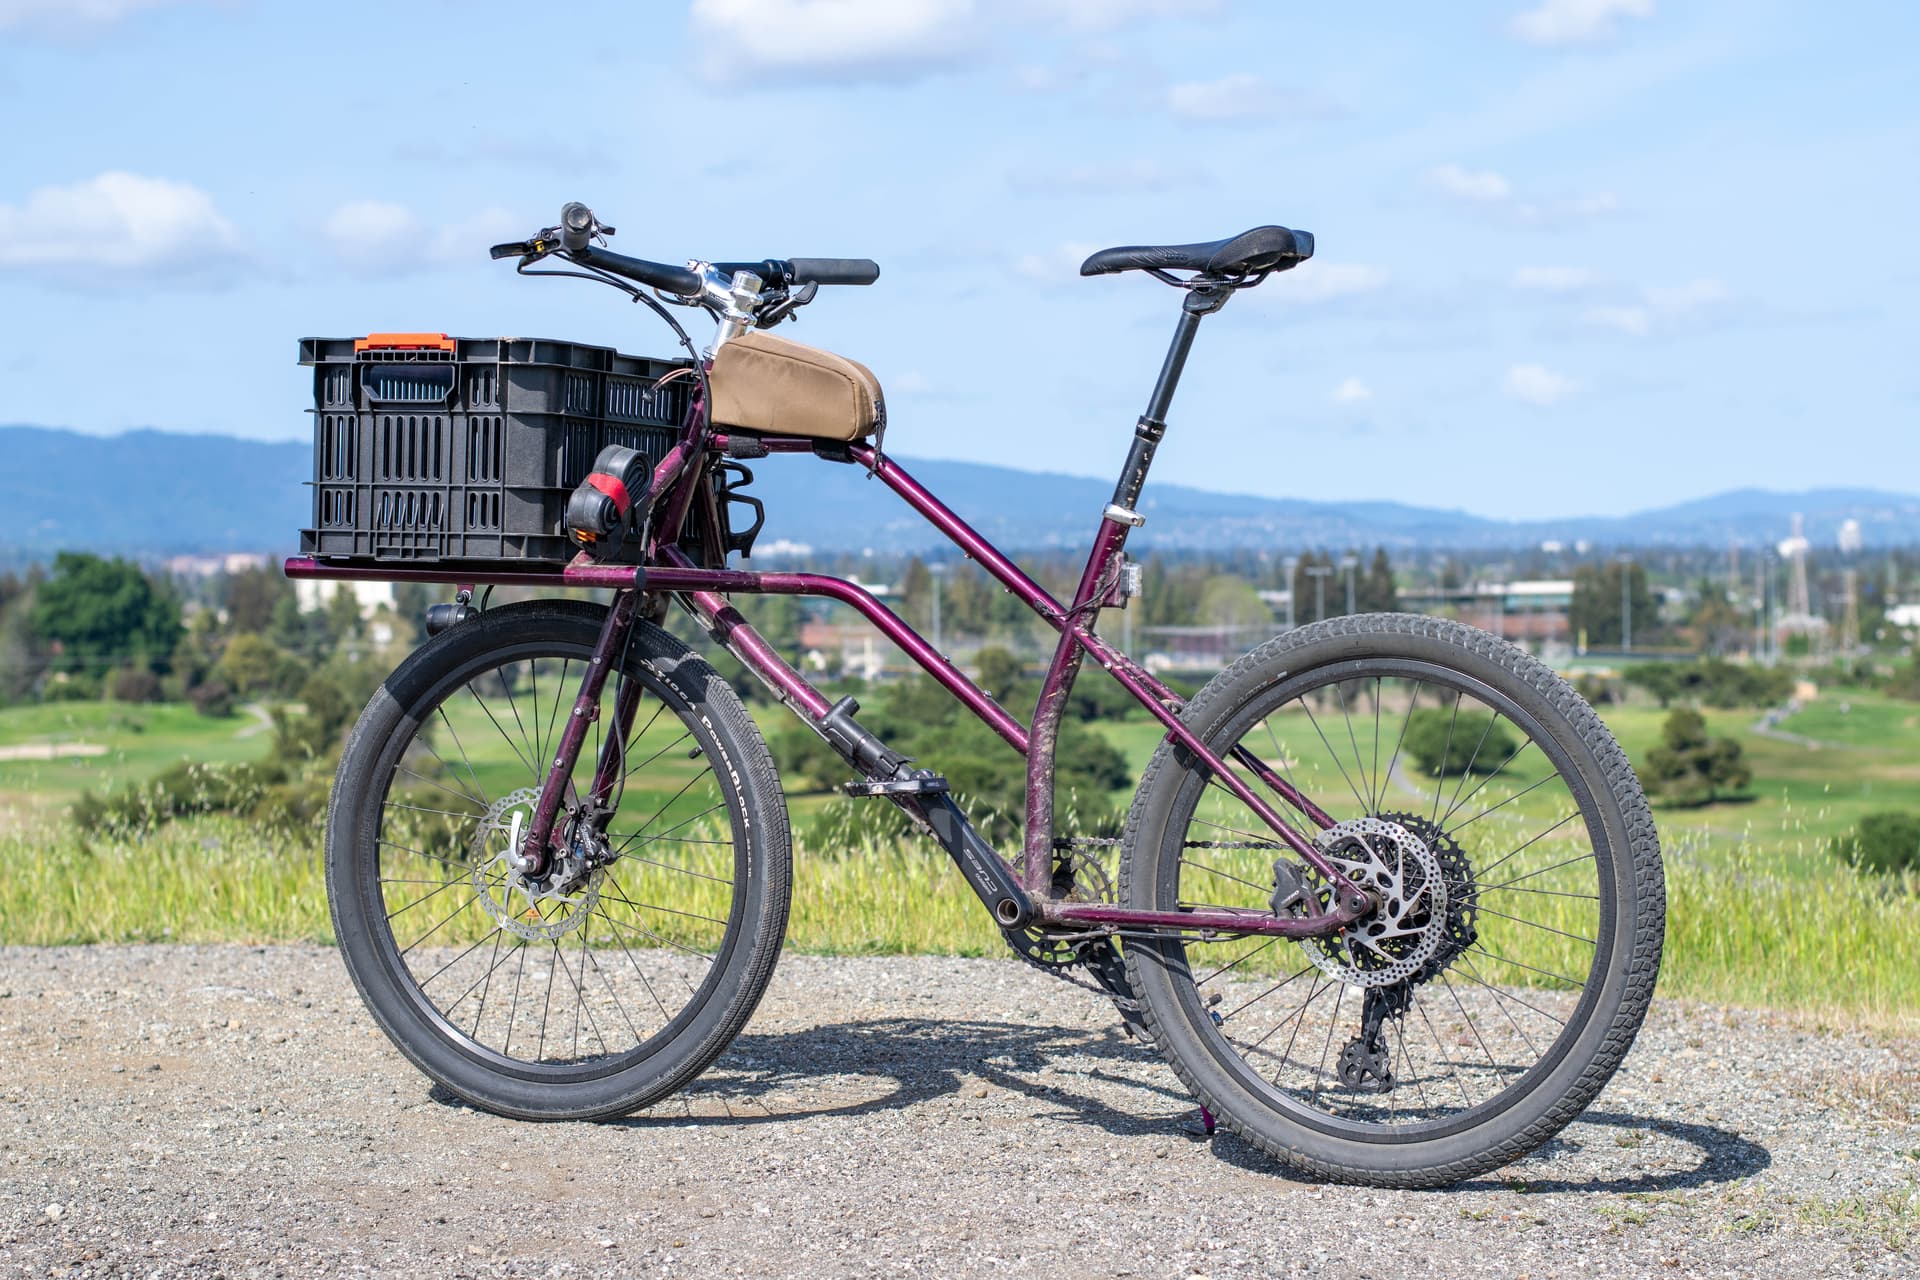
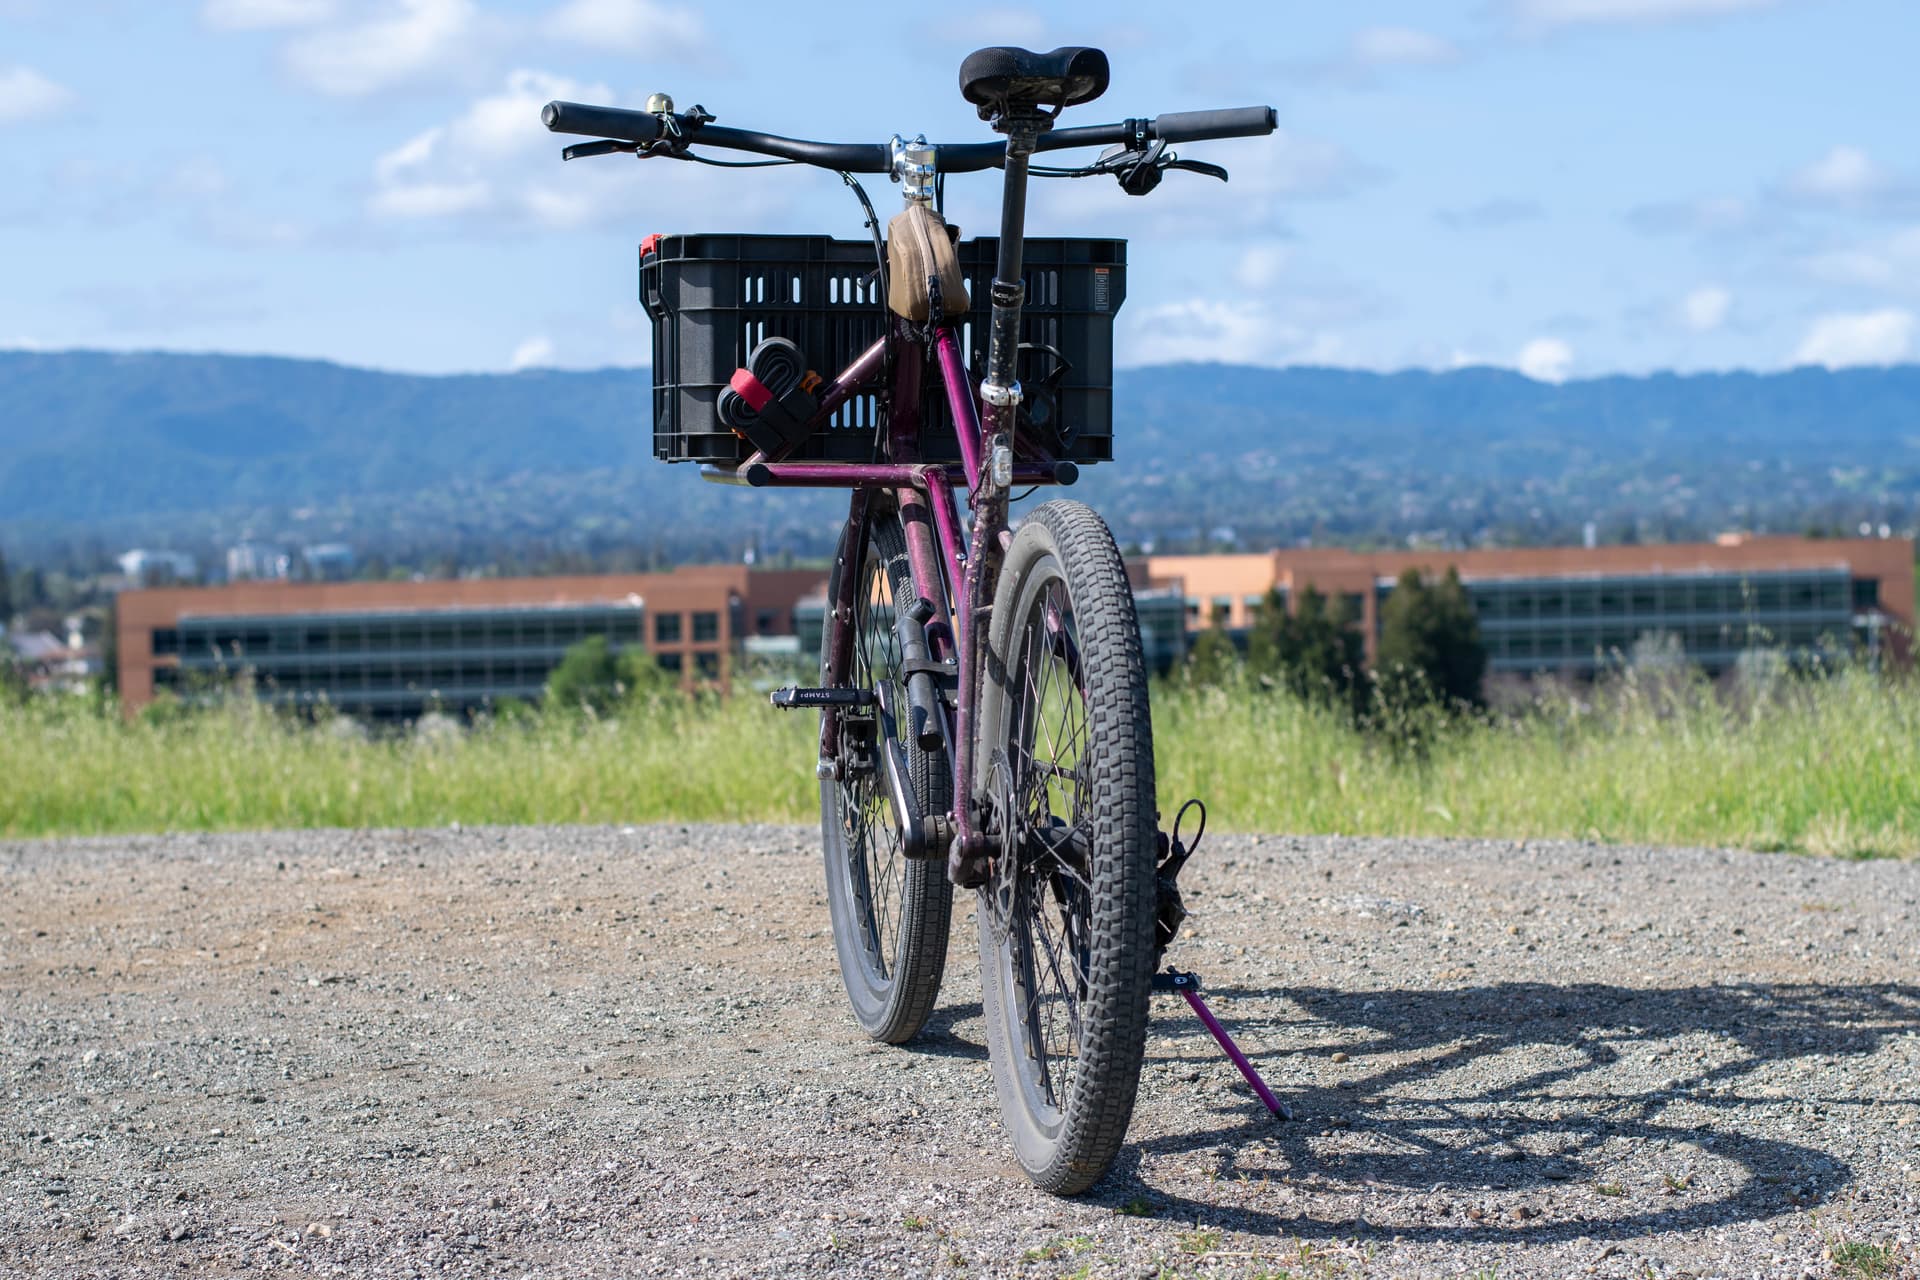
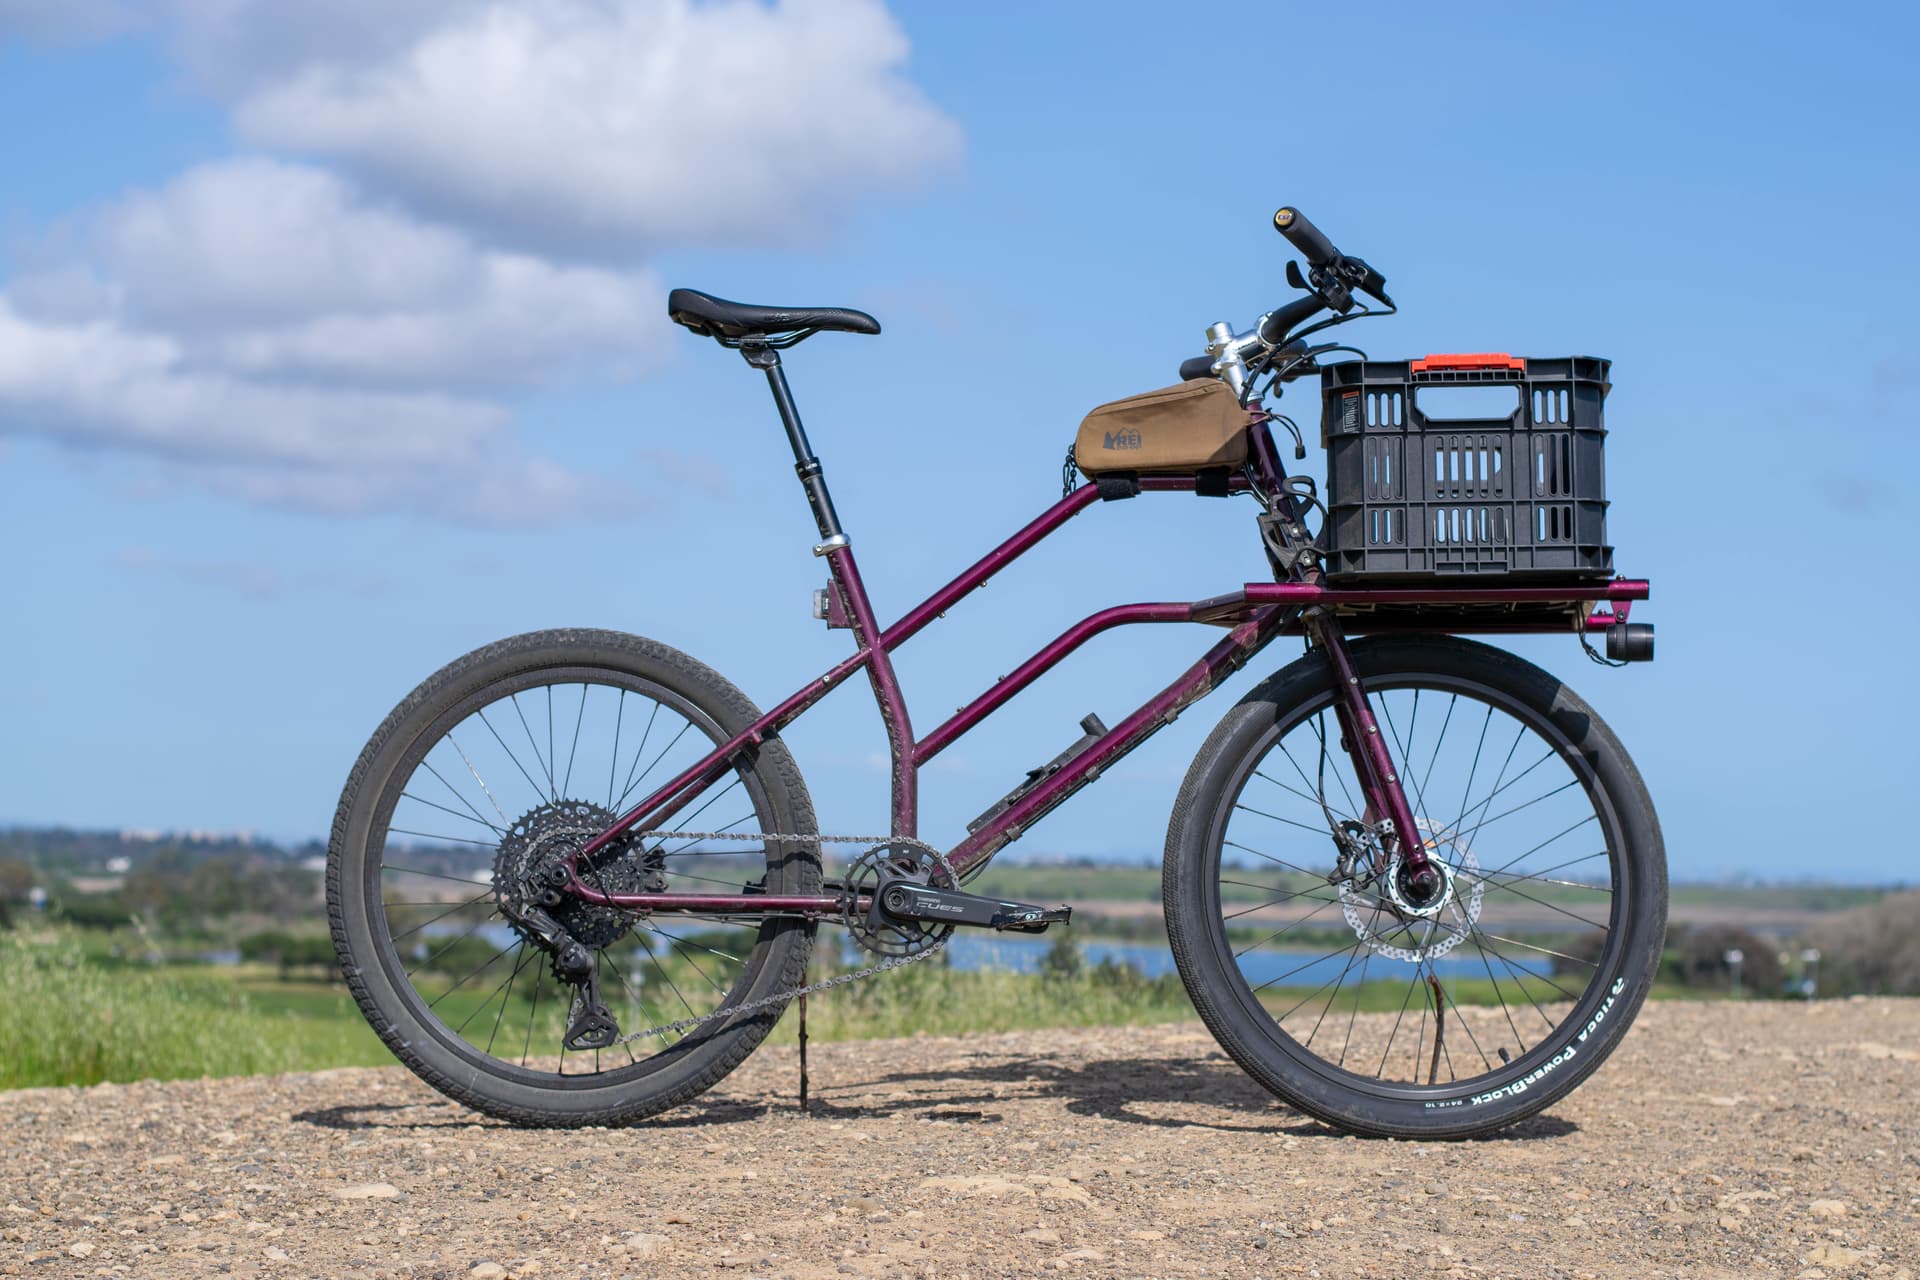
Long overdue update on my 24" commuter+cargo bike. Below is a ride report and general notes on what I learned to implement or avoid on future frames.
First, here’s a geometry chart of my current setup with all my touch points dimensioned. This is configured with the zero offset fork; I prefer the handling - loaded and unloaded - of the zero offset fork over the alternate 50mm offset fork I made.
I’ve ridden the bike for a few thousand miles on paved and unpaved surfaces. The unpaved portion has mostly been easy single track / multi-use trails.
The GEO is great. This is the most comfortable bike I’ve ridden. My handlebar touch points are roughly level (in Y / vertical) with my saddle, and the combination of saddle and handlebar X/Y location result in an upright riding posture that feels good on uphill, downhill, and flat. No aches or pains after 2-3 hour rides. I plan to use this seat / bar touch point position as a starting point for future bike designs.
Considering kinematics/kinetics, I think the combination of BB drop, rear/front weight balance, and mechanical trail + wheel flop strikes a pretty good balance for my preferred riding style. I couldn’t get comfortable on the 50mm offset fork; the bike felt darty and a little too unpredictable, even with ~20lbs of front loading. The higher trail / wheel flop from the zero offset fork made the bike feel a little truck-like going uphill, but it’s something I’ve grown used to and no longer notice, especially considering the stability I feel going fast on flat or downhill.
The Shimmy
If you take your hands off the grips, the bars can sometimes shimmy. It’s a weird phenomenon, and not one I fully understand. I’ve found the speed and amplitude of the shimmy is affected by COG height (i.e. if the dropper is up or down) - this is the biggest one, tire pressure - second biggest, tire tread and front load (surprisingly, front load does not have a huge impact). I suspect there is some weird load paths and unbalanced stiffness in my frame that I need to characterize. Excited and curious to see how my next bike feels.
Wins
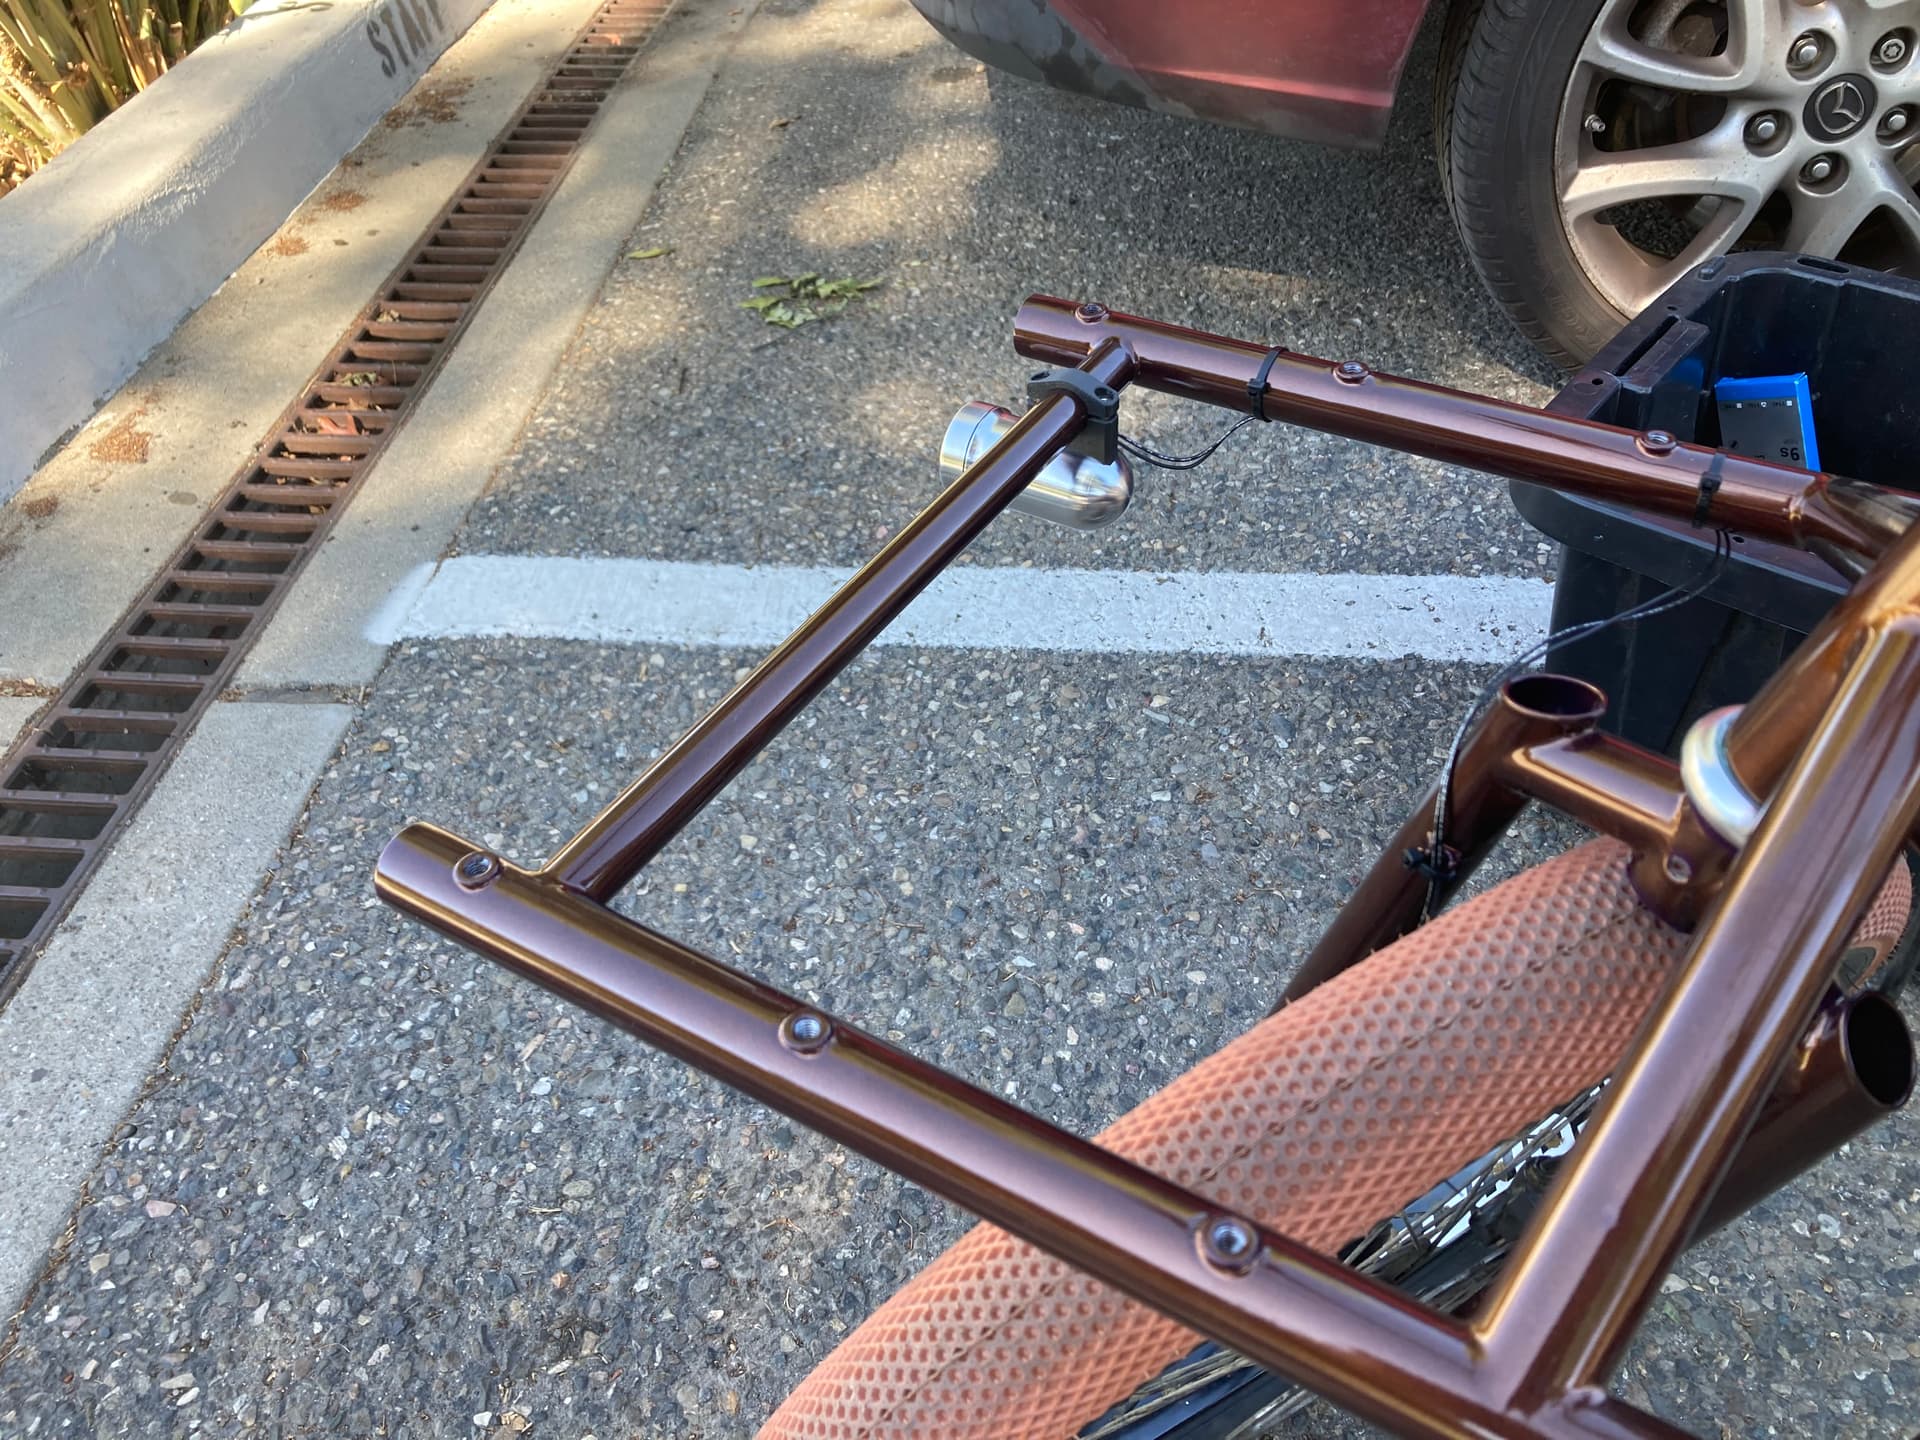
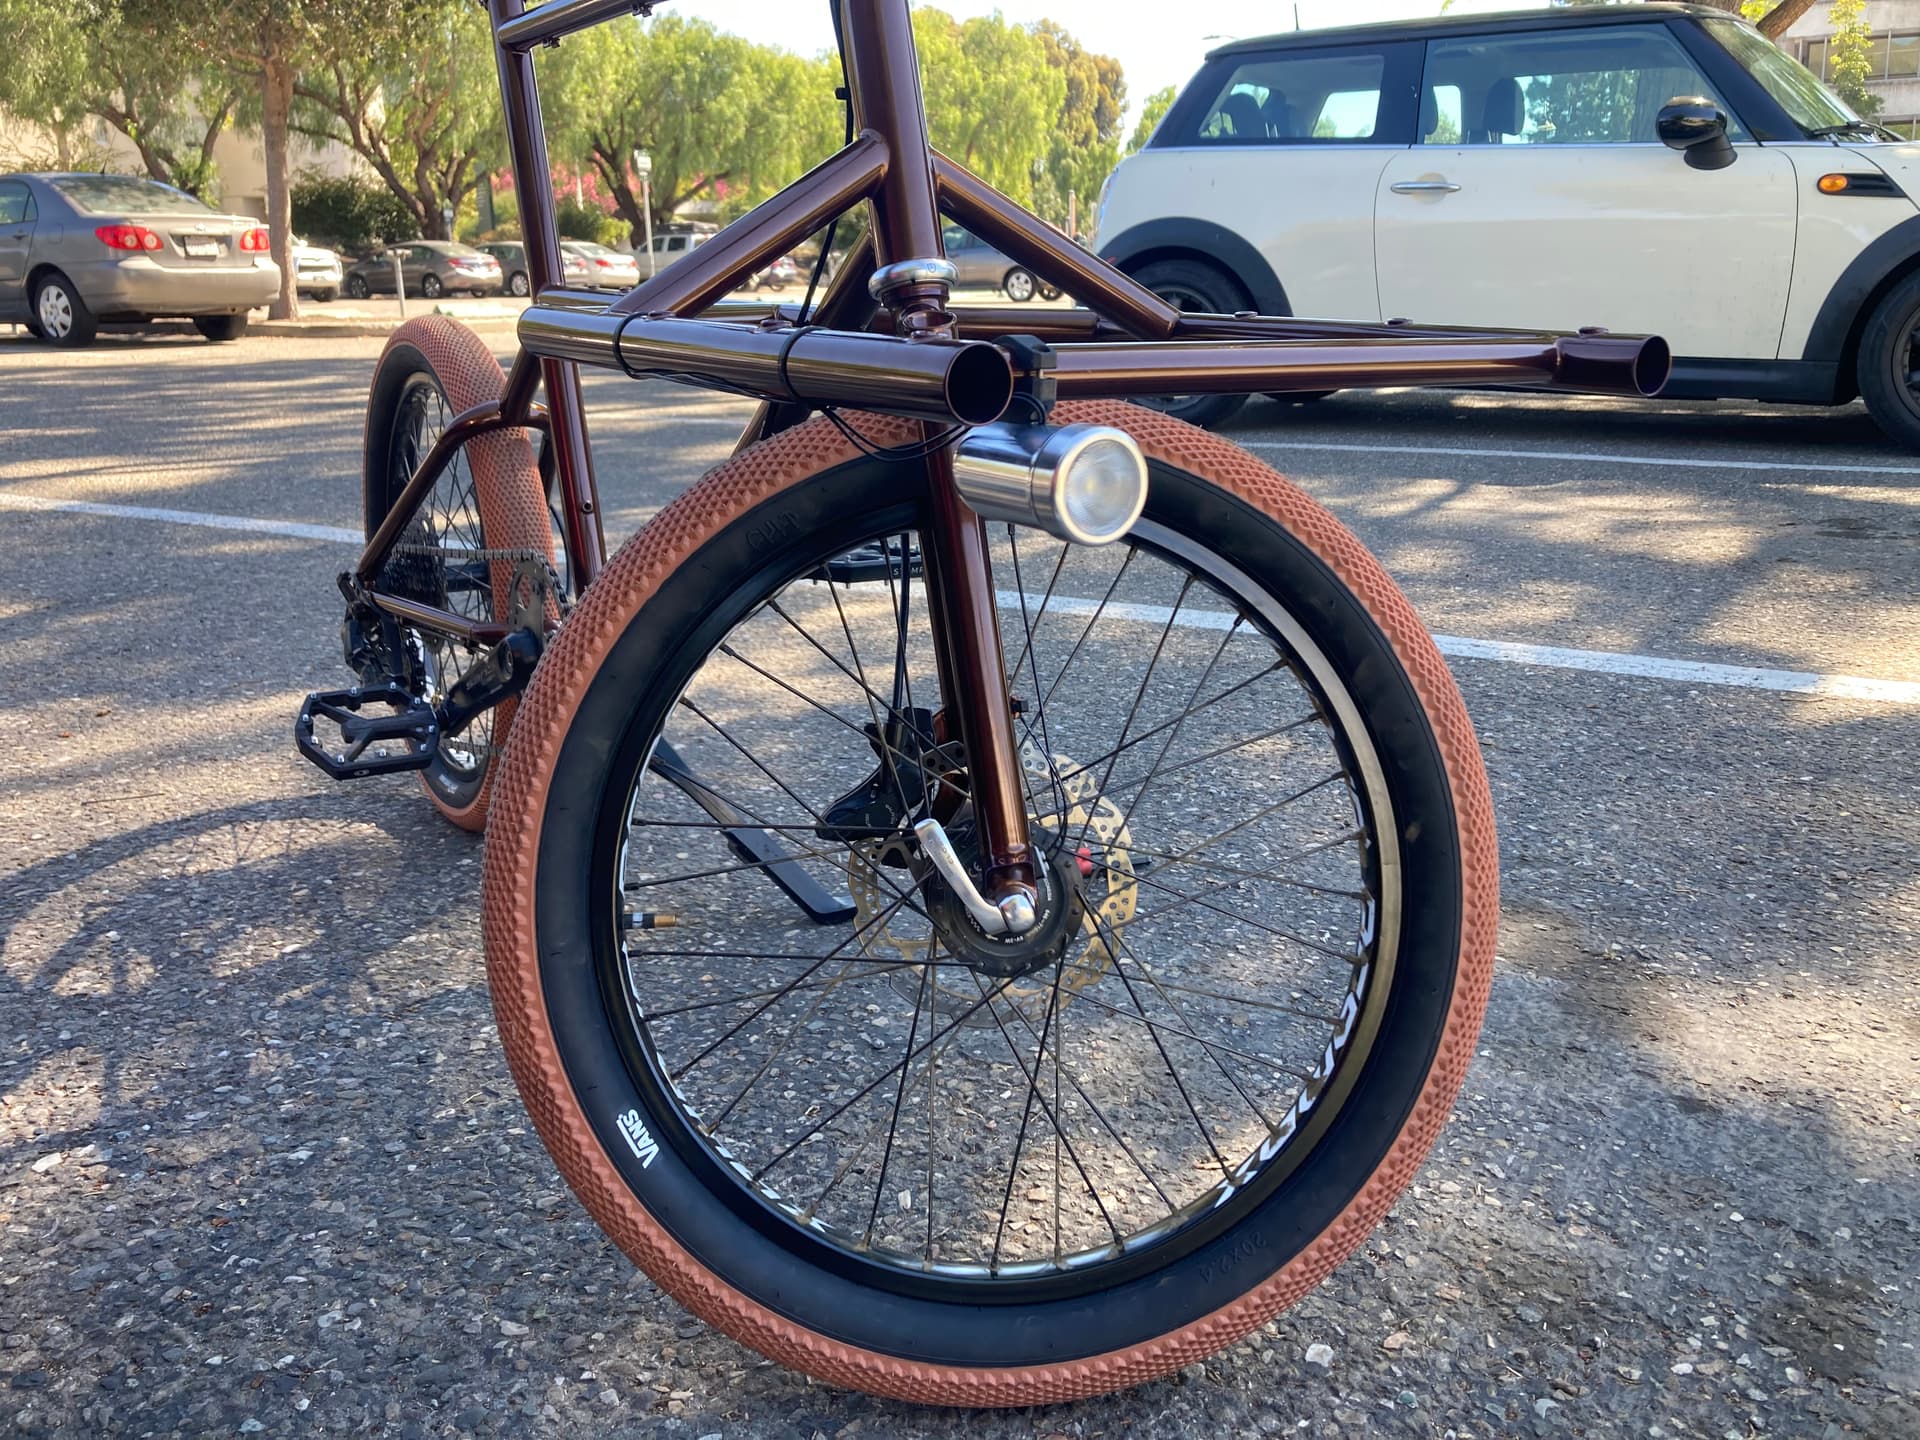
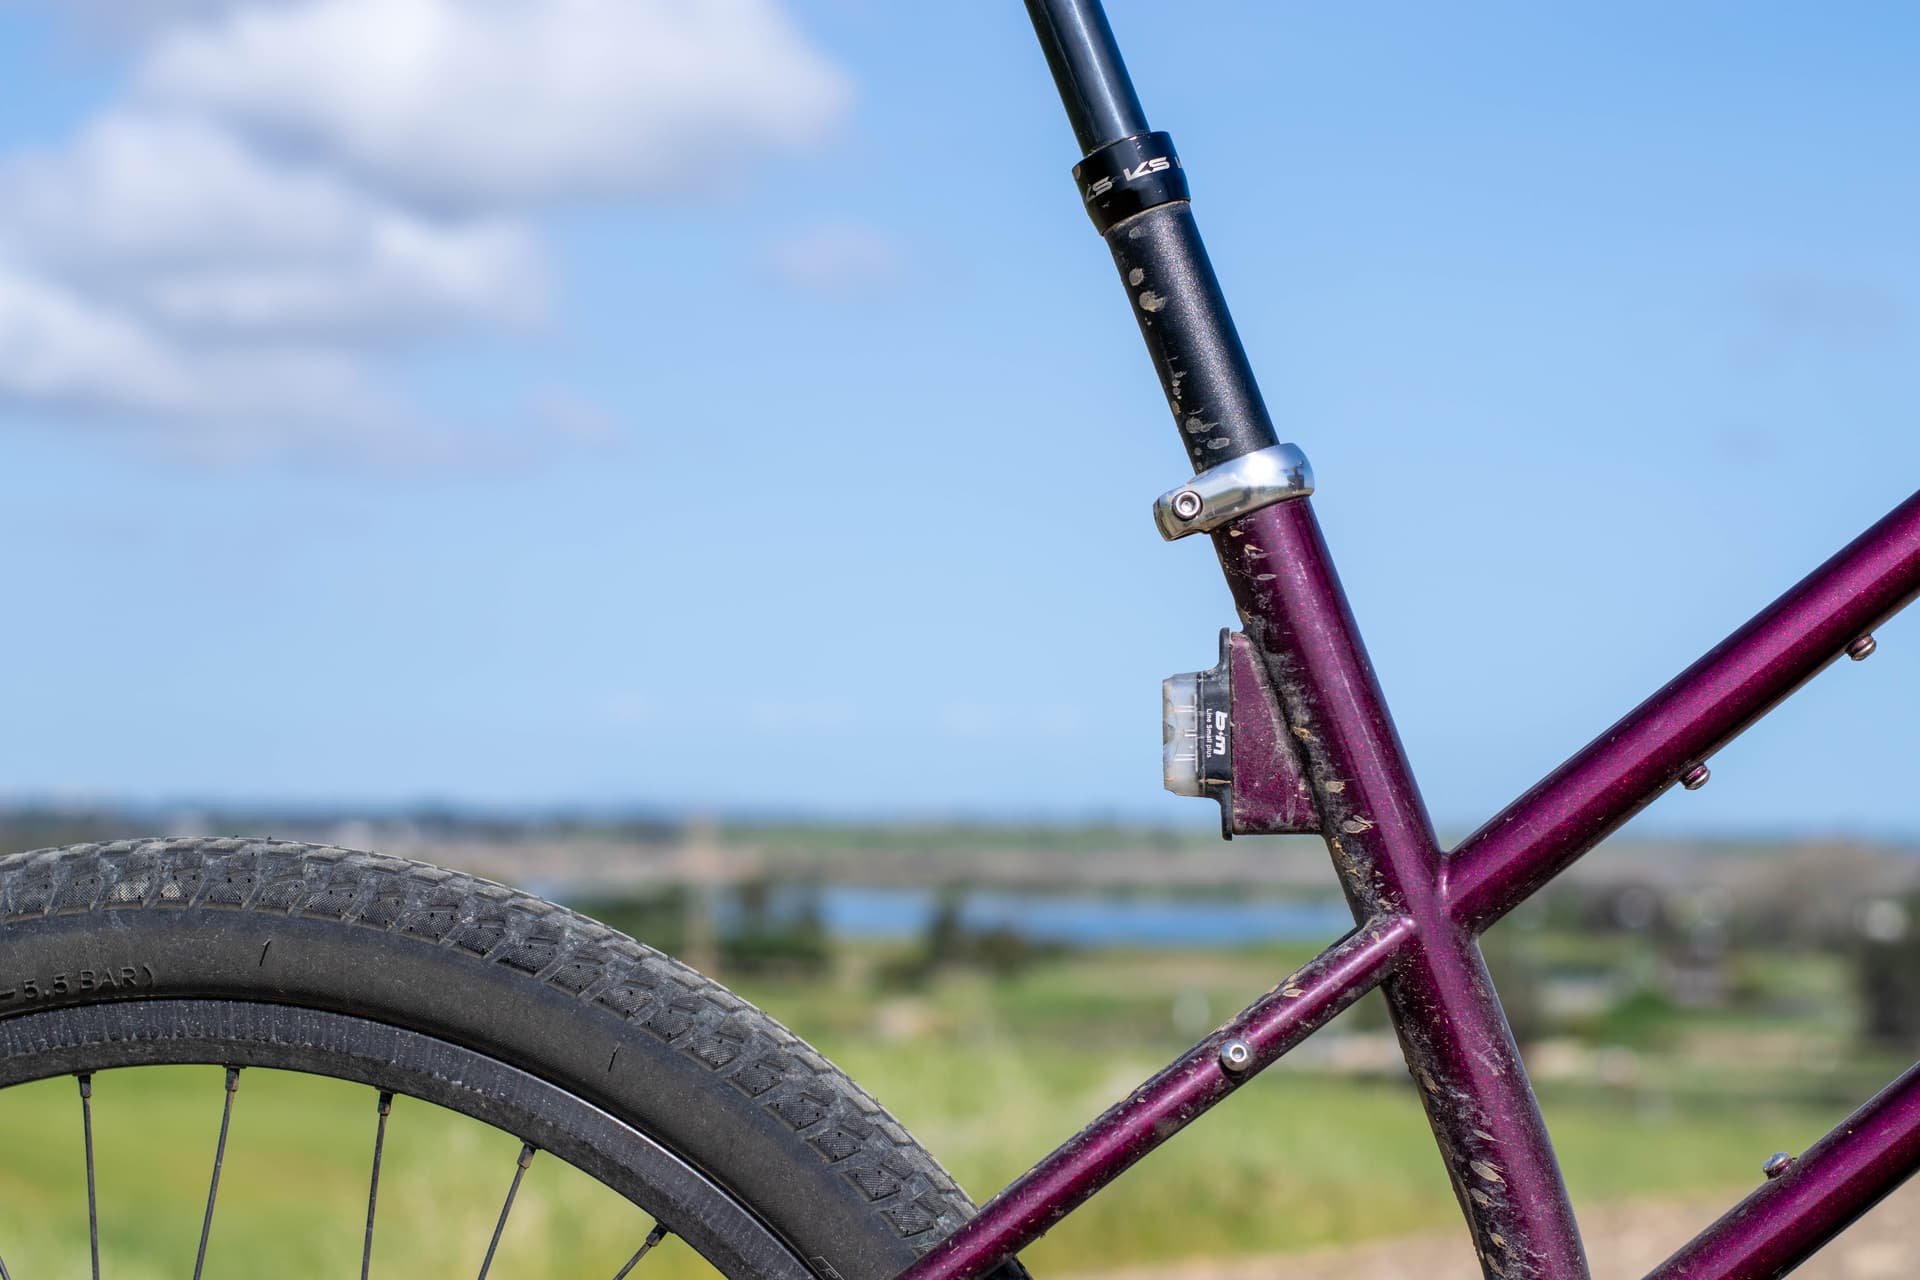
I’m happy with the internal wire routing for my dynamo lights and the integrated taillight mount. This has worked pretty well. I’m currently using 3D-printed TPU grommets to seal most of the wire holes.
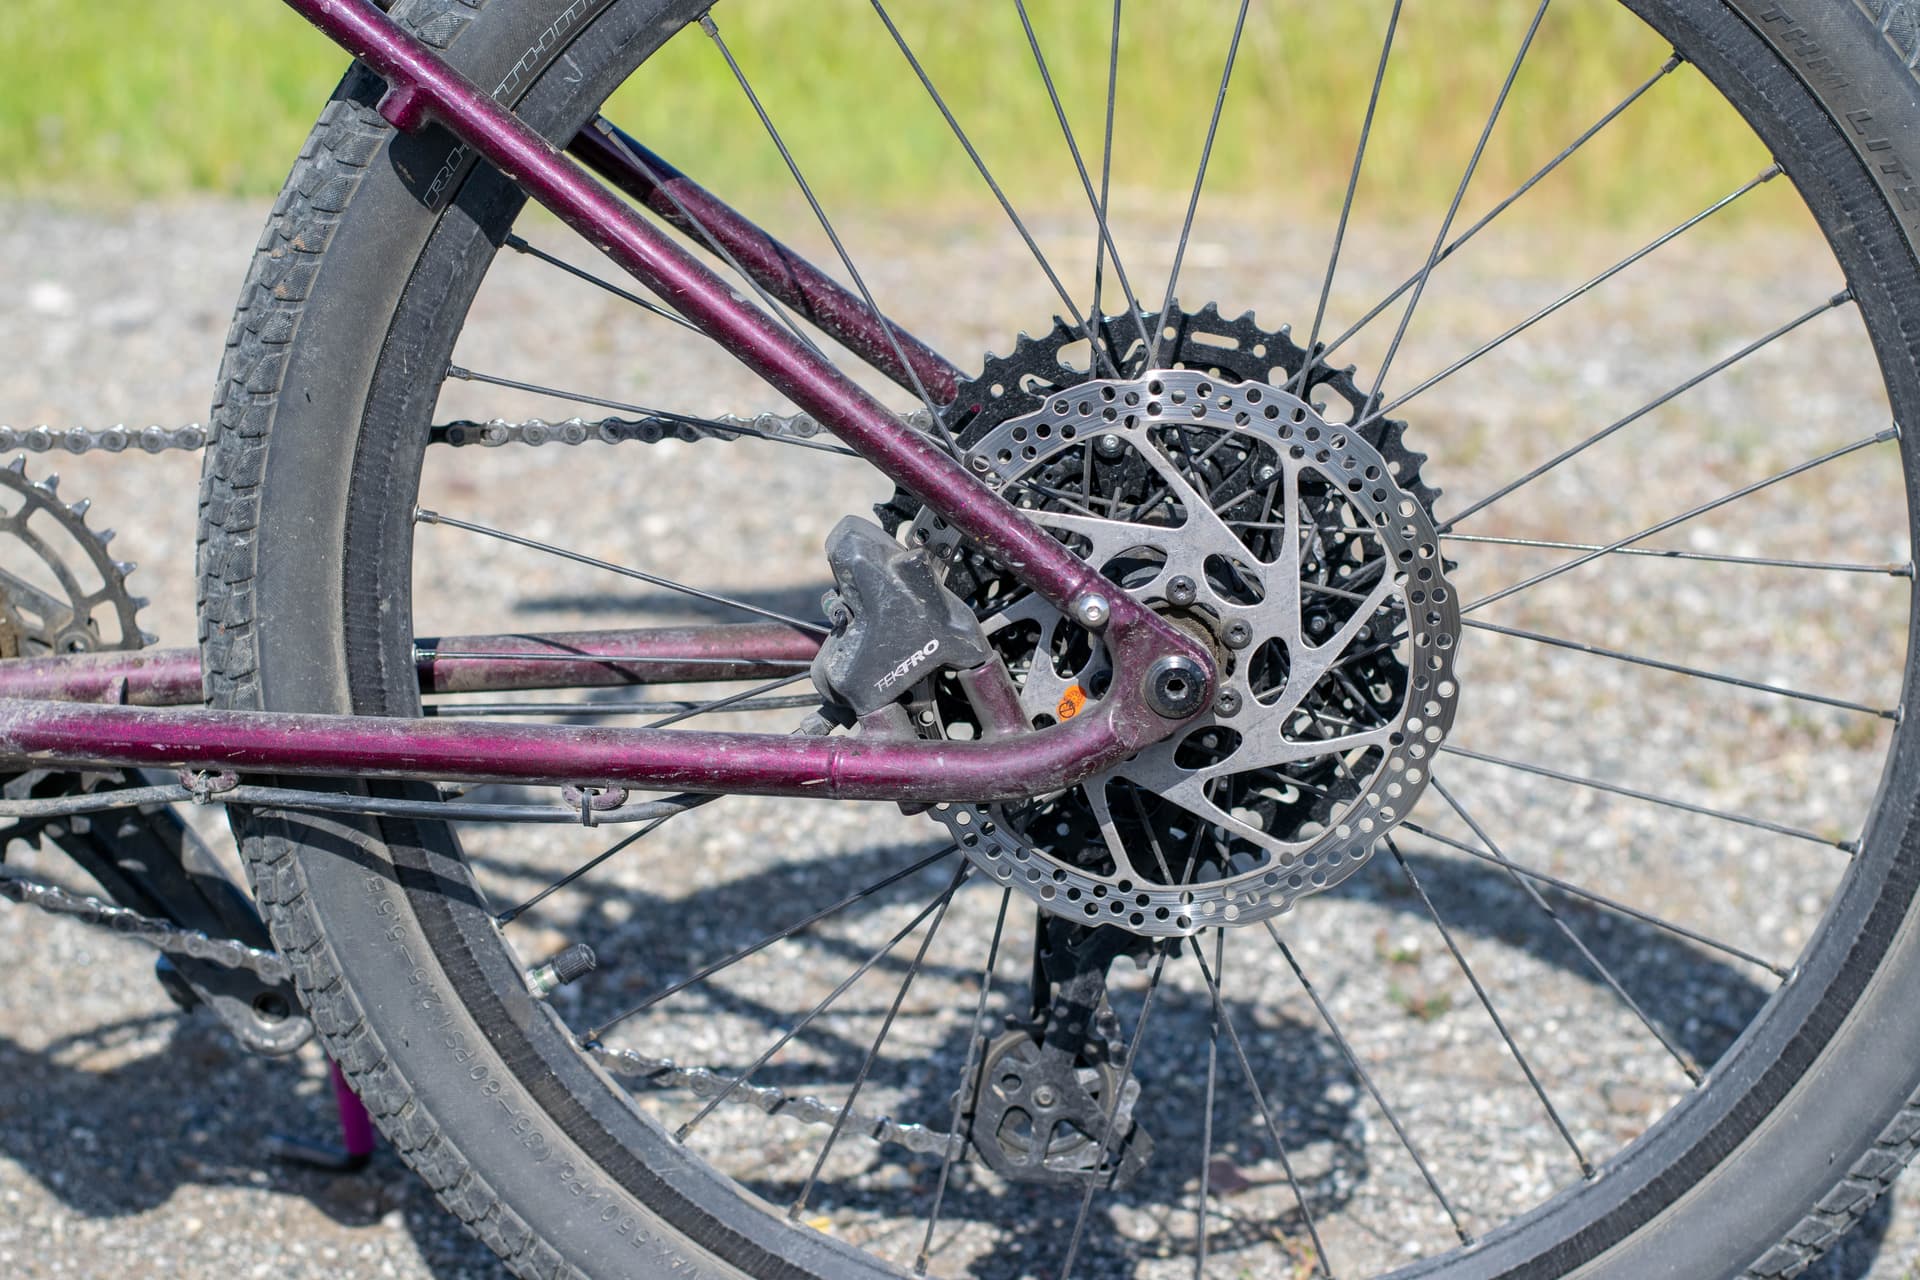
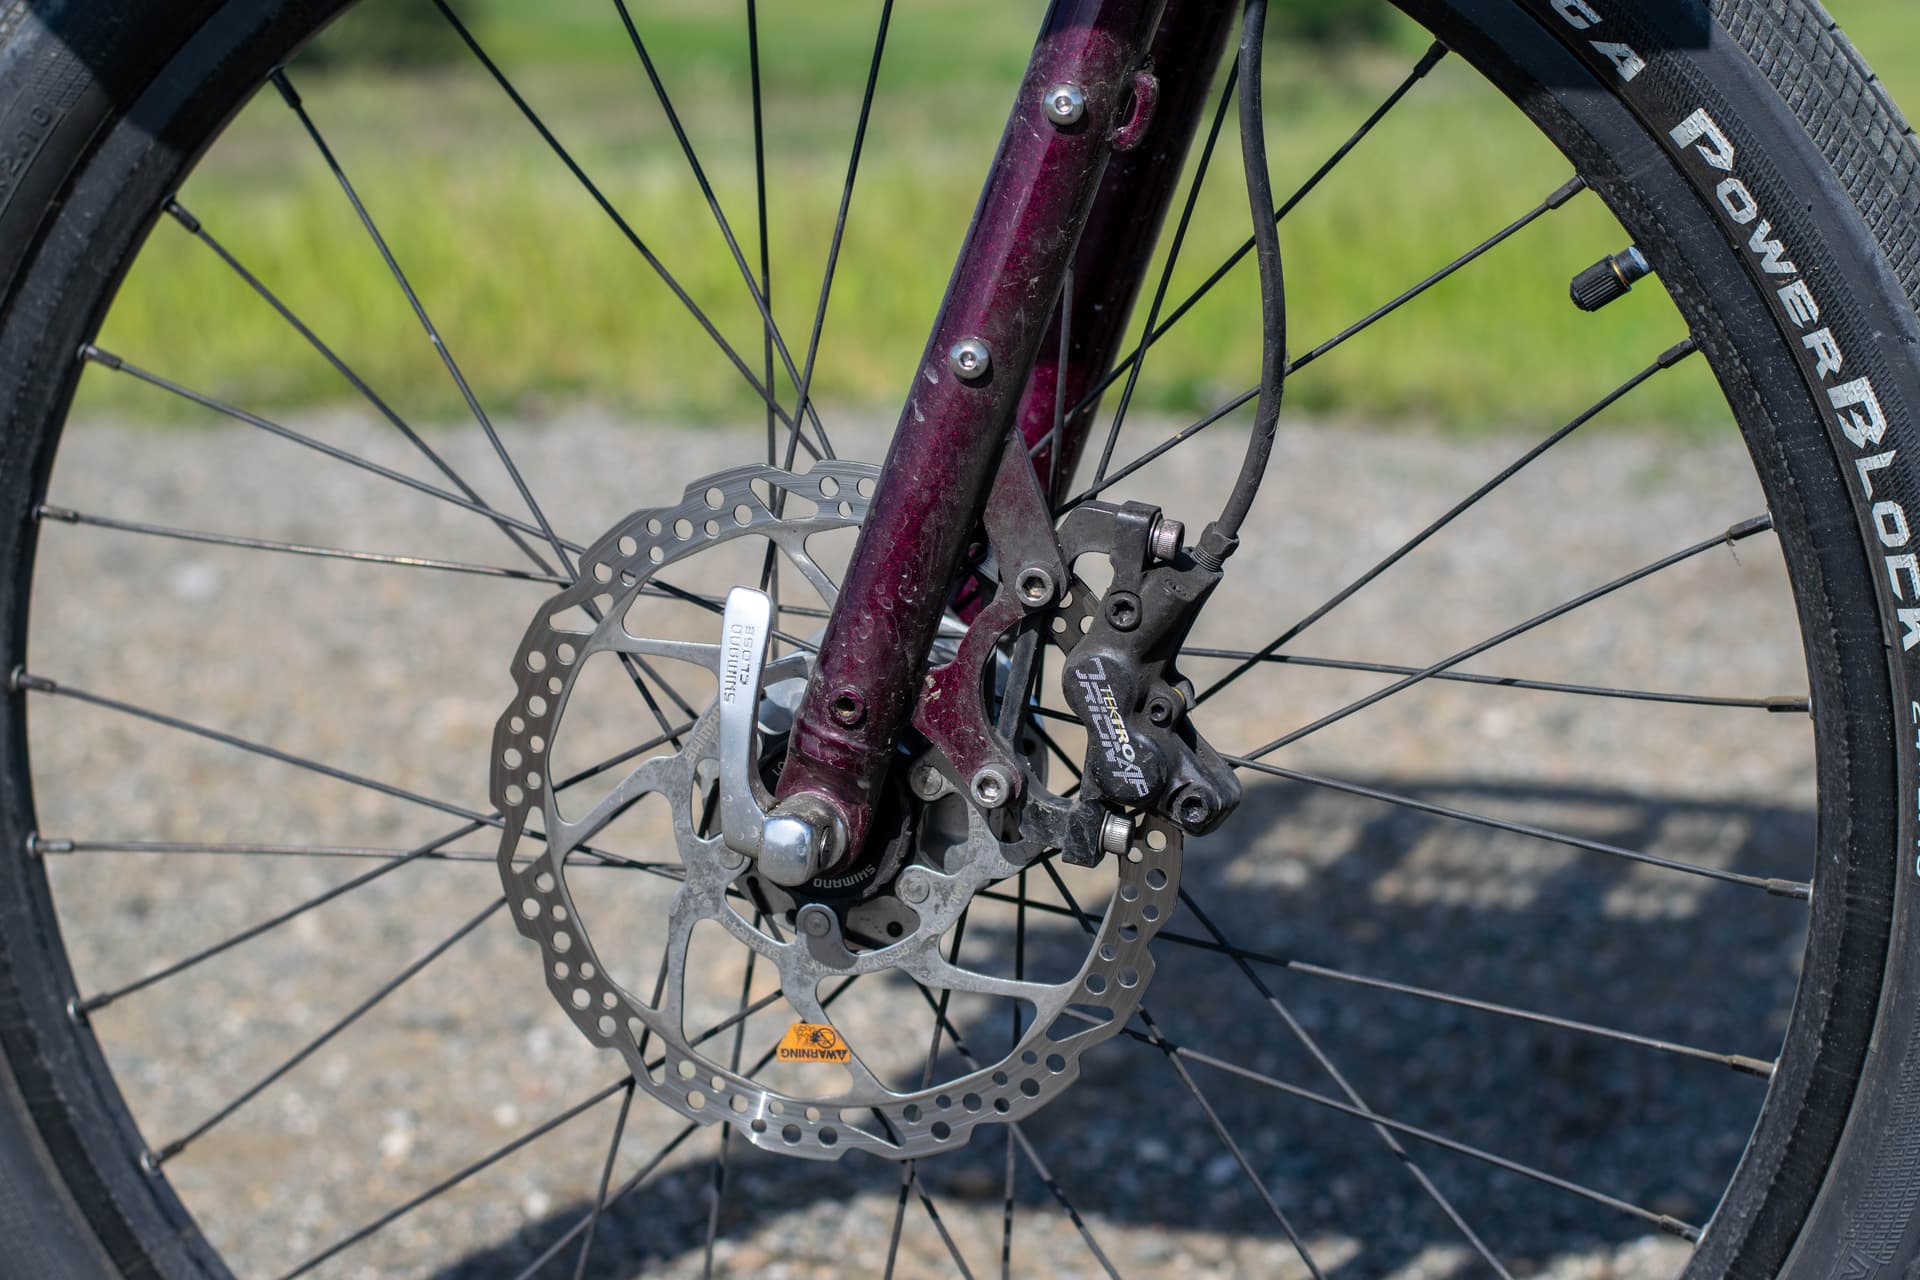
3D printed UDH + Flatmount dropouts were really easy to use during fabrication. I didn’t do any post-machining aside from lightly hand-reaming on the 12/20mm bores. 3D-printing the dropouts also allowed my to create horizontal chain stays which was an aesthetic goal I had.
Bauer tote. This thing rocks. The trifecta of lightness, durability, and low cost. I initially tried a Wald 157 and it wasn’t a good fit for my loading/riding style - broke a lot of wires/spot welds.
Parallel top / middle / downtube with collinear seat stays, horizontal chin stays, and horizontal front rack. I’m happy with how all this came together (aside from the funky downtube bend near the head tube for crown clearance, lol).
24" wheels. This is a really nice size where I can have a large front load without handlebar interference. The 24" wheel size makes the bike feel really zippy and fun, but maintains momentum better than my previous 20" bike.
Ritchey Kyote bars. These things rule. Backswept bars feel amazing.
Losses
Ø27.2mm seatpost. I should’ve gone with Ø30.9mm to get access to a wider range of options with more travel. No rigidity/durability problems with my current KS dropper, but I’m often yearning for a bit more travel and faster response.
Integrated wheel lock bosses. I tried mounting an Abus rear lock and wasn’t a fan. It was huge, rattly when bombing mounting track, and ultimately wasn’t more convenient than just carrying a u-lock around.
Kickstand Plate. My kickstand plate was way too flimsy. This, paired with a center mount, dual-leg kickstand which opened at the wrong angle (for this bike’s geometry) was a recipe for disaster. The kickstand applied a pretty big moment on the kickstand plate and twisted it out of shape. I could re-bend it, but honestly don’t encounter many situations where a stand is needed.
Whatever combination of frame characteristics result in the mysterious no-hand shimmy. My next bike design is using a combination of larger diameter tubing, and removing the middle tube. I’m curious to see if these modifications resolve this effect.
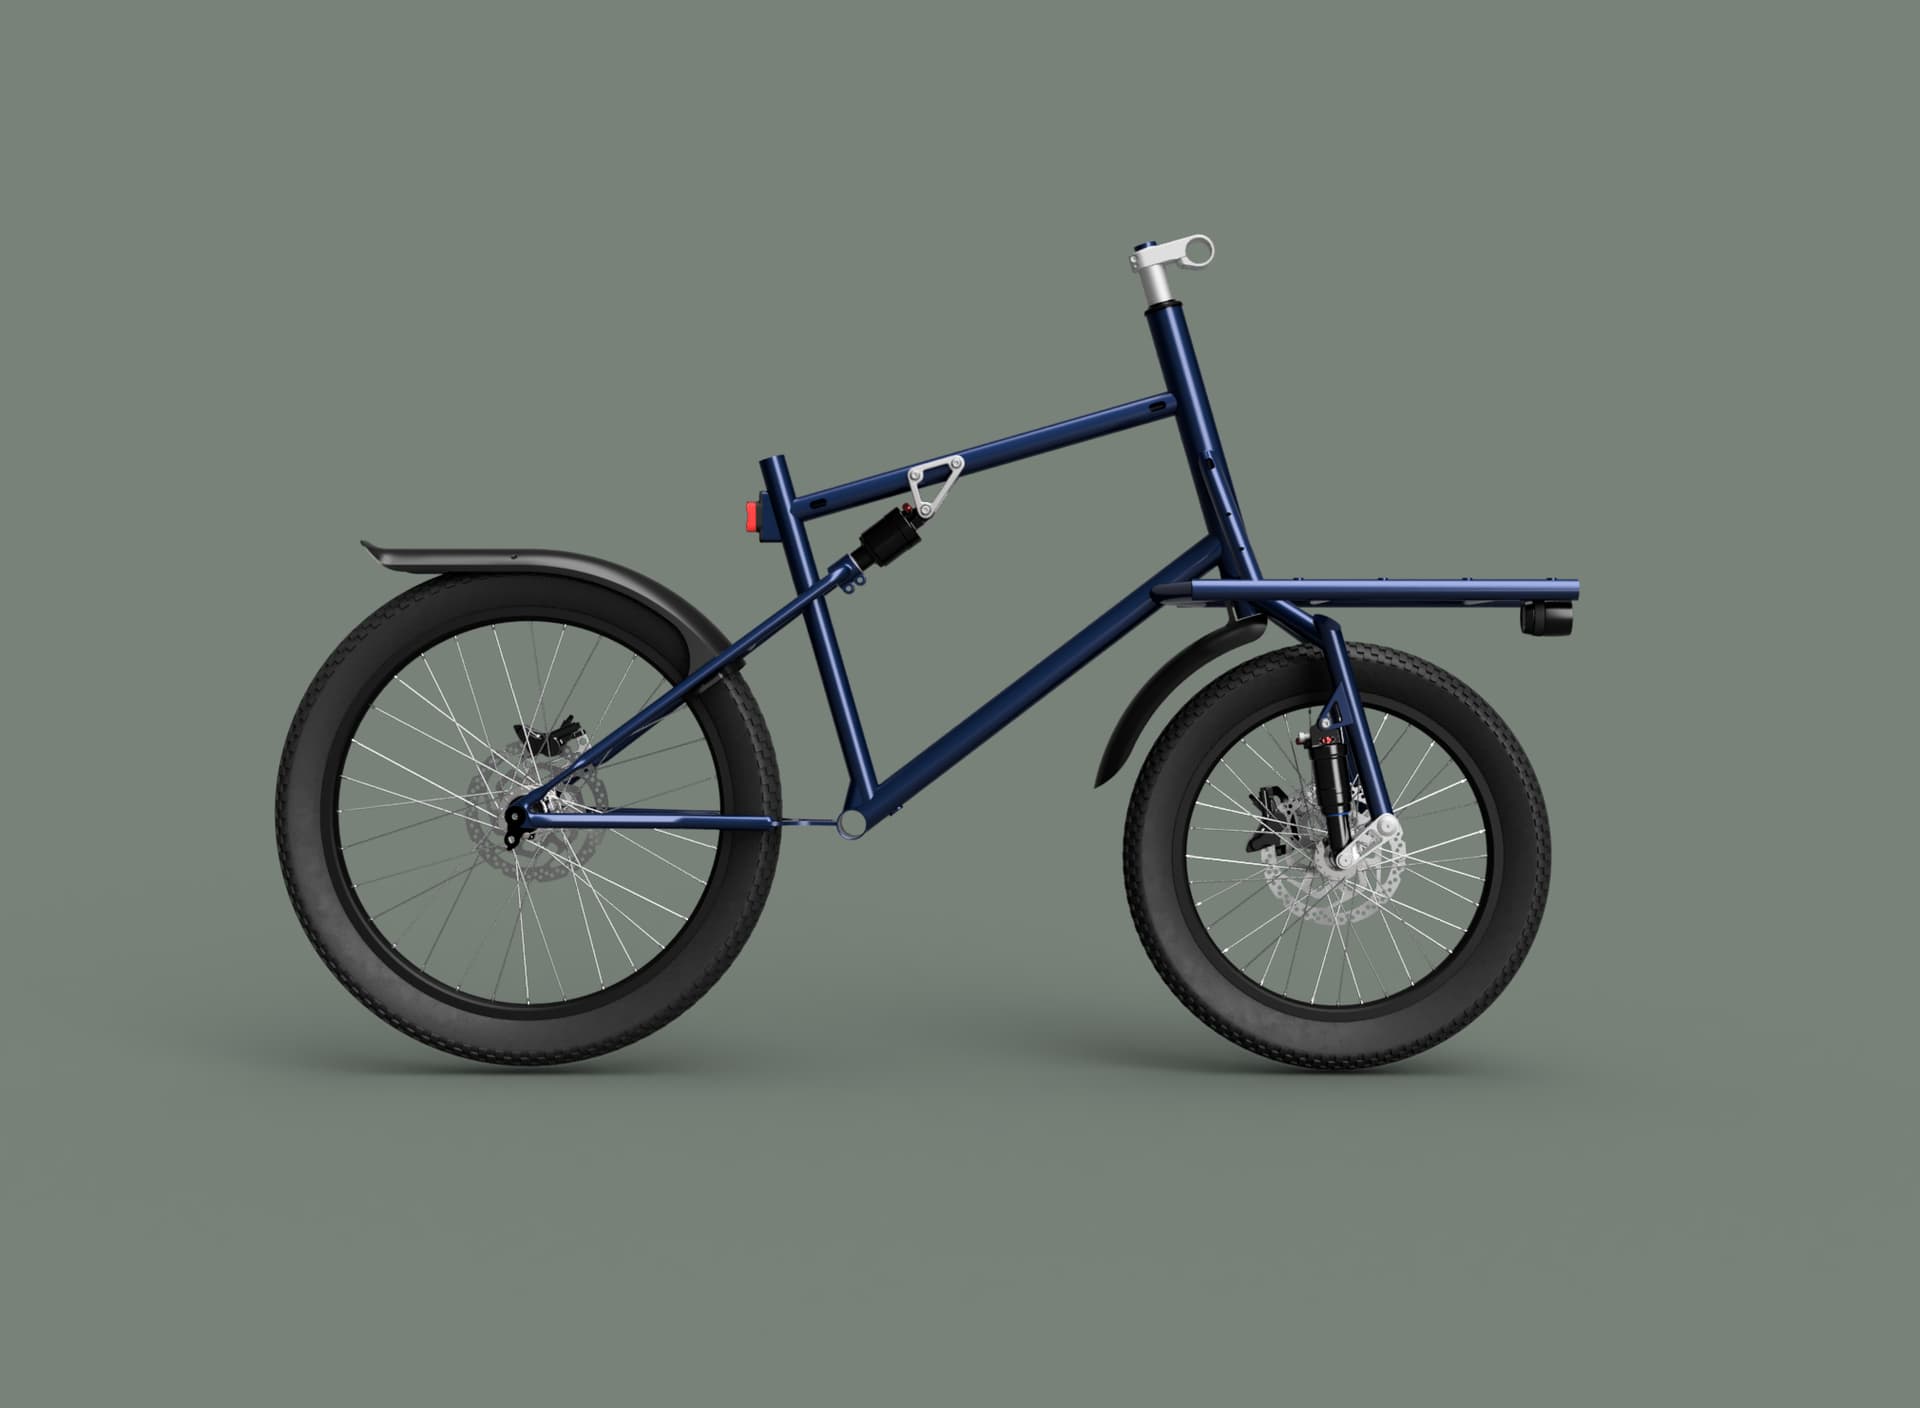
Btw, sneak peak at the next frame, which I’ll hopefully finish next month. Linkage fork, flex-style rear suspension, should be a fun one!
This is super interesting and not the result I would have expected. Although if ya really sending it off-road then it makes sense.
With the shimmy have you considered experimenting with some kind of dampening system? There are a few different ways you could approach that with aftermarket systems. Cane Creek Viscoset, Bullit Dampening Kit and Pademelon Steering Dampener all come to mind. There’s also integrated systems such as the KIS sytem by Canyon. Keen you know ya thoughts there amazing work on the bike too!
For the full sus, typical cargo loads are my ~15lb/7kg backpack, a full bag of groceries, and various big boxes that I shuttle between offices at work. The roads are pretty rutted/bumpy on my commute and I’m excited to see how the suspension changes the ride.
@Spencermon Thanks, Spencer! I discovered linkage forks through the designs you shared, so this means a lot.
@bushtrucker Yep, I was also surprised by the handling results! As you mentioned, this can probably be explained by my riding style / location.
Adding a steering damper is definitely something I want to explore with the next build. It’d be cool to build my own version of KIS, but I may revert to the Cane Creek Viscoset if I’m running low on time.