One of the ways I was able to learn about layup is thanks to a relationship with my local bike shop. I was able to get a few warranty scrapped frames that I cut up and dissected to see layer counts and directions.
As for the “weldments”, the early years of production carbon bikes would use aluminum bits in their construction, this is how I did my 1st frame, with aluminum head tube, bottom bracket and dropouts. It is not the ideal solution, but if done properly it will work quite well
Interesting, did you find much of a difference between brands? Did you cut them in different areas of the frame such as lower HT/DT junction or other areas that undergo complex loading?
There are definitely differences, especially in the older frames when companies were doing it all in house, the more modern frames from the big companies all seem to be trending toward each other in terms of fabrication techniques. But, likely that is due to a limited number of actual fabrication companies doing the large volume production for a number of brands. A Trek and Specialized will look very similar when cut up. All of the recent high volume frames I have dissected are one piece front triangles, the only multi piece front triangles I have seen are from smaller manufacturers, and those are multi piece and glued together, or rarely are bonded with a layer of carbon.
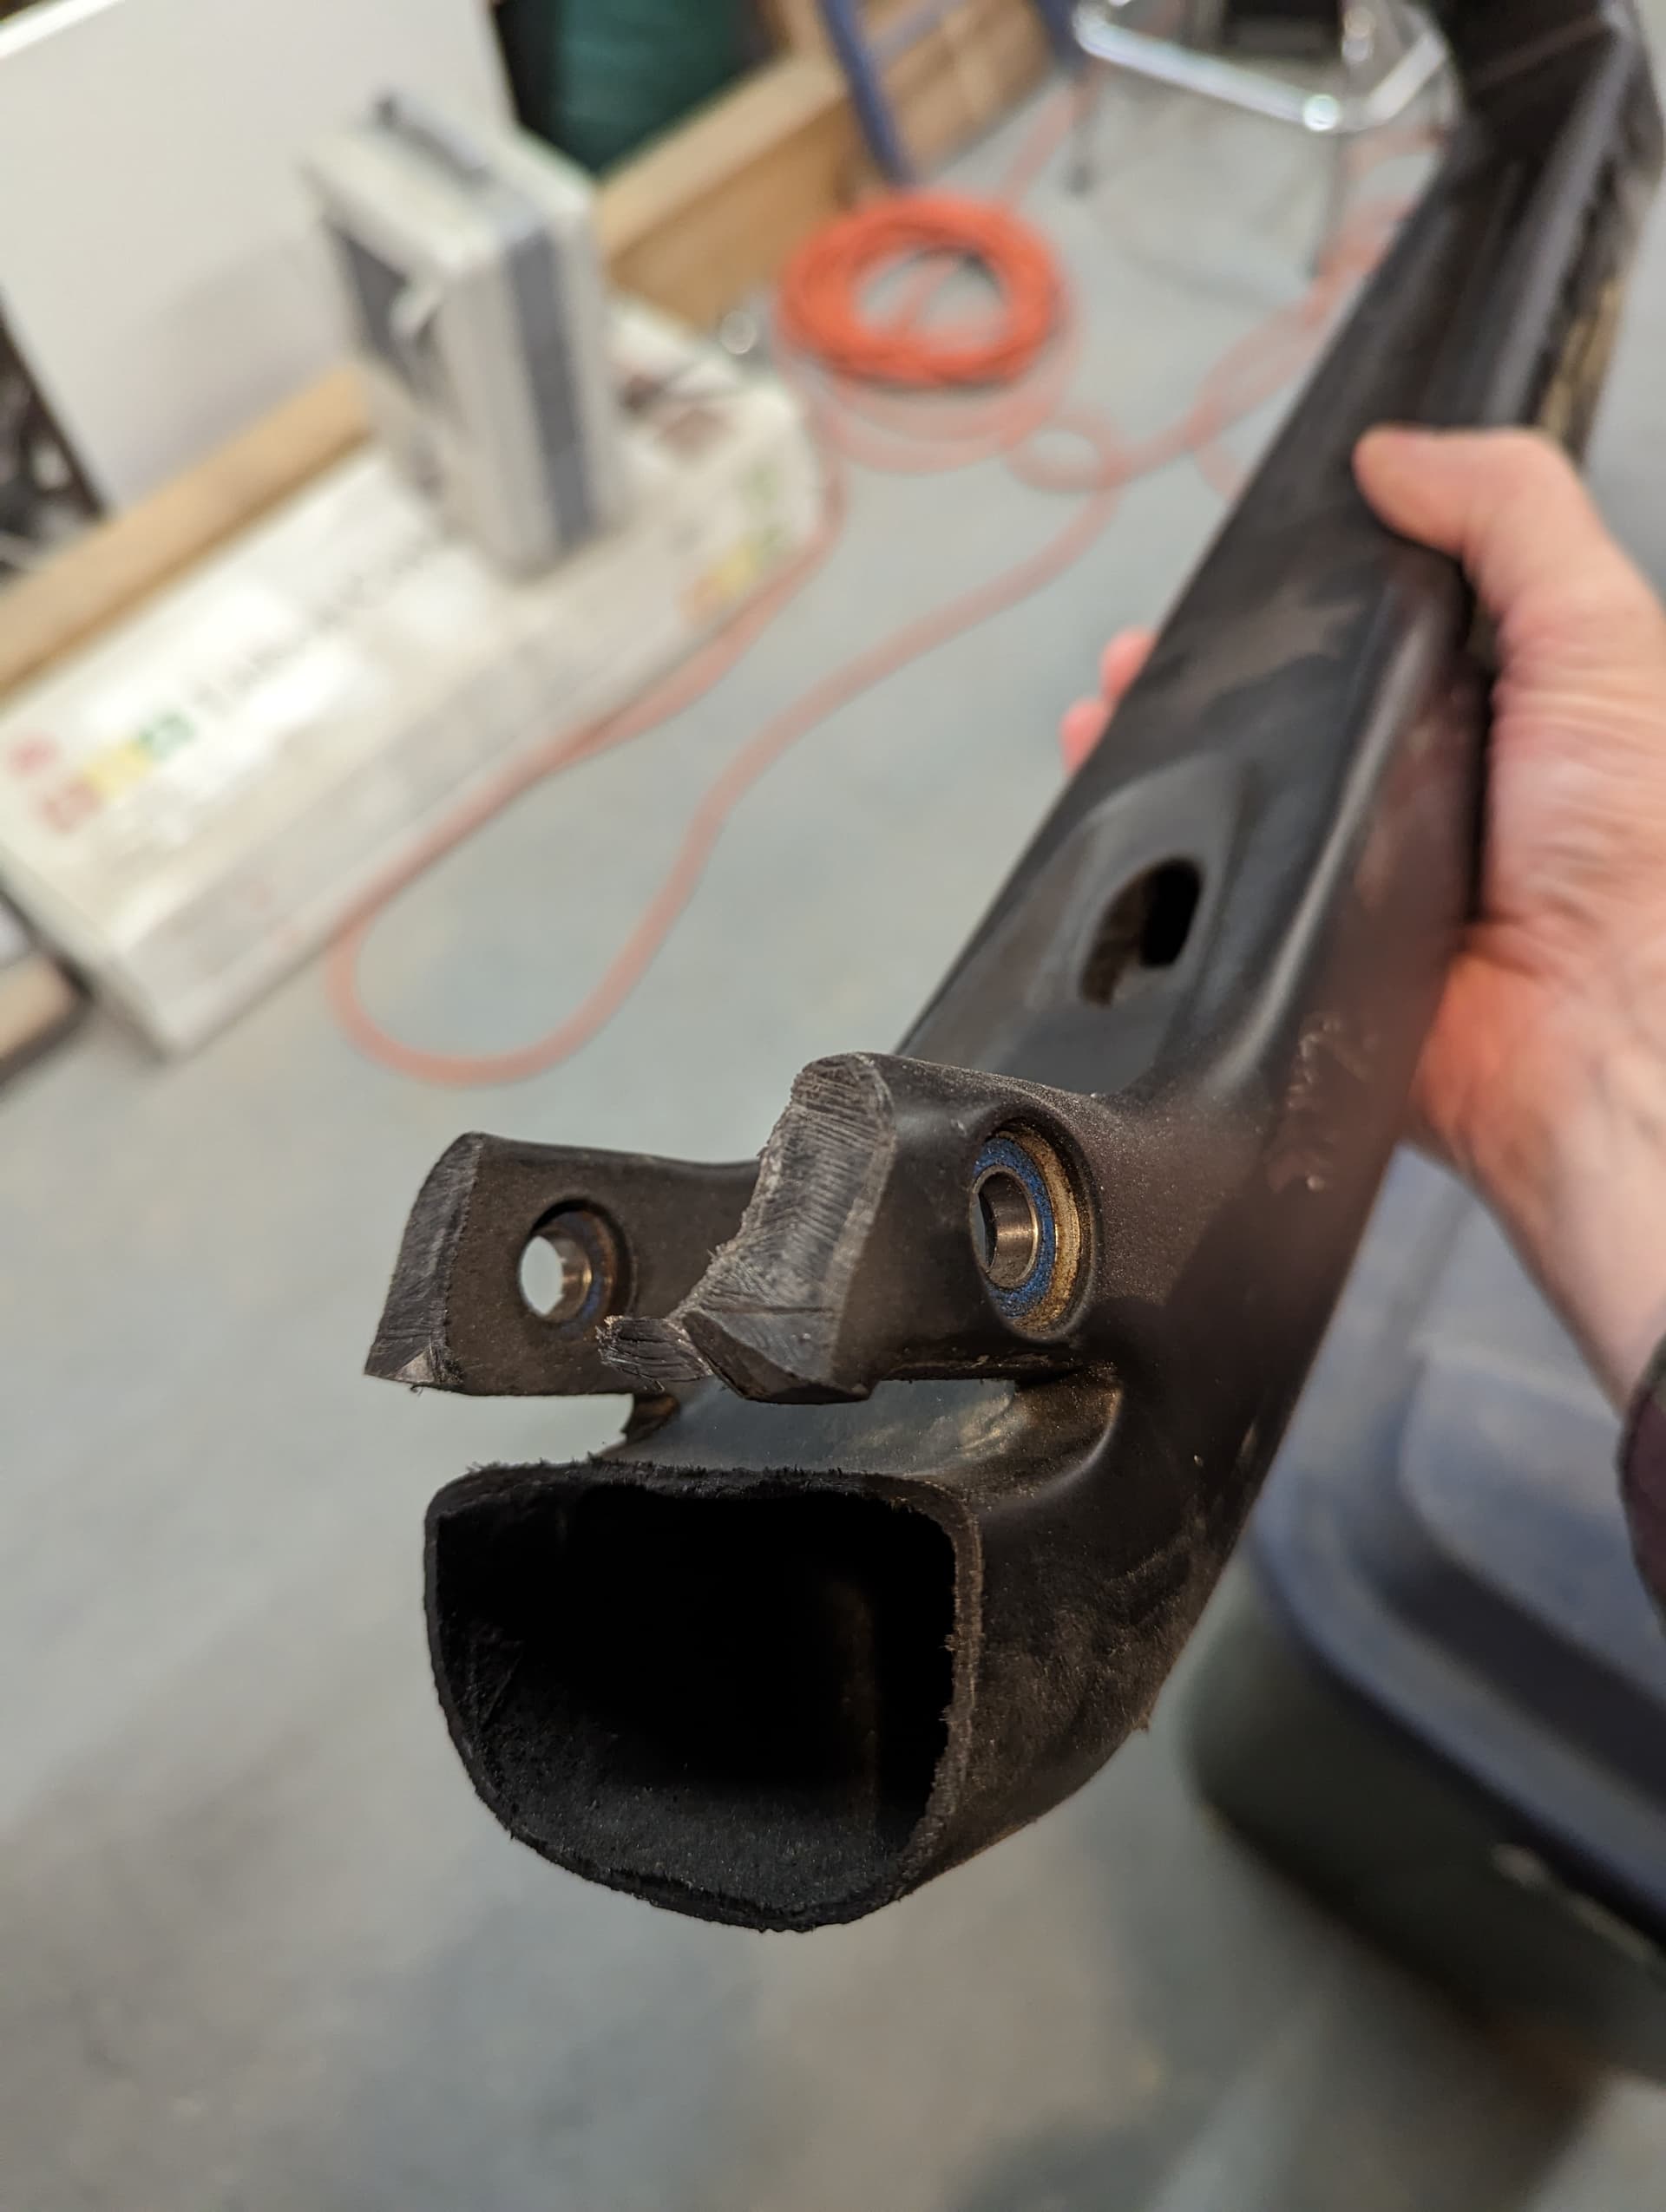
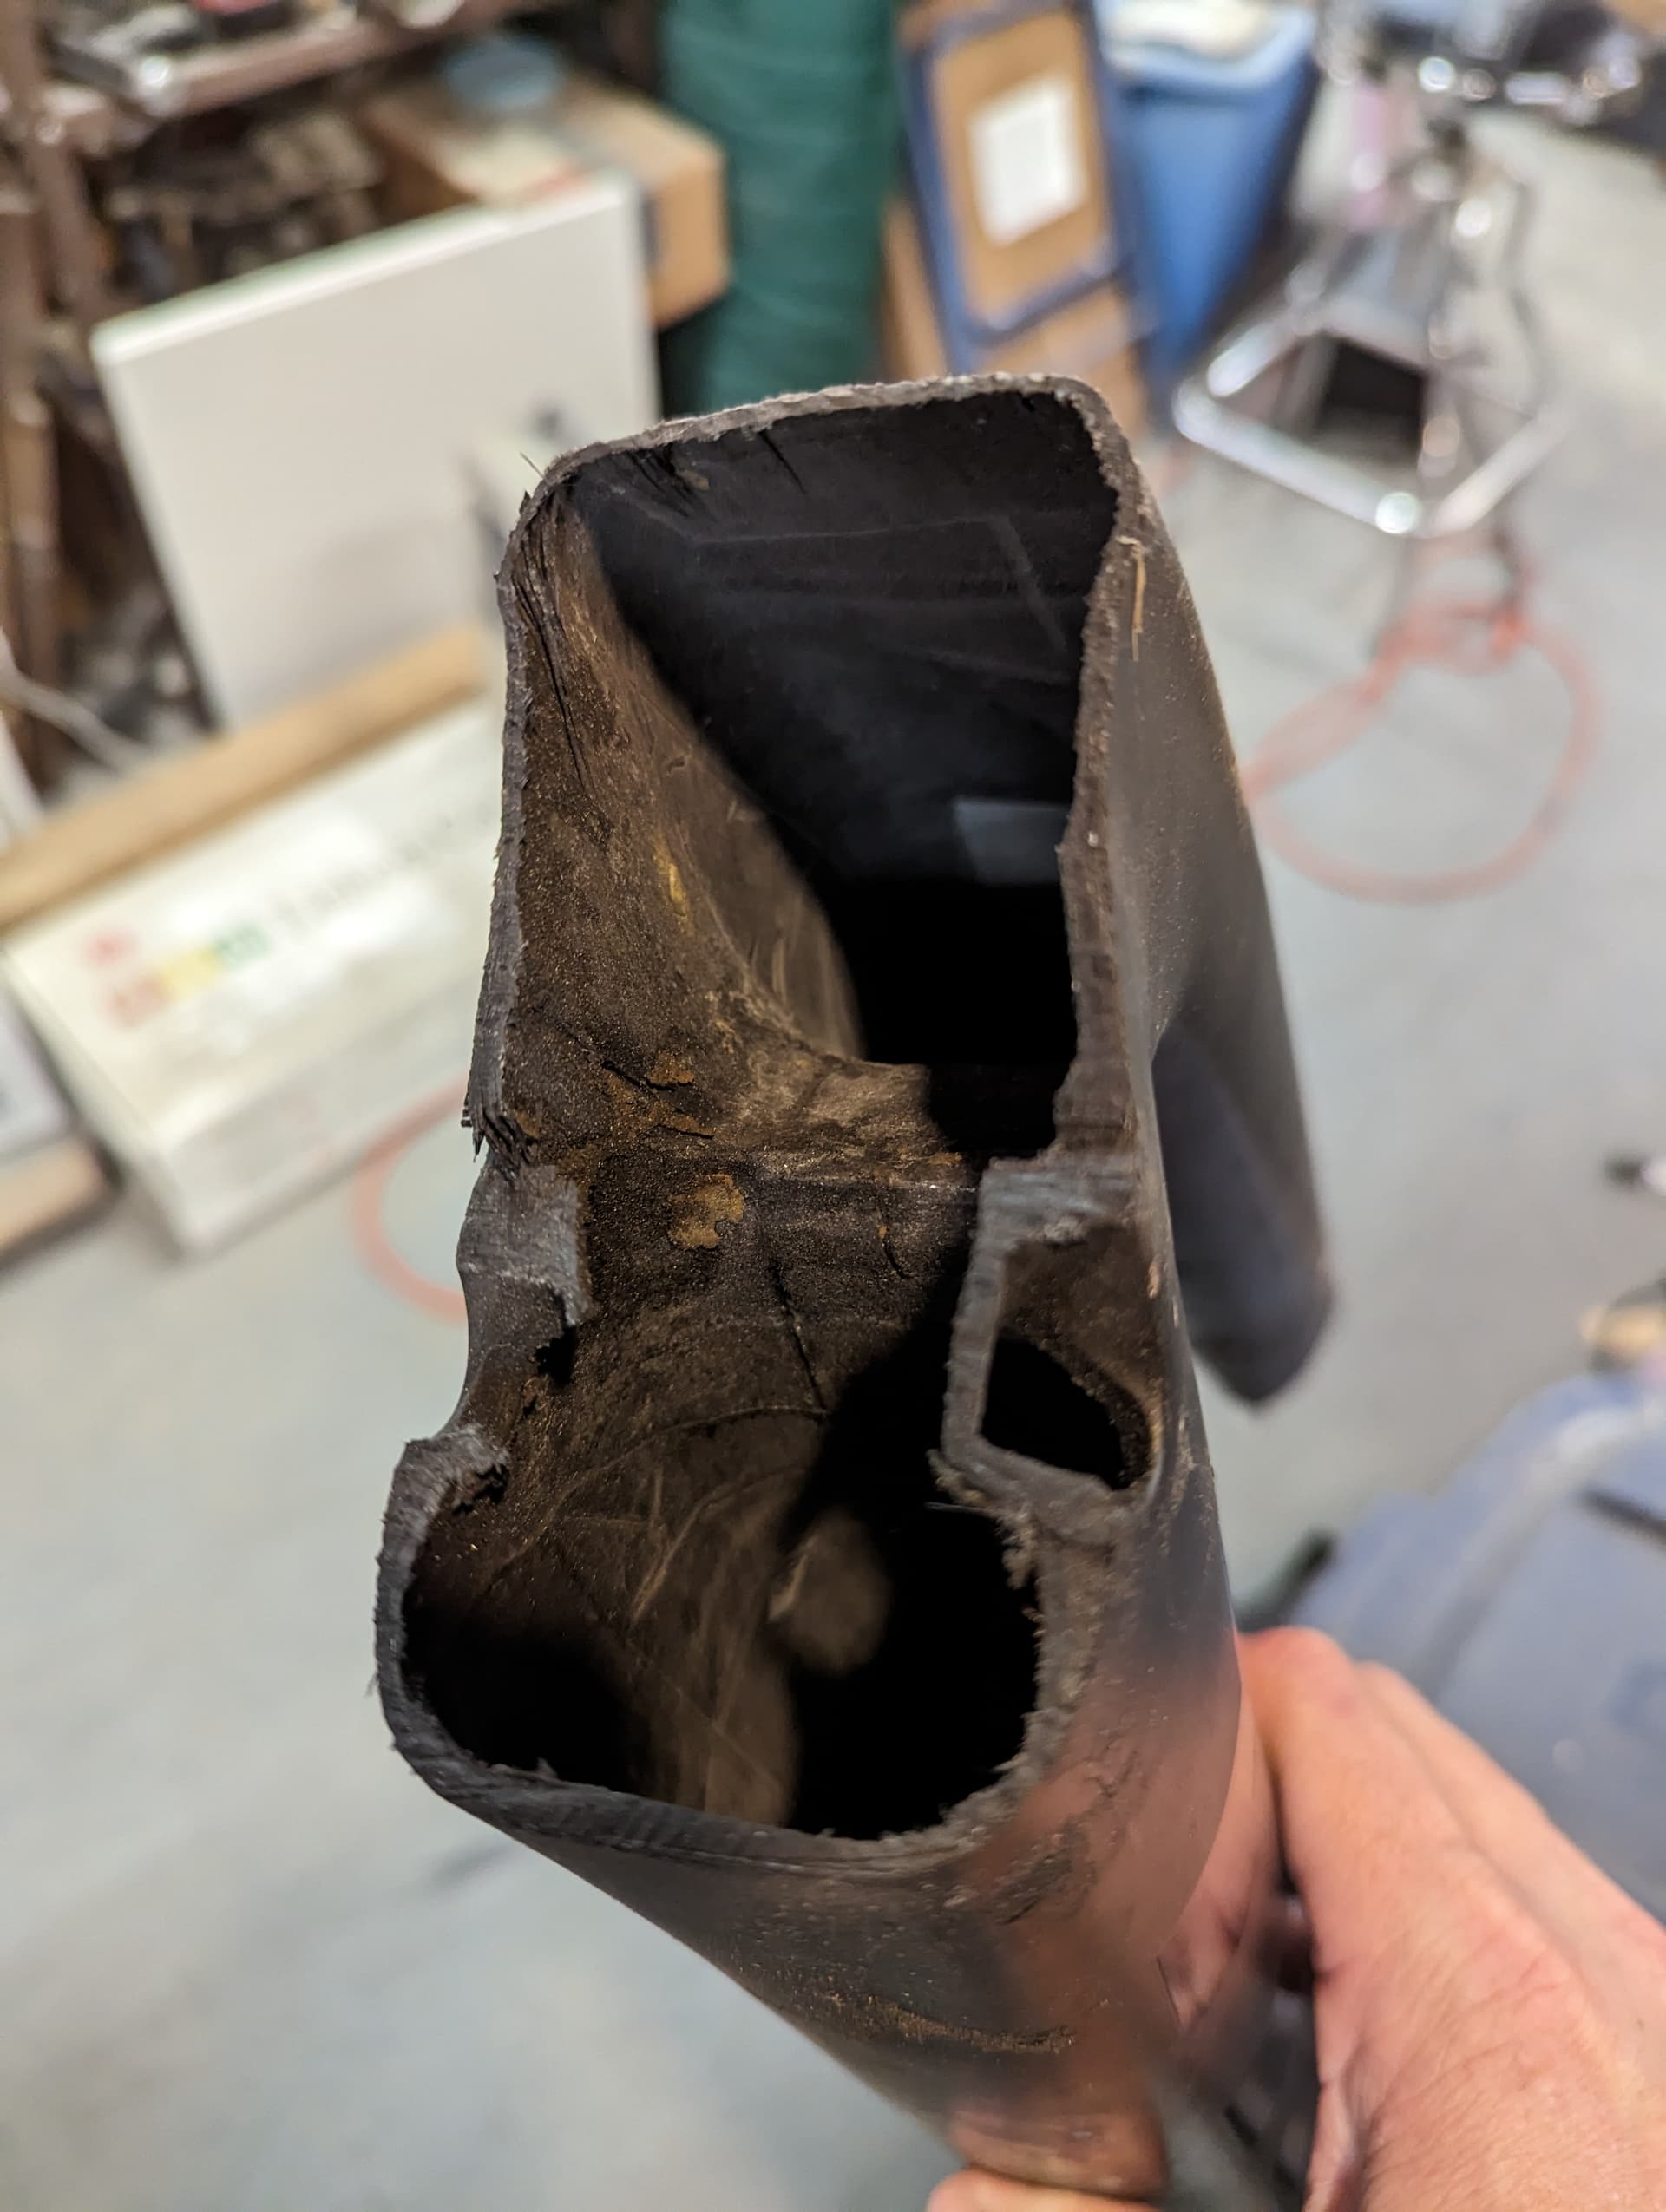
In the stress points, HT, BB and pivot points on FS bikes, there is a lot of carbon built up. Several of the enduro bikes I have cut up are TANKS, and are damn near indestructible under normal conditions. Conversely it is surprising how thin most of the tubes actually are. I was repairing the middle of a seat stay on a mid priced road bike and it only had 3 layers of maybe 3k in it.
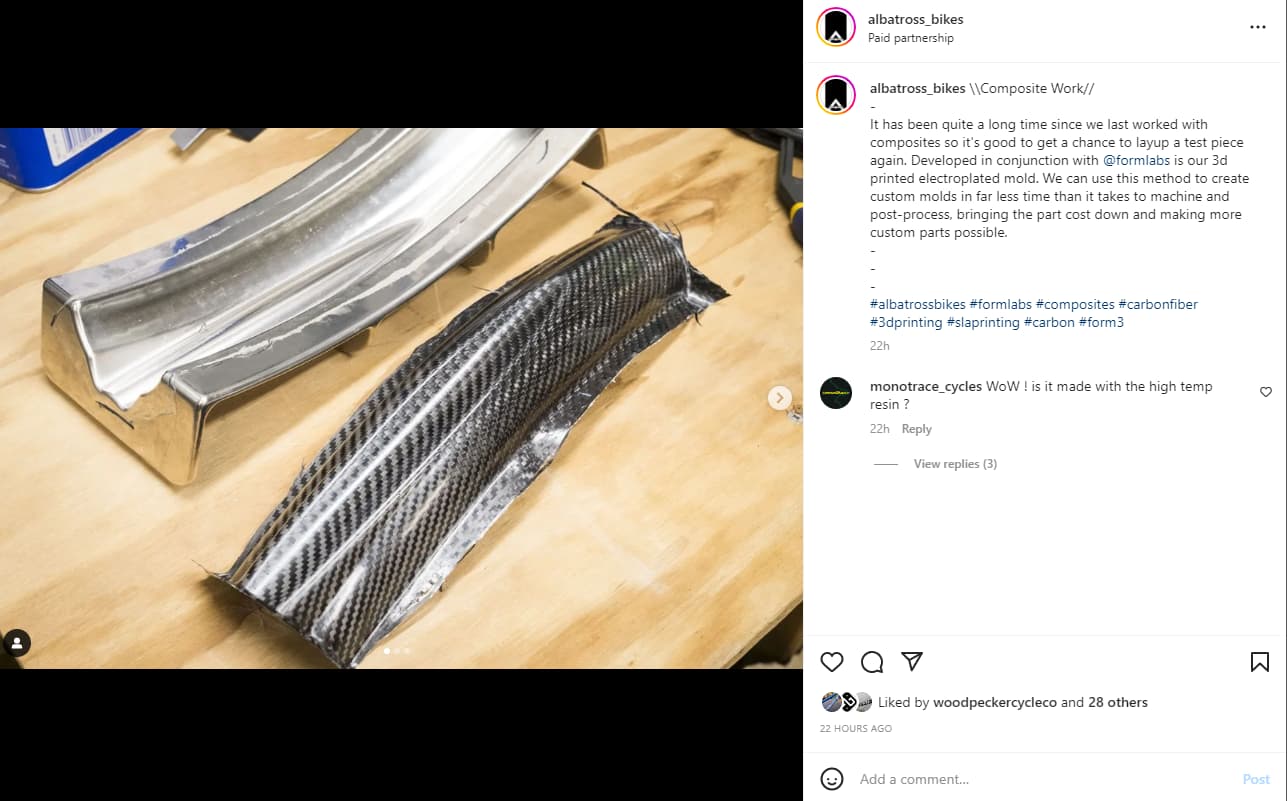
This is very cool! Never thought about using 3D printing this way. Are you able to share some secrets? Is the plastic still there? Are the molds heated?
Never thought of the torch, interesting idea. The other way is to sand down through it. That is how i do it when I am repairing a damaged frame, so I can rebuild the layers correctly.
Thanks for the shoutout @Daniel_Y That was something that I proposed and developed with Formlabs about a year ago. It’s a High-temp Resin that is then plated though an Electroless Nickel process that resulted in a Hard Nickel finish on the printed part that improves the release and chemical resistance of the mold. More details on the process can be found here at Formlabs. Especially in their whitepaper
The benefit with 3D printed molds is that you could include in-mold heaters if so desired as well as scribe lines for later trimming. The downside is that they don’t last as long nor are they as strong so they don’t tend to work well for bladder compression molding without a backer of some sort to provide the strength.
This part was laid up with a “wet pre-preg” method to make it easier. No pre-preg. And consists of a | 90deg 3K | 0deg Uni Hi-Mod 12K | 45deg 3K | layup schedule.
I’m new here but work a lot with composites in my builds.
I built a carbon road bike in the past (tube to tube, homemade tubing) and am currently working on a full suspension bike (prepreg in negative moulds), but I will open a thread for my builds.
I don’t have any interest in making bikes for other people so I am happy to share my knowledge on layups and processing if people have specific questions!
I am starting to build tube to tube road bike as hobby project. My question is “How to create joins between tubes correctly?”.
I will mitter tubes and glue them together with 3M DP420 (epoxy structural adhesive).
Next it is important to strengthen joints by putting some layers of carbon sheets.
Could someone recommend layers and orientations of layup of carbon sheets in joints?
Somewhere I have read that the overlap must be 1.5 times the diameter of the pipe.
A lot of people use prepreg with vacuum bagging together with high temperature for better strenghts. But I would like do not go by way of high temperature. Wet layup with vaccum bagging is for me as hobbiest more cheap method.
Hi Pol, sounds like you are on the right track. There is a post further up on this thread with a link to quasi-isotropic layups. That is what I recommend you start with.
i agree with pursuit and seems you already are on the right track. the 1.5 times (i assume wall thickness, not diameter) seems about right to me. but as you already know the fibre orientation is crucially important.
what tubes are you planning on using? If you know the layup schedule you can more or less duplicate that in a heavier form. I disagree with pursuit with the quasi-isotropic layup tho. this probably makes sense around the bottom bracket area, where you have a complex, not easily determined loadcase. for the head tube however, you know you will have compression/traction around the upper and lower headset. inbetween you will have sheer forces therefore, so you would need diagonal layers to transfer those stresses. It is usually also a good idea to alternate between UD and off axis fibres if possible. This will greatly help with the fatigue life as fracture propagation is greatly reduced.
one more thing would be to create a big fillet in the transition of all tubes after bonding. I used epoxy with microballoons and fumed silica for this.
I hope this makes sense. I’ll see what i can find in terms of pictures of the road bike build.
Anyone here doing 3D printed ti/steel lugs with carbon tubes or know of where to find good resources for it? Looking to start designing for that setup, as glueing things together seems simpler than layup schedules.
I was looking at this for a gravel bike recently and quickly drew up some lugs and asked around for some quotes. It ended up prohibitively expensive for me. I think guys like Atherton and bastion can make it work, as with inhouse production and always printing very similar parts they can really optimize the nesting and don’t have to make a margin on the printing.
If anyone knows a good source for titanium parts I’d still be very interested in this. But for now i think a tube to tube construction with overwrapped joints is the way to go.
Silca is doing the printing for the majority of the Ti builders (including us). I would guess a complete lugset costs $1500-$2000/frame. For reference, a pair of printed dropouts costs ~$600
that’s not actually too bad. however, I think printing would be much more attractive for beefy full suspension mountain bike parts where you have a lot of pivots and shock mounts and the like, and then you can probably quadruple that cost…
I think the only way to do it in a production setting that Bastion and Atherton are doing, is to buy the machines and have dedicated personel to process the parts. I have seen first hand how Bastion process their prints and it’s a very laborius exercise taking many hours. That’s on top of the couple of hundred thousands of dollars to set it up.
Mark at Prova uses Ram3D in NZ to make the parts he uses in his Ti and steel frames. I know how much engineering goes into what he produces and the level of details. For example the seat binder bosses he welds to his frames are hollow and the modelling he’s done for it is exquisite. Certainly a level of design and fabrication to aspire to.
Would it be a simply insane idea to take two (or more) broken carbon bikes, chop out the good bits and bond them together to create a “new” frame? Assuming that a) you know the good bits are sound, b) you have the skills and facilities to do the job and c) you happened to have suitable pieces that fitted together to give you decent geometry, looks, functionality etc. If bonding/wrapping plain tubes is viable and repairing damaged carbon is viable, I can’t see any reason this wouldn’t work too. (cue Jurassic Park quotes, “you spent so much time wondering if you could…”).
I have friend here locally that has been doing this to make kids bikes. Takes a broken full size adult frame, chops it and sleeves the cuts to bond and rebuild into a kid size frame.