Hello everyone
I am slowly trying to get around building my first full sus mtb. As I am a total noob to the topic I am looking for some help.
Things I know, is that I want to make it, in the simplest possible way, so it will be a straightforward single pivot, using a bsa BB as a main pivot. I do not want to go into discusion about suspension travel and geometry as this may vary, beetwen designs but I would like to know a few things I have totally no idea about. Here are some questions that are in my head at he moment:
-Is there a specific or desirable characteristic that a steel single pivot should have
-Is building it without a linkage software a good idea
-What are the most important guidelines I should go with
-Do you design one with a specific shock in mind? air vs spring
-Is there something, you should definitely avoid during designing a frame like this
Nothing more in my head right now but I am sure I’ll have many more problems as the discussion develops, wich I hope It will. Maybe It could transform Into a small guide for anyone wanting to start building full sus frames and feels overwhelmed by the topic.
Cheers
-Is there a specific or desirable characteristic that a steel single pivot should have
I recon somewhere between 110% and 130% anti squat. Depends on your riding style, for me 110% is fine, my wife needs more because she is a violent pedaler hahaha. with a single pivot try to get as much progression as you can, it probably wont be much but you don’t really need that much. if you get somewhere between 5-10% it should help.
-Is building it without a linkage software a good idea
Not really, linkage x3 cost $25usd. How many hours are you going to pour into this bike build? Best to get the software so you have an idea of what you are going to get at the end. It also means you will be able to use your bike as a reference point for making the next bike even better.
-What are the most important guidelines I should go with
Dunno about most important, but ballpark leverage ratio should be about 2.8:1
Choose a travel range and pick the metric shock size that fits that travel range.
-Do you design one with a specific shock in mind? air vs spring
Air sucks, use a coil (opinion)
-Is there something, you should definitely avoid during designing a frame like this
I use a 216x63 shock because I had one lying around on my first frame. That was a mistake, its outdated (hard to find modern replacements cheap) and in my bike it’s overdriven with about a 3.2:1 leverage. Its not the end of the world but it means I needed to custom tune the shim stack to get it working nicely which is a hassle.
Here’s a thread with how some people are doing pivot bearing arrangements:
This youtube channel has some good info too, but I wouldn’t take his opinions on what things should or shouldn’t be as gospel. He does give very good explanations of antisquat/antirise/pedal kick etc:
What physical and digital tools do you have access to?
Everyone has different skillsets and tools, so this advice might not apply. But in my opinion, design time is always free. Design software always has opensource/free versions that can help you design your bike. The only cost is the time to learn new skills.
I would start with a hand sketch of the suspension layout, specifically the bearing cross-section of your main pivot. I suspect you may run into trouble with the width of a BB shell main pivot.
Not really a full suspension, but I spent over 50hrs designing this with @Meriwether. Even with all the 3D CAD and design time, I have no idea if it’s going to work.
I do know you’re completely blind without something telling you what the suspension is gonna do. Little, tiny layout changes have huge effects in how everything works. Does your design have 456,000% anti-squat? 11%? Do you know? How?
I know you said you didn’t wanna talk about travel or geometry, but you’re gonna need a way to figure those things out. You will need to know the stroke of the shock you plan to use, it plays a role in everything. I’m also in the coil shock camp, but it really depends on the leverage ratio your frame has, or is designed for. How do we know the leverage ratio? Linkage. Get it, it’s affordable and if I can learn it, a clever orangutan could probably figure it out.
I have a rear end from a cannondale habit I will try to design the front triangle for it. Still have no idea what to do so I will be watching this thread.
Easiest way? Copy a Starling and you’ll have an nice riding fully that’s fairly easy to build. (For someone that has build a frame before with acces to a lathe and a lasercutter/supplier) For the first bike I would ignore coil as it is easier to get an airshock up to the right pressure/sag for your frame.
Linkage is a wonderful tool but had some glitches when I designed my first fully, and had me end up with 95mm of travel instead of the desired 150. Still was a wonderful bike to ride though! But since then I have drawn out the suspension path and ratio in CAD. More work, but still gets a result you can work with. Graphs are nice, but if you don’t know what you want or how everything feels they still don’t tell you anything. Just make sure your main pivot aligns with the chainring and you should have a pretty OK riding bike, at least for you first fully. (And check out Starling or Paul Aston for “controversial” opinions about progressive curves or linear bikes with coils and so on)
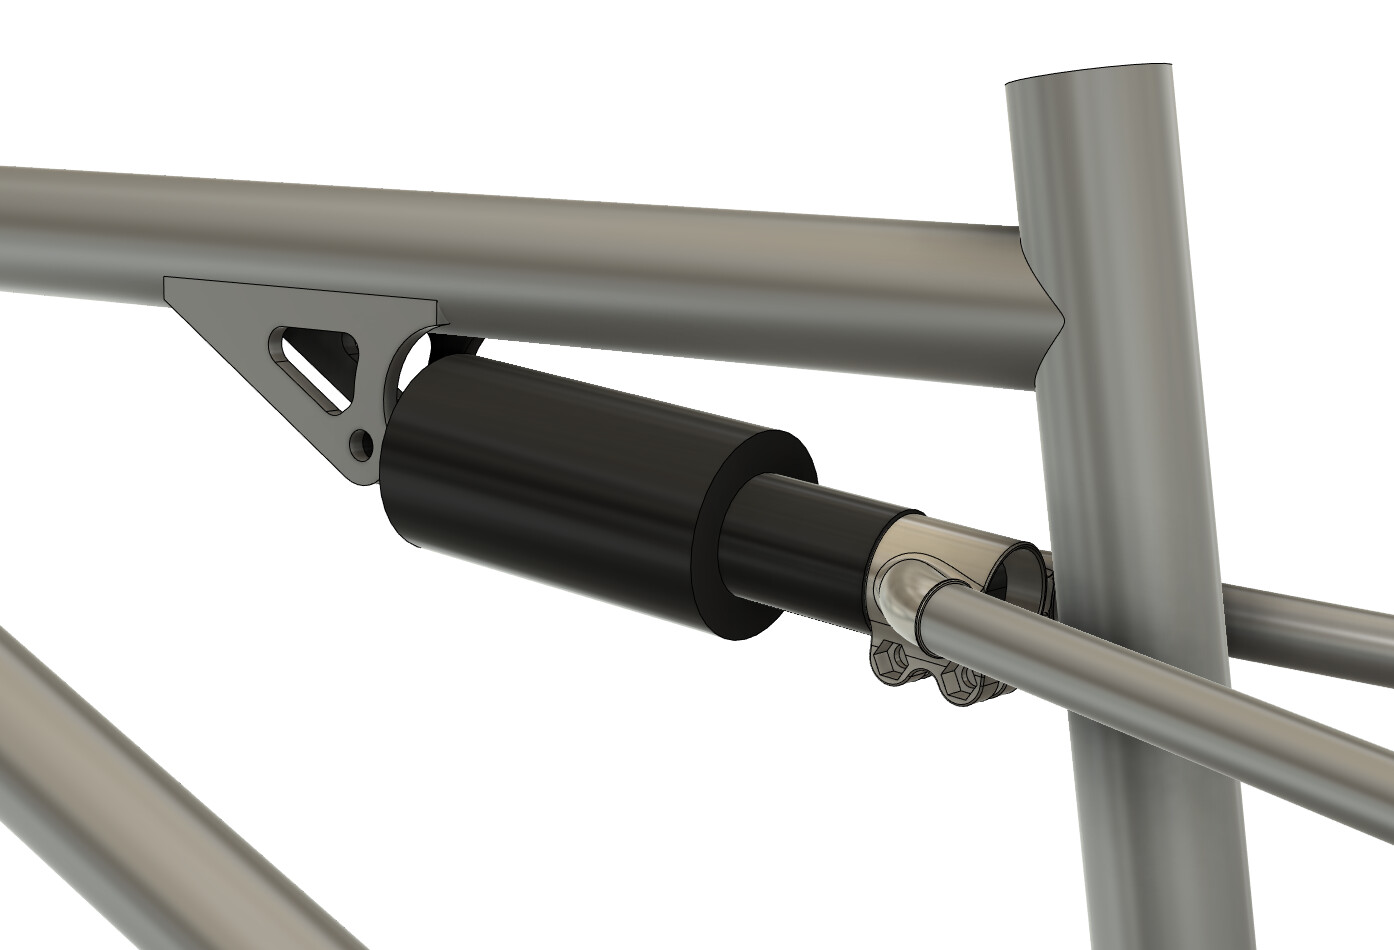
@Daniel_Y : Nice design! Have you considered putting the lower flexplate above the BB shell? As stated above, in my experience getting your chainline and pivot aligned makes a massive difference in how the bike pedals.
What you should avoid? Thinking this will be thé fully. See it as a first attempt and life will be easier.
Great advice! There is no shame in copying, that is how you learn. In my experience, the first version always sucks, the second attempt gets mildly better, and the third is great.
@Maj If you need help copying a frame, I can easily reverse engineer a front triangle design in CAD so you can print it out 1:1. No shame in asking for help either.
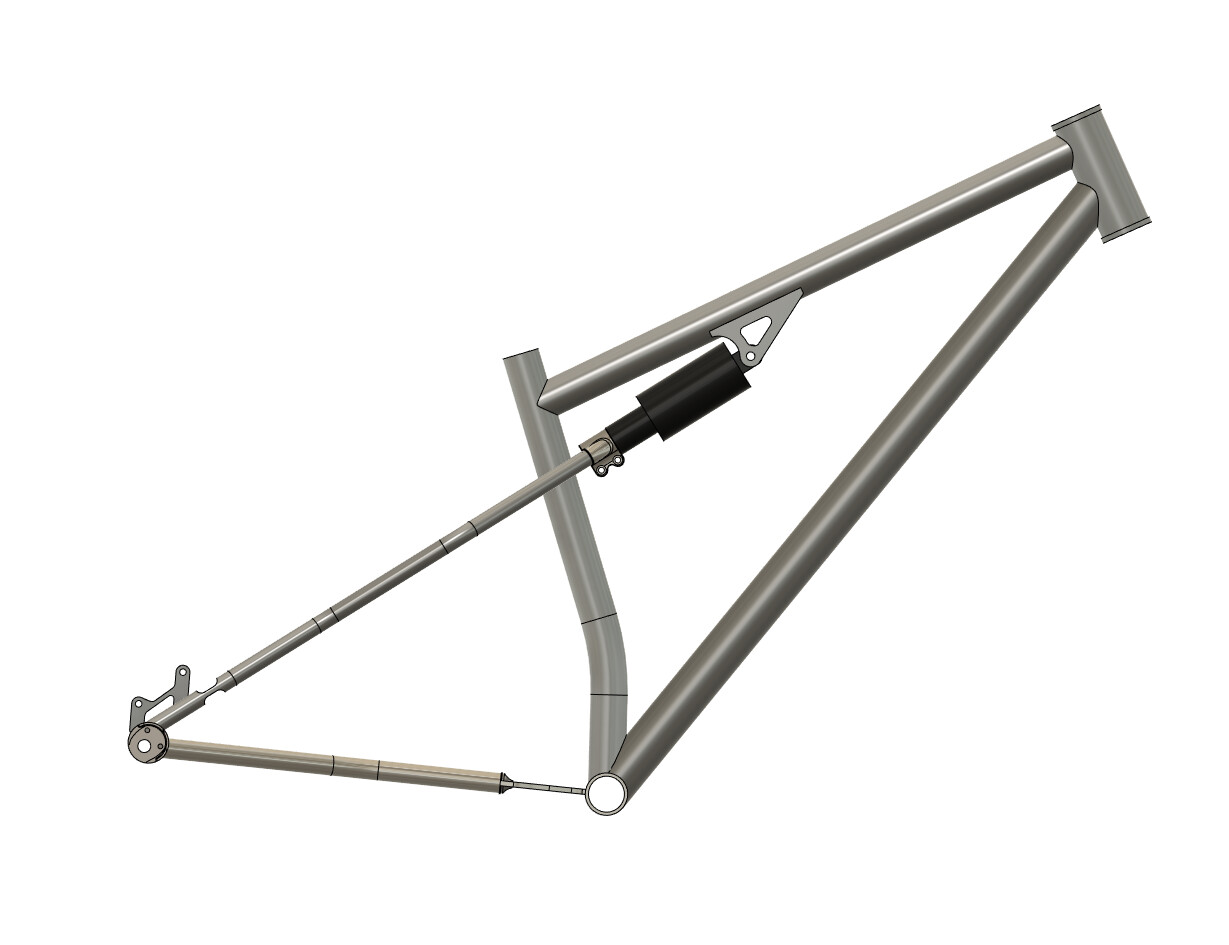
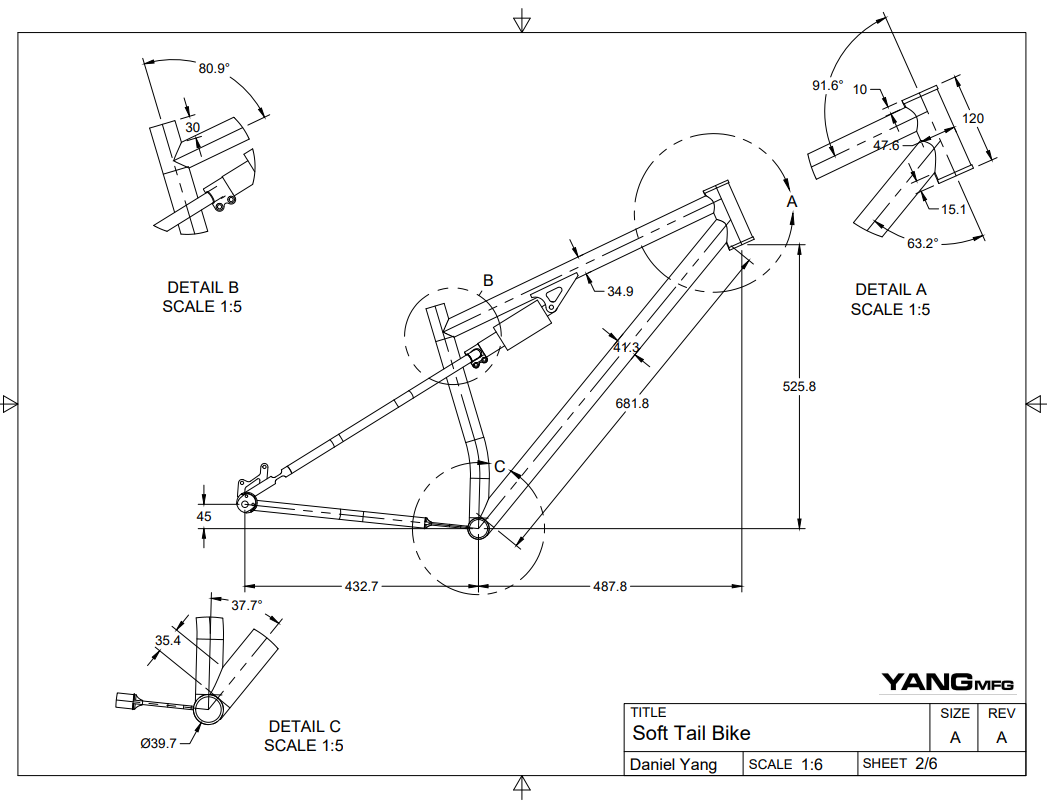
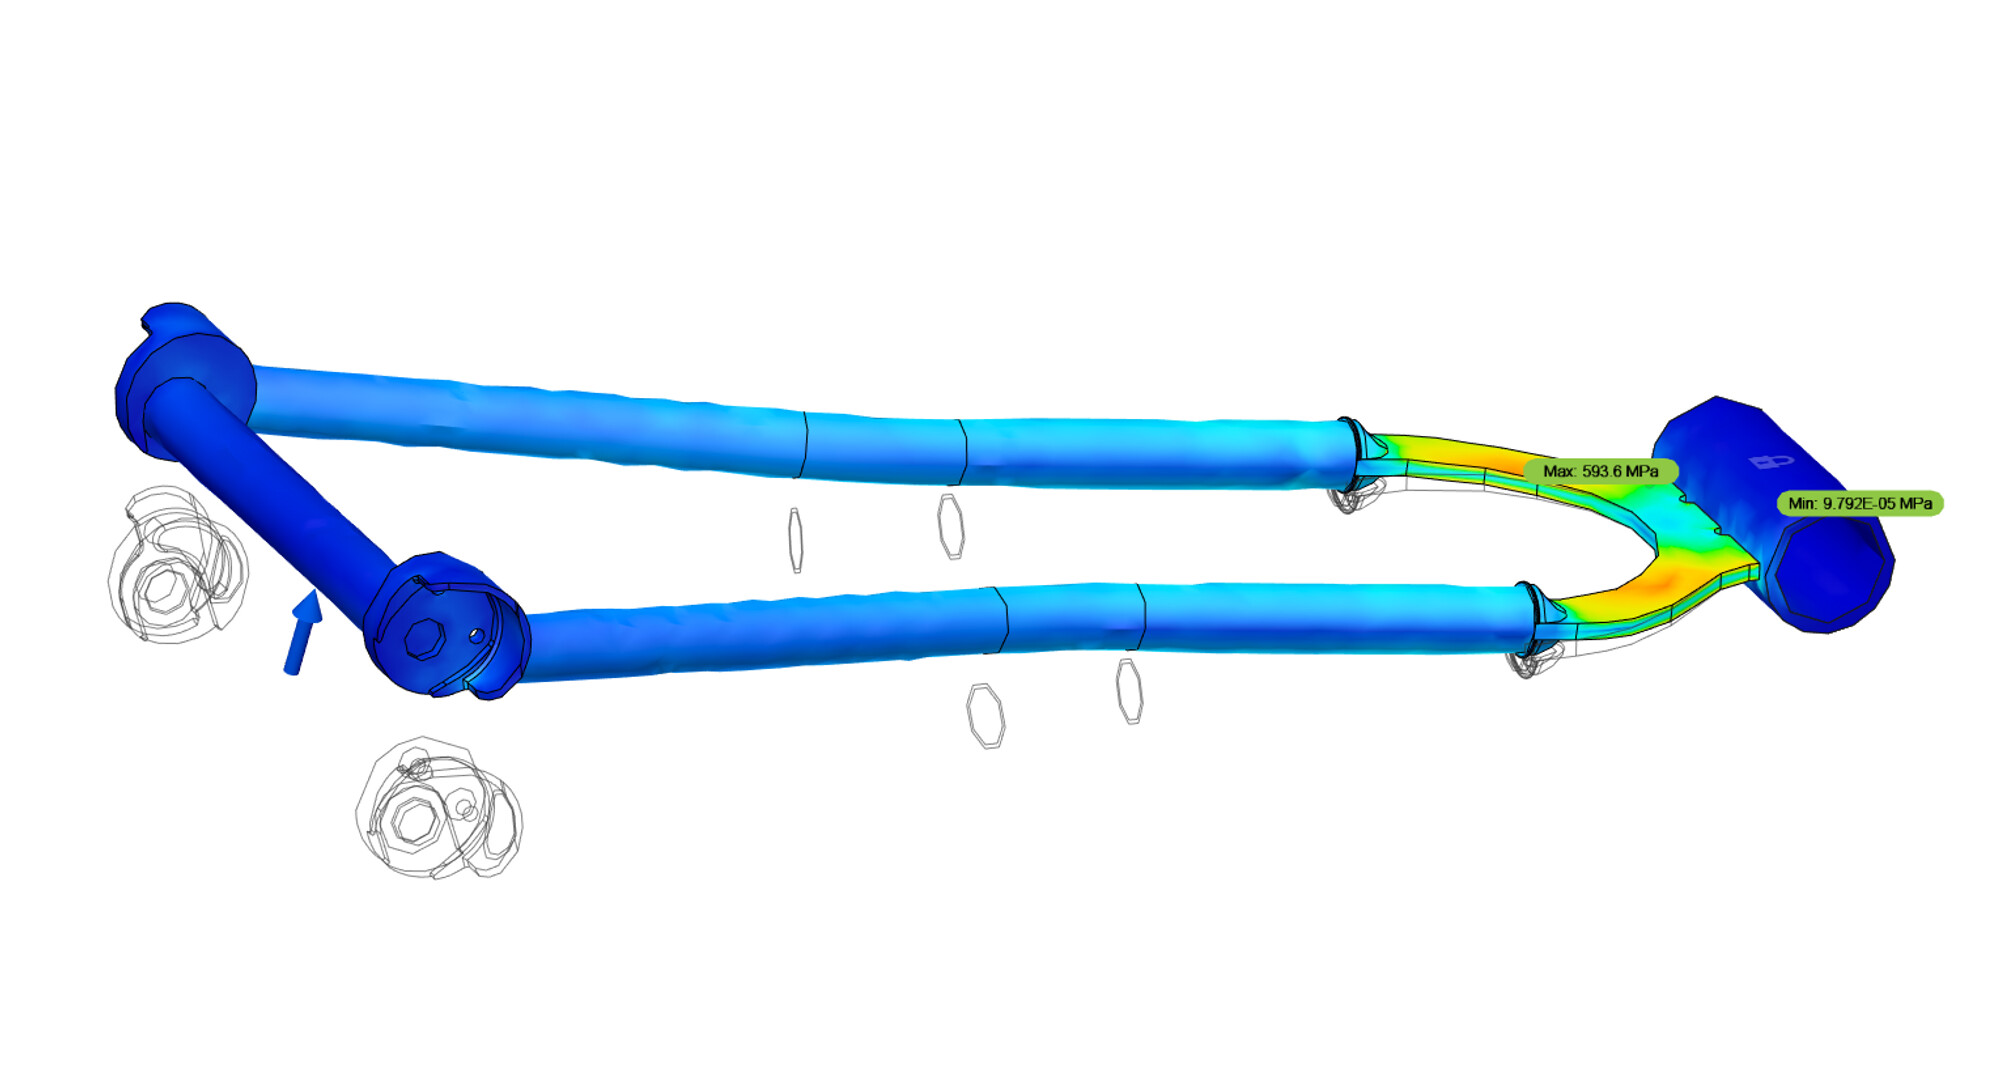
I did consider putting the flex plate above the BB, but I was unsure of how you would access the bottom of the plate to weld. The focus of that frame was to get it manufacturable, rather than to optimize performance.
My own personal opinion: I am not a fan of softail designs. Putting in a main pivot would have improved that bike a ton, but the client wanted a soft tail. I feel like softails are a leftover from the early 2000’s. With dropper posts, wide rims, tubeless tires, and better suspension, mountain bikes are ridden WAY harder. I think if that bike was ridden with the mindset to attack everything, the flex plates would be stressed past their fatigue limits.
That being said, that softail improved my CAD skills a bunch, I just hope it comes together and stays together!
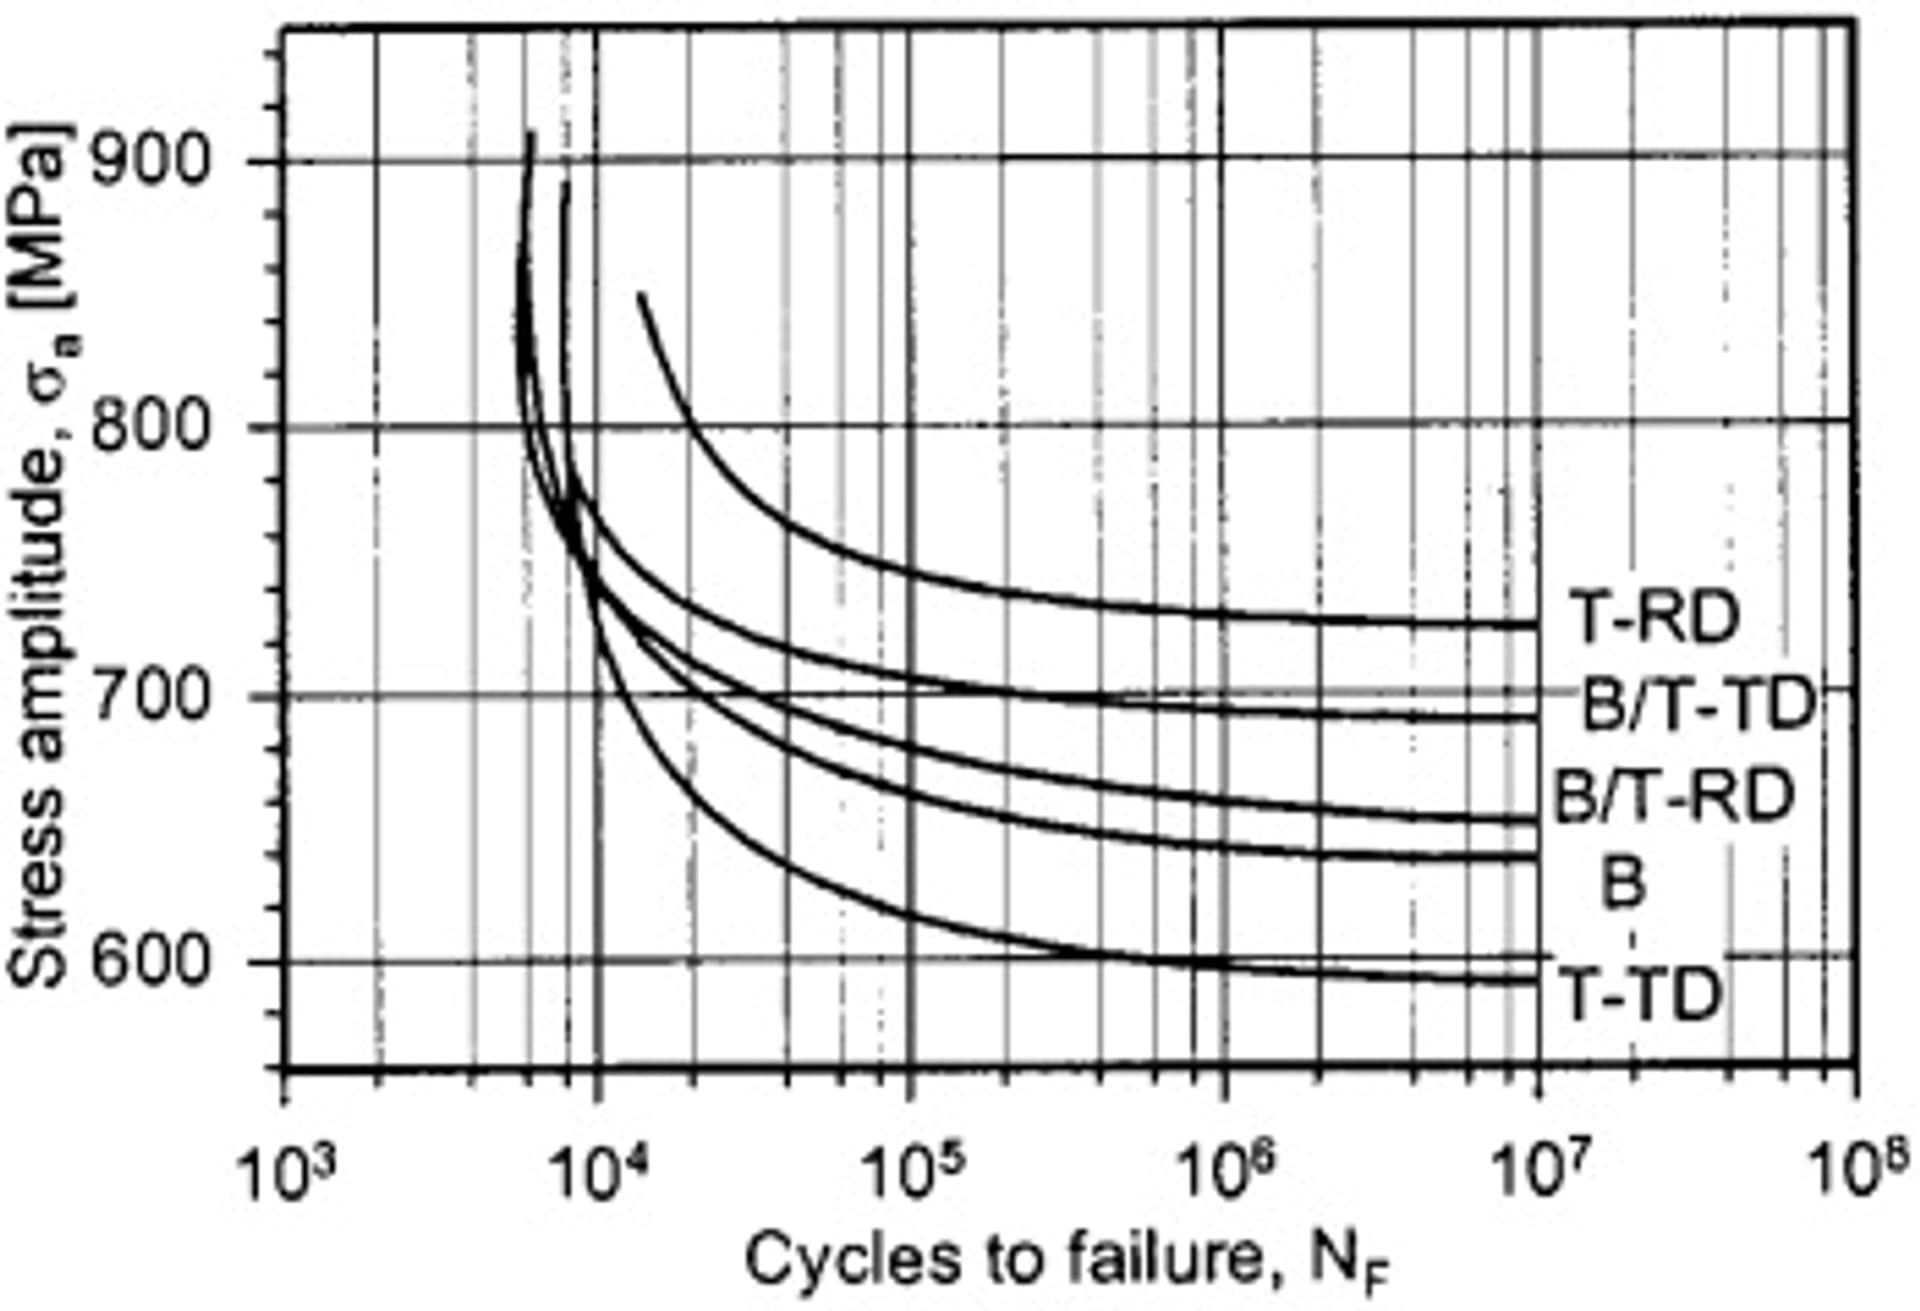
Quick fatigue theory 101:
If you can keep the stress of a flexure below a certain limit (in this case, for titanium <700mPA), it theoretically can survive infinite cycles. This is called the Endurance limit.
Fatigue failures are not deterministic (meaning that it’s guaranteed not to fail or survive after N cycles). But the takeaway is: the lower you can keep the stress, the less likely it will fail due to fatigue.
Hear hear! My Victor started life as LTST (Long Travel Soft Tail) without a main pivot and a basic “shock” (There are some cute Brompton coils) but in the end decided that it would be better to have a real full suspension, even with limited travel.
If you don’t want to use Linkage software here are a couple tips.
Shock placement, having the forward end of the shock lower than the rear will get you a linear (tiny bit of progression) leverage ratio. If the nose is higher than the swingarm end you’ll get a digressive LR. Linear will ride better than digressive. A small bit of progression will help with bottom out, but these days there are many shock options that can aid in tuning it.
Shock, get a air Cane Creek. You’ll be able to tune the shock without needing it to be re-valved. The CCDB shocks have a very broad range of tuning and you will be able to find a setting that works well. If you buy a used Fox or RS it’s a crap shoot on what tune you get and if it will work well. New aftermarket Fox and RS stuff will likely have a MM tune. Medium compression and Medium rebound.
Main pivot, I recommend using the 44mm headtube instead of a bb shell. With a 44mm headtube you use top cap bearings on both sides and the stack height on the bearing is lower than on a bb cup. It’s a tight spot to fit a pivot behind the chainring and ever mm counts. Use an offcut from a steer tube for your main axle, drive a starnut into each end for set bearing preload.
Main pivot location, set the center of your pivot with the top of your desired chainring size. This will get you very close to the 100% anti-squat and ride well. If you want more active suspension while under pedal load then drop the pivot to below the chainline, firmer go higher.
Thank you everyone for adding so much to the discussion
I’ve built +/- 25 rigid frames so far, and have an acces to lathe and a mill. Allso use fusion 360 but let’s say I am not a master. This project is meant to be a good fusion training. I hope to get this frame designed fully in 3D. @Daniel_Y your tutorials get me closer and closer to this. Thank you for posting them because they are a mine full of knowledge. You are a gifted tutor.
This was actually my first idea to go with, but copying it from the foto seems not to precise, not knowing the size of the frame wich the foto was taken of. what Would be the best dimension to scale from. I was thinking about a shock length as it’s probably the same through all the size range.
Is leverage ratio just a ratio between two distances, from the main pivot to the axle, and from the main pivot to the shock mount?
@earle.b Thaks for the tips on how to build it without linkage, I think this will be my way to go, with my first frame using your tips as guide lines
It will probably be a ss frame as it is meant to go down hill pretty much exclusively, so It doesn’t really matter how it handles pedaling, but what would be the advantages of a frame stiffer or more active under pedaling forces?
The leverage ratio is “wheel travel/shock stroke”. That gives you an average. But the leverage ratio is not always constant. Depending on the suspension design(layout, linkages, etc.) the leverage ratio may increase, decrease, stay constant, or any mixture of the 3.
Say for example your bike uses a 210x50 shock and you achieve 150mm travel with your shock layout and suspension pivot positioning. Your leverage ratio is now 150/50 or 3. But this is just the average. depending on how you position the shock and main pivot and any other pivots your leverage ratio could start at 4 and end at 2. Making the suspension very progressive. It would be much easier to compress the shock at the start of the stroke than at the end of the stroke. The wheel would move 4mm for every 1mm the shock compresses at the start of the travel and then as you compress the suspension, it would be more and more difficult to compress until the wheel is moving 2mm for every 1mm the shock compresses.
If you use Linkage (seriously, it’s inexpensive and sooo helpful) you’ll get the leverage ratio at any given point in the travel. It will plot out a leverage curve over a graph. If you want to have some comparisons, you can always check out linkagedesign.blogspot.com and then translate it into English. They have analyzed many bike and categorized them into travel brackets and wheel sizes. It’s a pretty decent way to check and make sure your numbers aren’t way off course.
If you are riding a single speed, you’ll likely be standing up a ton and pedaling. If your suspension is especially soft (talking about anti-squat), all your effort will be wasted in compressing the suspension and none will be put into forward movement. The counter effect is that if your suspension(anti-squat) is too stiff, it pedals nicely, but your main pivot is now quite high and that means that as your bike goes through its travel, the rear wheel gets much further from the bottom bracket. This pulls on your chain and can be felt as pedal kickback.
Why I would just buy linkage is because it can calculate all of these characteristics for you. I would suggest you have around 105% anti squat, but without the ability to calculate that, you have no baseline to measure against. Technically, you can calculate leverage ratio, anti squat, anti rise, pedal kickback and all the other things manually, but that’s a real pain.
Thanks a lot for the input @Spencermon that’s a lot of helpful news for me. Could you tell me why are those values in percents and how to understand them?
For example what does 105% of anti squat means?
There are many other things besides Anti Squat to consider when designing rear suspension, but If you want to keep things VERY basic, I’d focus on good leverage ratio, progressivity to match the intended shock(more progressive leverage ratio for coil, more linear ratio for air), and anti squat. With a single pivot suspension, you won’t have the ability to tune for the other factors like axle path, anti rise, etc.
I have been watching with interest.
Hopefully my questions are aligned with the original post.
Messing with linkage I started from scratch and pretty much derived the bikes mentioned above… haha…
Assuming a roughly linear single pivot with the shock driving into the down tube do you guys have some rules of thumb for eye to eye & stroke for given travel increments?
My current arrangement is 100 travel with 190x40 shock. My hope is that 100mm is a little conservative for a 40mm air shock.
My other curiosity is how stout does the down tube need to be for this? I assume people are using 38mm straight gage but what wall thickness?
Any other tips or tricks for shock mounting are appreciated.
Also thanks @earl.b for mentioning the headset as pivot. I had looked at that before but obviously haven’t tried it yet.
One quick note about Linkage (and any data analysis) is that your data out is only as good as your data in. Make sure you check and input a realistic Center of Gravity since the default one is usually WAY off.
I think the general rule of thumb is 2.8:1 for leverage ratio. So 100mm on 190*40 stroke shock would be fairly conservative at 2.5:1
I have used 38.1x0.9 and 44x0.9 for downtubes on my 2 single pivots, no issues so far. On the 38mm tube’d bike I put in a doubler plate to distribute the pressure over a longer distance.
Probably worth saying it depends on rider weight/riding style as to how beefy you might want to make it
I think you are on the right track. I think most people are using 38x.9 straight gauge downtubes. I have seen a few diy bikes buckled at the downtube.
Most people gravitate to headsets or BBs for their main pivots out of comfort, but I actually feel like this is a disservice.
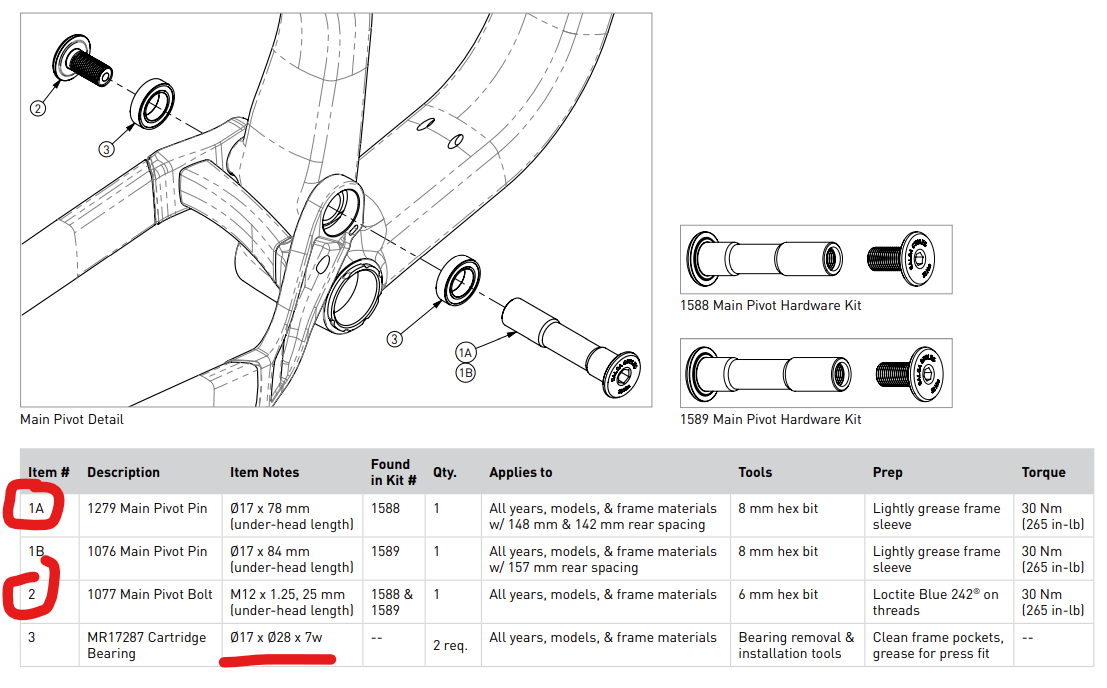
Packing the bearings is actually critical to locating and fixturing your main pivot. BB’s and HT’s are way larger than they need to be, which will unnecessarily constrain your design space. You will still need to contend with the bigger challenge: the pivot axle and hardware.
In the spirit of walking before running, I would leverage an existing design: Both Cotic and Starling (and many others) use a 6902 bearing for their main pivot, which is sized 15mm x 28mm x 7mm. That suggests that a 15mm main pivot axle is more than enough. You don’t need 24mm (bb) or 29mm (headset)
It gives you more margin of error (spacing, bore diameter, warping, etc…)
Flexibility: It allows you to switch bearings or axle sizes if you decide to change your design
Without the cups, you will probably need to ream the steel part, which is more difficult.
Conclusion
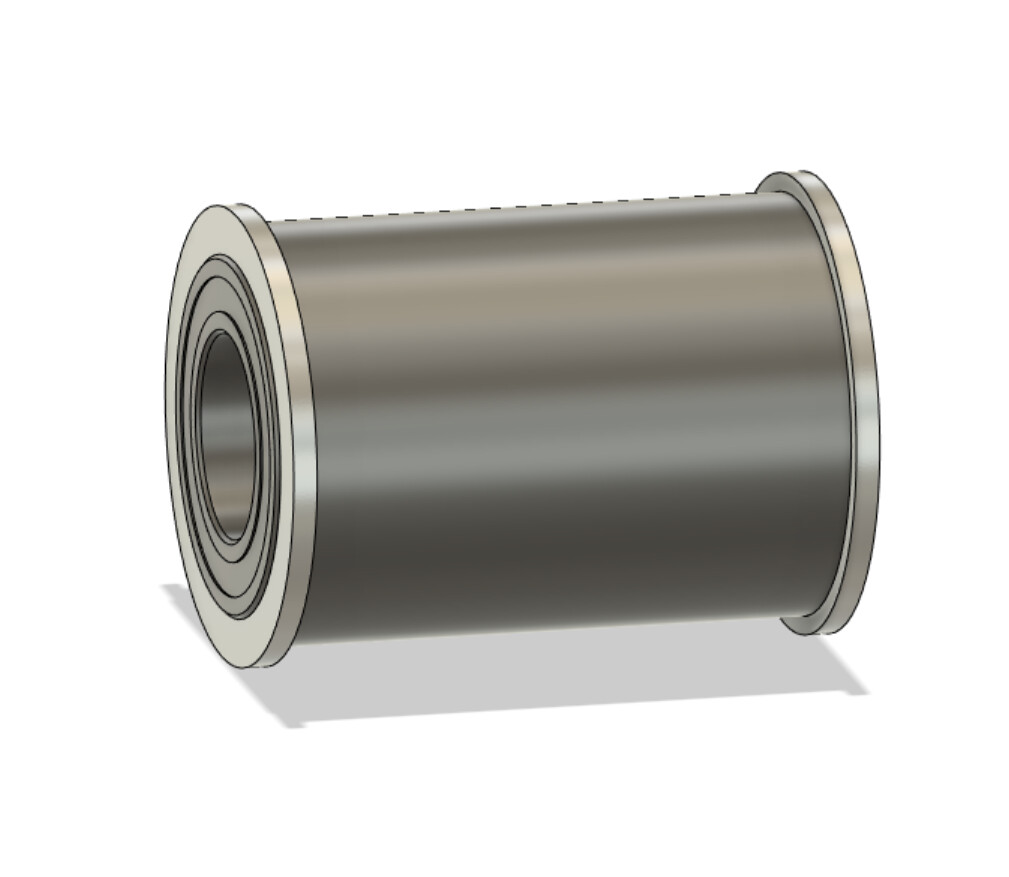
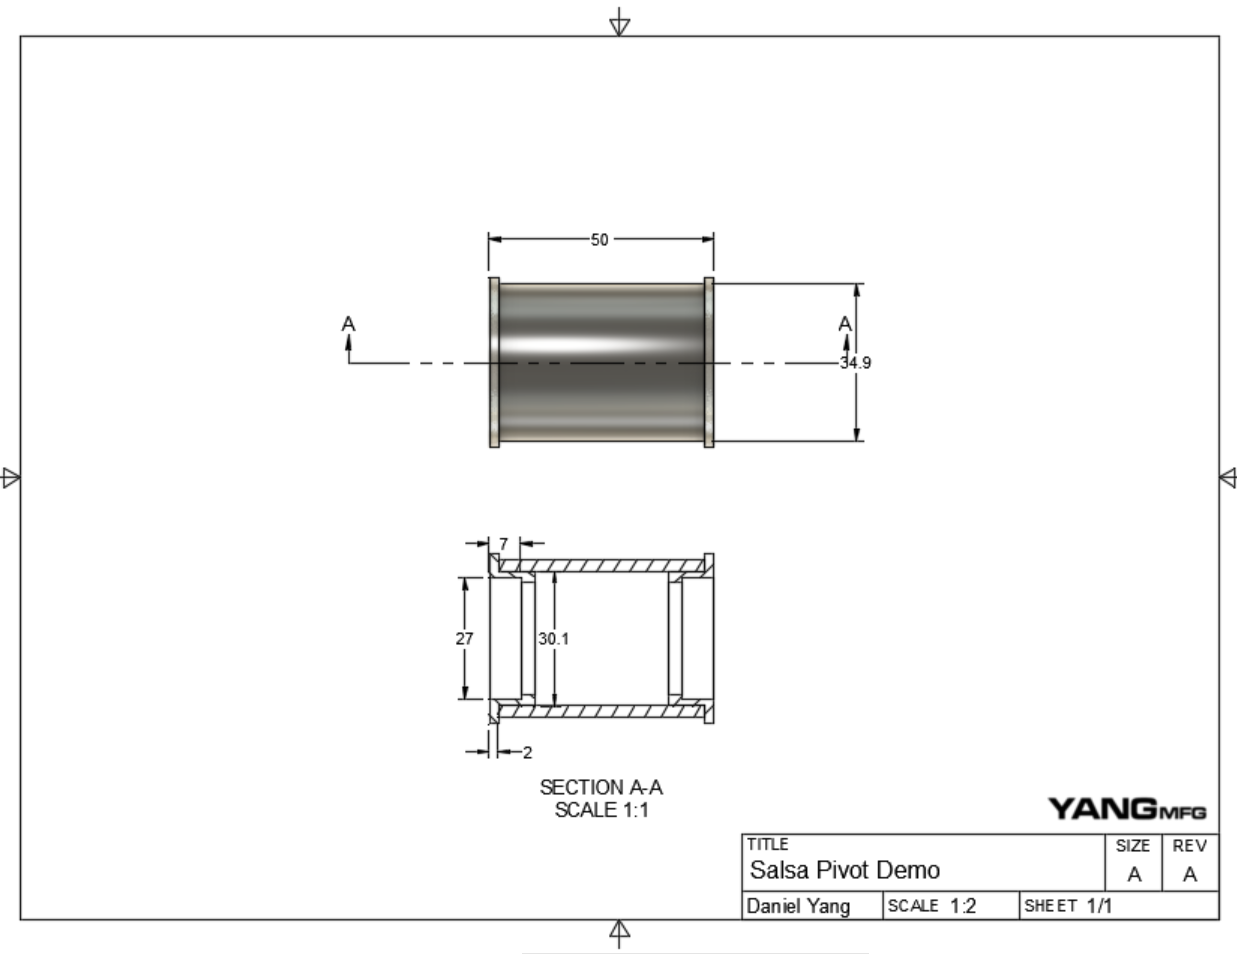
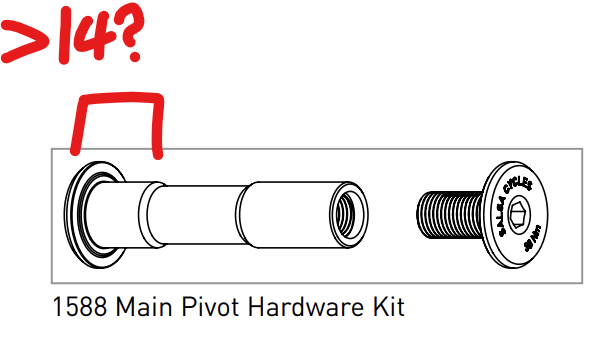
Note: I drew this design as a live axle (the axle spins with the swing arm) as opposed to a dead axle (bearings spin on the axle) of the original salsa design. I believe the live axle is easier to implement in steel. However, you would need to verify that the salsa axle has enough shoulder to attach to the swing arm (likely a 1/4in thick plate) and the bearing (7mm thick). That means you would need >14mm of shoulder on the axle (which appears to be the case).
Anyways, that is how I would do it. Even though this design seems more complicated than using a BB or headset, I think designing your own main pivot will make your life easier down the line. This is just a rough draft, so I likely overlooked something.