The Sputnik H-tools look really cool. Let us know how you like them. I tried to buy some a couple years ago and gave up after multiple unanswered emails and phone messages.
1 Like
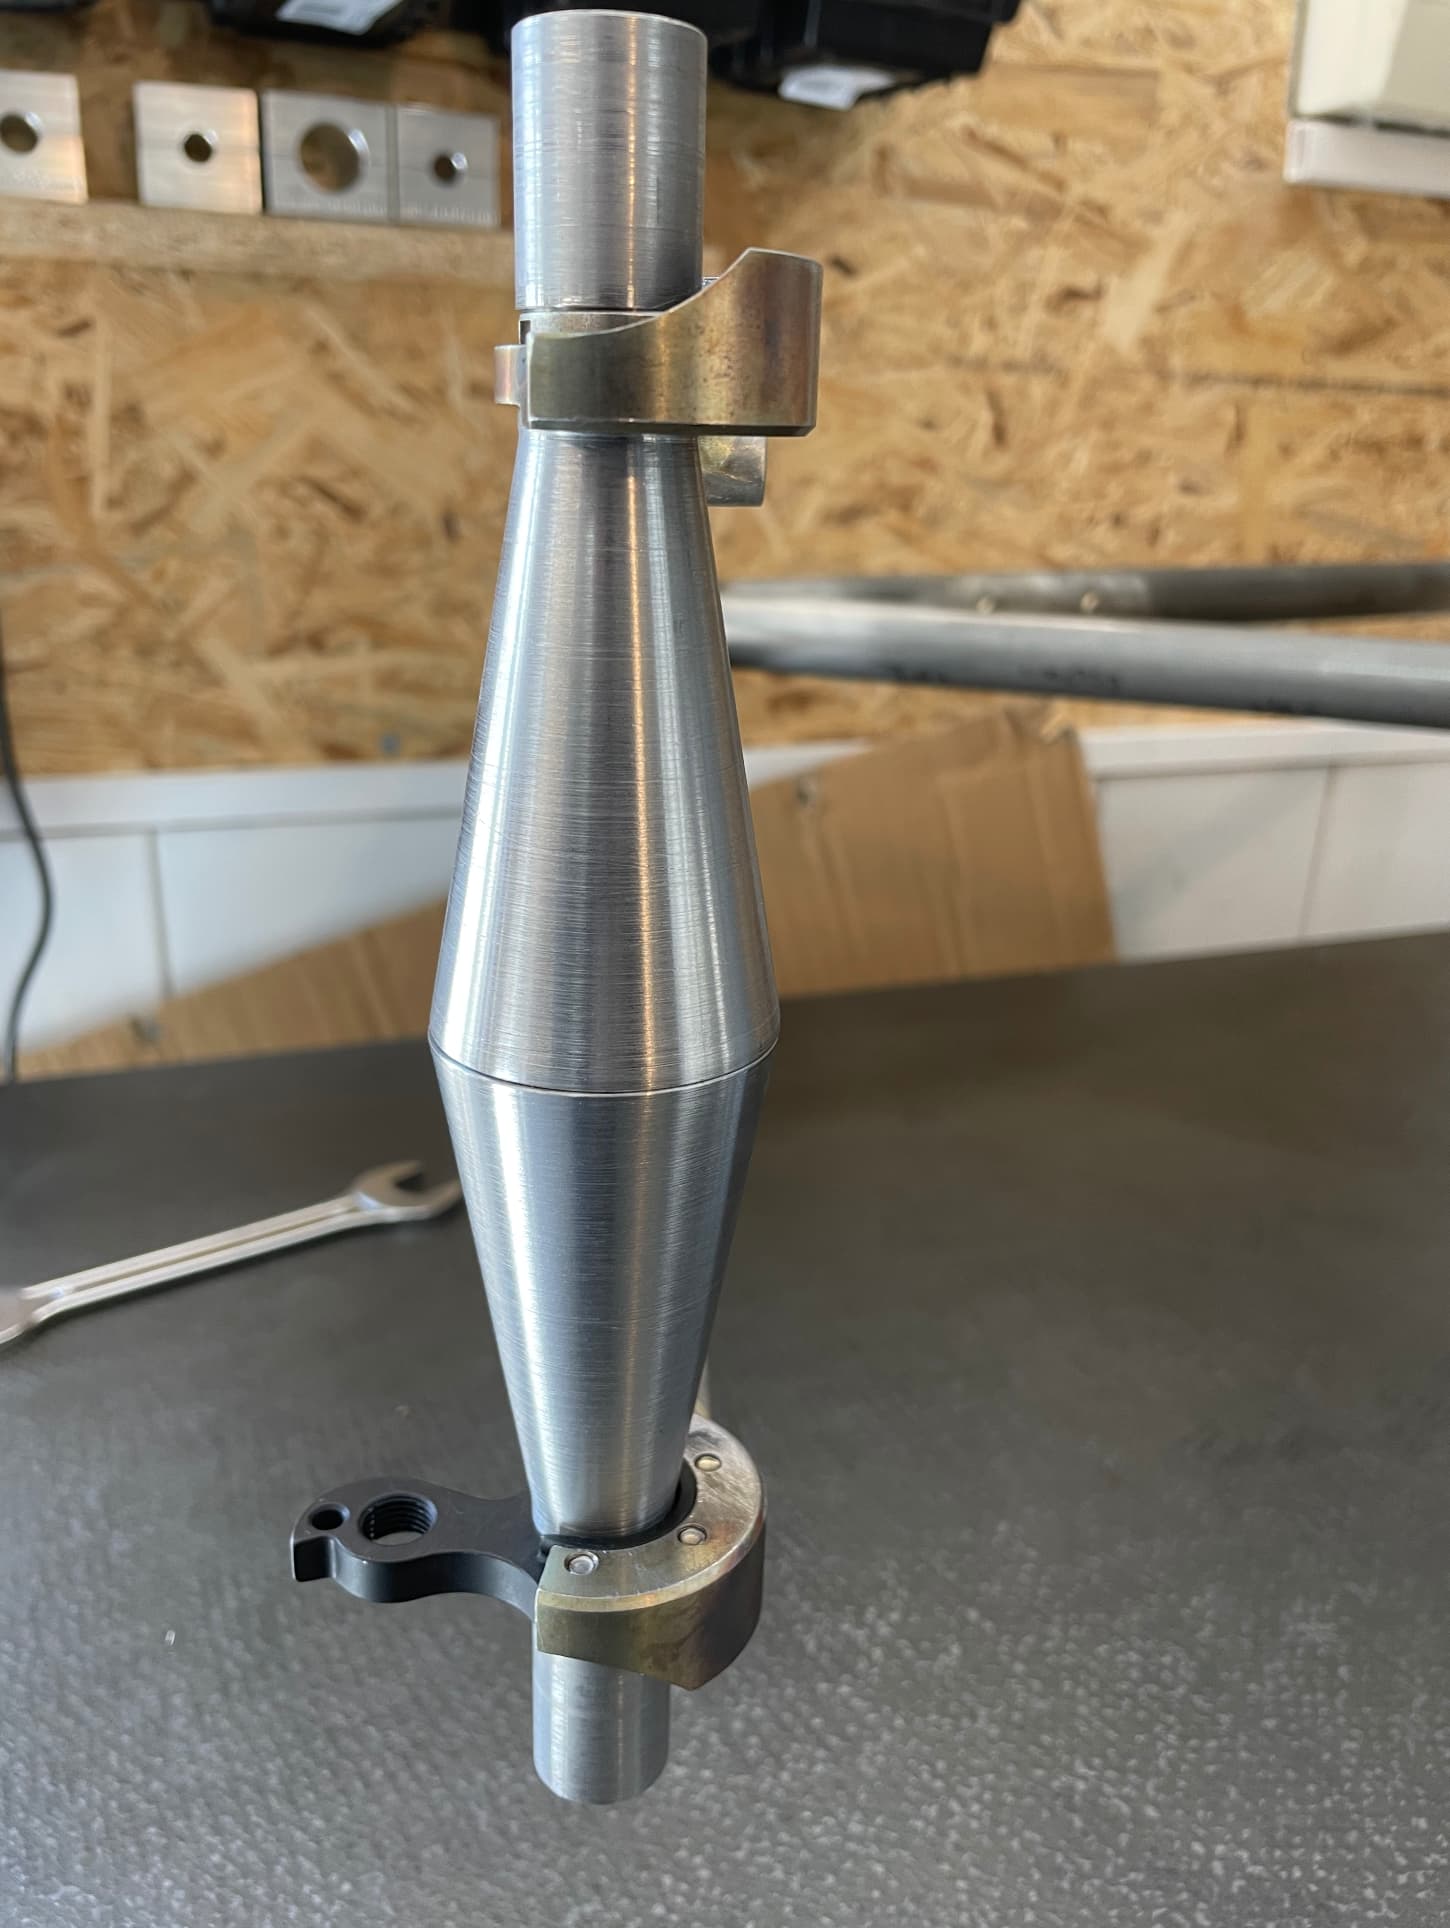
you can 3d print yourself this, I’ve made it and it works for me. It’s not perfect and probably will not fit dropouts you have, but feel free to modify. I have them in plastic and in steel, but just for checking - plastic is enough.
dropuot_aligment_tool_prawy_v2_poprawiony v2.step (21.1 KB)
dropuot_aligment_tool_lewy_poprawiony v3.step (29.3 KB)
6 Likes
Will do once I use them. Slow go on my frame.
We have had a set of the Sputnik D/O alignment tools for years and the work great!
1 Like
Interesting point about your own symmetry Walt. That makes me think of frame stiffness and front derailleurs.
Back when a lot of mountain bikes had a triple crankset there was a quantifiable difference in stiffness from left to right. I remember 16% stiffness difference (deflection measured at the rear end with bb fixed) due to the asymmetrical construction at the main pivot area on one bike. Imagine that every frame with a front derailleur cornered better or differently to the right and left.
2 Likes
Almost everyone has a dominant/forward foot when descending, too.
Ain’t nothin’ straight. Good thing it doesn’t matter.
-Walt
4 Likes
I’ve found that it’s easier to bend (ie. cold set) a frame straight using lugs. Mostly though, I’m building fillet brazed frames and getting into TIG lately.
The thing that I’ve found is that if I get my miters down super precise, the end alignment seems to be way better. I can reliably get to within 1-2mm deviation from center when fillet brazing, and my goal is to shoot for about 1mm or better if I can.
I’ve started doing TIG and finding it a lot harder to get good alignment. A whole lot harder. I’ve tried a few different tacking and weld sequences that other builders have written about in other forums, but I still am having a ton of difficulty getting to within even 2mm of center. I’ve kinda just learned to say, F-it. Close enough. The wheels are mostly aligned. I wish I could do better with TIG though.
1 Like
Tight miters and weld sequence are critical. Once you have your miters super dialed commit to a sequence and don’t change for a few frames. See if your misalignment is consistent, then try making small changes to bring alignment in.
4 Likes
When you’re learning TIG you’re also likely not as consistent with heat input on each pass and the amount of filler you dab on each pass. You will be much more consistent later when you’ve got more TIG frames under your belt. Having more heat on one pass will pull it more in that direction. Knowing from experience, if you burn a hole and fill it you add a lot of filler and heat that’ll also pull the tube.
I know a lot of weight is placed on “weld sequence” but I bet most builders have their own sequence that is a bit, or a lot, different than the others. I remember a builder that welded 100’s of frames at Co-motion say that weld sequence doesn’t matter. He had welded a bunch of frames in a different sequence and they all turned out the same so he concluded that I t’s all about the miters. I’d add that it’s also about the fixture and tacking it right way so when you weld it doesn’t move.
5 Likes
When I think and speak about weld sequence it is from the perspective that I use the same sequence every time with a repeatable outcome, not that the sequence I use is the only one that works. Doing the same thing every time makes RCA very easy, once you deviate from a standard process, trying to determine what led to an unexpected outcome becomes much more difficult.
4 Likes
When I was learning I just remember this (weld sequence) seeming like the secret sauce, in that nobody wanted to share their sequence because it took them so long to figure out and makes their bikes unique, or something like that. I understand that to some extent, but my comment was to try and break that down a bit for beginners of TIG so they don’t worry about any specific right way of doing it and instead focus on the welding itself since that’s the hardest part on thin wall tubing especially.
Once they do a few frames a sequence will start to appear and make sense to them, resulting out of their type of fixture and what result they get at the end.
It’s been hard for me to develop a consistent process and weld sequence because I don’t have a consistent model, but there are generalities that I follow for each frame that I learned early on from established builders and trial and error:
- tack and weld the vertical planes first (tops and bottoms or 12 & 6’s), then the sides.
- tack the acute angles first to pull the tubes together
- weld the obtuse angles first
- switch sides as you weld the frame together, starting and stopping at each tack, so not to pull it too much in one direction (UBI taught this as 12-3, 6-9, 3-6, 9-12 with moving from one pass per tube to another - and this sequence is what we’re discussing). However, some (including myself) don’t start and stop at each tack and instead pass over the tack so not to add too much heat over and over to that same spot.
And this is where we get into the weeds since I bet everyone does it a bit differently.
7 Likes
Your sequence is similar to mine. Tack on the vertical plane, weld from acute angle to obtuse angle in 1/4 tube welds, alternating sides. I think as long as you don’t weld one entire side first, you’ll be fine.
It is very easy for me to have a standard sequence because all of my bikes are so similar in regard to fabrication. When I do end up with something different it’s a confusing experience for me.
4 Likes
Yeah, this is what I think too. I’ve messed up and forgotten something/accidentally made minor changes to my usual sequence many many times and it doesn’t seem to matter much.
-Walt
5 Likes
I think you’ve hit on something that might help improve my alignment, or so I hope. I need to improve my welding. I’ve got my miters down fairly good, except for maybe the chainstay and seatstay miters, but that will improve with a better jig I am working on. If my welding is inconsistent then even with a good weld sequence, things will still be off.
My TIG welds suck. It’s bird poop level suckage. Im not even doing pulsing because that is gonna mess me up. I think I am overdabbing the rod into the puddle. And since I can’t get it consistent every time, it must be that the weld pulls unevenly. I have tried a few different weld sequences that some pros have posted on other forums and blogs, but it makes no difference. I can get to about 4mm of center when I’m TIGing. That sucks. I know, but it’s the best I can do. One frame it’s off one way left, head tube twist. Another frame, it’s the other way. Sigh…. It’s seriously way harder to get good alignment TIG welding.
The one constant that I seem to always have no matter what is that the rear dropouts ALWAYS ALWAYS pull in a little bit. It doesn’t matter if my chainstay miters are dead on perfect. I was doing a classic 130mm spaced rear end for a road bike a few weeks ago. My rear jig axles are spaced for exactly 130mm. I finish welding the chainstay to the bb shell. I then measure the alignment. Now, the rear spacing measures about 127 or 128mm. It does this every time! I don’t know how to correct that so I don’t have to cold set the chainstays.
1 Like
Don’t sweat a few mm’s, I doubt you will feel it on the bike. Also, as it’s been said before, coming up with a precise estimate of how far out your frame is from “perfect” is a challenge in itself.
I would wager that many builders still have to cold set the chainstays a little bit before adding the seat stays, it’s very common to have them pull in or out.
Just keep doing practice welds on scrap. I would do this almost daily, and also right before I would weld a frame up. Don’t worry about the length of the pass either. It all will click one day.
3 Likes
For the rear that is very common, to the point where the most commonly used dummy axels are 2 mm wider to compensate. Next time add a 1 mm washer on each side.
2 Likes
I’ll echo everyone else on the dropouts, the seat stays always pull them in. Part of your final alignment should be setting the dropout faces from center so that will correct them.
Definitely work on being consistent. Did you start tig welding just to build bikes? Have you practiced on thicker material? If not, I suggest getting some .125 or thicker material for practice. It slows everything down and lets you learn what you are looking for in the puddle.
5 Likes
Interesting, in my case when I jumped to TIG welding, alignment was much better than filet brazing. Much easier to pull one side or another and much more consistent results. Still need to be smooth all around the weld but it’s a long learning process.
I know how hard it can be when you have to think about everything at the same time during the process, checking alignment, staying focus on your weld, checking again.Keep at it and don’t worry about the numbers, if it look straight it will ride straight. Take note of your process and see what could have been improve for the next one. good luck!
5 Likes
The old tradition was that you were supposed to make your own welding table once you had the basics down. Welding thicker stuff is a great way, as @Neuhaus_Metalworks points out, to get a sense of how liquid metal behaves/learn to see the puddle well/etc without the stress of worrying about blowing holes in expensive bike tubing.
-Walt
5 Likes
Do you happen to know which BQ this was in?