IMO, that is pretty far the average height and far below the average weight! Most of the wisdom of bike fitting and handling revolves around 5’10, so I really encourage you to find out yourself!
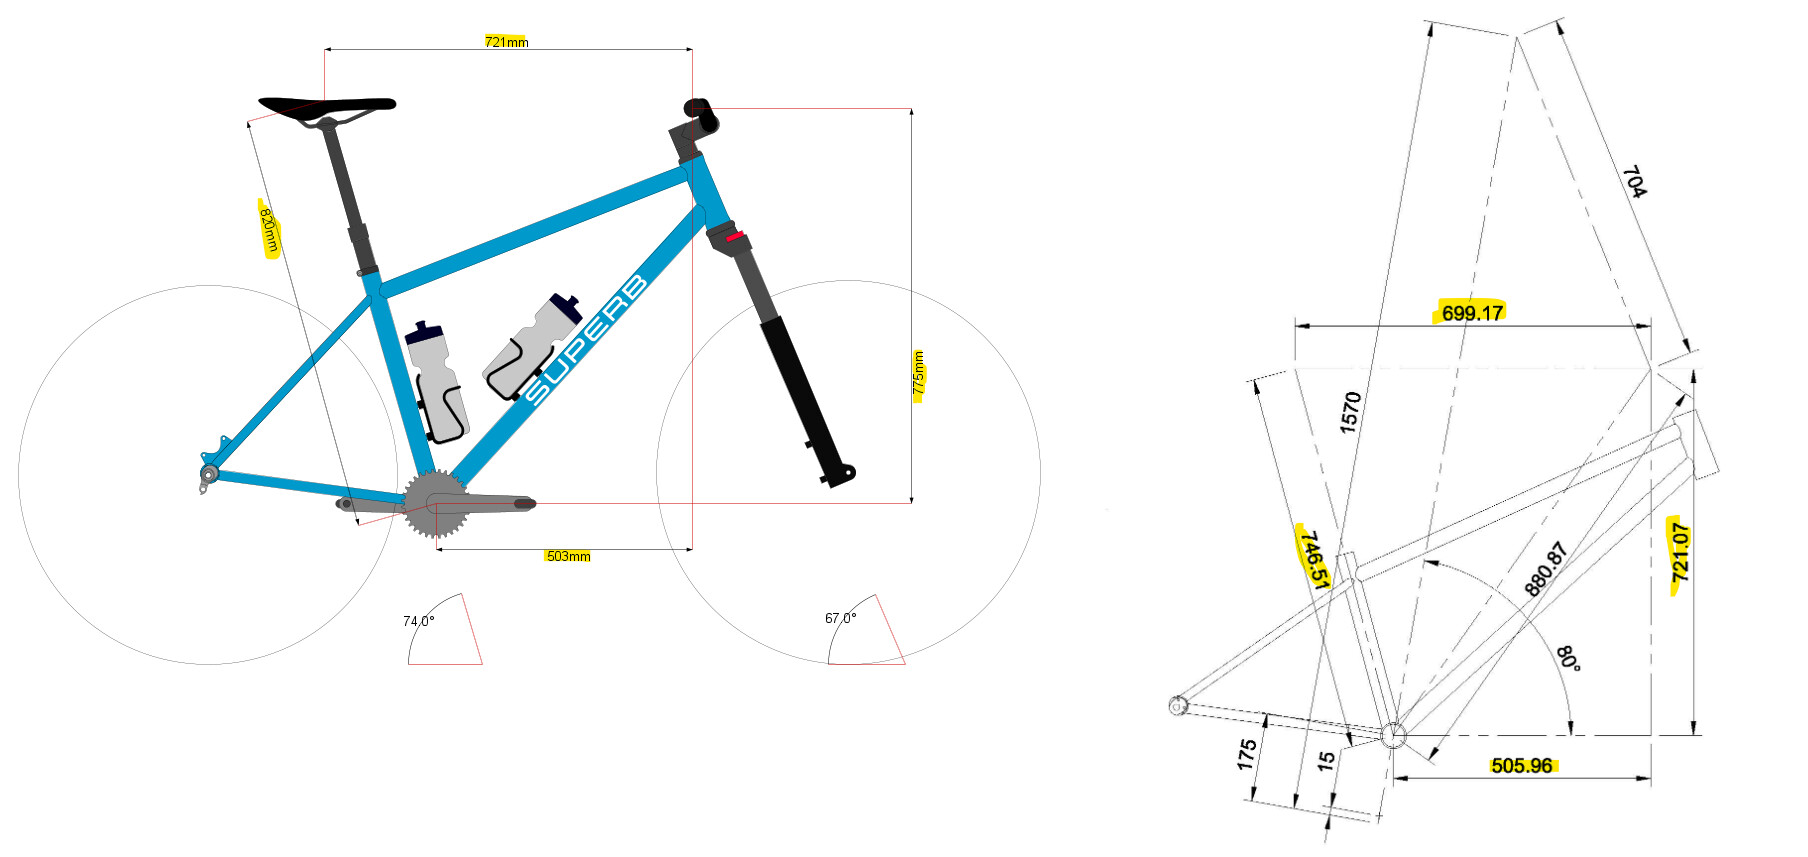
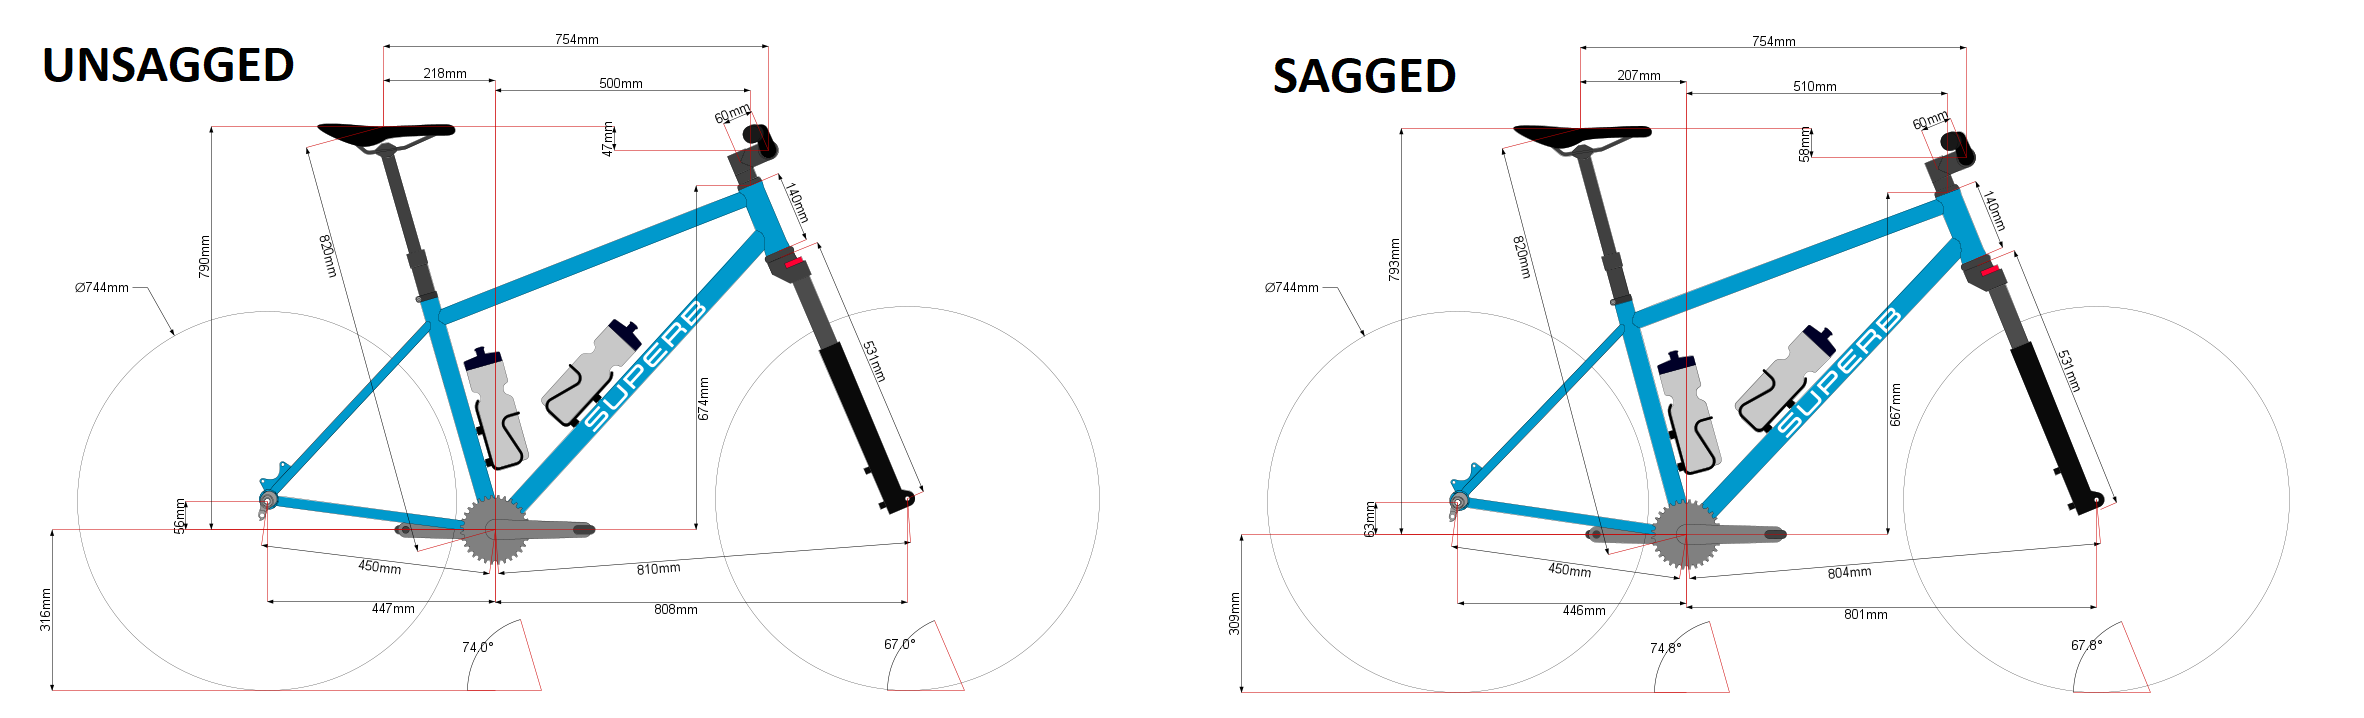
Note: I use unsagged geo for various reasons. To convert to sagged, steepen the STA and HTA 1 degree and 10mm to the reach
I finally took the time to write out my method for fitting mountain bikes. What you are designing is really a flat bar gravel bike. In that case, the seated fit matters the most, so I would optimize around that. I will follow up with an example.
1) Saddle Height is the Characteristic Length
I start with the saddle height. Everyone pedals slightly differently due to preference or habit. From low saddle mashers to high saddle tap dancers. The seat high encompasses:
- pedaling mechanics
- cleat position
- shoe stack
- crank length
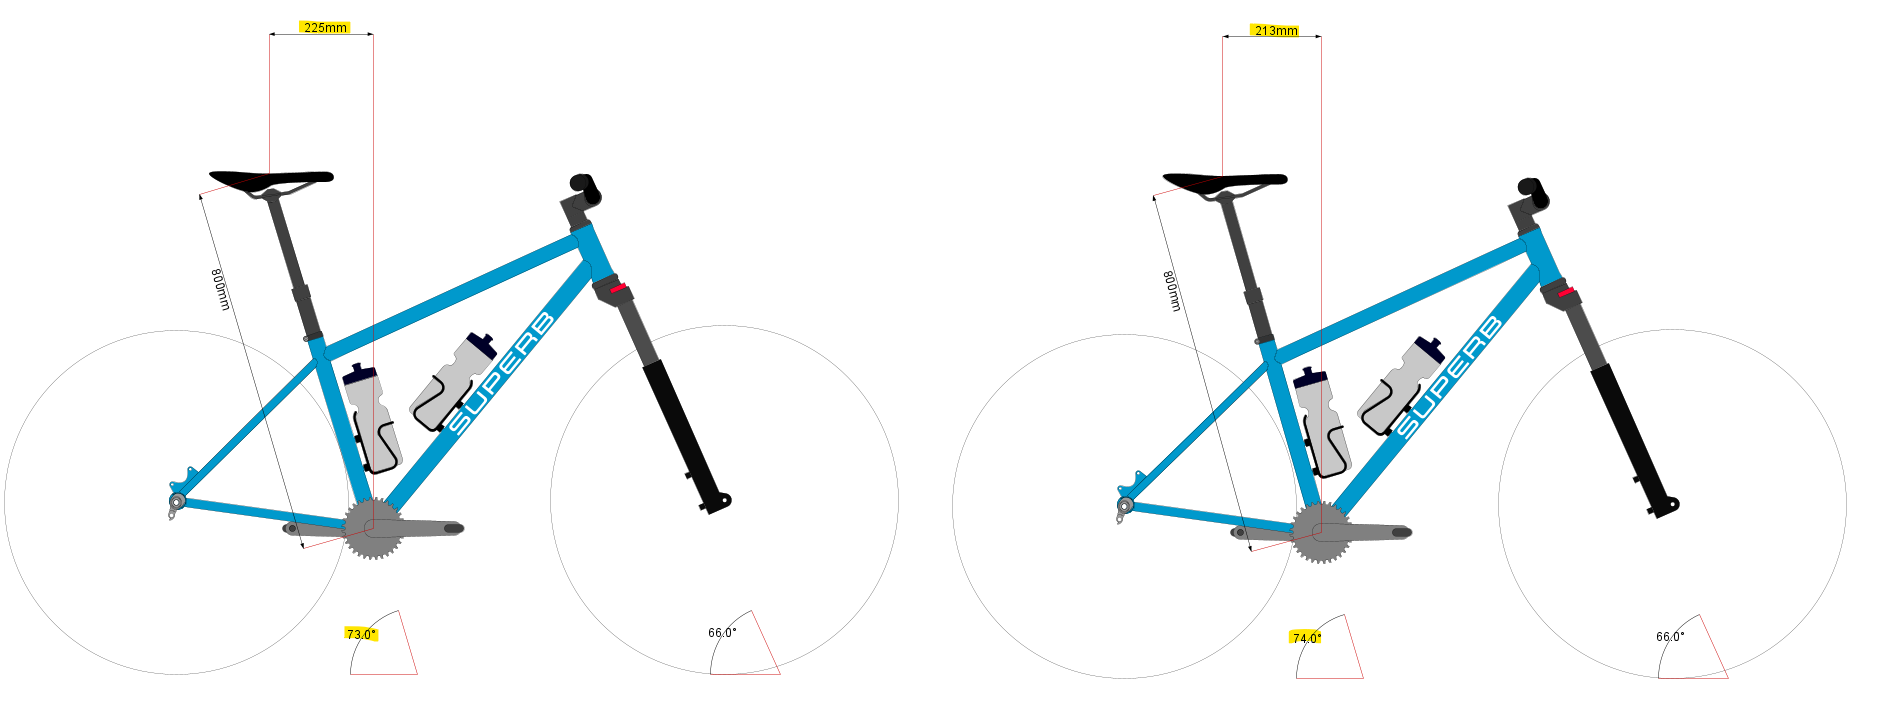
2) Determine STA
The STA is dependent on the terrain and use, a bit of a personal preference, kinematics, and marketing.
If I were to generalize:
- 73-74 for flat (road, gravel)
- 74-74.5 for general mountain biking
- 75 for steep or techy climbs
Keep in mind:
- I use unsagged geo! One of the reasons why I do this is that when you climb, you are riding unsagged geo.
- Road and gravel bikes typically have 10-20mm of seatpost offset, which is like another 1-1.5 degrees slacker STA!
A few things to keep in perspective. Even at a really tall 800mm saddle height, 1deg of seat tube angle is ~15mm of fore-aft adjustment.
- people’s femur lengths can easily be +/-20mm
- A saddle’s “sweet spot” relative to the rails can be +/-10mm
- The saddle rails can accommodate +/-20mm of adjustment.
4) Pick the HTA
HTA is going to be terrain, personal preference, and marketing driven.
To me, the HTA and fork travel needs to make sense with the STA and the intent of the bike. If you have steep descents, you probably have steep climbs too! Paring a slack STA and slack HTA is just asking for the bike to lift off climbs.
A few more notes:
- Riders taller than 6’0 might want to consider a steeper HTA to keep the wheelbase in check and weight on the front wheel
- Shorter riders need narrower bars, which don’t give you the same leverage to manage a slack HTA. I recommend going steeper (or less trail) if possible.
3) 5% Bar Drop (saddle to bar clamp)
I aim to have the saddle within 5% of the bar drop with 20mm of spacers. This gives the user room to play around with their fit.
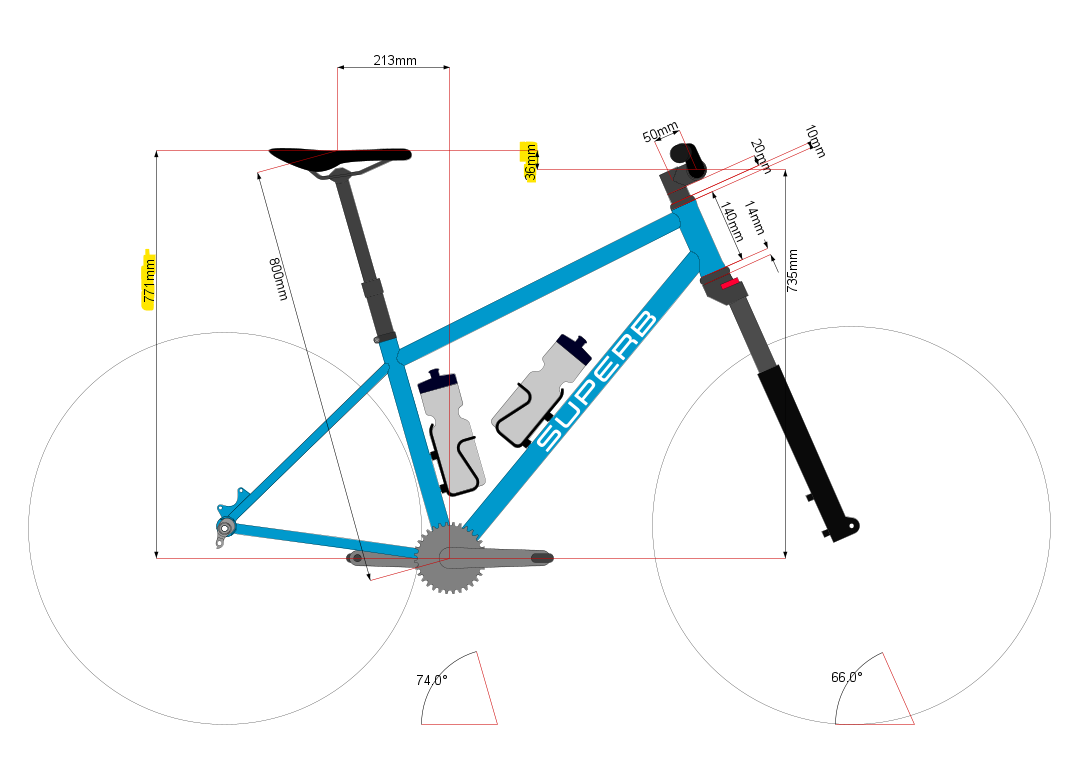
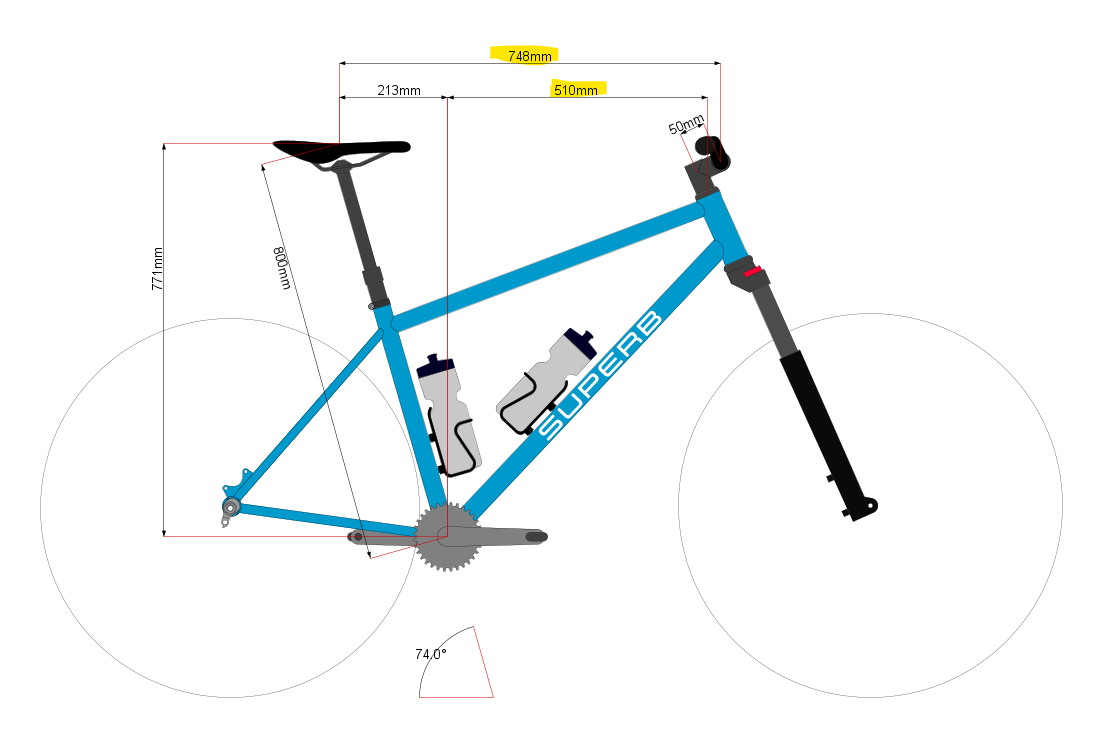
In this example, Saddle_Y = 771, so the target_bar_drop = 39mm. A 140mm headtube gets us there.
Notes:
- Shorter riders <5’6 will struggle to have bars lower than the saddle
- Taller riders should use high-rise bars >40mm to keep the wheelbase in check
- I don’t design to grip ends because that dimension is impossible to get from customers
- I don’t design around a particular bar, because I expect the user to switch bars
- Bar rise is used to fine-tune the fit
- I don’t like swept bars (>9deg) on our bikes
- the most I recommend is the PNW range
4) Match Stem Length to Steering Geometry
I think its important to match the (effective) stem length to the steering geometry. I visualize effective stem length and trail as two levers that are coupled together:
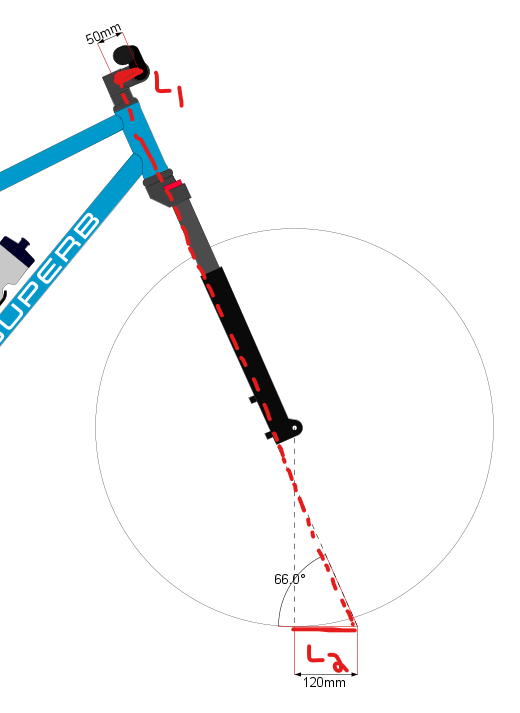
The combination of the steering input (L1) and the steering response (L2) should make sense for your application:
There are four permutations of L1 and L2:
| L1 (stem) | L2 (trail) | Steering Input | Steering Response | Example | Result |
|---|---|---|---|---|---|
| short | short | fast | fast | A road bike converted to swept back bars | Very twichy bike |
| short | long | fast | slow | Mountain bikes | Stable bike that rejects disturbances |
| long | short | slow | fast | Road and gravel bikes | Nimble bike with stable steering |
| long | long | slow | slow | ??? | Bike does not want to turn |
There is no magic number here because there is a lot of personal preference and people can get used to anything. However, I still think there is a correct stem length and bar width for your application. If you are going with a steeper geo (67-69HTA), try designing around a longer stem (60-70mm). Not fashionable, but you will probably like it.
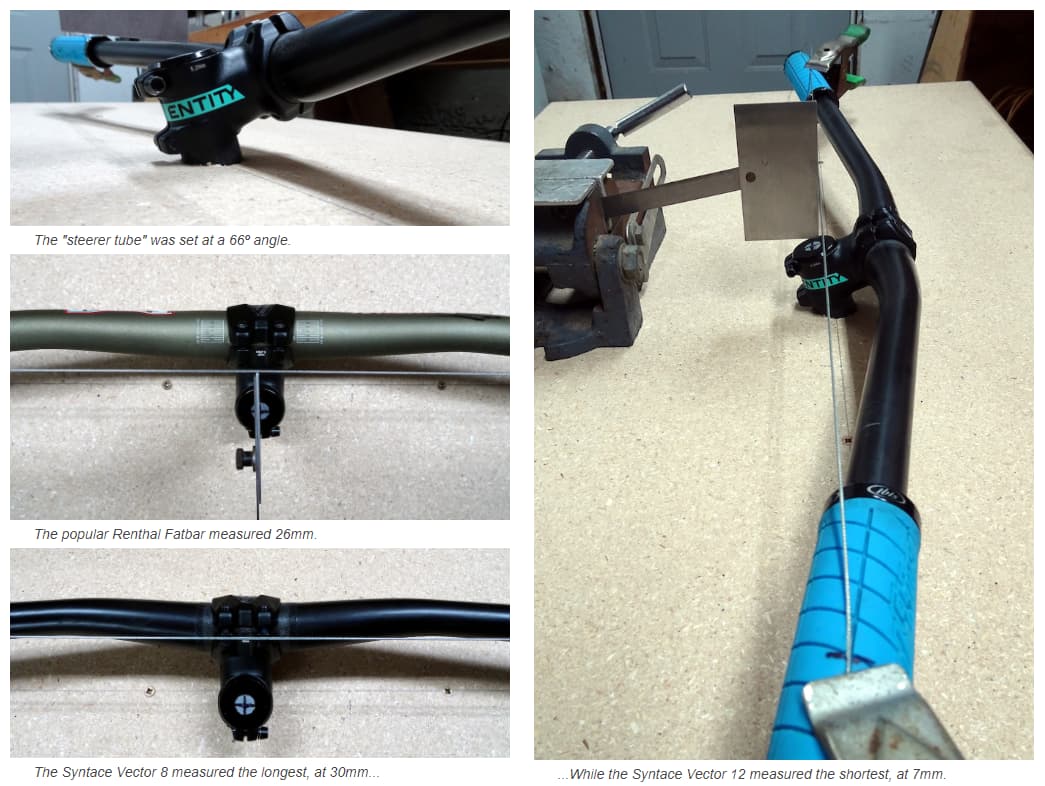
Side note: The effective stem length is going to depend more on your bar sweep, width, and roll than your actual stem length. So be careful! From Richard Cunningham and MTB handlebar dimensions
What about grips behind the steering axis? I personally don’t like the feeling. I feel disconnected from the front wheel like I’m throwing a wheelbarrow at rocks. As a byproduct, the negative stem pushes your front center further out by 20-30mm, which I don’t think suits many designs.
5) Rider Compartment and Reach
The butt-to-bars dimension is a bit tricky and subjective. It can be affected by:
- saddle angle and sweetspot
- bar roll
- bar sweep
- bar width
- personal preference
The best way to figure this out is to use one of your existing bikes to get a working baseline.
- does it feel cramped?
- will you use a wider or narrower bar?
- do you want to go longer or shorter?
Or, this would be a great time to look at your RAD measurement.
6) Tuning the weight balance with the chainstay length:
You guessed it, the weight balance is also subjective and affected by marketing! For the weight balance, I compare the rear-front ratio (RFR).
From this post:
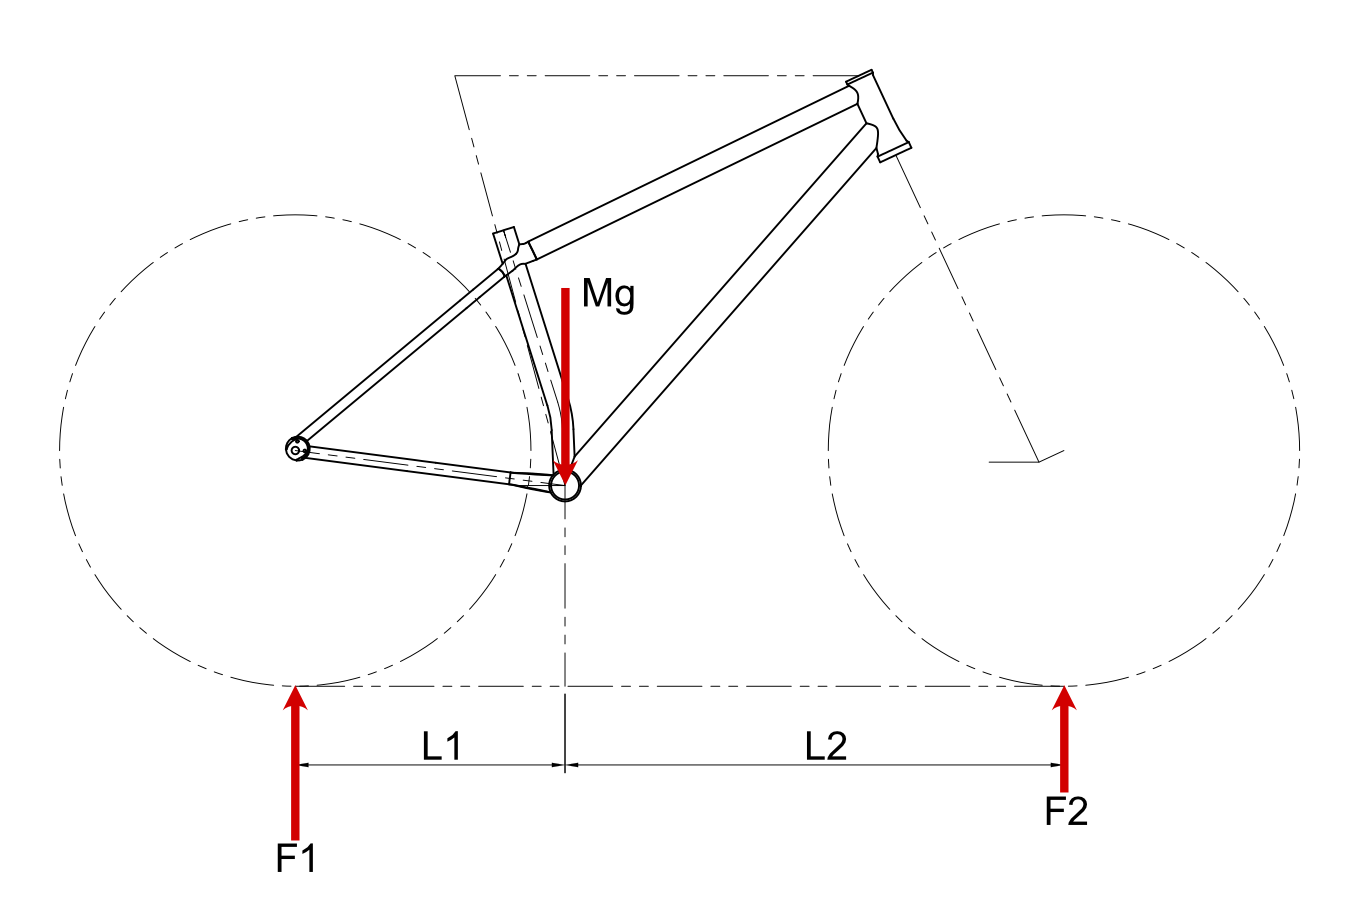
Assumptions:
- Flat ground
- weight is through the bottom bracket (ie. standing up)
Rear wheel force: F1 = L2/(L1+L2) * Mg
Front wheel force: F2 = L1/(L1+L2) * Mg
The rear/front ratio is really easy to calculate because most of the terms cancel themselves out:
rear-front ratio: RFR = F1/F2 = L2/L1
| Less RFR | More RFR | |
|---|---|---|
| Climbing Traction | Rear wheel slips | rear wheel grips |
| Climbing | front wheel sticks | front wheel lifts off |
| Desceding | front wheel hangs up | rear wheel takes the abuse |
| Flat Cornering | even weight distribtuion | front wheel can wash out |
| wheel lifts | planted | poppy |
For my mountain bikes, I found RFR of > 1.88 fun, but on the limit of what I consider a well-rounded hardtail.
Keep in mind, the assumption that the weight goes through the BB is a big one. People come in all shapes and sizes and weight distributions. Riders have different styles which shift their weight around. The RFR is more of a tool to compare your preferences to you own bikes bikes rather than an absolute goal.
7) Massaging the Numbers

This is when I take a step back and look at the bigger picture. I fill in the blanks: tube spec, bb drop, tire clearance, seat tube length, aesthetics, headset standard, fork offset, etc.
I will iterate through all steps 1-6 again, and tweak the numbers.
- Did the wheelbase creep too far?
- Did I stray too far from the design intent?
- Is this too big of a change to what the customer is used to?
- How confident am I in the customer’s provided numbers?
- Maybe the customer hates their wheels lifting off, ill shorten the reach and spec a longer stem
- Maybe the customer can’t wrap their head around a 450mm chainstay
- Maybe the customer just wants something different
For an endurance mountain bike, this is probably where I would land you:
- RFR 1.80 for more balanced ride
- 60-70mm stem with 40-50mm riser to keep the wheelbase in check
- Bar drop of ~7% your saddle_y height (more than 5% because I recommend a big riser)
- The reach can be tweaked to your preferences/ what you want to try
Here it is compared to your RAD method. It’s not a direct comparison, but the truth is probably somewhere in between: