I agree. I have a benchtop mill. If the price is right, I’d rather have my time than the money. I’m also interested in making more than one.
2 Likes
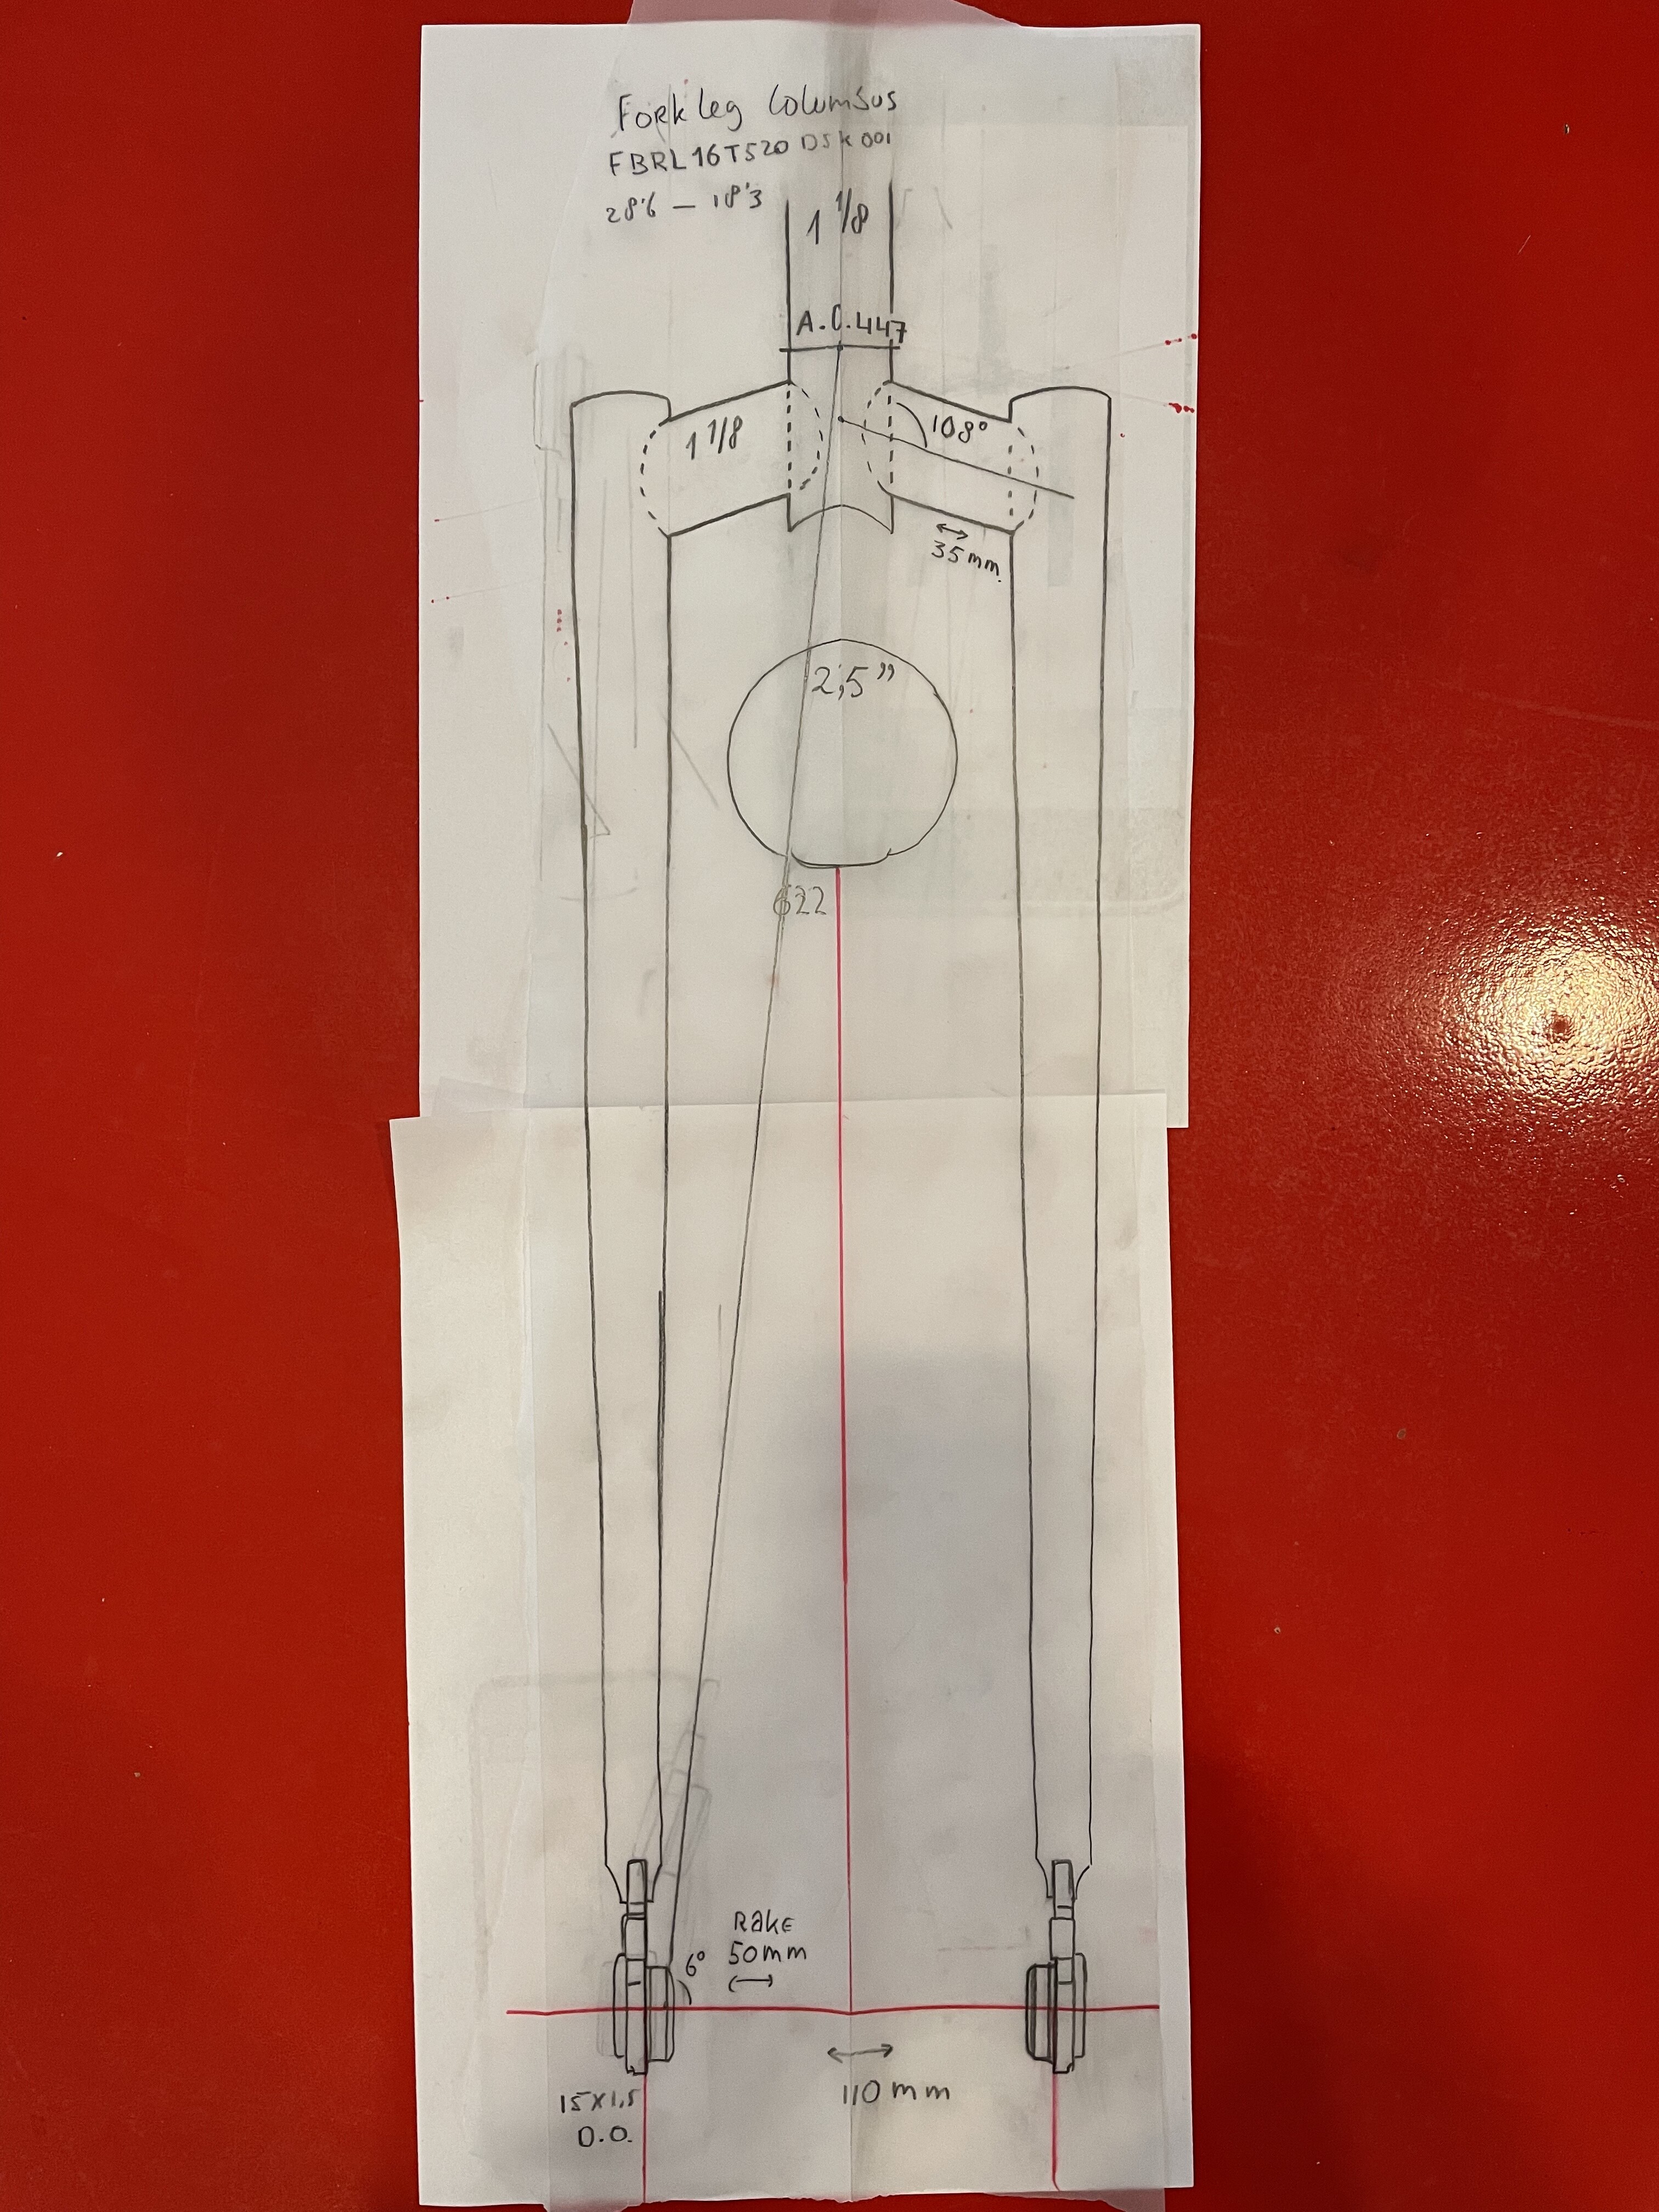
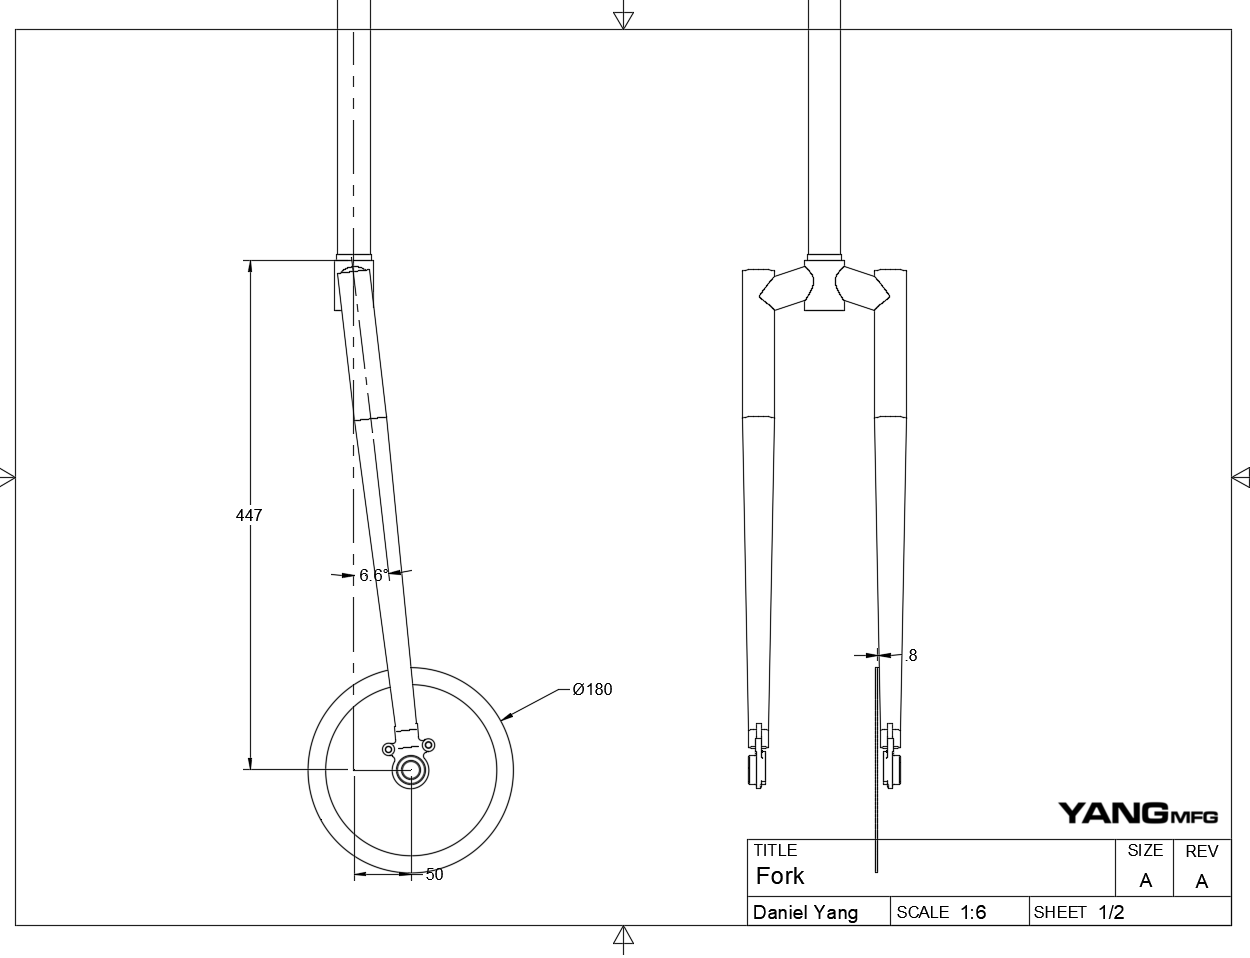
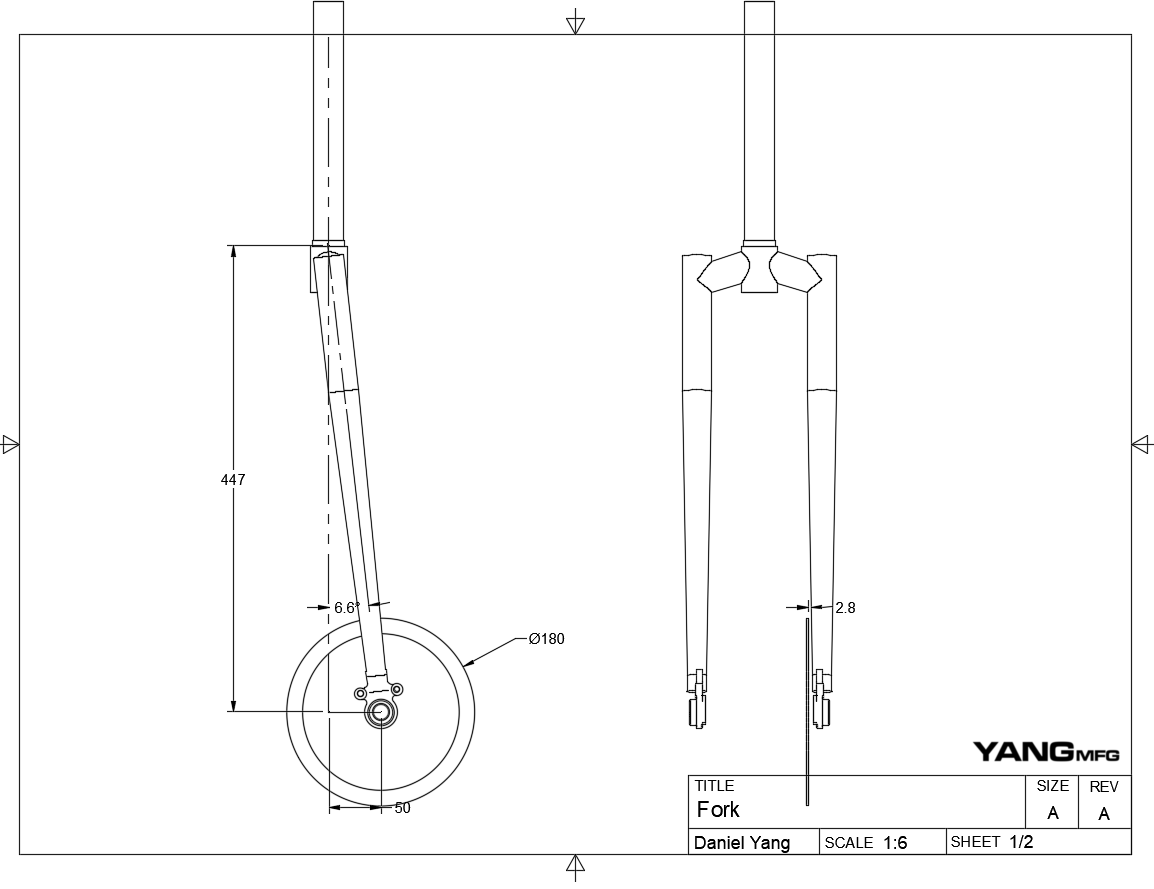
No fusion here, I drew up a fork design today.
Printed PMW dropouts design, and took the specs from Columbus their website for the legs.
I chose a random angle for the segment struds 108 degrees.
The line going thru is the rake, 6 degrees.
I made a mark on a tubeblock at 6 degrees and use that as the offset “centerline”.
Did I miss something? Thanks
3 Likes
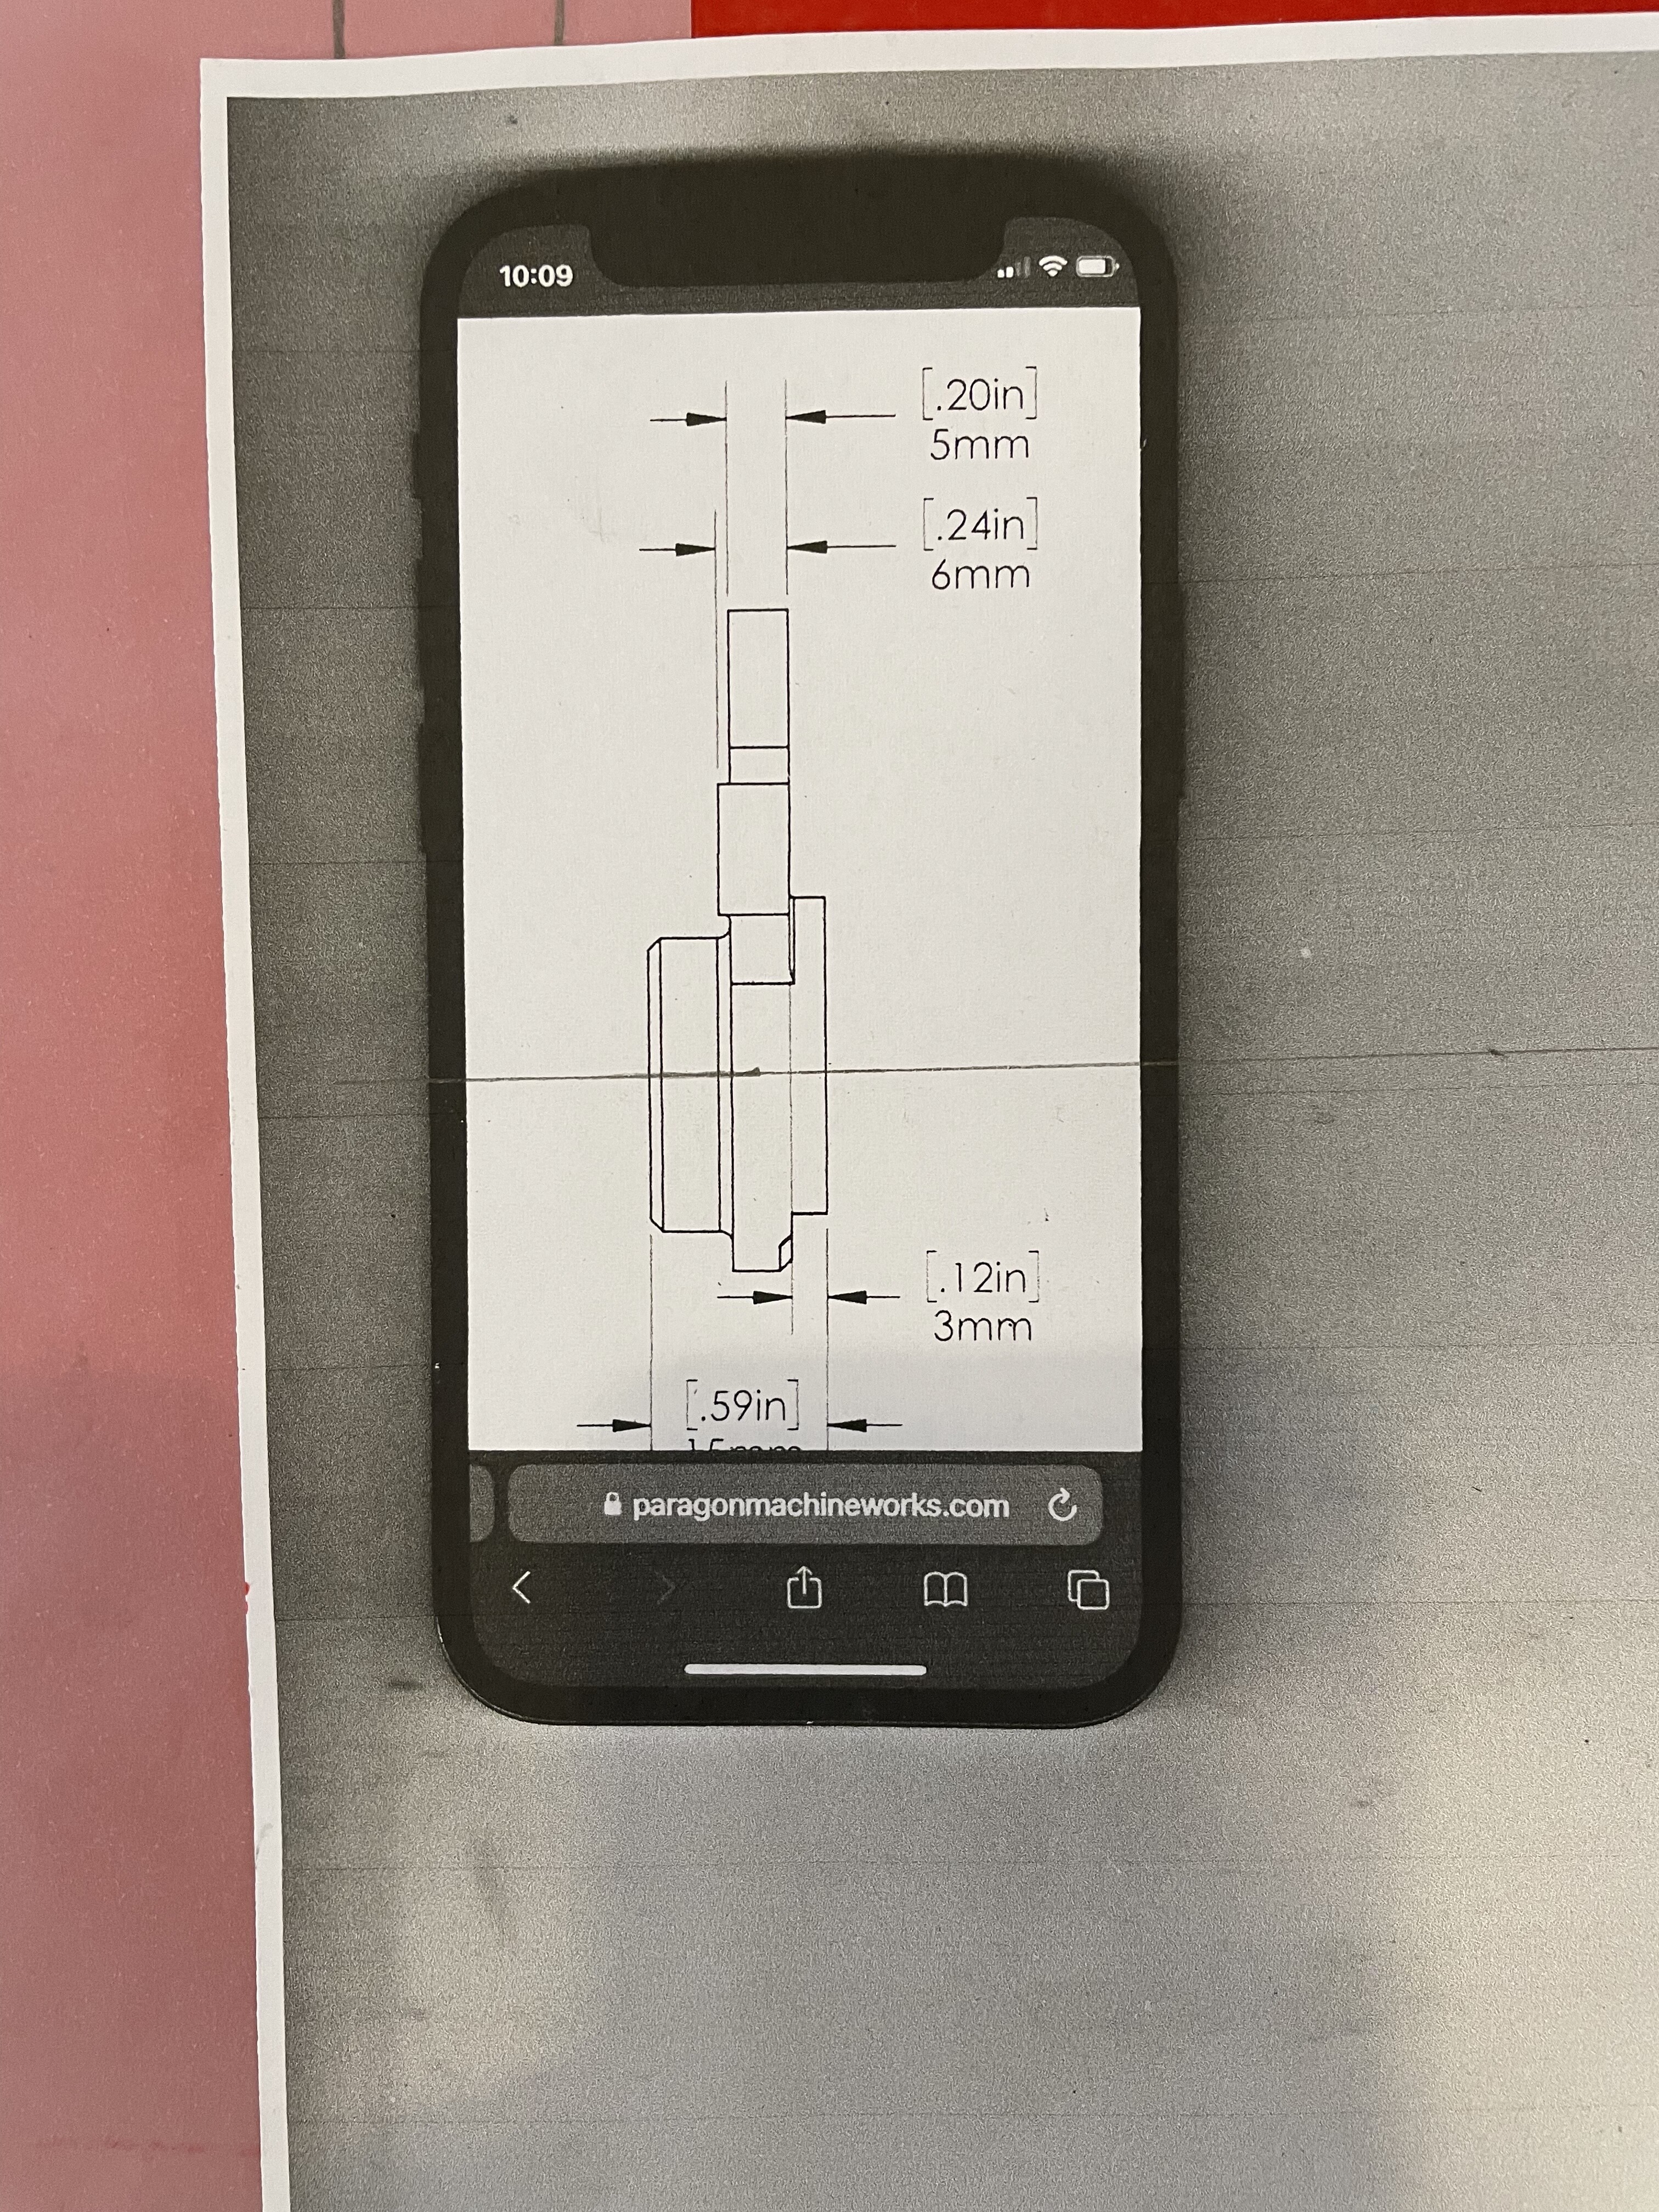
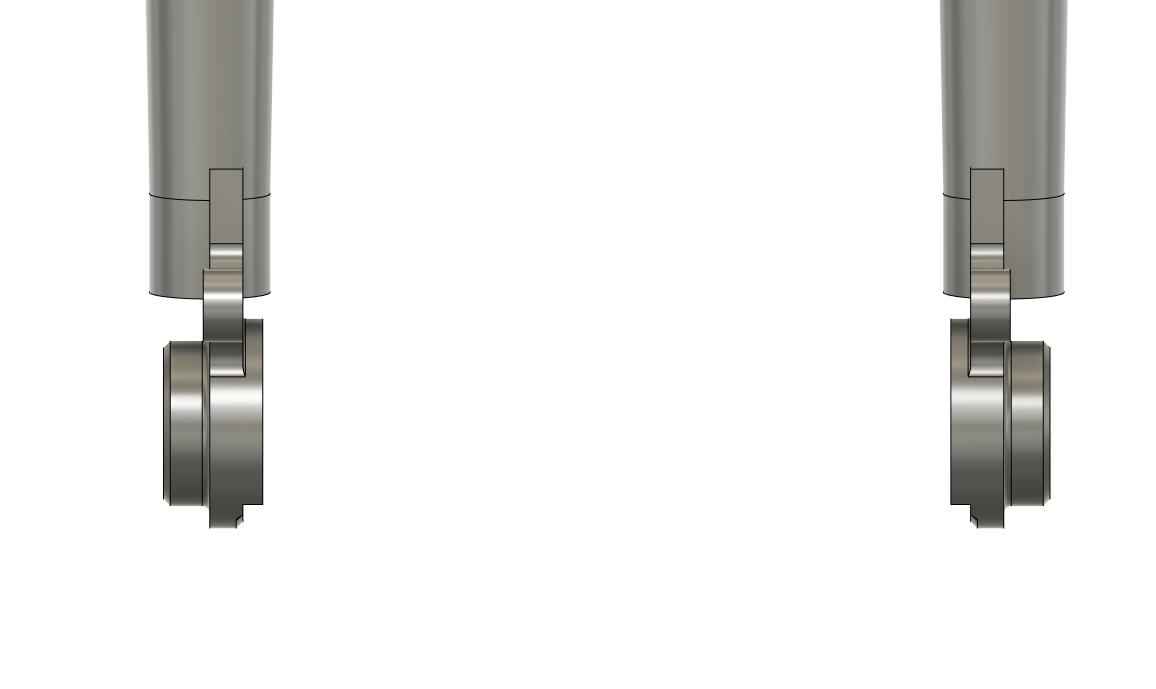
I’d recommend adding your rotor to the drawing. The tabbed style dropouts eat up some of the rotor to fork leg clearance. It can get cozy quick!
8 Likes
Thanks Em, I had a feeling it might get close.
See if I can source hooded dropouts
1 Like
Hey @anon91558591 - didn’t you say once upon a time on one of the forums that steerer cutoffs are good material for the crown segments?
Retrotec makes some nice looking forks too - I especially like the way Curtis caps the tops of each blade with tubing.
5 Likes
Some dinnertime CAD: Fusion
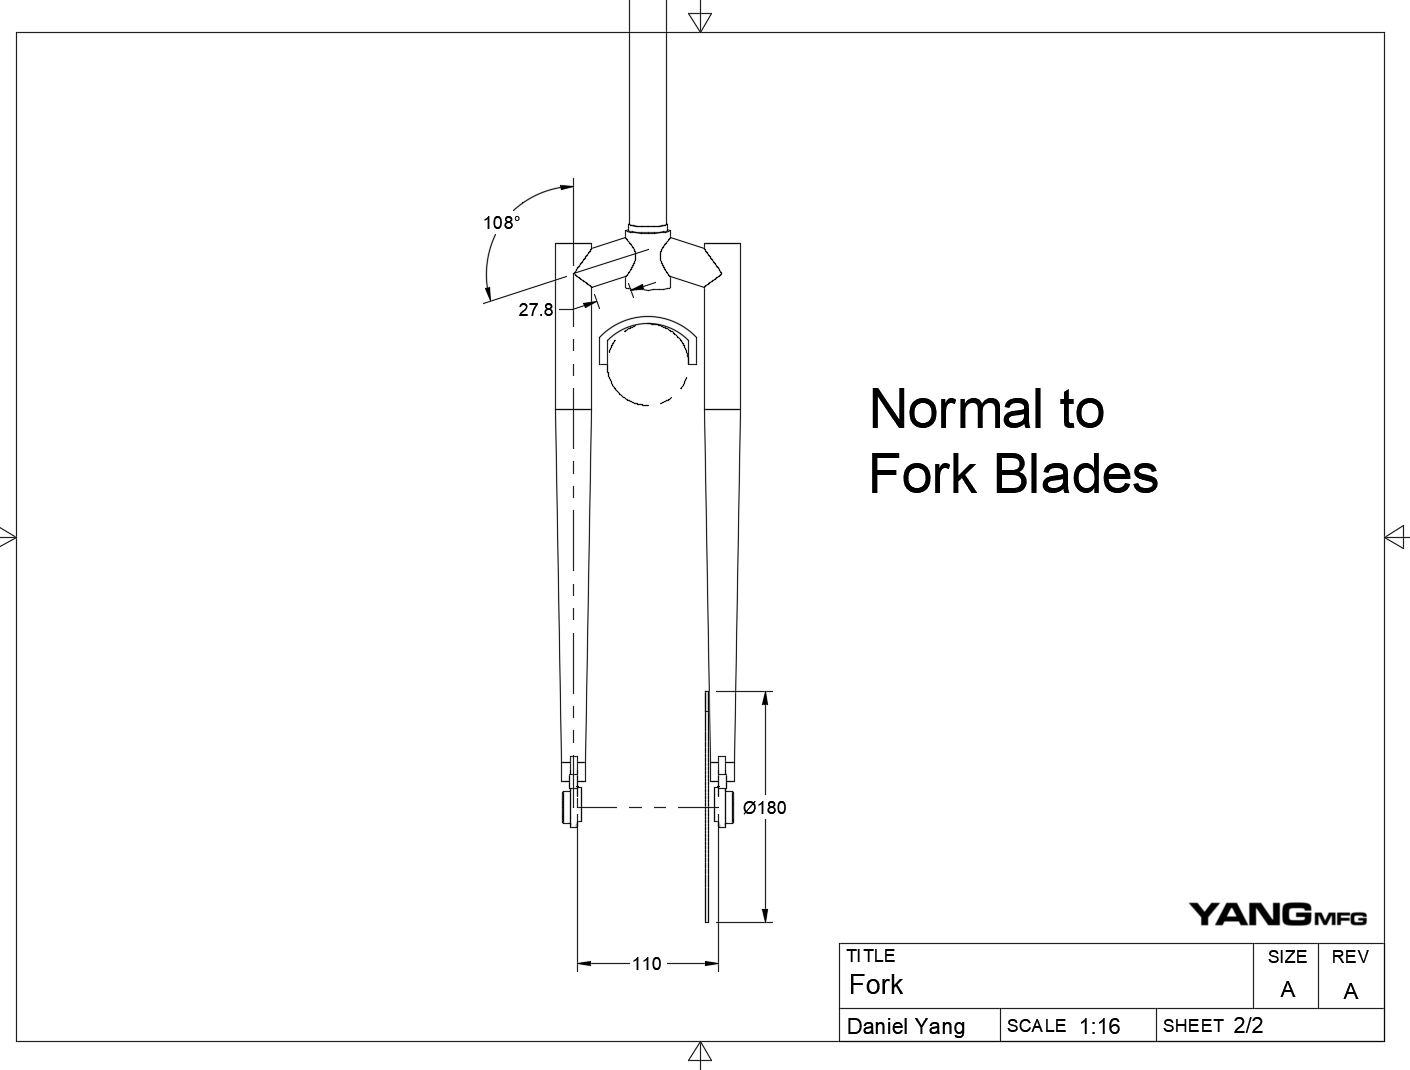
- The 180mm rotor clearance is probably too close for comfort
- The angle of the blades I got was 6.6deg
- The length of my segments came out shorter (27.8mm)
3 Likes
@scharencycles You can use anything you want, I used to make crown pieces out of the tops of the old MSRD-LT steerers just because they were silly long (like 350 or 400mm or something) and it seemed like a waste, and they were 1.1mm wall which was what I wanted. But it’s pretty cheap to just buy 20’ of 1 1/8 x .049 and build forks for a year, too.
@Daniel_Y The usual solution for disc clearance here is to not join the dropouts on center to the fork blades.
-Walt
2 Likes
Thank you @Daniel_Y , yours is a lot more accurate.
Looking at your picture I noticed that I drew in the D.O the other way around. Actually I had them the other way but wasn’t sure.
It seems I need to look in to fusion…
What parts exactly are you using the laser cutter for? I didnt know you can cut round stuff with a laser
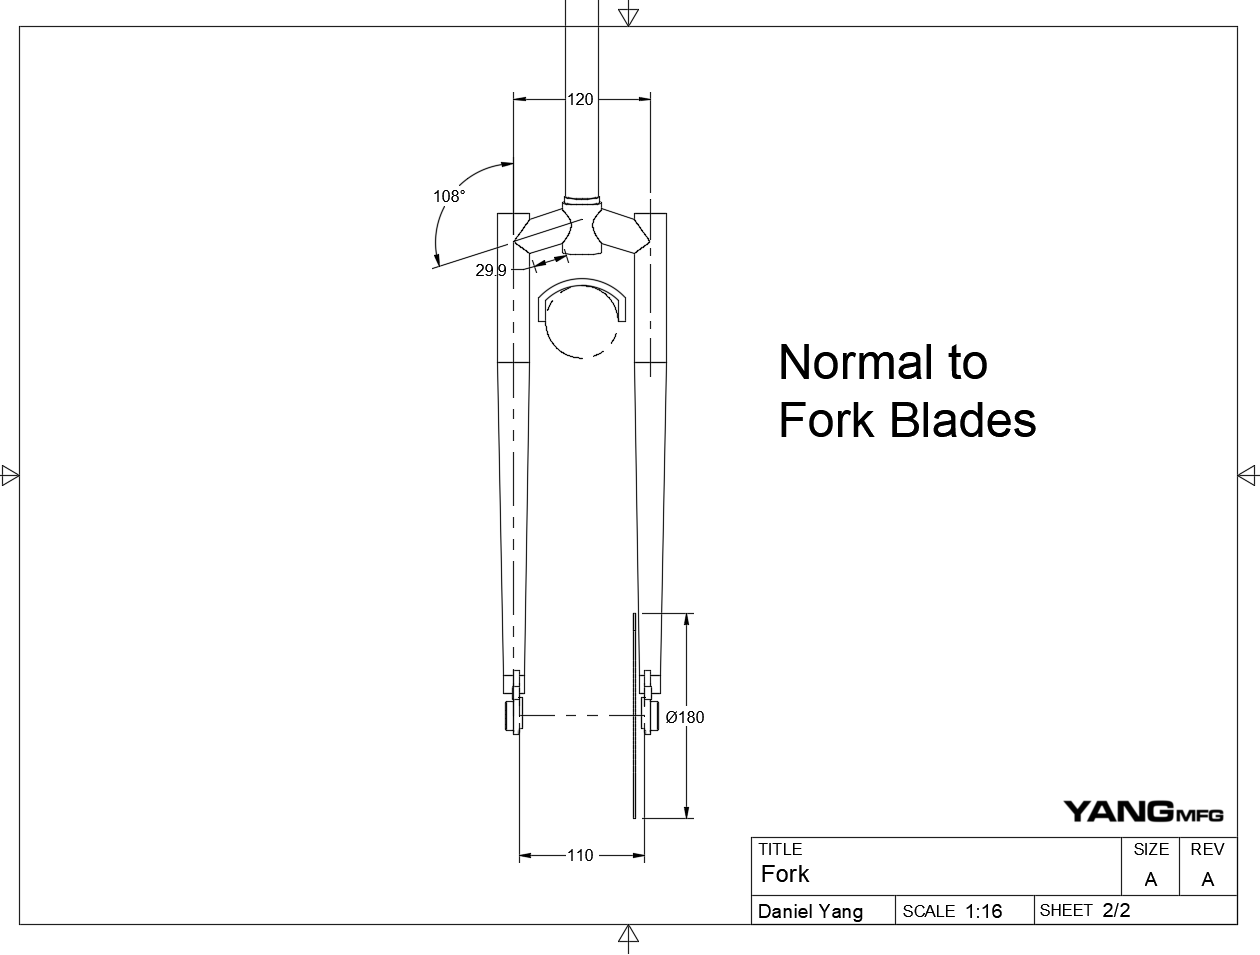
As per @anon91558591 suggestion, If you space out your two legs 120mm, it should give you enough rotor clearance:
I need to find a way to cheaply and easily print bike-sized prints 1:1 scale. For prototypes or first build its really useful to have something to lay out
4 Likes
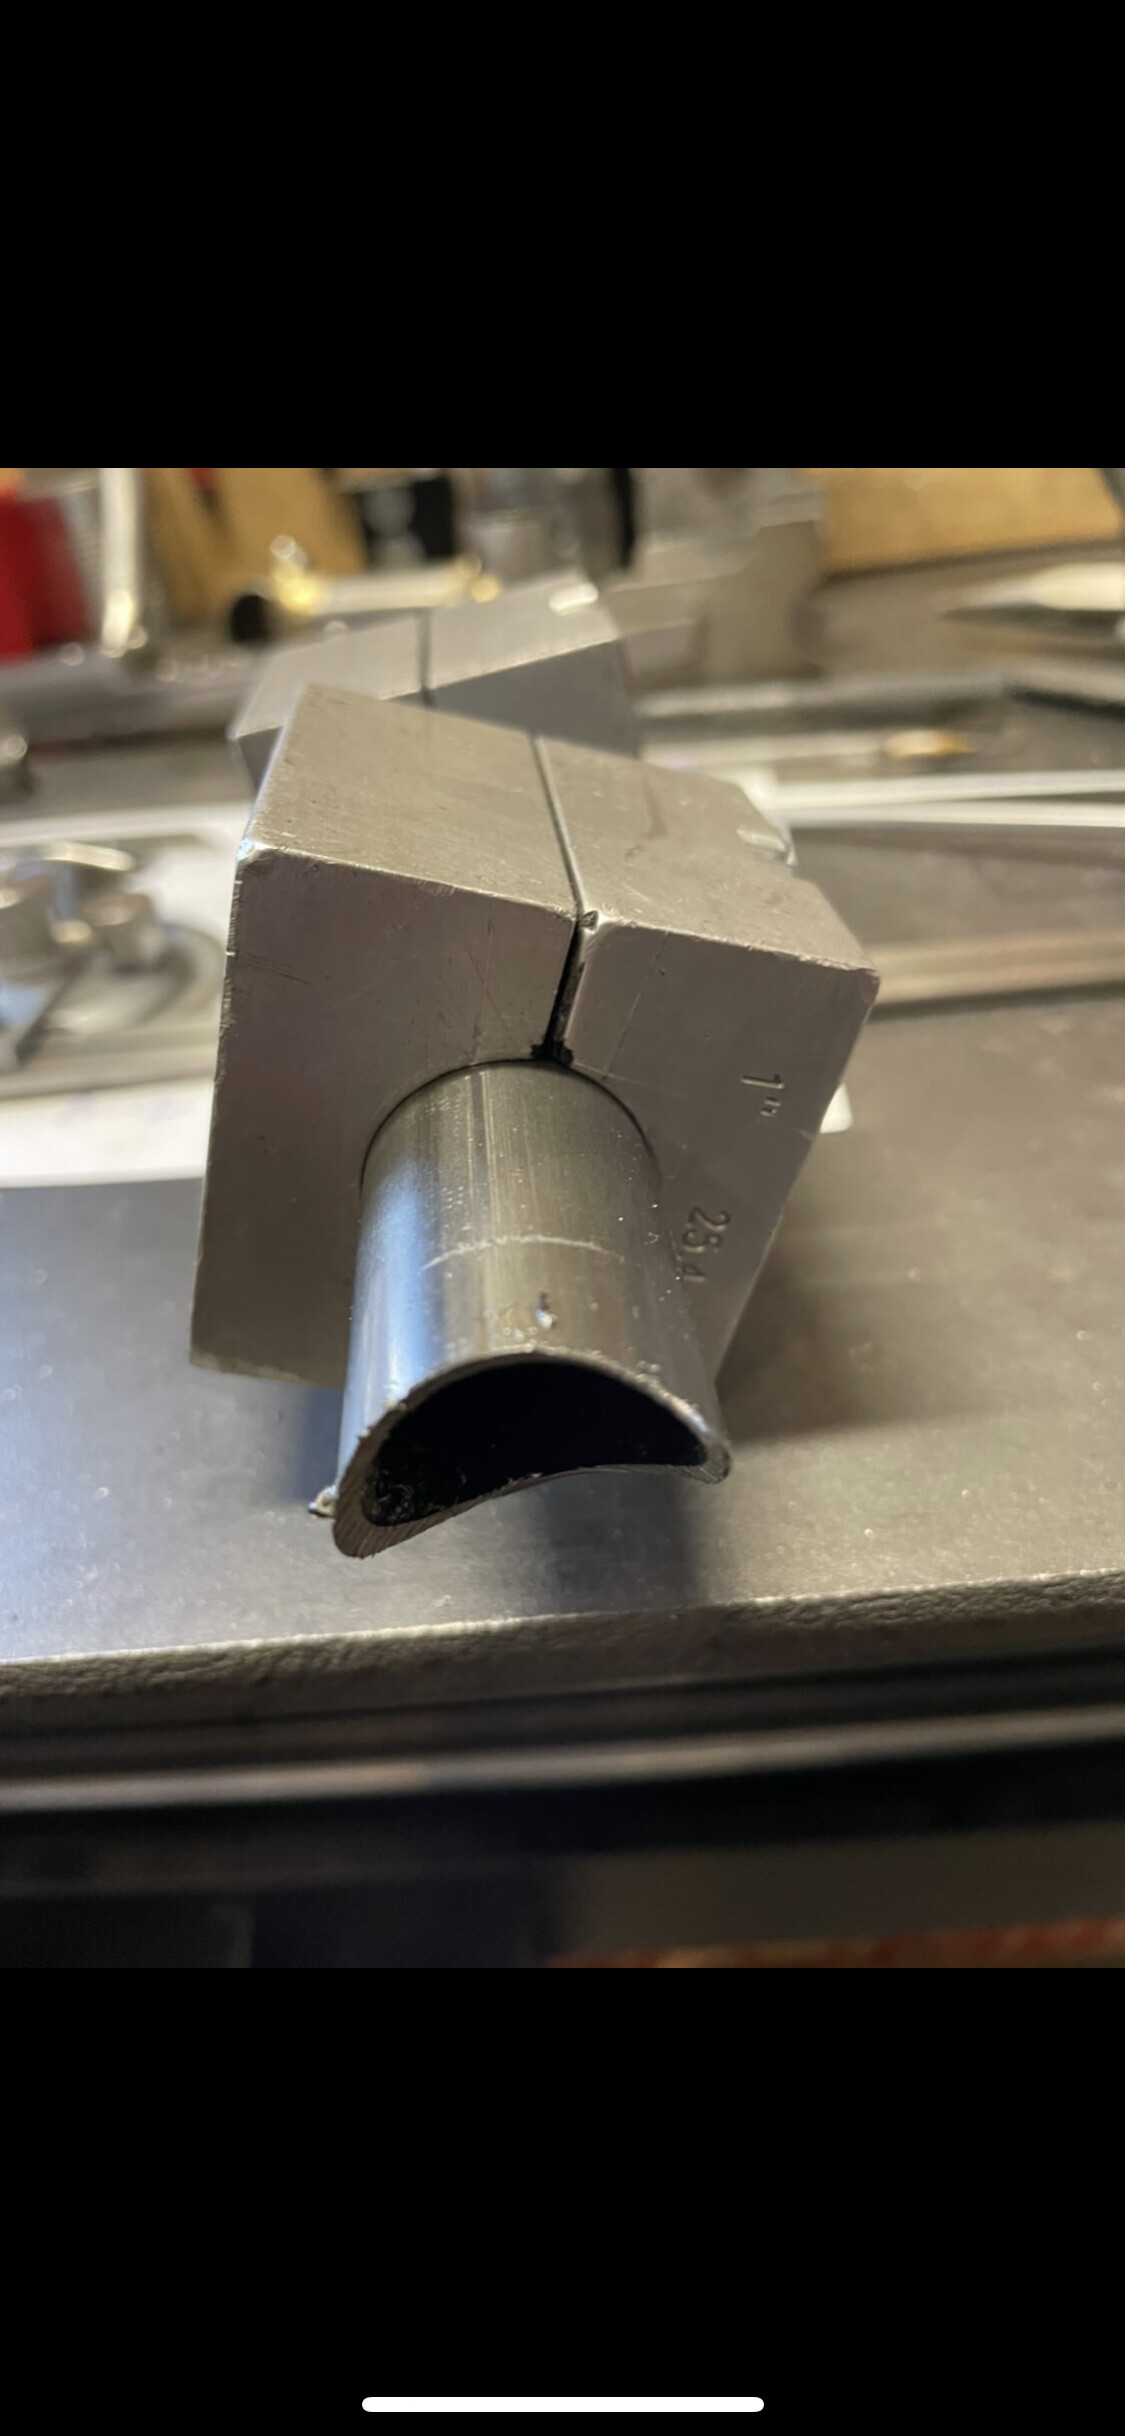
The short, segmented pieces that attach the legs to the steer tube.
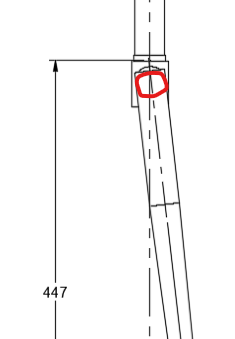
I noticed something interesting with the CAD that I’m still wrapping my head around.
The fork is designed in CAD as it would be built:
- The leg is mitered to the segment at 18° (108°)
- The segment is mitered to the steerer clocked 6.6°
- All miters are centered (no offsets)
However, if you look at the top-down view, the segments naturally angled forward 2.1°
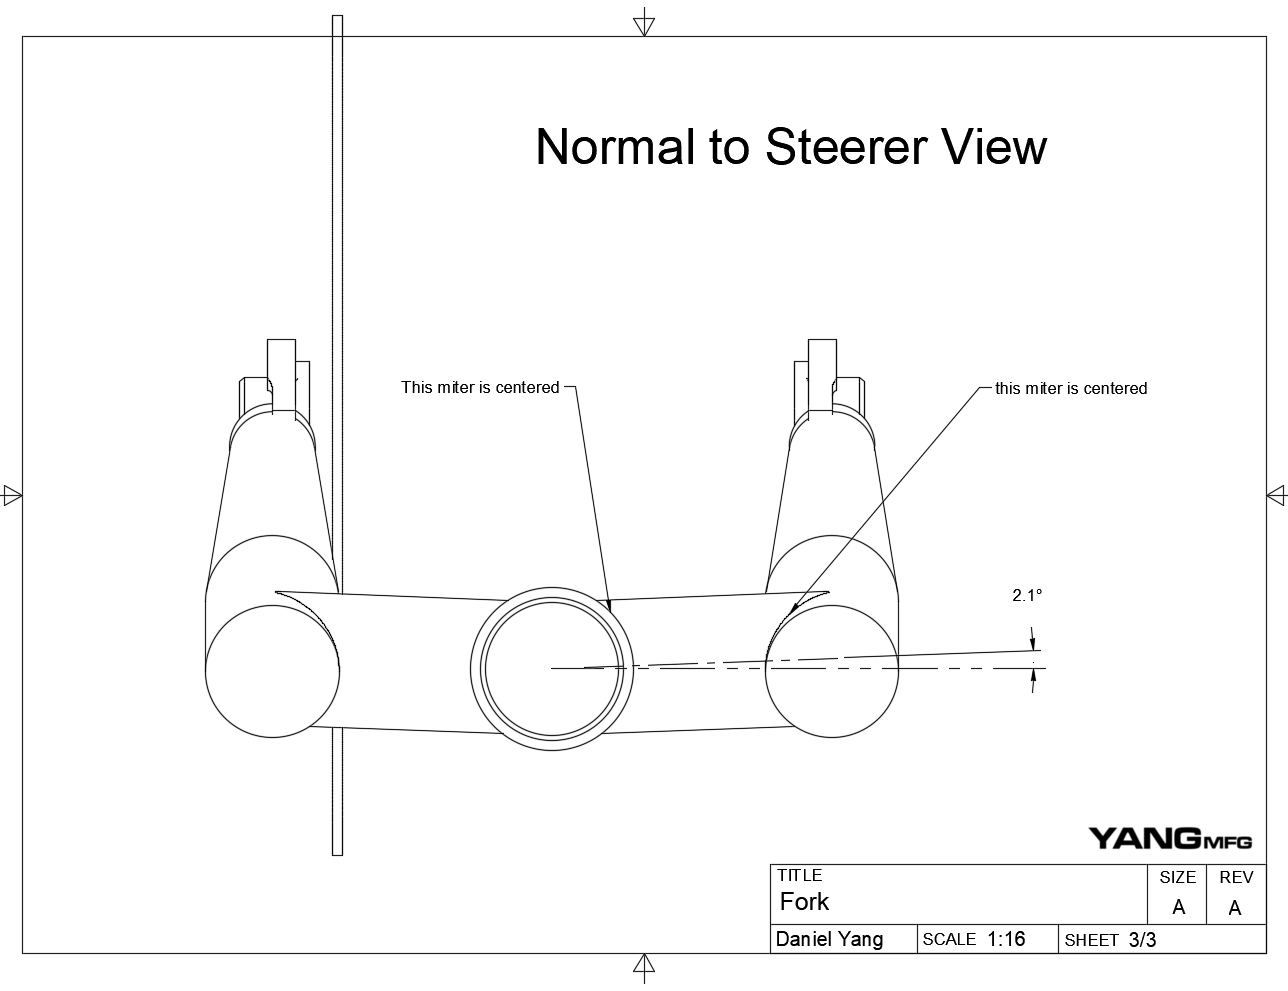
I’ve noticed this phenomenon building the bike’s seat stays as well. I think it is because we are using 2D methods and dimensions to represent 3D relationships.
I checked this CAD several times, and the drawing checks out. My best explanation for the 2.1° angle: the sequence in which you rotate an object in 3D space actually has a non-intuitive result on the final orientation. This sequence is called Euler Angles
Maybe one day I will sit down and figure out linear algebra to solve this mystery, but until then, that is my best guess on what is happening.
The Takeaway:
- If you mitered your segments and fixtured your fork exactly to the drawings, don’t be surprised if your segments are canted forwards. Don’t try to fix it!
- If you are using a fork fixture to miter the steerer, rotating the segments would allow it to hit the centerline of your hole saw. If you didn’t rotate the segments, your cut will be offset 2-3mm (which is fine)
6 Likes
This is to much for me to wrap my head around.
I need to do it and see it to understand stuff like this.
Thanks for all the input Daniel.
The drop outs are Enroute , will start building it in 2 weeks or so
Hey Daniel, I have full-scale prints made at a local place that specializes in construction documents and blueprints. It’s less than $5 for a b&w printout that’s 36x48". I agree, it’s super useful to have the full scale print if you are trying something new. All you need is to find a print shop that has a plotter, which uses a big roll of 36" paper.
1 Like
Yep, anywhere that prints architectural plans should be able to print B&W very cheap. The largest size you’ll probably find is the US is ARCH E - 36 x 48 inches (914.4 x 1219.2 mm) like you said. Internationally it’ll be A0 (841 mm x 1189 mm). Handy measurements to keep in mind when setting up ya 2D sheets.
1 Like
I haven’t been paying attn lately so catching up now, but I’ll post a couple of fork failures I’ve had on that other thread to keep it all in one place. But yes I had one customer break the thicker 1-1/8” True Temper MSRD (?) steerer in half whole 20 miles out in a race in Alaska, he had to carry his bike out and wasn’t badly injured thankfully. That fork was only 470 axle to crown too. He also broke his frame so he’s just hard on bikes.
I’ve also had legs crack at the bottom of the crown piece weld bead. Cutting it open I realized it started at the oversized breather hole to allow easier passage of a dynamo wire (1/4” club now!). This is why you’ll see forks with gussets at the top of the fork blades (Iglehart, Retrotec, Sycip, Fat Chance). But those don’t use Walt’s fork legs, I believe they used straight gauge that was 0.035” wall.
Paragon’s tapered and “straight” steerers are all I’ll use now. The 1-1/8” steerer is 35 and internally relieved, a bomber steerer and could be used for a MTB if you are not wanting to use their tapered version. Their steerers are machined vs the Nova or BFS (not sure the Nova one exists anymore) which is a tube so lighter. I love the two lengths of the Paragon.
Sputnik makes a sweet segment mitering fixture based off what he made for Fat City years ago. You can build your own too that is less complicated and get the same result. I used to use a tilt table and milled out paragon tube blocks, which works but involves a lot of edge finding and precision sharpie use.
3 Likes
Did the steerer break in the middle? or did it break at the crown race?
That is a good callout and data point. Builders use empirical testing to vet their designs, which in most cases, works pretty well. However, designs and riding styles slowly creep, but the construction methods and materials available don’t necessarily adjust. That is why I think these conversations are invaluable.
1 Like
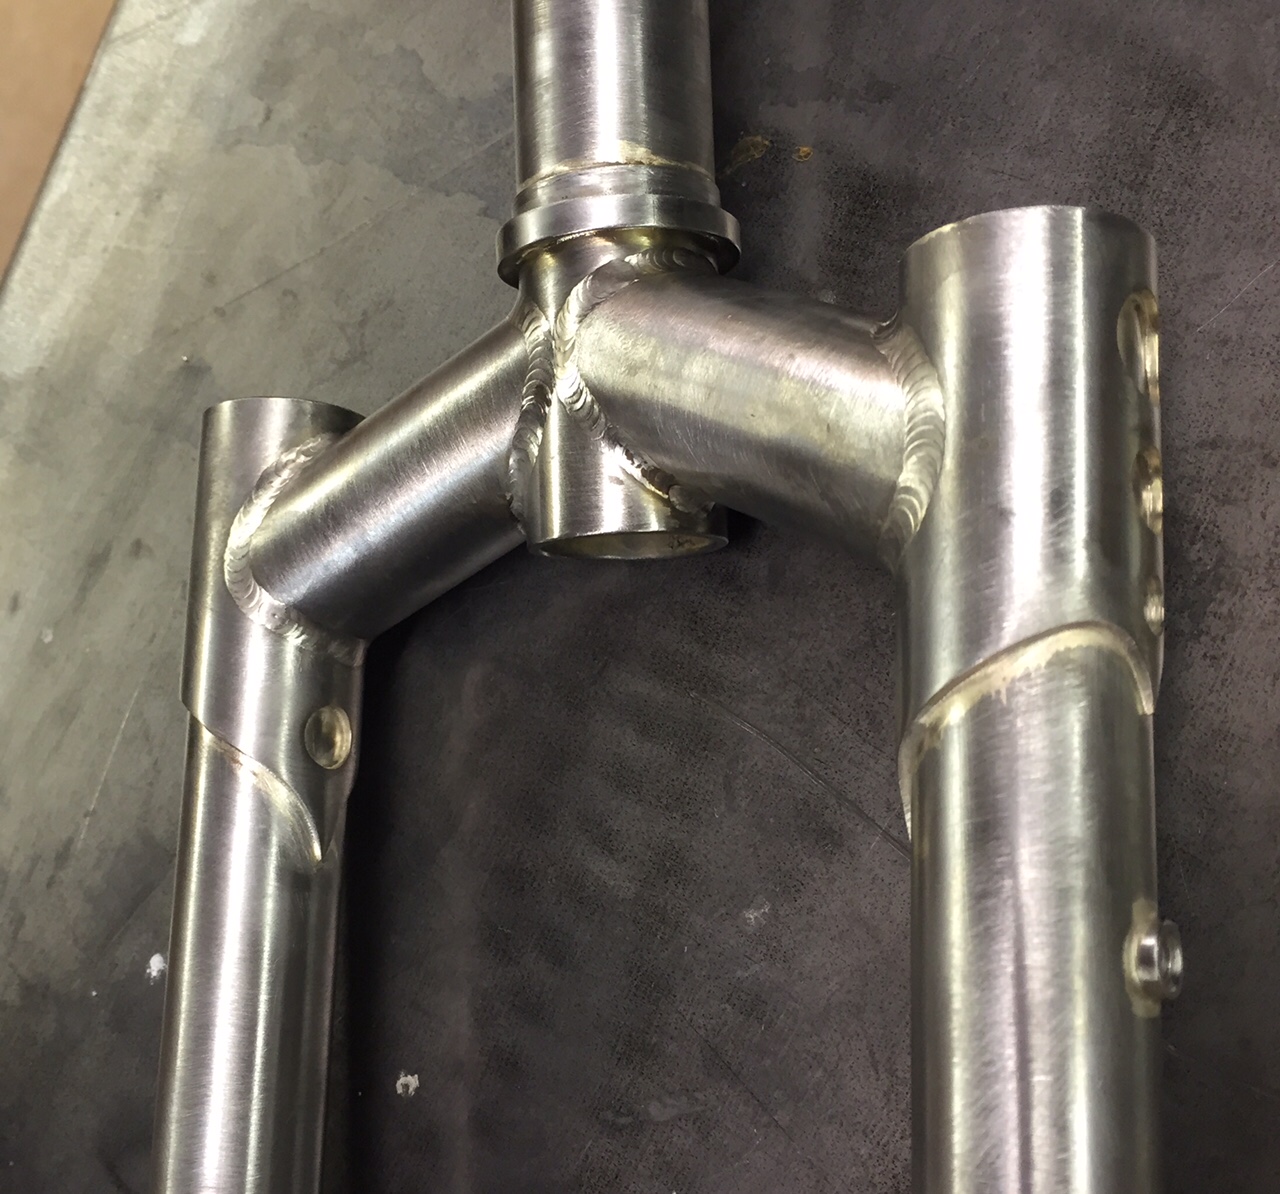
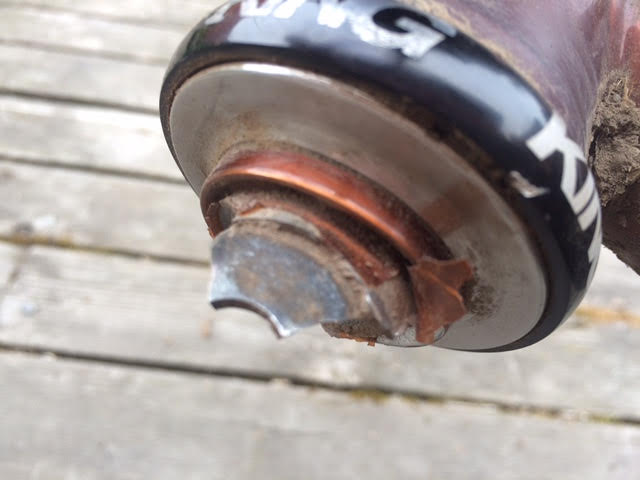
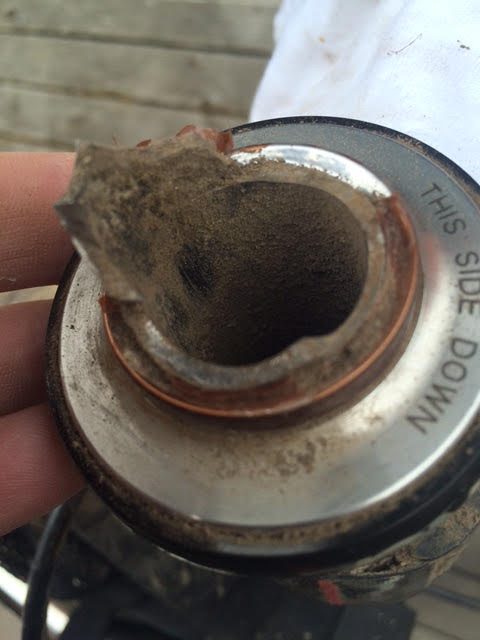
I believe the start of the crack was at the breather hole in the steerer to pass the dyno cable, you can see the two sides of the crack start at the top of the hole in one of these photos. It likely had been cracked for awhile but it ended up snapping in half all at once when he was riding. He bought two bikes from me after this BTW! I built him a new fork with a tapered Paragon steerer and haven’t had any issues since then.
4 Likes
I think part of the phenomenon has to do with the fork offset being controlled by the fork legs and how the part was modelled. Since the legs are on an angle, and the segments are angled down from the steerer, forcing a miter on centerline with the fork leg would require a forward angle since the fork leg axis is technically forward of the steerer axis along the entire leg.
I would bet that if you redesigned the fork with the leg side segment centered on the intersection of the axes as shown in your drawing rather than the tube itself, you will get rid of the extra 2 deg.
3 Likes
Ooo great info, thanks. I didn’t know Paragon straight steerer was made differently than the other offerings. I’m signing up for the 1/4" vent hole club.
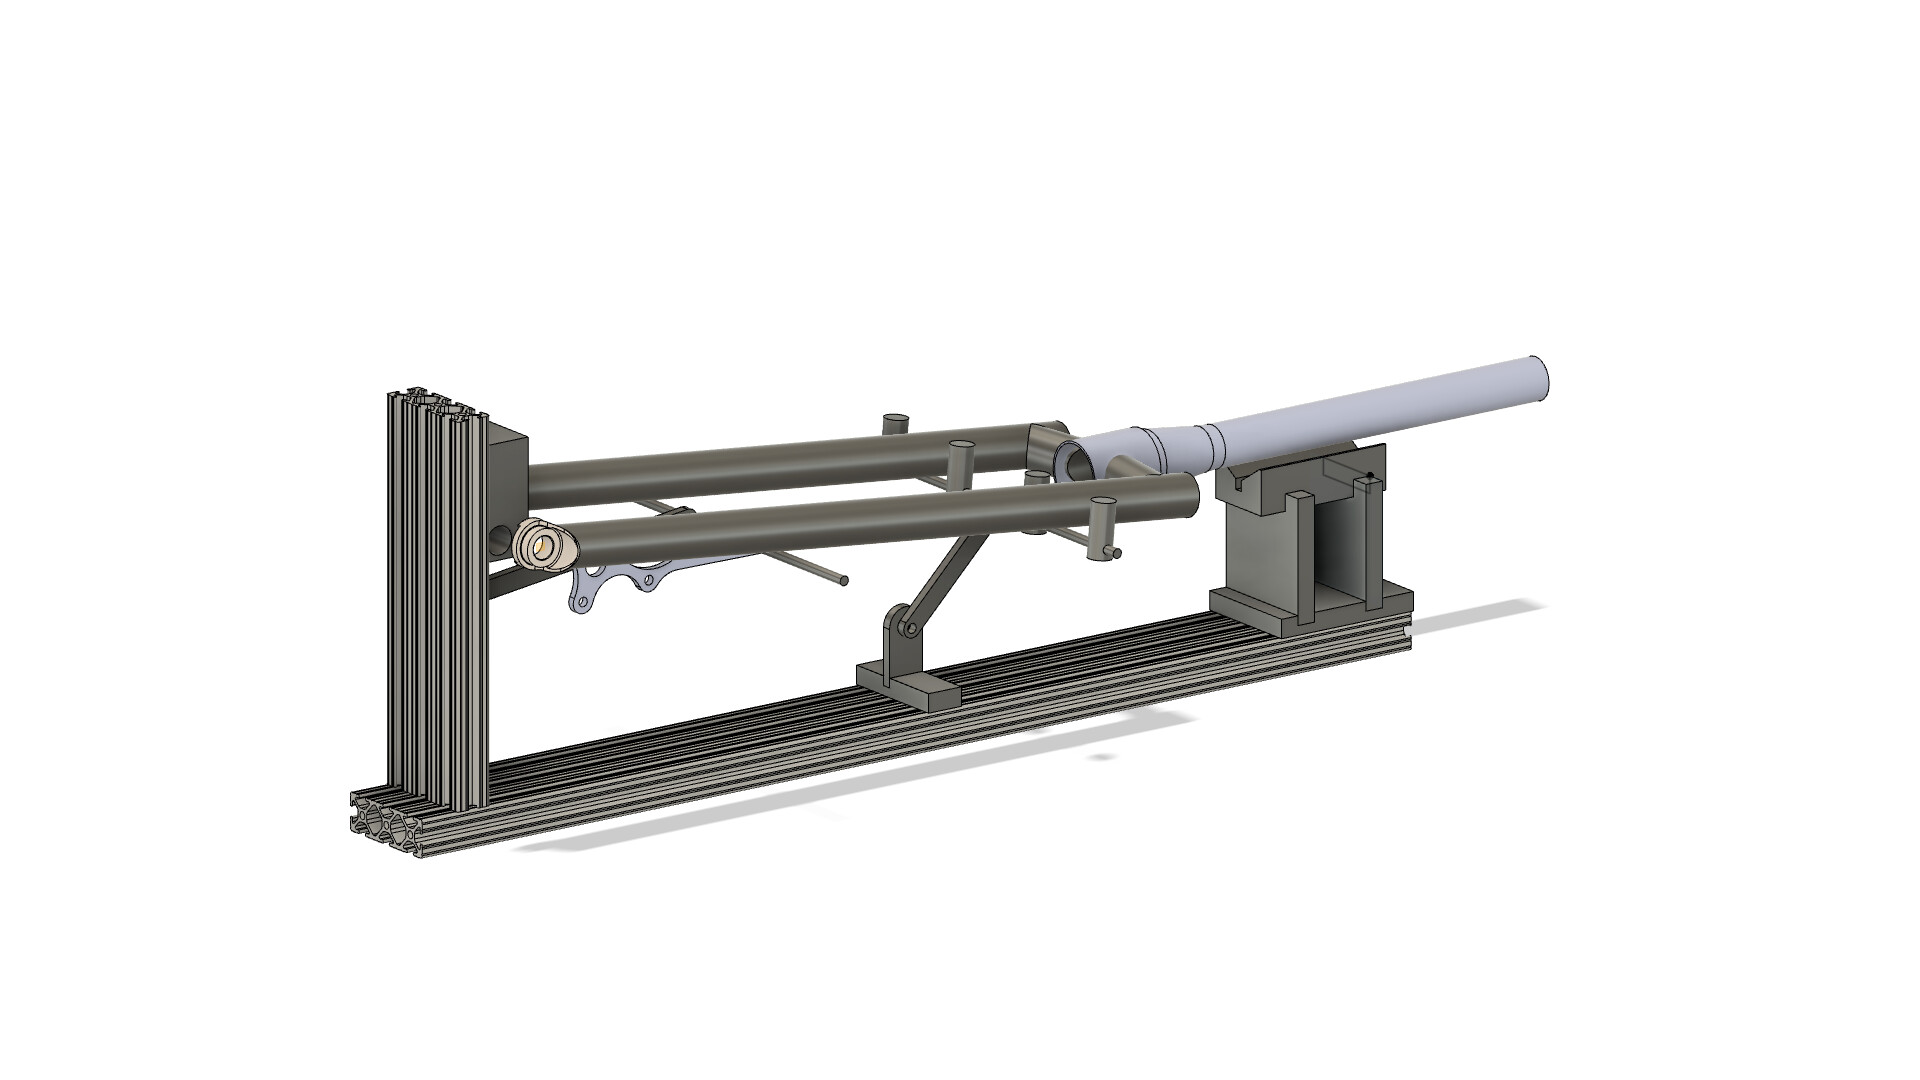
Speaking of fixtures, I designed some mods for my basic Alex Meade SS/CS fixture and just ordered some SendCutSend pieces for that, so hopefully it works OK. I didn’t create the nub pieces for the lower rod, but it will have them as well as two support arms instead of the one shown. I realize there are probably some cheaper ways to build this, but I already have the V-block and wanted to practice some milling to make the bottoms of the base pieces self aligning with the extrusion, etc…
Hoping this thing works and I’ll be building a fork soon!

2 Likes