Neat setup! I imagine it’s a much cleaner miter than a hole saw setup. I’m wondering how you get your miters at the position you want. With a hole saw notching setup, you would set the notch location before you start the cut. But with the abrasive setup it seems you feed incrementally until it’s deep enough. Do you mark out where to stop the miter with a template or something?
yeah you can use a template to mark where to stop, or mark it with a marker or something.
This is a cool setup except that without using blocks, it would be hard to then notch the other side at the same angle as the first, but good to know that there are Jackobs holders like that
1 Like
That looks great!! I have always wanted to try to build a mitering fixture for the lathe (another project on the list I never get to!).
This approach would be fast and accurate using a vice on the cross slide with a rotary table (would need a larger lathe):
MAGNETIC ‘V’ BLOCK UNIVERSAL VISE JAWS – Votaw Tool Company
First step for new cutter is chuck it up in reverse and face the backside so it sits on the arbor straight.
Then after you attach the arbor and chuck the whole thing up, you can run a skim pass along the OD of the cutter to remove any snaggly teeth that will cut oversized. You can also see if it’s out of round and squish it back to round. I do this or run them across my belt sander to remove the wayward teeth. Also, check out fine tooth saws. they are a little nicer for thin walled tubing.
Missouri Precision Tools, Inc.: Rockhard HSS BiMetal Fine Tooth Hole Saws (mo2ls.com)
4 Likes
An alternative to the Votaw jaws linked to (which are out of stock anyway), these are from BikeFabSupply.com, in stock and cheaper:
V-BLOCK SET INTERLOCKING 3/8"(9.5MM) - 2" (51MM) ANO BLACK — BICYCLE FABRICATION SUPPLY
And they come in purple ano!! W00t! ![]()
(I’d prefer silver, but that’s not offered.)
The choice of a 120° angle seems odd, I’d have thought 90° would be more useful. For example you could hold square tube or bar for a cut on the diagonal, or hold something in a square collet-block for making octagons. You know, for all those times you wish you could make an octagon? OK never, sorry I mentioned it. I’m sure the 120° angle is fully functional for tube mitering.
For the most part I hold tubes in round tube blocks like Paragon’s, but V-jaws are great for oval tubes.
I noticed a weird thing about tubes that are ovalized at one end only, making a transition to round somewhere back from the oval end. Like if you squish the bottom end of a seat tube to oval at the BB shell, transitioning quickly to round for the front derailer. You’d think that would be a hard shape to hold for mitering, but v-blocks hold it like magic, The different degrees of oval, as you go from the miter end to the round part, all hit at ifferent places on the V-faces, but they do all hit. The V-block tightens against the tube along its whole lenght. I can’t wrap my head around the geometry of why this works, maybe it only works approximately, and the steel flexes until it hits everywhere? But I’ve done dozens, probably a hundred miters like that (I used to ovalize the bottom of the ST pretty often) and they all cut fine without slipping or marking the tube.
2 Likes
I have one of the Votaw v-blocks and all the stuff you mention are true. Specifically they don’t work well with variable shaped tubing. They have a magnet in the middle of the back so they stick to vice jaws (as well as all sorts of filing debris!). I considered trying a half round of steel to stick to that so that one side would pivot to clamp tapered tubes. That wouldn’t be for machine mitering though.
So many ways to make things more complicated! My wife likes to say I will do an unimaginable amount of work to avoid doing work. ![]()
2 Likes
I just got a mini lathe for mitering. I was going to use a cross slide milling attachment and tube blocks.
Do you think using a bracket direct mounted to the compound will make a more ridged cut?
1 Like
I don’t know if a bracket on the compound would be more or less rigid than the milling attachment but this is some information I think is important to consider when designing your setup.
To get a good cut it is important to have the tube positioned over top the carriage or as close as possible to it. With the photo in that ebay listing, the milling attachment sticks waaay out to the side of the carriage. When notching the tube, there will likely be lots of downward force which will become rotational force on the carriage with that long of a lever arm.
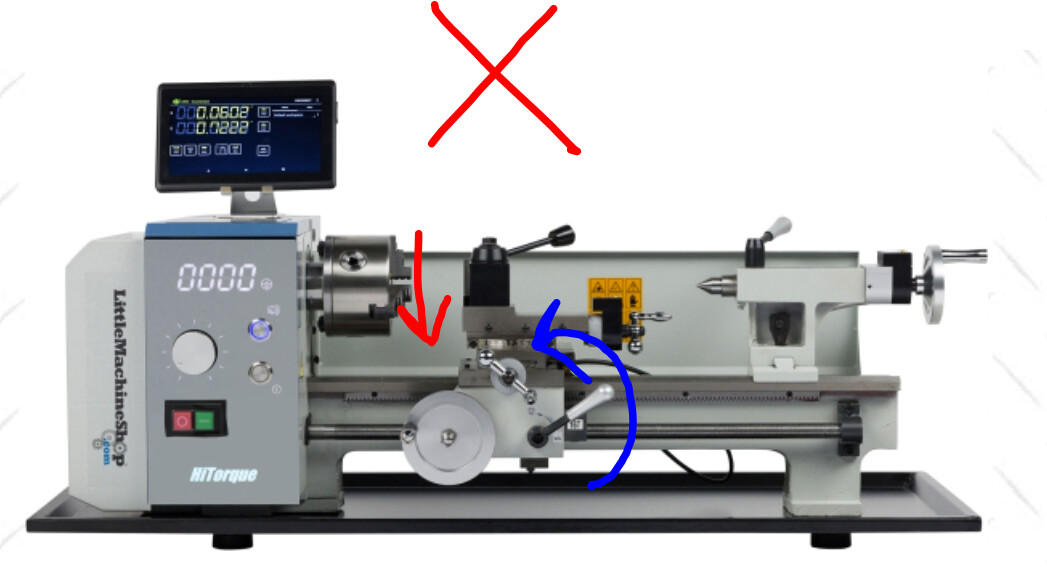
Red is the force of cutting the tube and blue is the resulting force on the carriage. The dovetails don’t resist upward force as well as downward force.
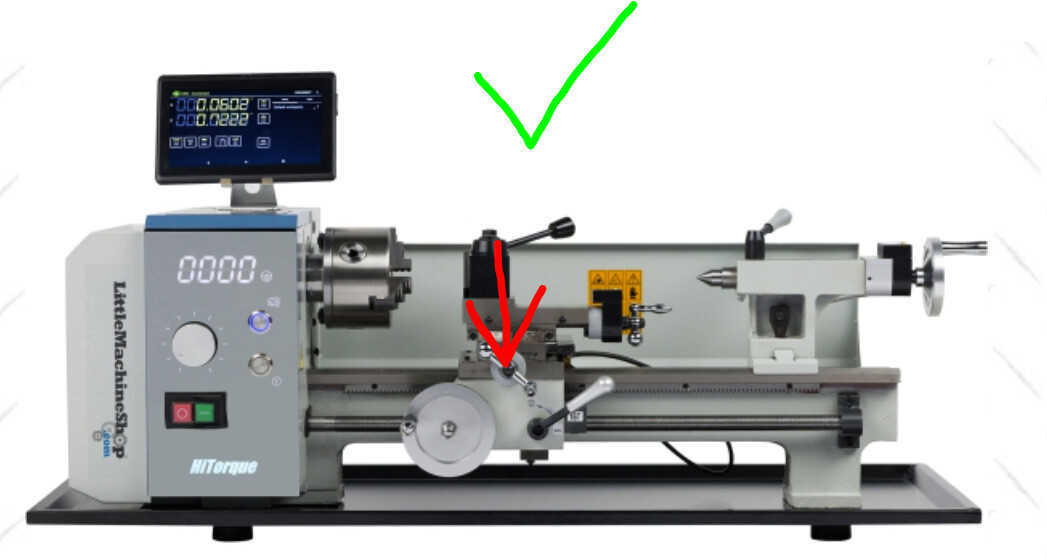
If you can have the force going straight down into the carriage everything is better. It makes a very noticeable difference on my machine.
So if you go with the milling attachment idea, don’t use it the way it’s used in the ebay photo ![]()
Hope this helps you a little bit.
Good luck and be sure to share your progress!
4 Likes
That’s great feedback!
This one probably has 1.5inches less offset but I think it needs adapted to fit my lathe.
2 Likes
I experimented with 3D printing some tubing blocks that fit into the tool holders on my lathe. Adjust the tool holder vertically to center the miter and rotate the tool holder for the right miter angle. It was surprisingly effective.
Here are some pictures from another thread:
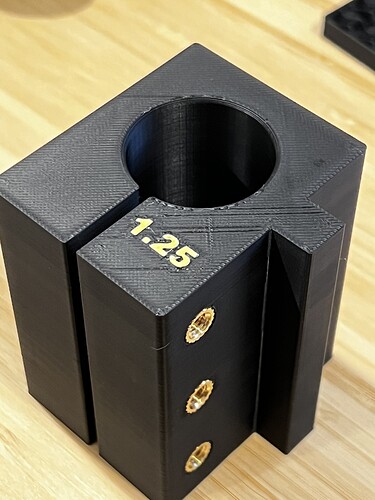
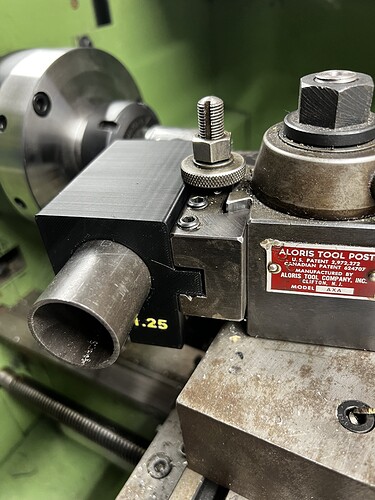
The key design aspect was making sure that the bottom part of the block (below the tongue) was able to sit flat against the tool holder so that it wouldn’t flex. A metal strip at the top of the tongue to spread load from the set screws is also a good idea. You can see in those photos that my lathe has a solid toolpost instead of a compound. I do own a compound, but don’t use it unless I need to make compound cuts. A block weighs about 200 grams, so it’s maybe $3 to make one.
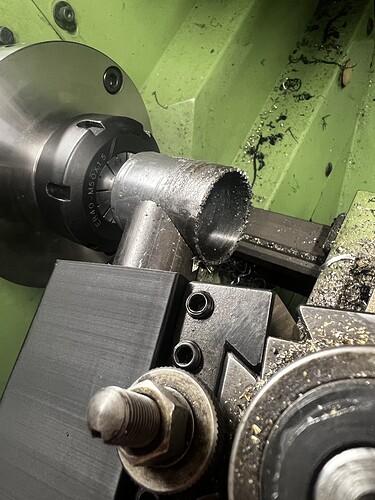
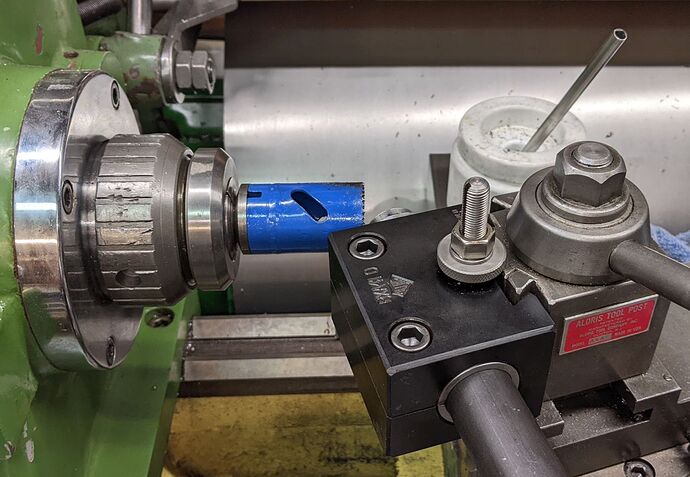
@bulgie is a local friend and was nice enough to share some boring bar blocks that were the right size for my needs, so I plan to actually use those now. This is his photo (we both have green lathes):
I still plan to use the 3D printed ones for oddball tubing sizes.
13 Likes
Wow, brilliant idea. I love seeing all these little innovations. Horizontal mills are really hard to come by. Using a sleeve to shim the tube to the correct size is an idea that never crossed my mind. We have an old anvil fixture that is missing some odd sizes. I could easily machine an aluminum shim…
2 Likes
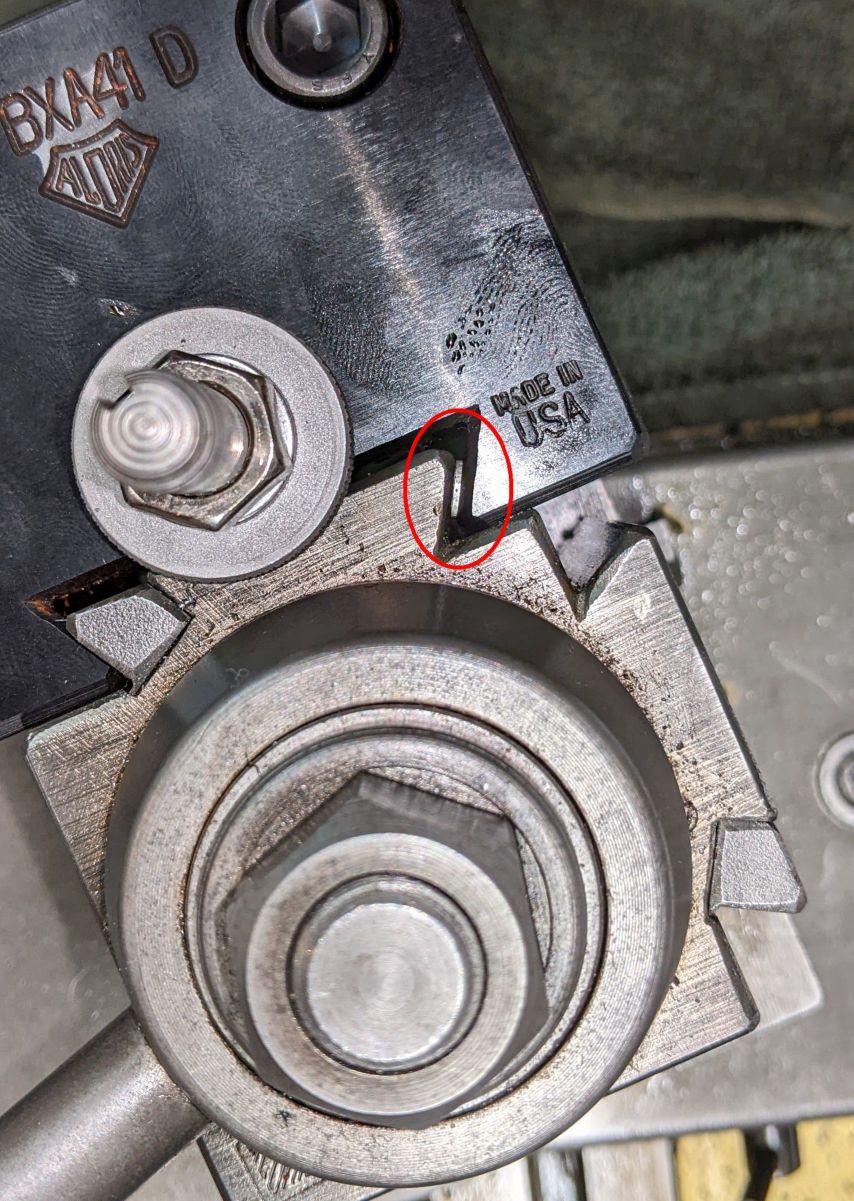
The other innovation that @bulgie had here is shimming the dovetail slot of a B-sized Aloris holder to fit onto an A-sized toolpost. It is rock solid and opens up a larger set of boring bar holders. This is important because the largest A-sized boring bars are 1", but B-sized goes up to 1-1/4" (which covers classic steel designs, but isn’t big enough for modern MTBs).
3 Likes
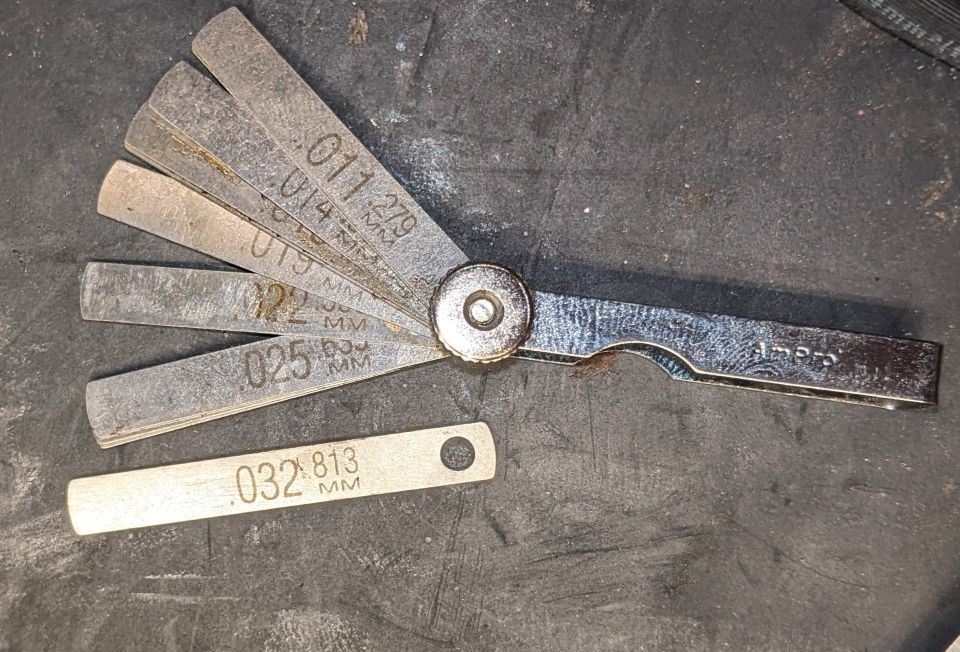
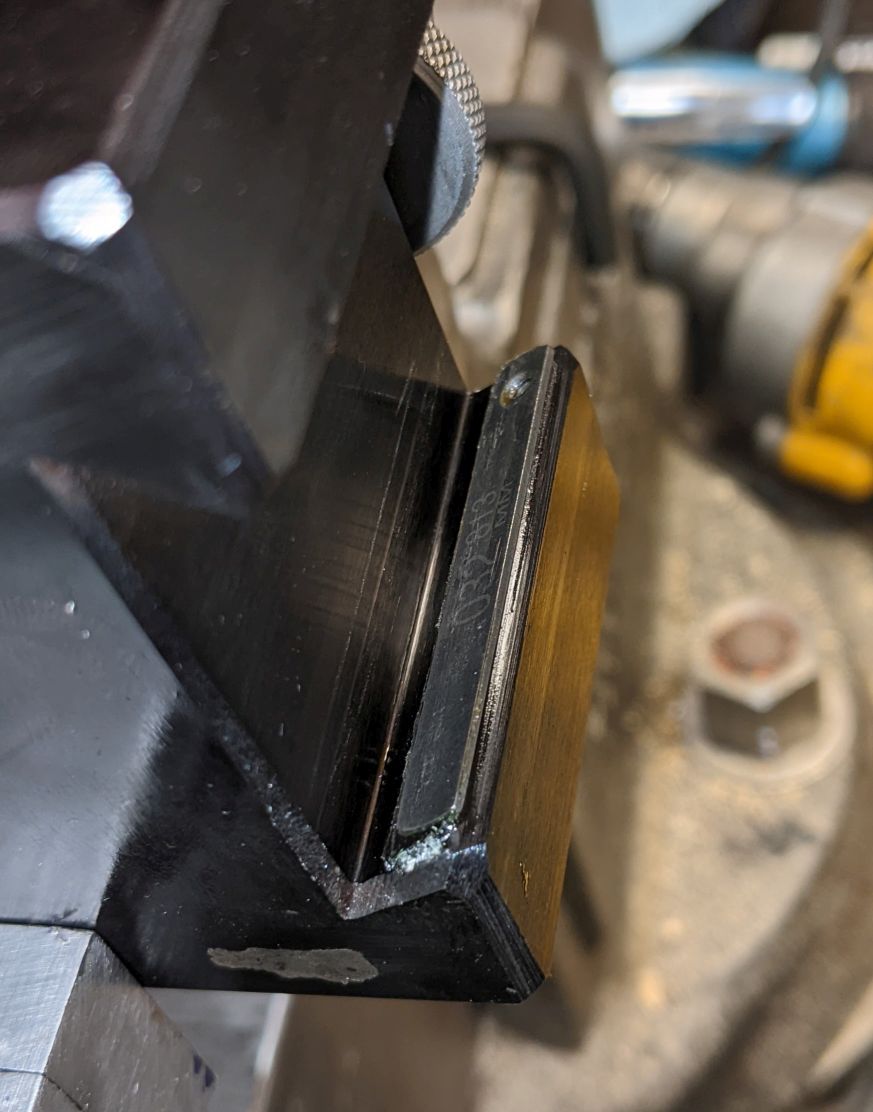
Oh yeah I should share that here. I’d call it more of a kluge than an “innovation”, but it’s easy and it works 100% reliably as far as I can tell. Maybe putting a BXA holder on an AXA post is an unlikely scenario, but in case it might help anyone:
I bought a packet of feeler gauges, $7 each from that river in South America. Take the .032" shim out of the stack, and you still have a feeler gauge set, just a thinner stack… Loctite that feeler into the dovetail of the BXA holder, clamp it hard overnight et voilà, you have another AXA holder. I haven’t been able to knock the shim loose; the Loctite bond seems plenty strong enough. I used #603 (green).
You could use anything that’s about .032" thick, but the feelers I bought are the exact right size, so there’s no cutting.
10 Likes
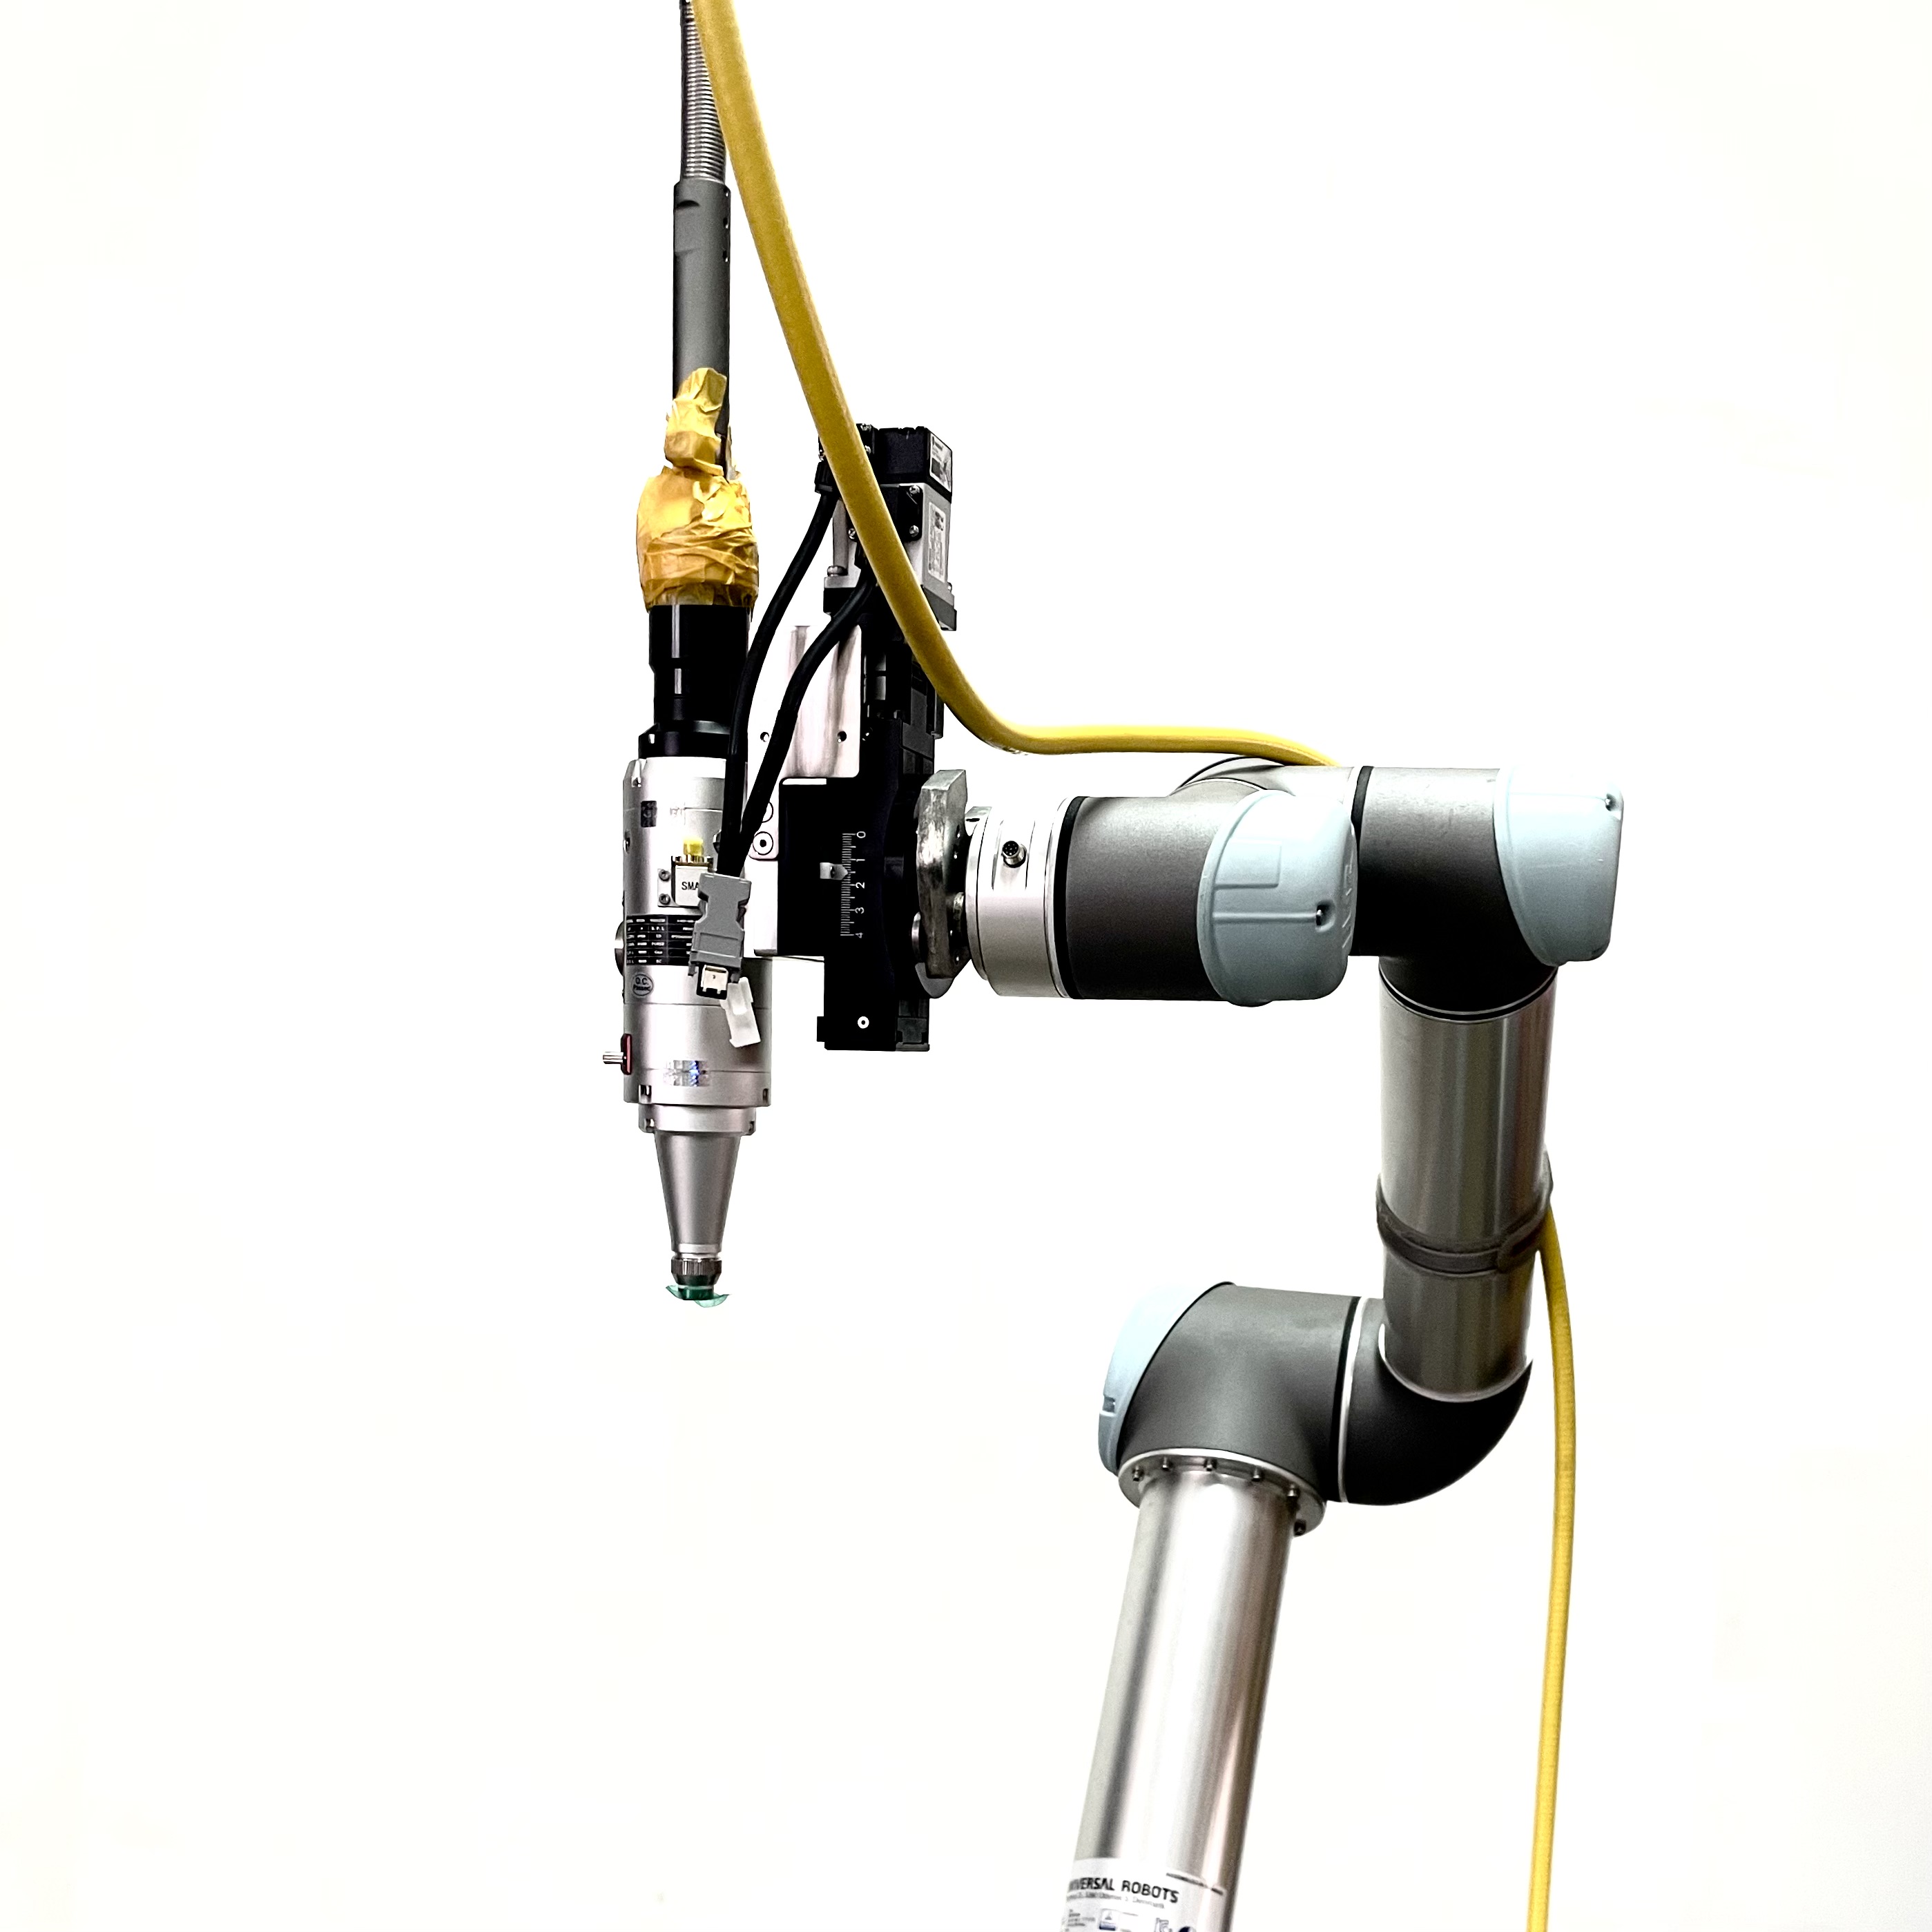
This is our Mighty Miter system being setup now. We are developing our own integration, not using off the shelf software. Will post action videos and more details soon….
8 Likes
Admins we need a ‘Whoa!!!’ reaction emoji.
I’m interested to see how this works! I work with several Universal Robots units every day. I wouldn’t think they would be rigid enough for the application of tube mitering, but I am excited to be proven wrong.
Which protocol do you intend to use to communicate with the robot?
Hi Travis.
I have done some milling and 3D printing with (industrial) robotic arms and the precision is good enough. In this setup, the rigidity in this setup is not a main concern as the laser head is not touching the tube and the weight is quite under the UR payload. As long as we manage to have smooth and low speed cutting paths, we are ok.
We are developing our own integration from BikeCad and RattleCad geometries or directly from STEP files. It is still soon to make it public ![]() . We are working directly with Reynolds as tubing manufacturer to guarantee the raw material tolerances for this process.
. We are working directly with Reynolds as tubing manufacturer to guarantee the raw material tolerances for this process.
This working strategy is part of my PhD research on Micro Factories and Digital Fabrication for the Bike Industry that started last year in Portugal, funded by European Union science programs…
11 Likes
Would it be an option in the gutter to order mitered tubes, if you supply a cad file?
This is very interesting, professionally speaking, we did the software for a known US company on their robotic welding arms - do you plan to release the software with some sort of licensing?
Yes. We will not be using full capacity in the beginning so we can supply mitres tubing to other companies. Probably we will stick to Reynolds tubing…
3 Likes
Hi @Matt. We are considering to supply the full setup but not on a short term. I strongly believe in a scattered network of micro-factories producing frames instead of a giga factory in Asia. For sure we will need to adjust a lot of things because one thing is developing our own solution with all improvisation we may have to use and a polished solution that needs much more. Maybe we can talk about that?
5 Likes