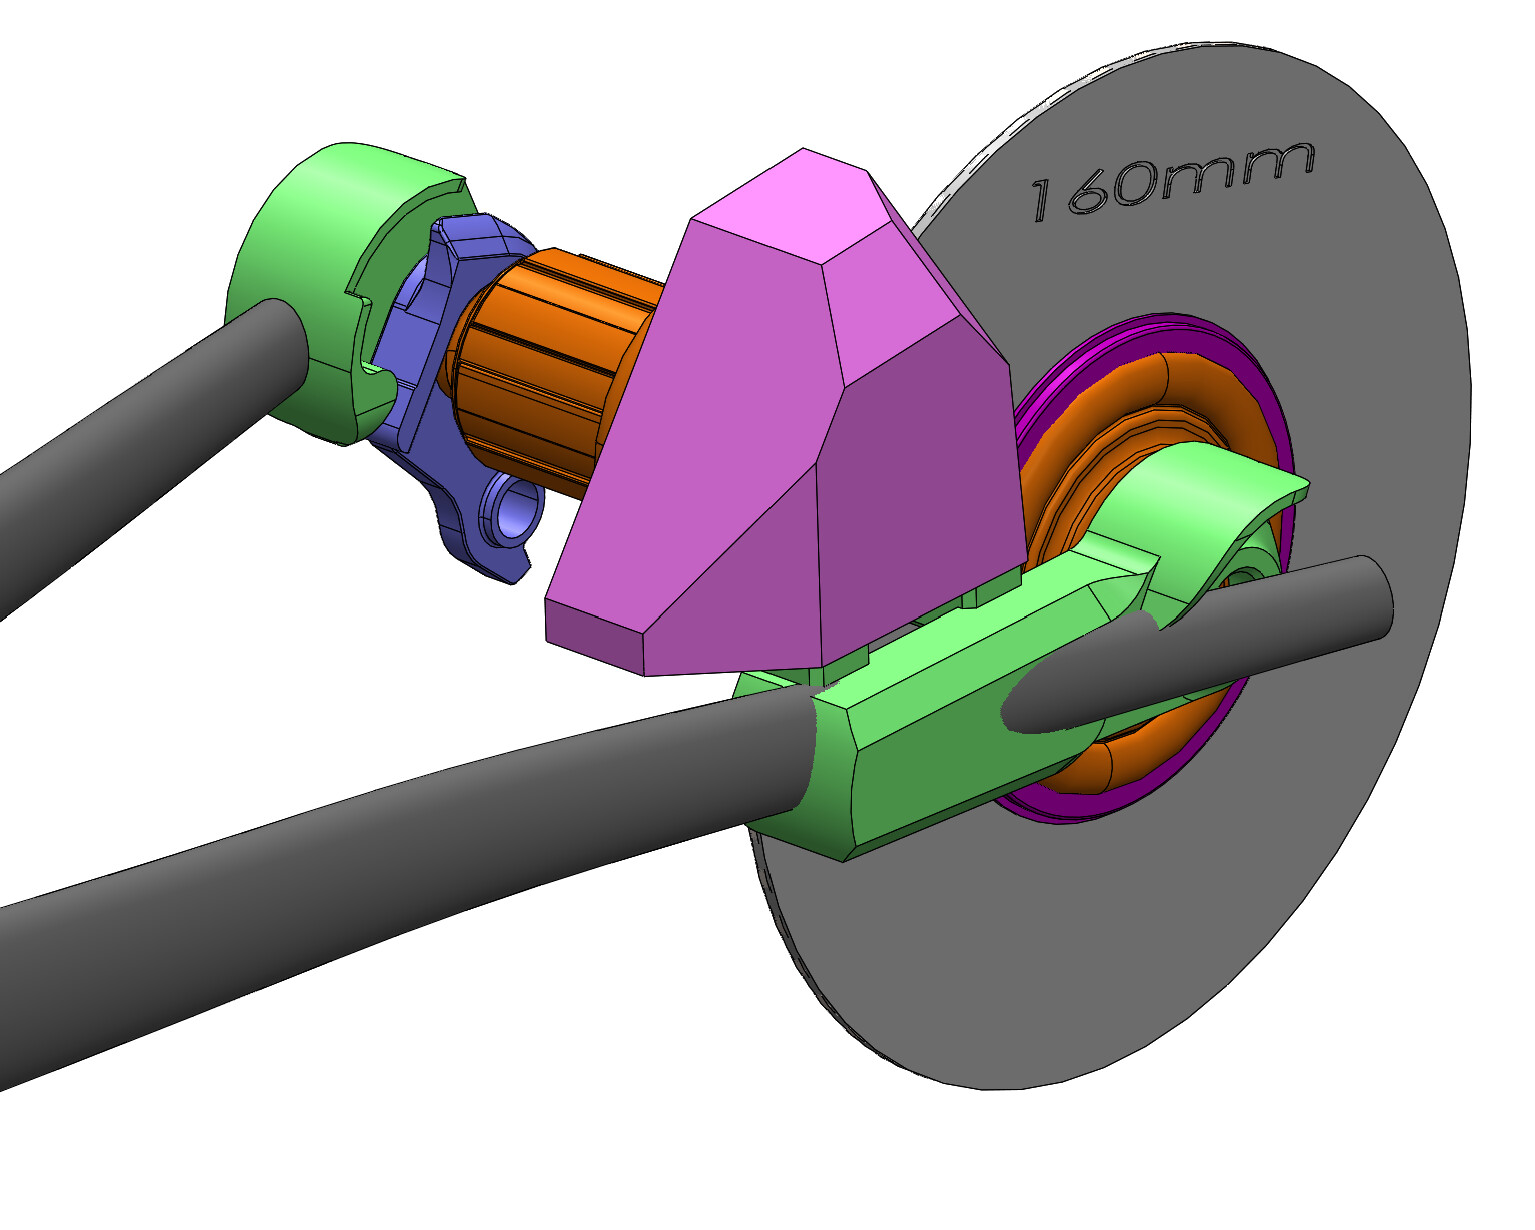
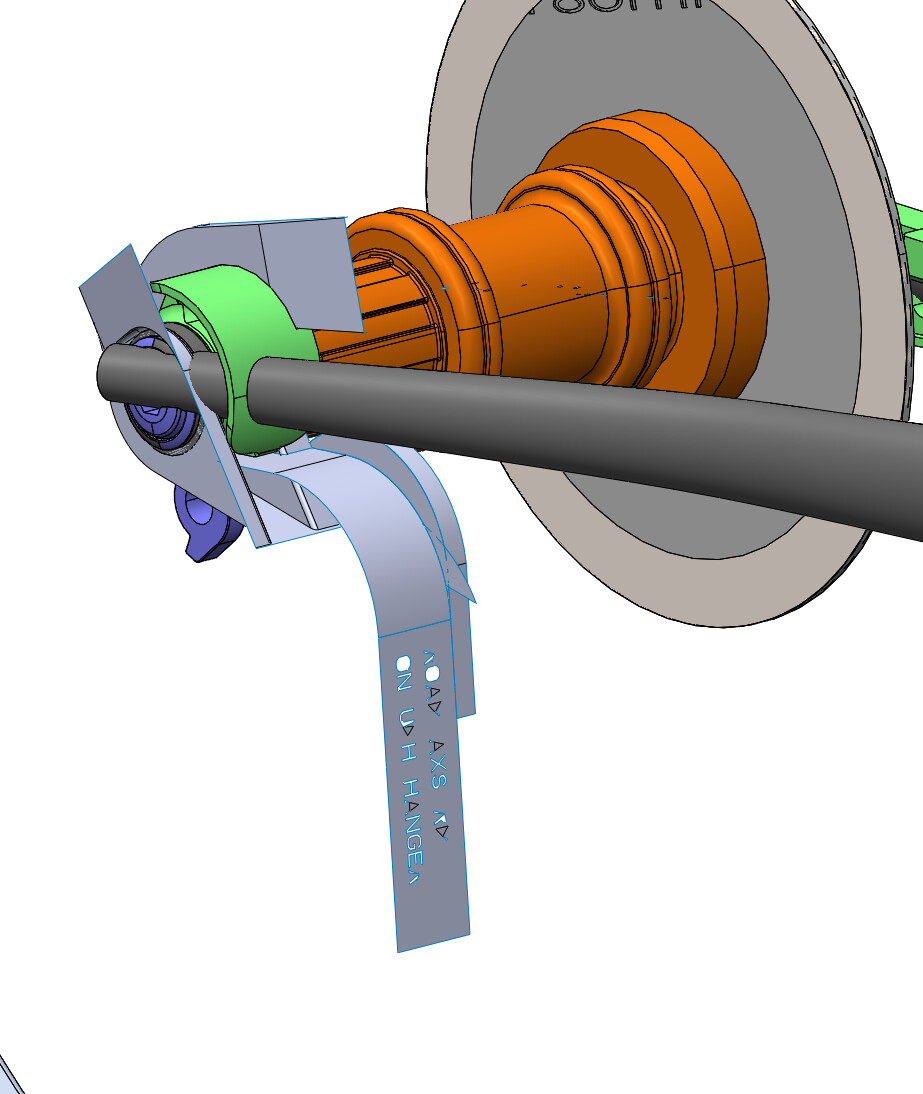
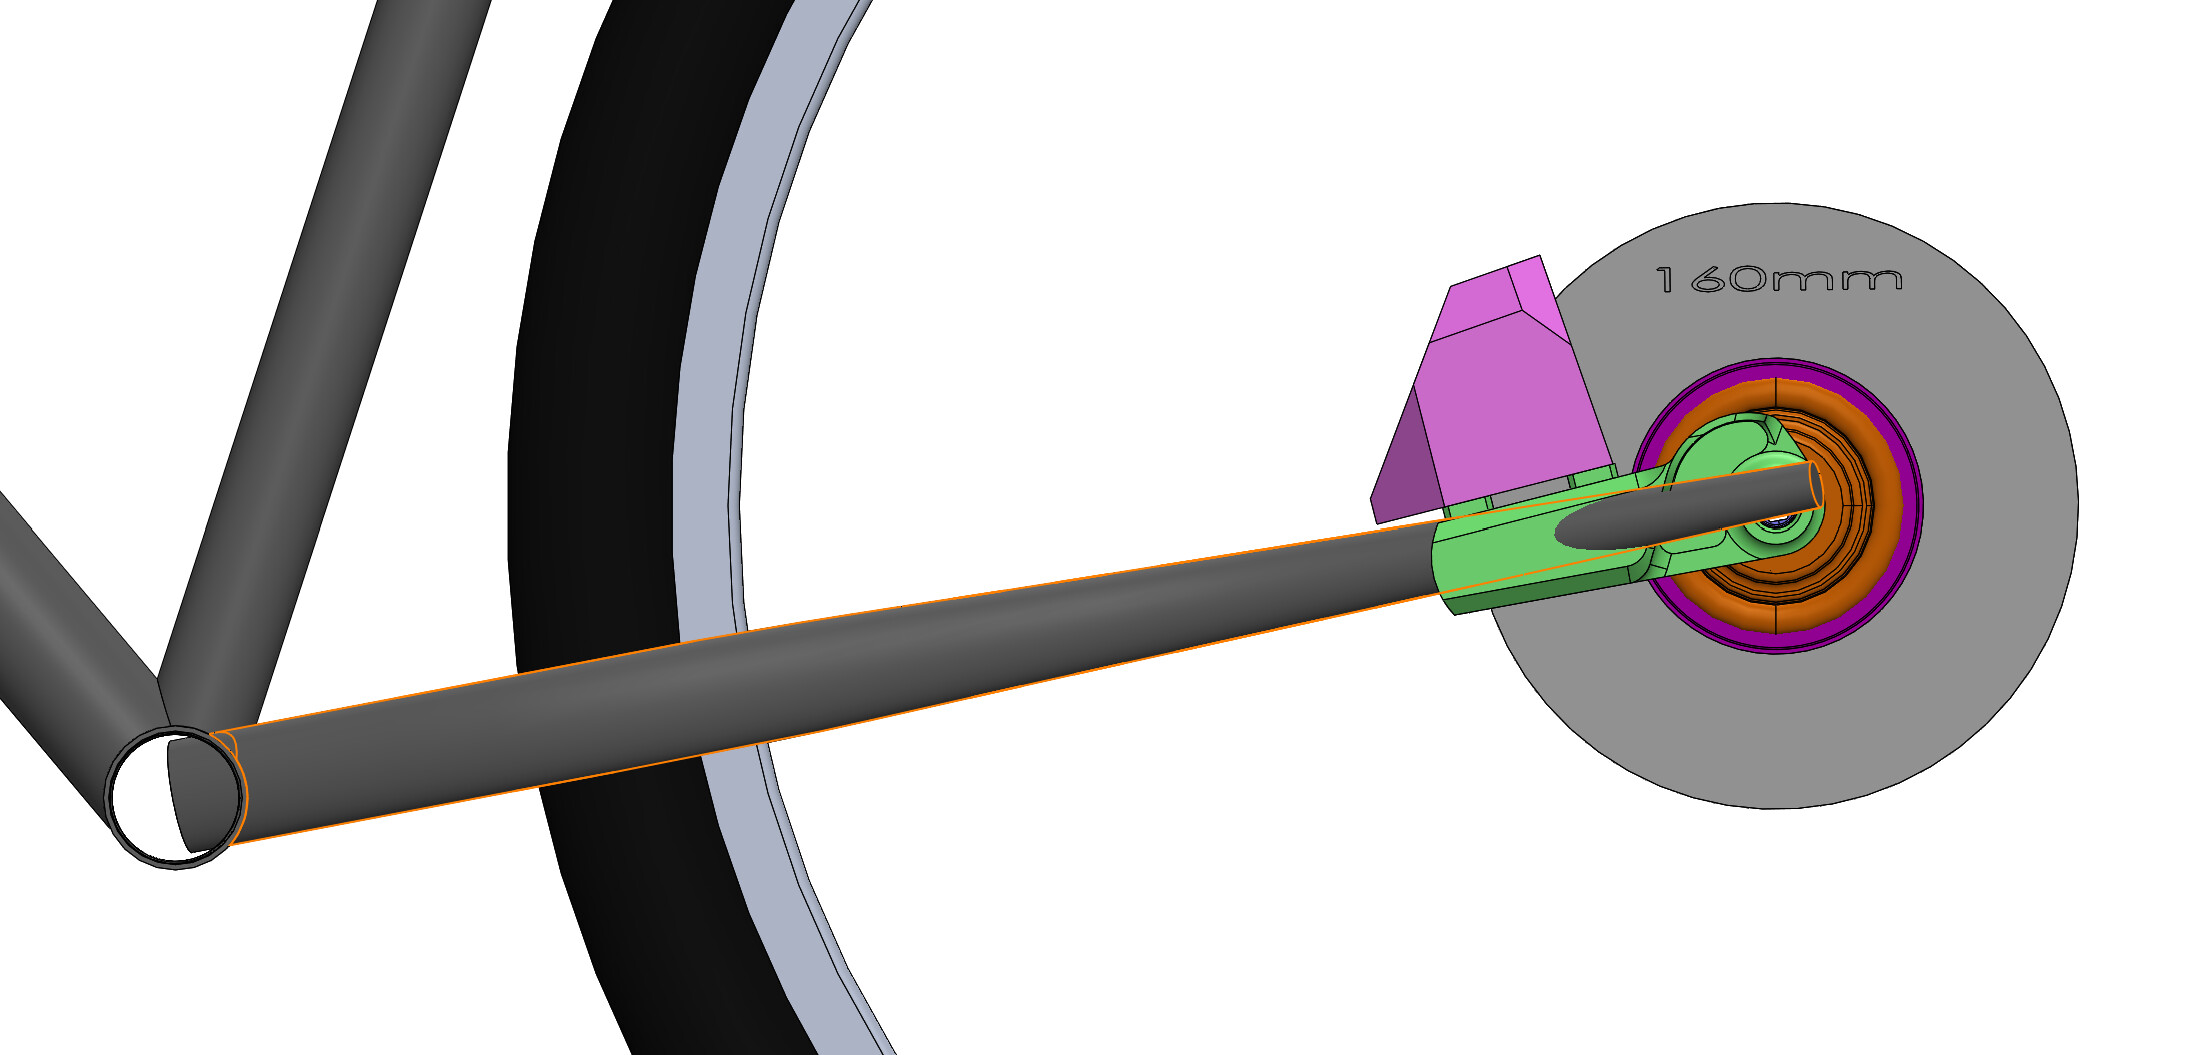
I am trying to implement the PMW UDH into a gravel bike build but I am having trouble aligning the chainstays to hit the rounded portion of the NDS hood. It seems that because the CS plane is offset higher, it tends to miss the hood. I’ve tried finding Chainstays that taper to a smaller diameter to minimize this effect, but I am wondering how others get around this. Could I just lower the NDS Chainstay?
Some details below:
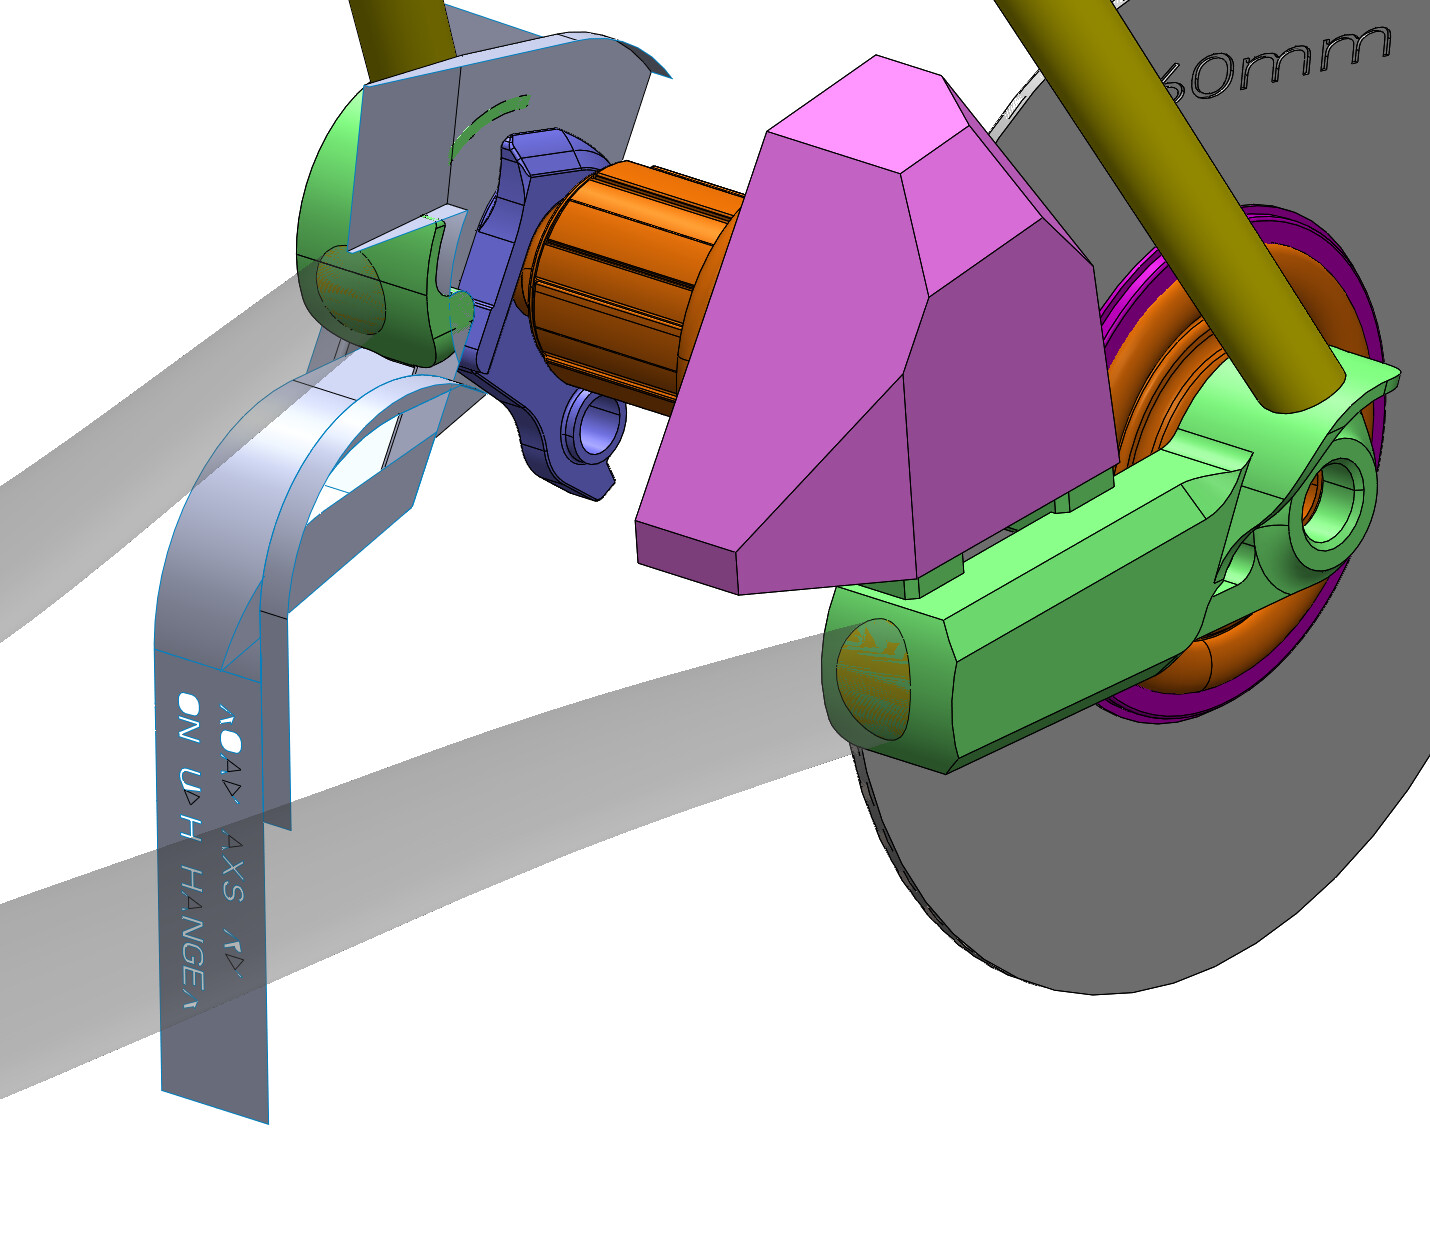
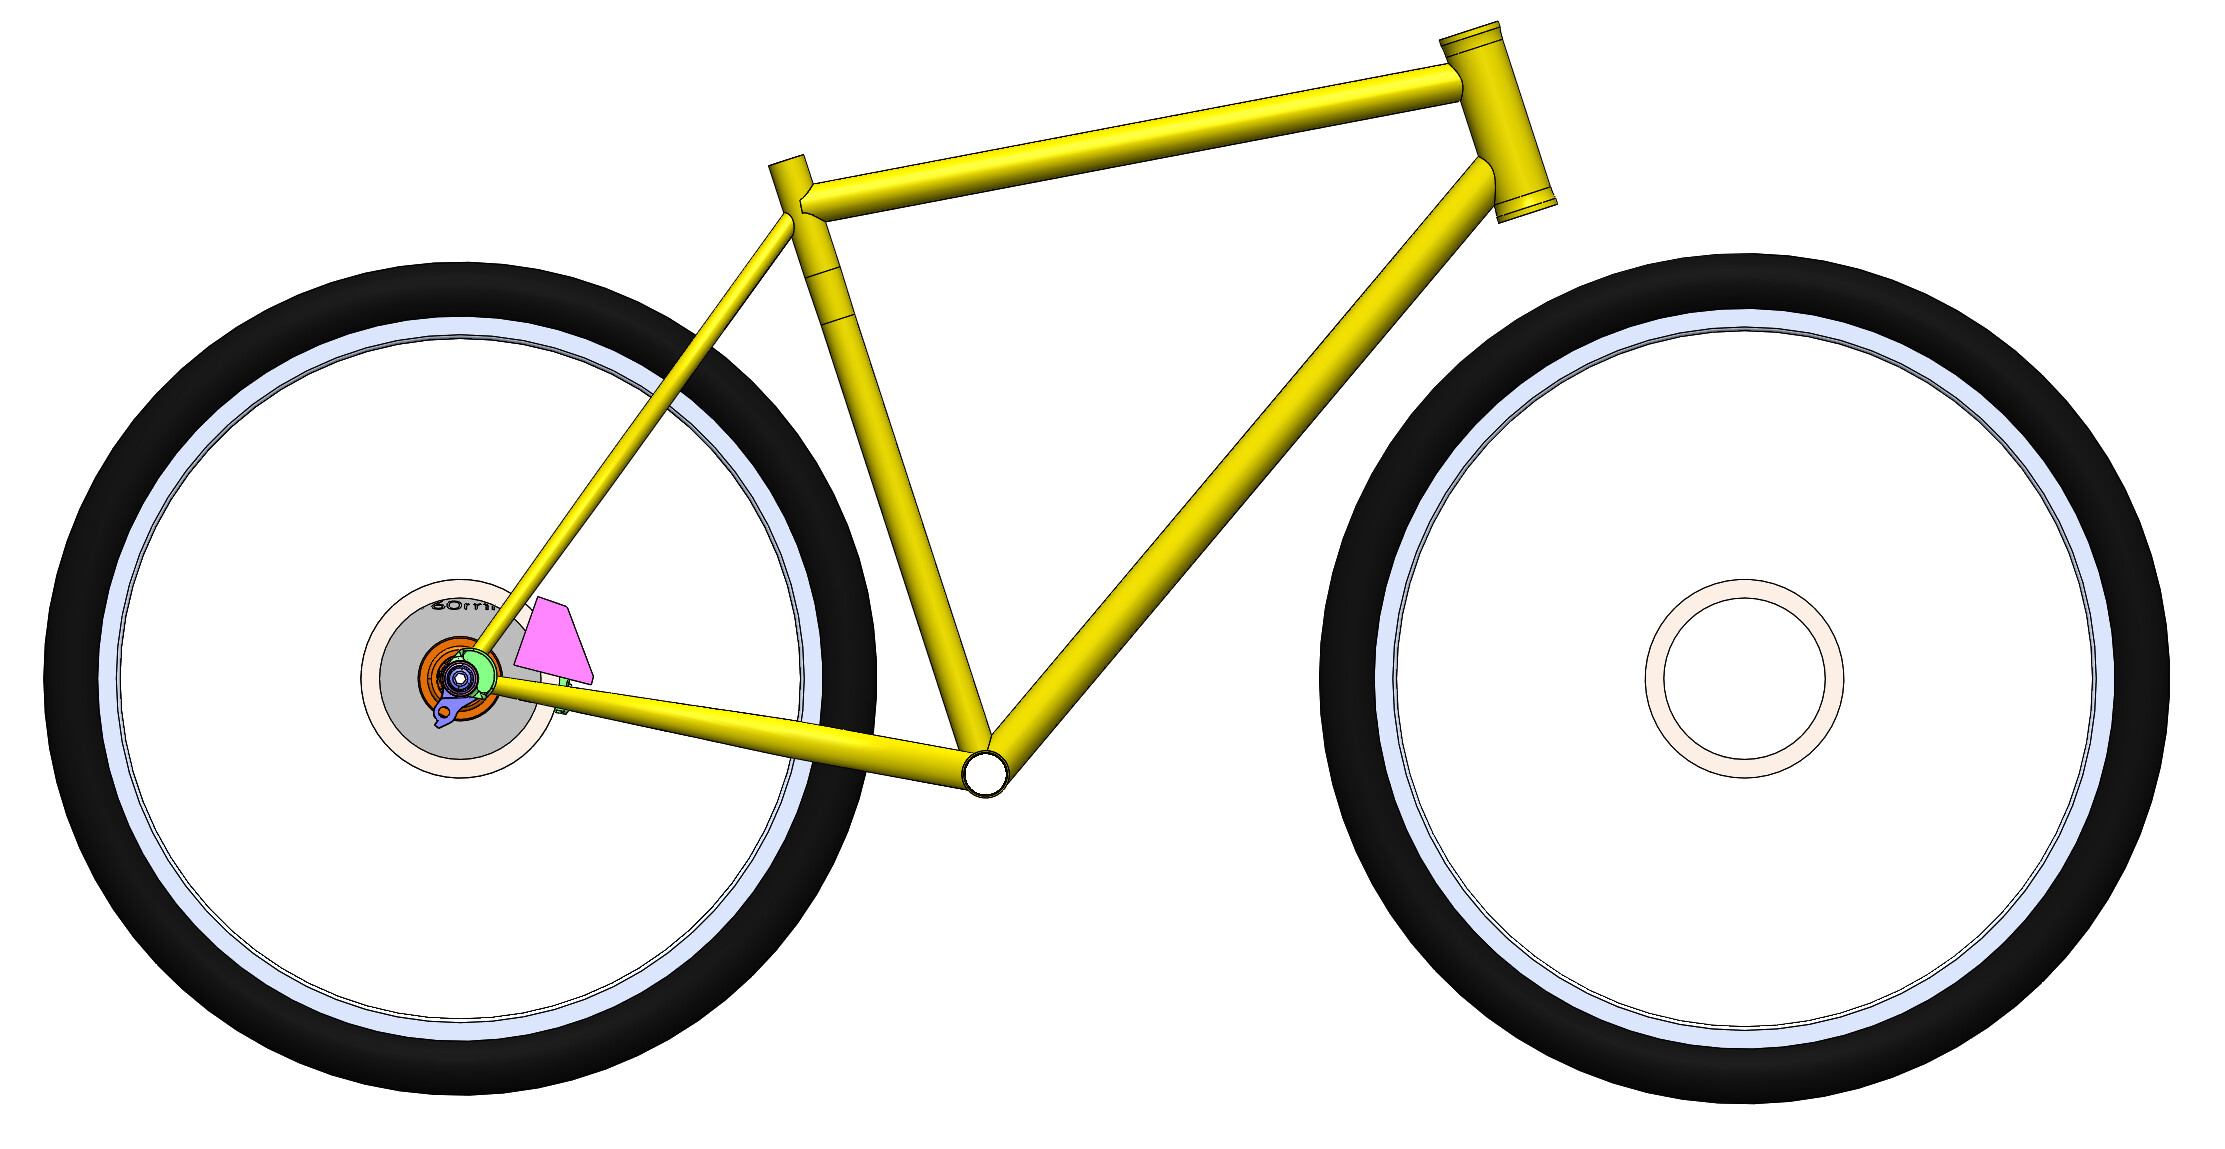
*430mm CS length
*77mm BB drop
*3.5mm positive offset for the actual chainstay plane to the rear wheel axis
*13 mm distance from the bottom of the dropout to the BB center.
*Zona 29er S Bend CS
Also, what is the purpose of the 3.5mm offset? I have the SRAM UDH clearance mask in the model and it does not seem to be close to that at all.
Thanks for the help!
(Will try to attach more photos, but have a 1 photo limit as a first time user!)
First of all, great CAD! The way you called out and position the dropouts and CS locations are very technically precise.
Many builders have had trouble with this pair of dropouts for the reason you posted. It is good that you figured this out in CAD rather than in real life.
You have a steel tapered chainstay, which is less of an issue. Titanium is the most common application for those UDH paragon dropouts, which requires a non-tapered 22.2mm chainstay. That gets much closer to the clearance mask.
The NDS hood is not quite on the right spot. There are three ways around this:
drop both your chainstays another 2-3mm so the NDS hits the hood
you are able to do this because you are using tapered chainstays
clock the NDS dropout up
I don’t recommend this, because your SS hood locations will be slightly off
I really appreciate the detailed response and explanation for why the offset exists! So helpful to talk to someone rather than be in my own head…
It seems like it would be clearer if instructions were just to offset the chainstay if it is needed to clear the SRAM mask!
*Q: Since it’s a steel bike, would you recommend a different style of dropout? It seems like the tricky part will now be to miter the CS different for the DS and NDS. This is my first bike, so I thought going with a integrated brake mount may be easier than going with the other options that seem less straightforward.
(Heh, the terminology is clean because I spent a lot of time studying your CS layout youtube video! Thank you for posting such helpful resources!)
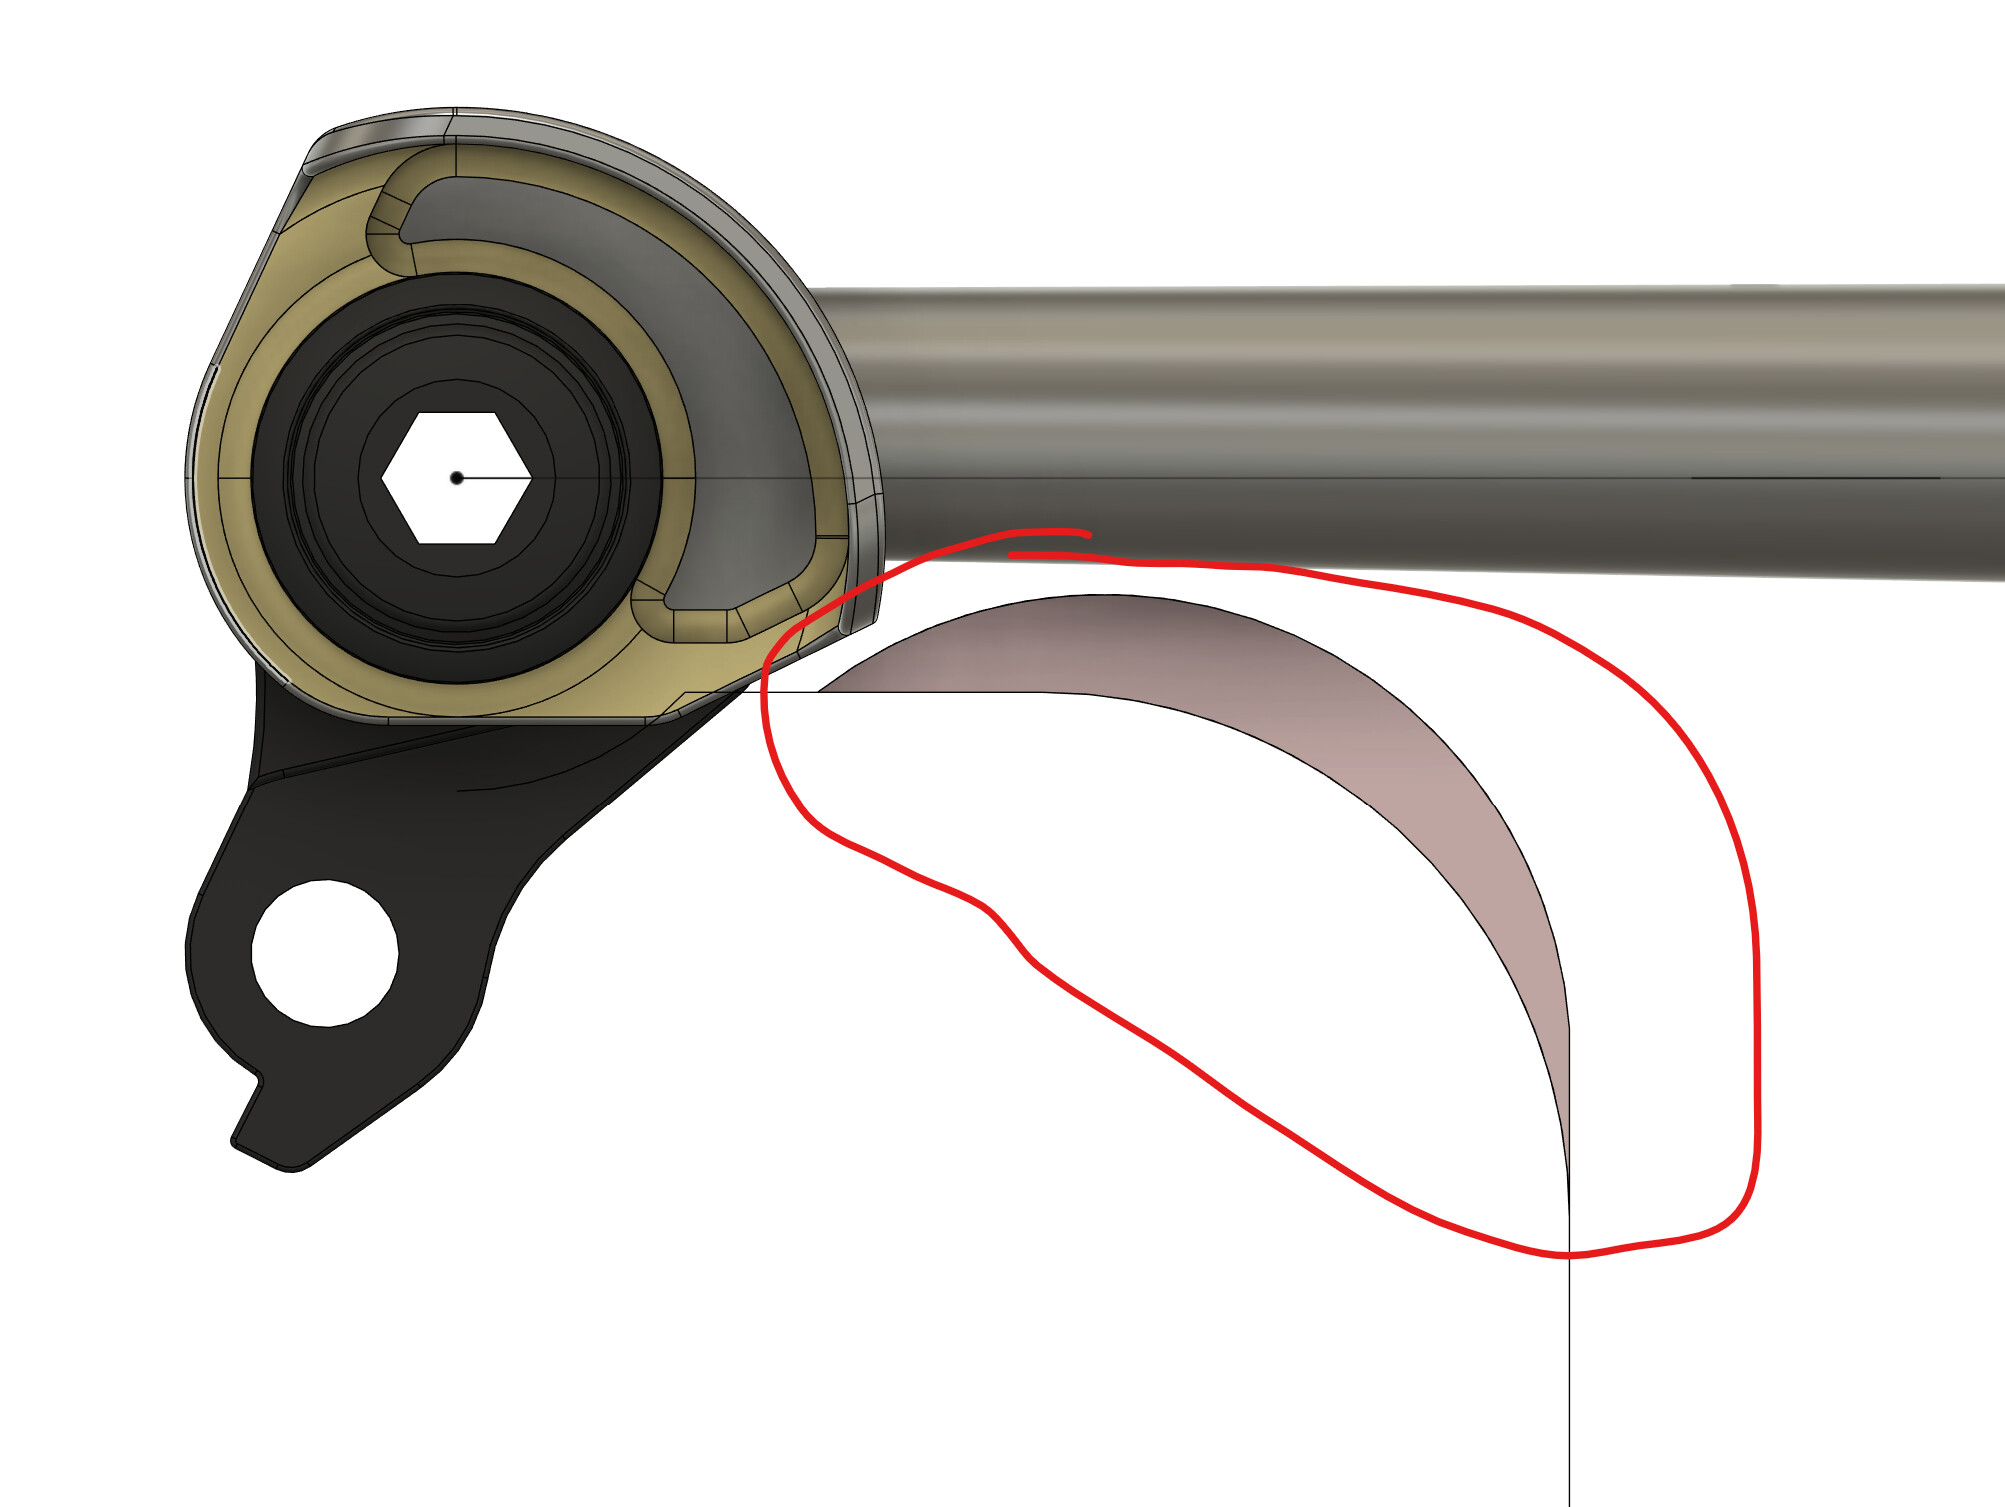
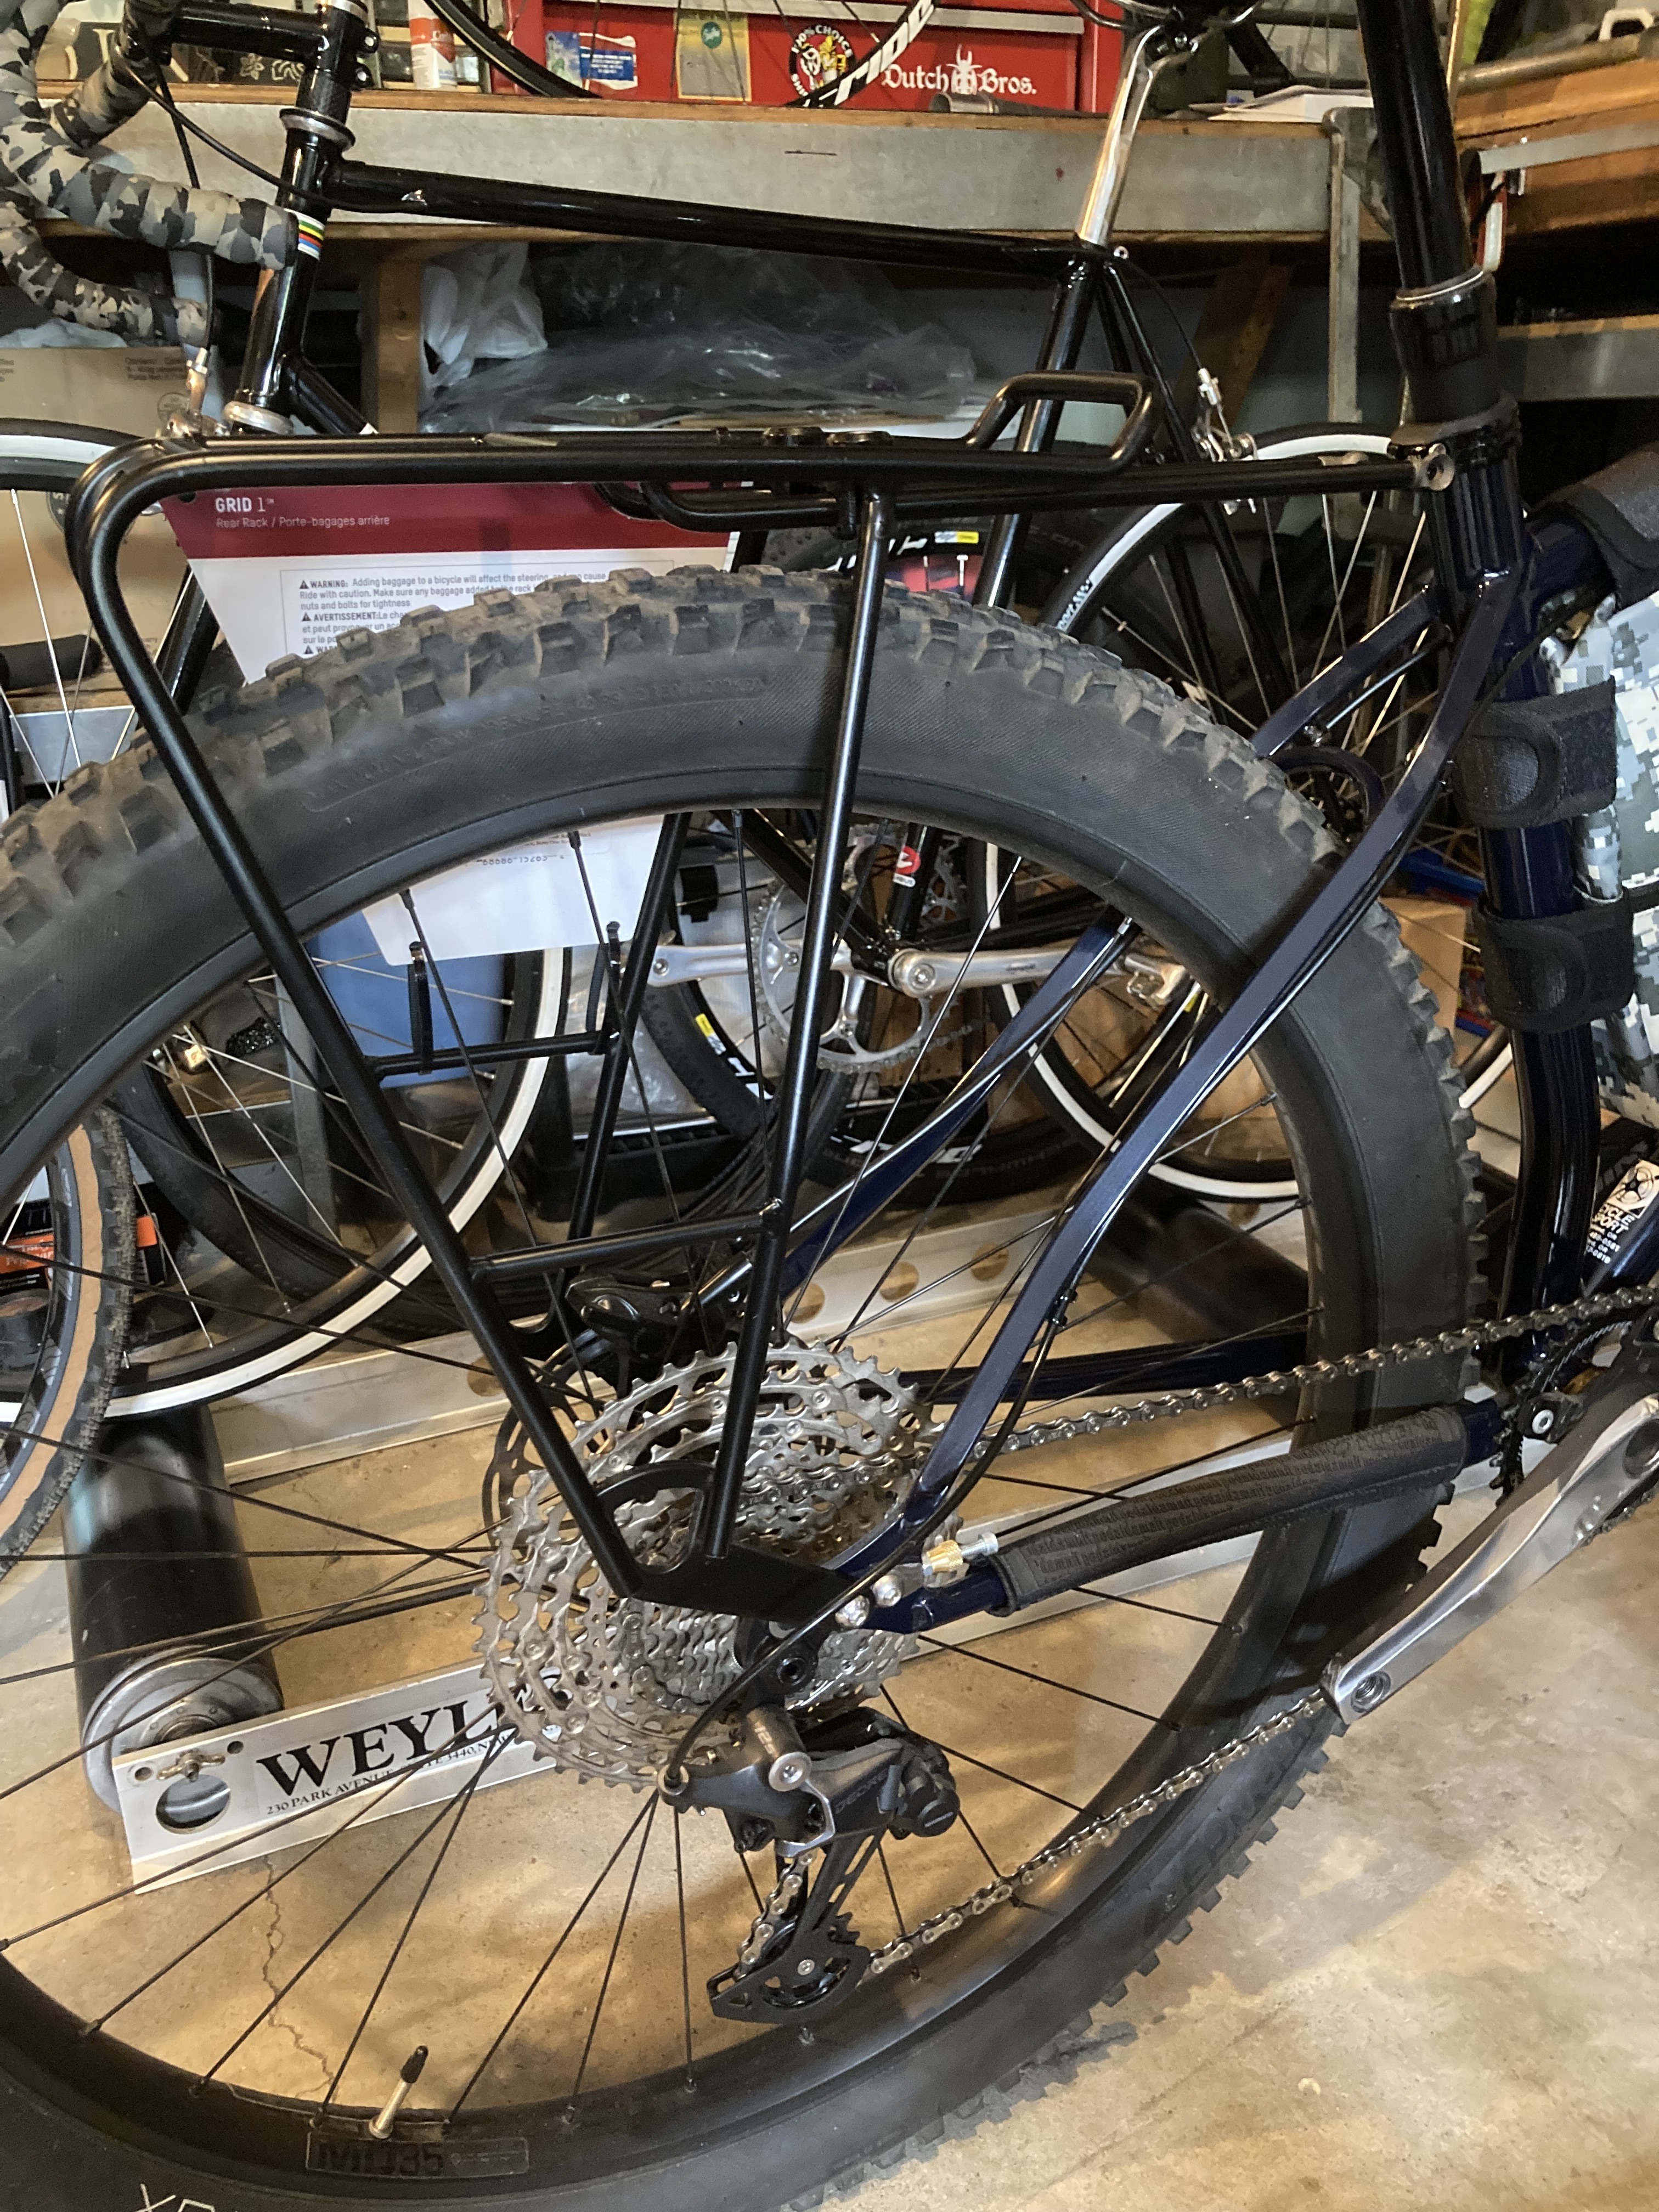
Some updated photos of the chainstays and seat stays fitting!!
Building an asymetric rear is not too much more difficult. I think this will depend on your tooling. Our workflow is:
Bend CS (in your case you are using pre-bent)
Miter CS-Dropout end with tube block
Weld CS to Dropout in chainstay fixture
Dimple Chainstay
Miter CS-BB in chainstay fixture
Mitering the CS-BB at the last step resets the tolerance stack of all the steps before it. That means mitering the stays separately is not much more difficult.
The Paragon sliding dropout is the only other one I would recommend:
Sliders definitely make building easier, and you can easily correct for a skewed wheel. It will also work better with pre-bend stays based on the hood locations. Most pre-bent stays run into crank arm clearance. This is why you see many custom builders bending their own chainstays.
*Does dimpling the chainstays affect the dimensionality of the CS (I think your comment on reducing tolerancing stackup by mitering the CS to BB last resolves most of this concern)?
*Any tips for sizing the chainstay dimple? I am thinking of 3D printing tooling that is shaped to the profile of the chainstay to minimize geometry distortion during the process.
Sliding Dropout questions
Thanks for the tip on sliding dropouts, I like the adjustability!
*Do sliding dropouts work with through-axles and a UDH standard (Looks like there is another part that bolts onto them that interfaces with the wheel?
*I am now realizing the integrated dropouts I currently have in the design don’t have rear rack mounts, which could be a nice feature to run panniers…any recommendations here?
It always affects the tube; that’s why you should do the CS to BB miter last. How much it changes depends on your dimpling setup.
^^^ That setup adds ~4-5deg to the bend unless you have a fixed support block, which only works on straight stays.
I usually expect to get 6mm of additional clearance with a dimple. If you push it too far, the tube will buckle.
There are two distinct topics: UDH compatibility and Transmission compatibility. If you are not planning on running Transmission, don’t worry about it. I wouldn’t even bother with the UDH compatibility.
The Paragon slider is Transmission compatible with this insert:
But only use that if you are planning on using Transmission. It is not intended to be an adjustable slider and impacts the geometry of your bike (lowers the rear axle).
I want to emphasize again: if you don’t plan on using Transmission, I wouldn’t bother with UDH. Dropouts are more expensive, it’s heavier, it makes the frame more difficult to build, and it’s ugly on a steel bike. All my opinion!
How close should I expect pre-bent chainstays to match their drawings? I was able to layout the chainstay drawing such that the CS did not interfere with crank arm clearance or the tire.
My line of thinking that led me to picking a 10-52 transmission build with a 40T front chain ring was:
Goal: Wanting gearing low enough to bikepack & use sram AXS with road shifters & have rear eyelets for a rack.
Thinking a 40/44 ratio (xplr 10-44) was insufficient
Looking at eagle gx axs 10-52
Seeing that 10-52 Transmission was ~$100-200 more and that it did not seem more difficult to build.
I am now more convinced that 10-44 is likely enough and best suited for typical gravel / road riding around the area I live (bay area) and if the terrain/trip calls for it, I could always swap in a lower front tooth.
I am slightly concerned that the dropouts do not have rear eyelets for racks. Can I braze in rear rack eyelets bosses next to the dropouts like one would braze on the upper portions of the seat stays?
Is it the right thinking to let the rear rack eyelets (which may get used very sparingly) control the design? I know there are also rear axles with integrated eyelets that I could purchase and run if needed?
Is the sliding dropout be what you would recommend to go with a sram xplr 10-44 cassette/RD?
I know these are all opinions… and the best learning is to just build it and find out what works for me… but it has been really helpful to hear yours! Hope you had a happy holiday!
Short answer - yes.
This is often done on production bikes. You can use a regular M5 boss (bottle mount style) and drill a hole in the seatstay and braze it in. Or you can use an hourglass style or round type rack mount that’s brazed/welded on externally.
My thought on the matter is that I would never let a “side detail” dictate and affect the overall design of a frame. I’d rather work on coming up with a neat and unintrusive way to incorporate what you’re after without negatively afftecting the aesthetics of the bike.
Axles with M5 theads on either end will solve this problem. Racks from brands like Old Man Mountain and Tailfin who offer proprietary modular axles for their rack systems are also great.
Alternatively you could also use dropouts with integrated rack mounts, like DS1006 - Dedicated 12 mm Flat Sliding Dropout or DS1035 Rocker Dropout from PMW. Note that you will have to purchase inserts separately for both these options (link to the specific inserts are in the description for each dropout).
Sliding dropouts are great to use for a first frame since the non drive side insert will have the brake mount integrated. It removes the need for a special brake mount fixture when building, so in that way it helps lower the entry barrier to building a frame and you know that as long as the dropout is aligned, the brake mount will be too. You also have the option to switch up the inserts down the track. Sliding dropouts can also, to a degree, help disguise/adjust out slight misalignments in the rear triangle (but only in one axis).
And of course, sliding dropouts are also (in my opinion) the best method to incorporate singlespeed-compatibility.
If singlespeeding is never going to be a consideration, and access to a brake mount fixture is not an issue, then I’d personally go with the smallest and cleanest dropout I could get away with.
All great info here so far. Only thing I’d add is that sliding dropouts such as the Conventional Paragon ones can be a real pain with rear racks. You generally have to place the mounts well up on the seat stay to clear the caliper. If looking for a singlespeed/adjustable dropout that works great with a rear rack I’d probably go for Paragon rockers or their new 12mm flat sliding dropouts. Both availiable with eyelets. UDH inserts are available for the rockers too.
I’ll add another option for a rack on Paragon sliders- a customer wanted to use a rack on a bike I built so I mounted this Blackburn to the rear slider retention bolts. The bolts are very large and more than strong enough for the rack. You would need to enlarge the holes on the legs of the rack and buy longer retention bolts.