I’m having trouble with burning a hole in the tube from the side of the tungsten. The heat seems to be too strong all around the tungsten, instead of just flowing off the tip?
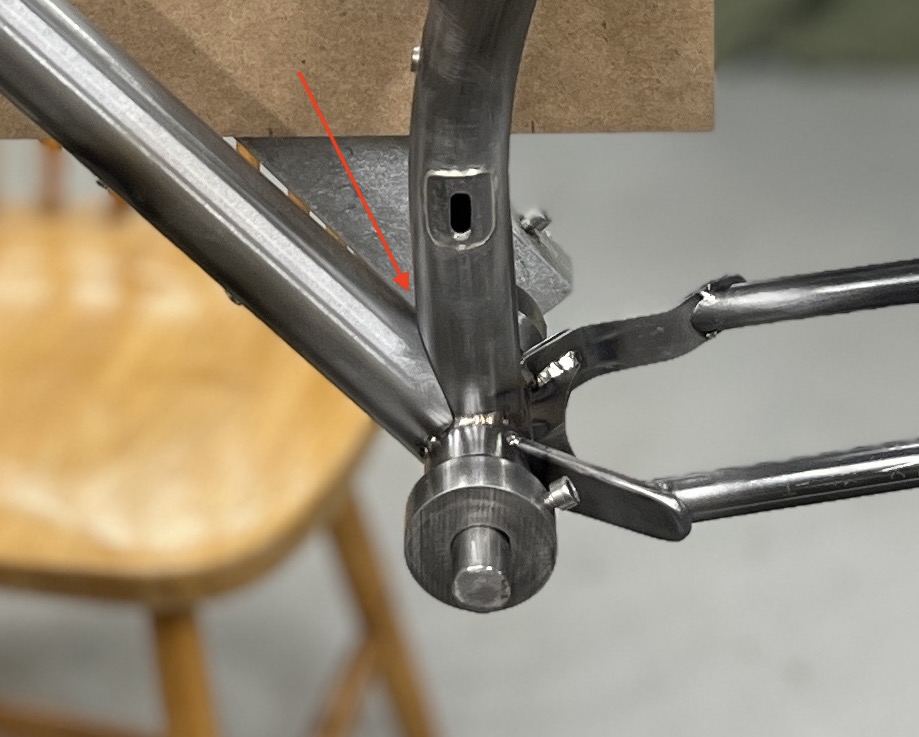
Also this joint is so hard to see no matter how I have the frame positioned, it ends up being kind of a blind weld, which doesn’t help the situation. I’m thinking I’d be better off fillet brazing that joint.
I have that challenge as well, what I have seen other people do is use more argon flow and extend the tungsten tip more so the cup will fit - also I wonder if the tip shape can play a role here.
but I am also in the same situation (or will be soon)
Are you burning through when you tack or when you weld?
How are you welding the crotch? (BB to center or center to BB?)
What are your settings?
I use a #10 Jazzy w/ 3/32" tungsten and I blunt the tip ever so slightly. The #10 allows for a bit more stick out than a #8. For whatever reason I’ve found that welding with a 3/32" electrode works better for me than a 1/16". Going up to a #12 or whatever never worked for me. I find it too big and I had a hard time controlling the torch with that much stick out.
More argon flow won’t necessarily help – if the flow is too turbulent then you risk pulling O2 into the weld area – but adding a bit of pre-flow and creating a dam to trap argon can help. Sometimes all you need is your hand on the back side to trap gas. If that doesn’t work, aluminum foil is your friend.
I’ll hang the ground on the seat tube. I honestly have no idea if this is a placebo but my reasoning is that the arc will pull more toward the ground. If I can start a pool on the ST and then connect the DT I have less chance of burning through.
Angle the electrode more toward the ST and try to keep the heat input on the seat tube. This is obvious but sometimes I just need to stay it out loud before I light up.
Tack at the crotch, let things cool and then start your weld from the tack. The tack will act as a bit of a heat sink and give you a wee bit more time to not blow through.
If you’re using pulse, stop. Cut up 10-20 acute joints like this and just practice. Download a metronome and play it through your ear buds. Use the clicks to help you time your dabs.
Find the sweet spot for your pedal. e.g. I set my machine at 75-80amps for welding .8 or .9mm tubing. This lets me keep my foot at a more comfortable angle and lets increase/reduce amps as needed. To me this is similar to dialing in overdrive/distortion on a guitar amp – the gain knob won’t do a lot until you hit a certain point. Then there’s a sweet spot – things sound good and a minor tweak really affects things. And, after that, things don’t change that much – its just a lot of noise.
I’m using a 1/16 tungsten with a large cup, I think comparable to a #12. I’ve been having good argon coverage with that cup compared to the #8 I was using before.
I just moved to 1/16 from 3/32 and have generally preferred it, but I could see this location doing better with a bigger puddle to bridge the gap?
I started at the BB, and moved into the crotch, and yes using pulse.
Practice you say? Interesting concept. I’ve sworn to myself after this frame I’m going to take a break from building, and just do a bunch of welding practice…
I would just mention, you’re on the right track with that idea, but I would keep the tungsten the same size (1/16"). But focus on adding more filler to help bridge the gap there. I find that’s important to keep from blowing through.
It takes a bit more filler anyways with that joint geometry, but if you stay ahead of it by adding more filler, than the heat from the arc gets focused into the puddle, instead of the base material.
Hope that makes sense. @ElysianBikeCo had great advice also. I also use aluminum foil for the weird joints like that. You can get crazy-long tungsten stick-out if there’s enough argon blanketing the whole area already.
This seems backwards but try using a smaller cup. One of the things a large cup can do is hide your mistakes (e.g. too much heat). Everything looks nice and shiny but you could be cooking the F out of it. (One of the many early mistakes I made.)
I was using a smaller cup previously but was having lots of argon coverage issues. It may just been a lack of flow. I really need to spend more time practicing welding, and less actual building so I can get my settings and equipment dialed, or at least better understood.
I’m not sure if this is a universal experience, but when I run into issues in those acute corners, it’s often from using too little power instead of too much. Too little power means the puddle isn’t as large and doesn’t bridge the two pieces.
This! It’s kinda counterintuitive but throw more amps and be ready to dab and move. I’d blow holes when I was not using enough heat and moving too slow waiting to get the puddle to form.
If you’re full pedal and stuck on certain pulse settings that can happen so allow a bit of extra on top and modulate the pedal to what you need, not what usually works for other joints of that wall thickness.
All great info, and thanks for the link to the other thread @maxwellkeegan (which I should have remembered since I was on there).
I think part of the challenge I’m experiencing is when my tungsten is in that joint, I can’t really “aim” the tip because the two tubes are so close. I feel like maybe my arc is jumping off the side of the tungsten, or at least enough heat is jumping of the side.
Maybe a much more blunt grind on the tungsten? Mostly, I just need more practice.
If the arc is jumping around and your tungsten is properly prepped, you are likely trying to establish the arc at too low of an amperage. The arc has too many options with all the material surrounding it, you’ve got to make it commit to jumping off the end of the tungsten (more amps).
Until you have more practice, I would not use anything thinner than .9.
If you are burning holes in the seat tube, I believe you are using too much heat, moving too slowly or your machine settings are not correct.
Practice, then practice more.