I'm Building a Wooden Bike!

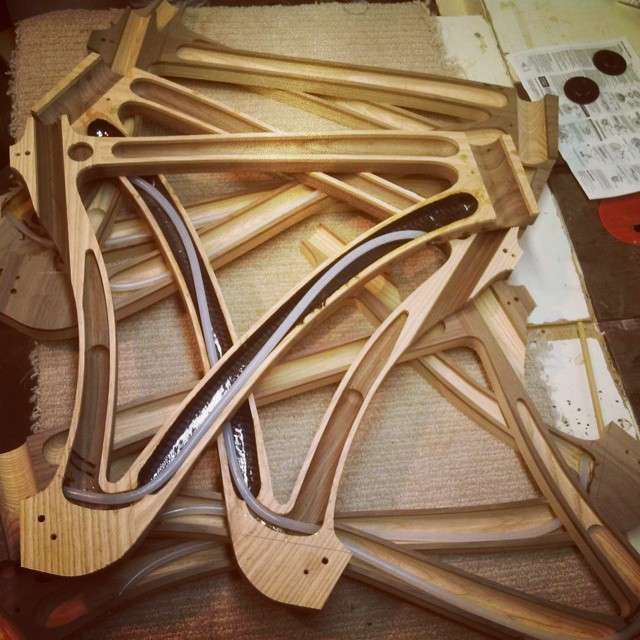
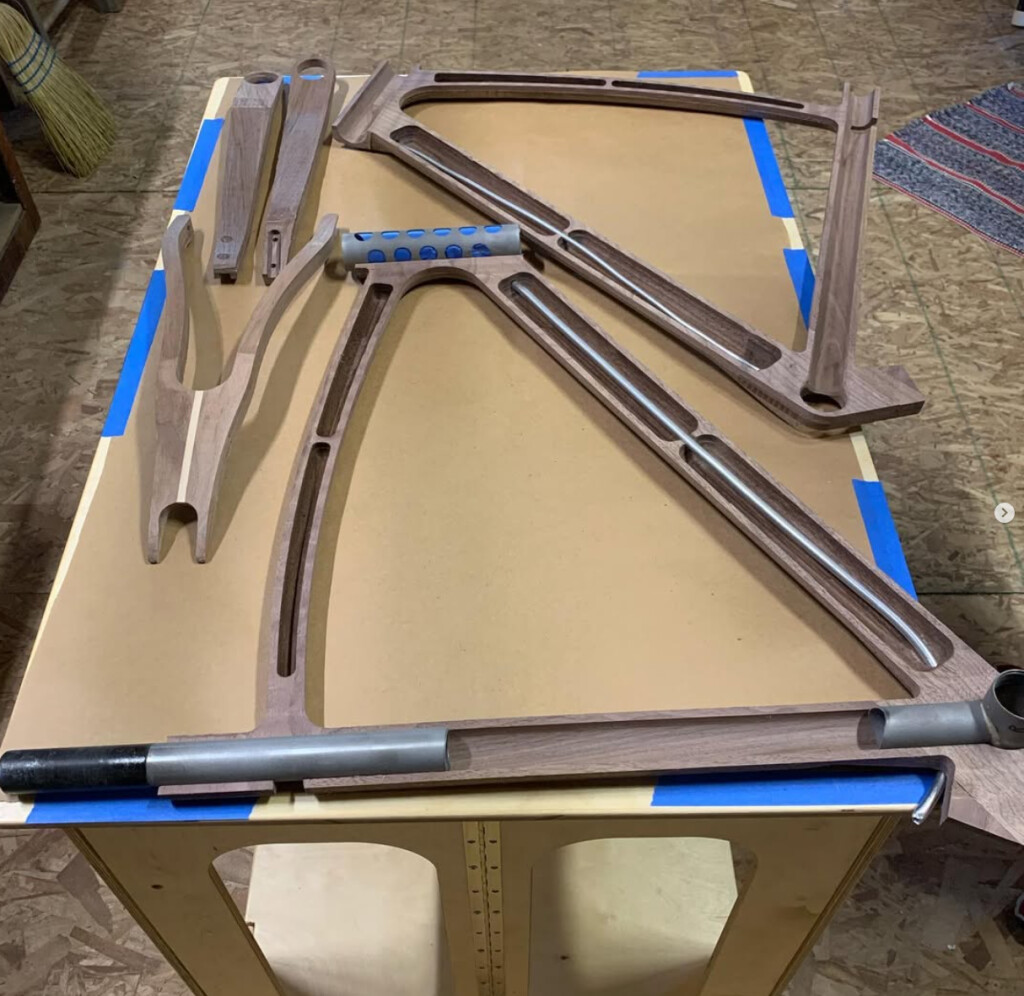
I’m building a wooden bike. The bike will be a personal art project and also a fun machine.

Why Wood?

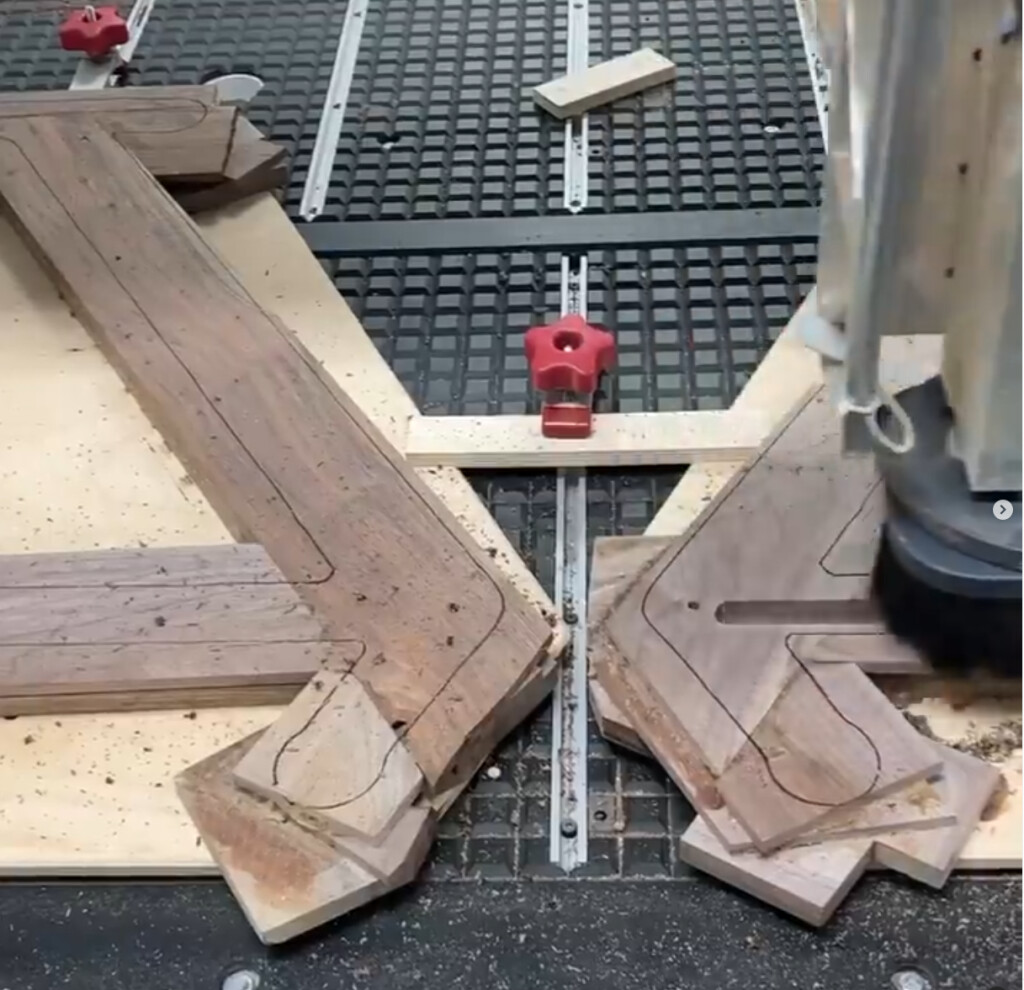
Of my “maker” hobbies, woodworking is what I’m best at. I’ve welded before, but it’s not my favorite tool in the shop. And while my welds are functional, I feel that the learning curve to get to truly beautiful welds and brazing is very, very steep. I’d need a lot more practice to get to something that I’d be happy looking at.

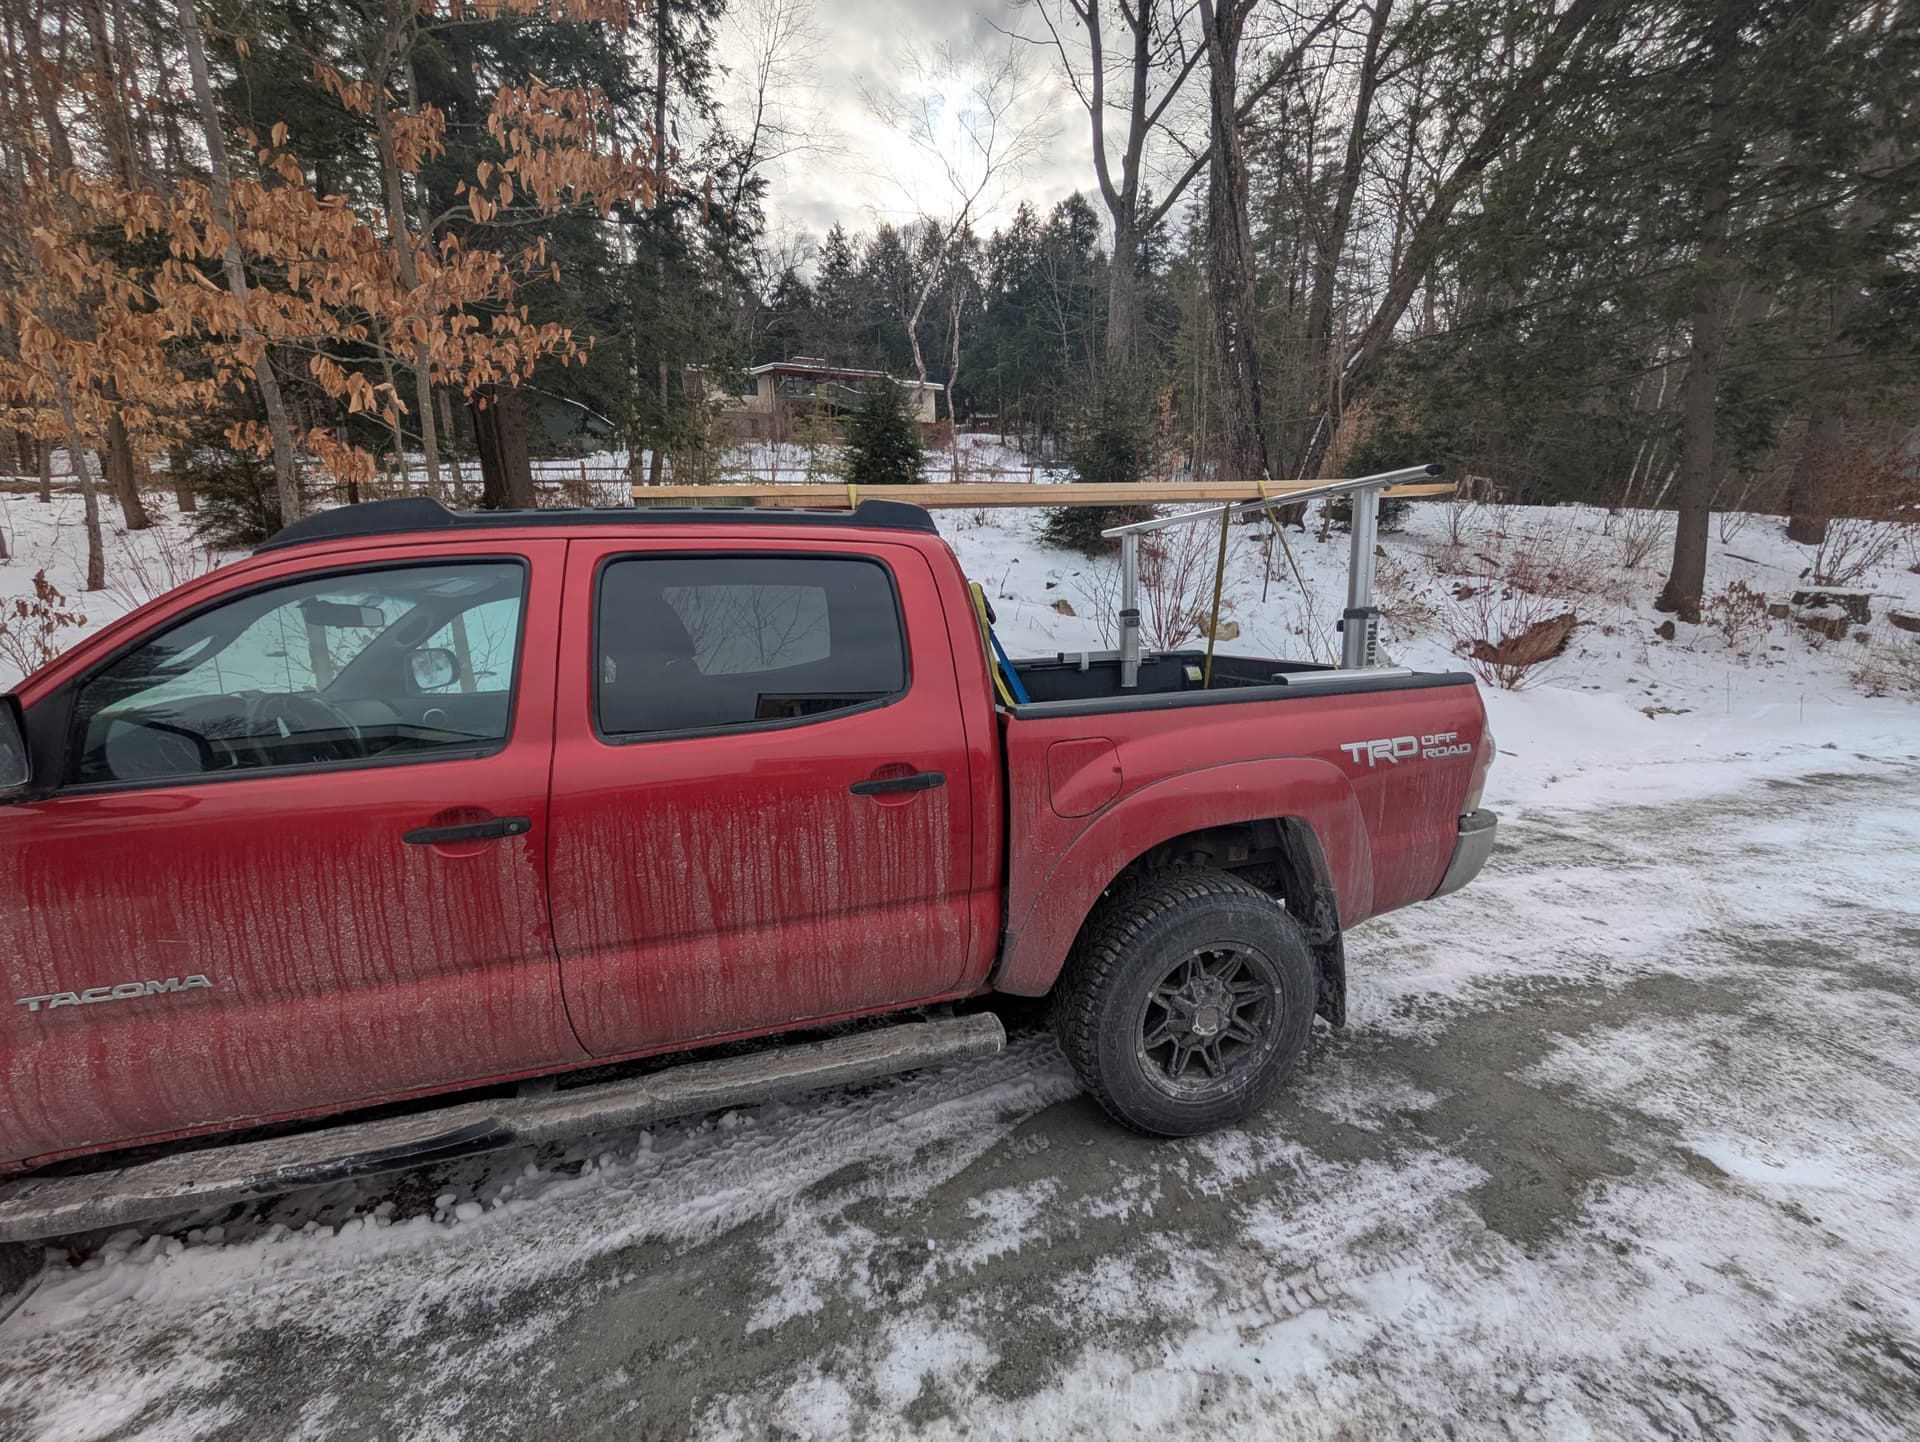
Secondly, wood is an absolutely beautiful medium that connects directly to why I ride bikes. I live in rural New England, and am surrounded by forest. I do exclusively gravel riding at fat old man speed. Doing that on a bike that I’ve built myself, from wood that was grown in my neighborhood, just adds another layer of satisfaction to that hillclimb through the woods.

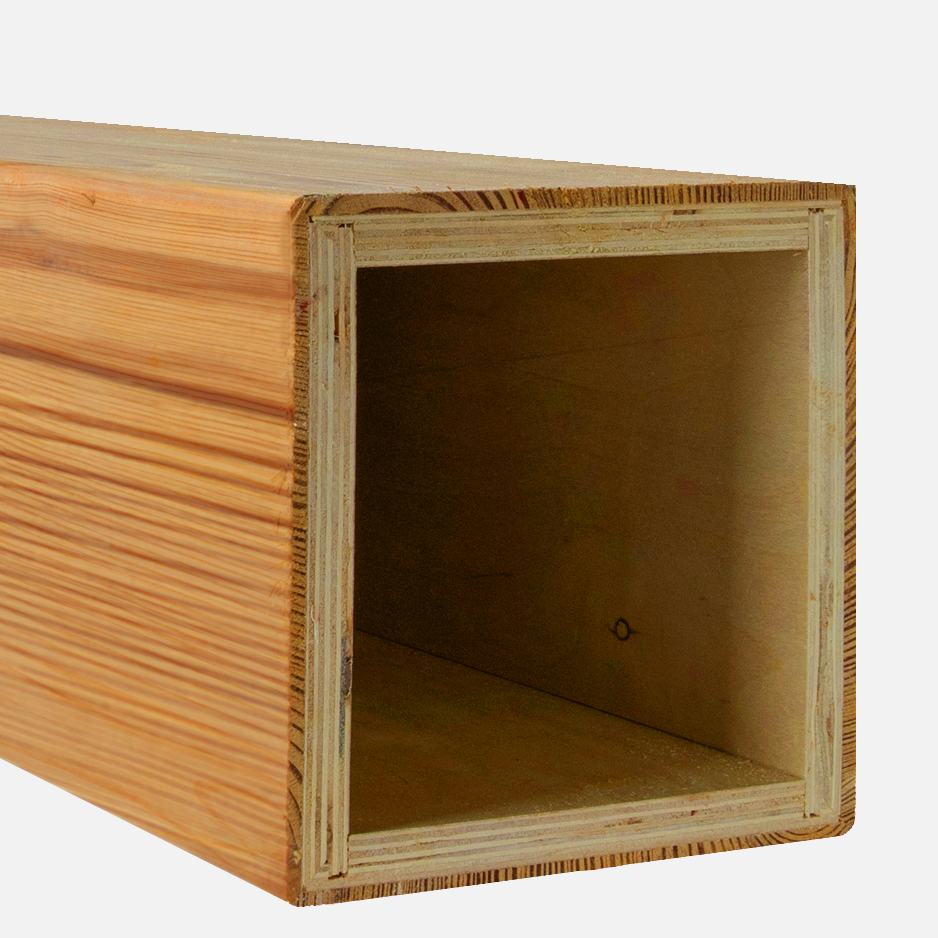
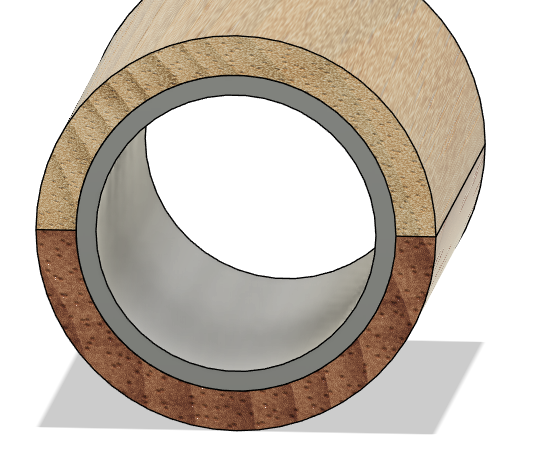
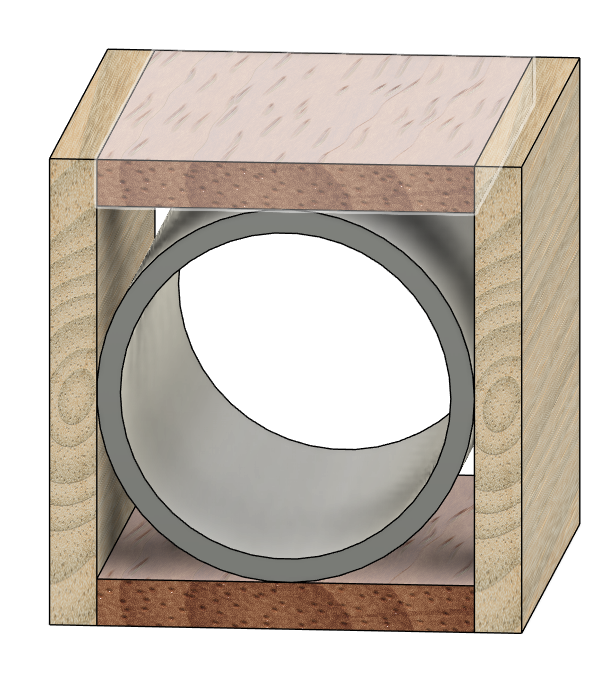
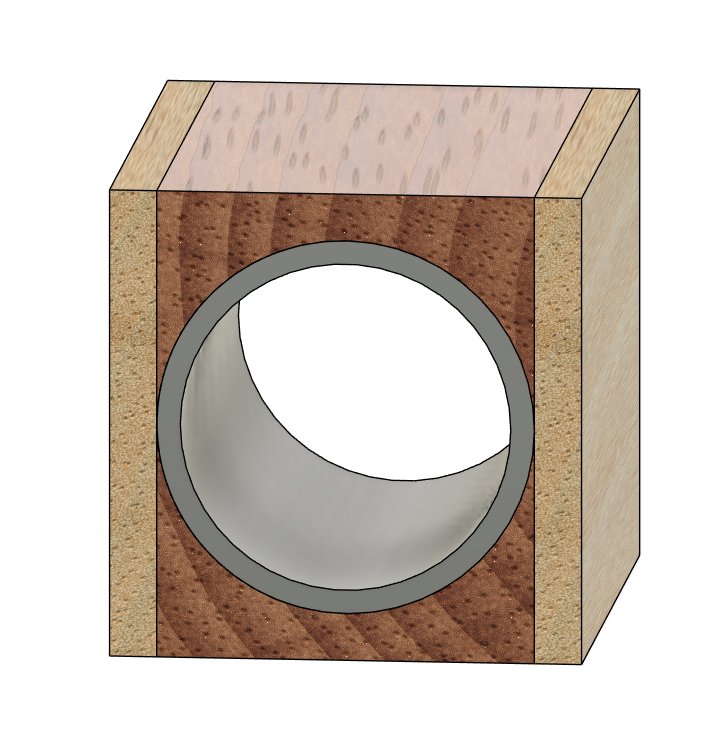
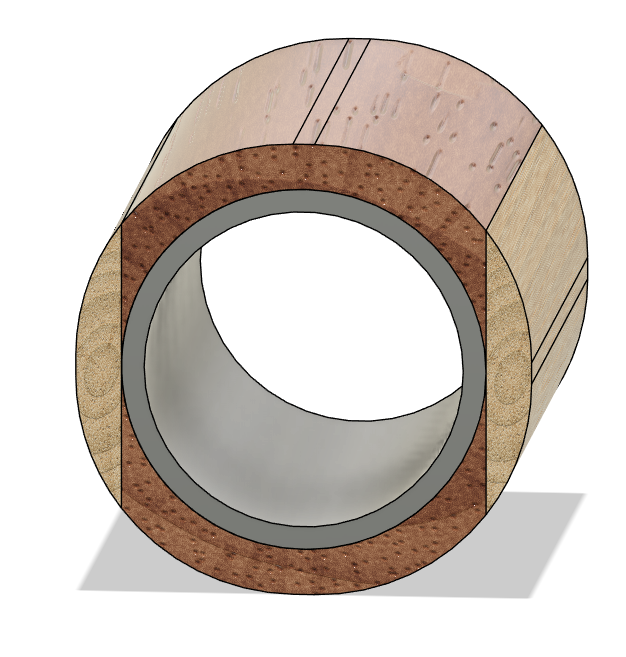
Finally, as proven by the investigations and math of many people who have built wooden bikes before me, wood has great properties for bike building. As nature’s OG carbon fiber, it has natural dampening properties. And depending on species, it has density to strength ratio that is comparable to metals used in traditional bike framebuilding.

Why Bikes?

I’m at the point in my life where what I invest my time in either must make me a pile of money, or produce maximum joy. Obviously building bikes is the path to riches…

For me, the bike project seems like something I can produce time and again in the shop, and each time will be satisfying. Some people produce cutting boards, some furniture. I have another 30 years or so on this earth and am searching for something where I can fiddle away again and again. We’ll give this a try and see if its worth continuing.

My Goals

For the first bike, I have a pretty simple set of design and learning objectives:

  • Build a performance oriented gravel bike under 20 pounds
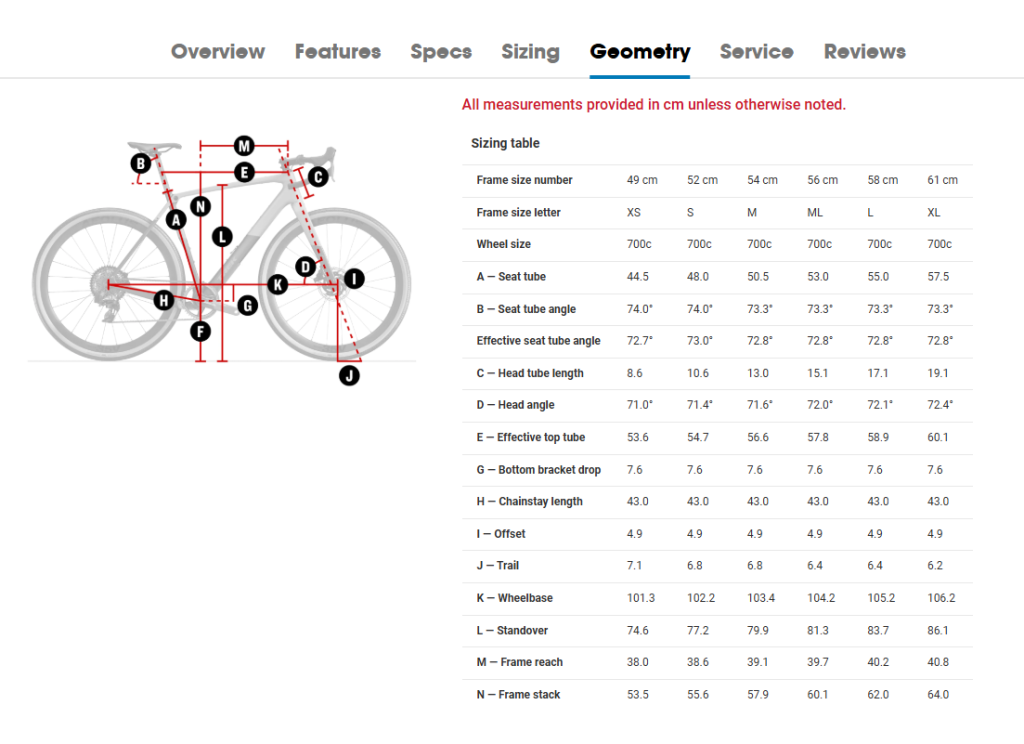
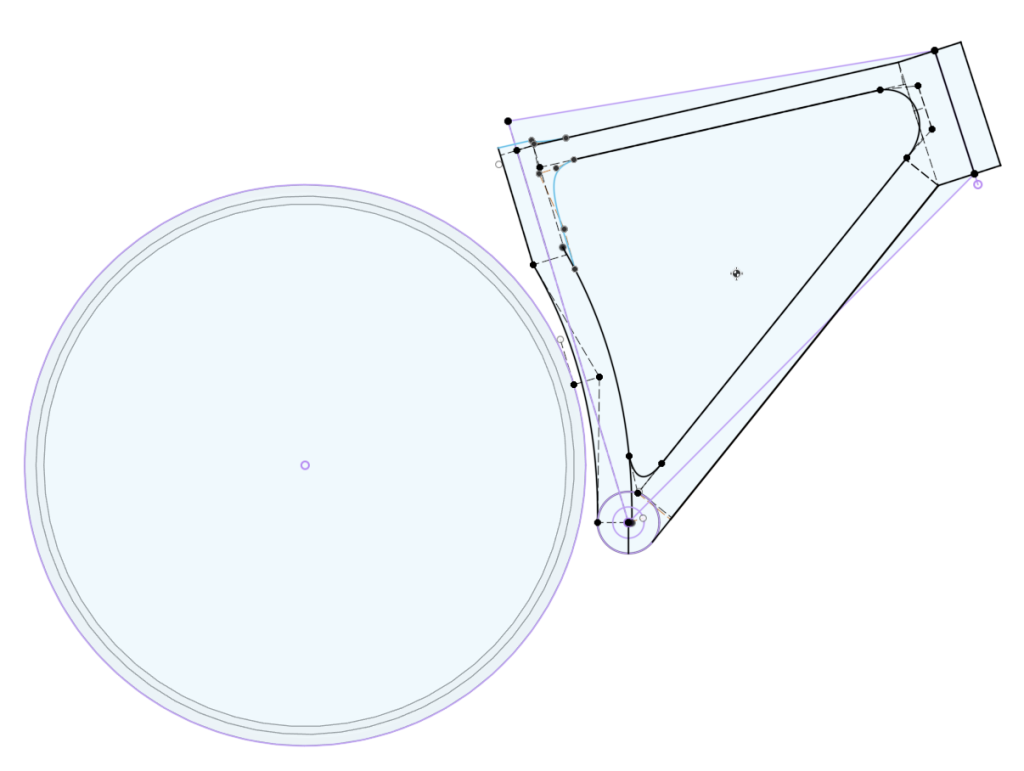
  • Learn to draft bikes well in Fusion, building a nicely parameterized model
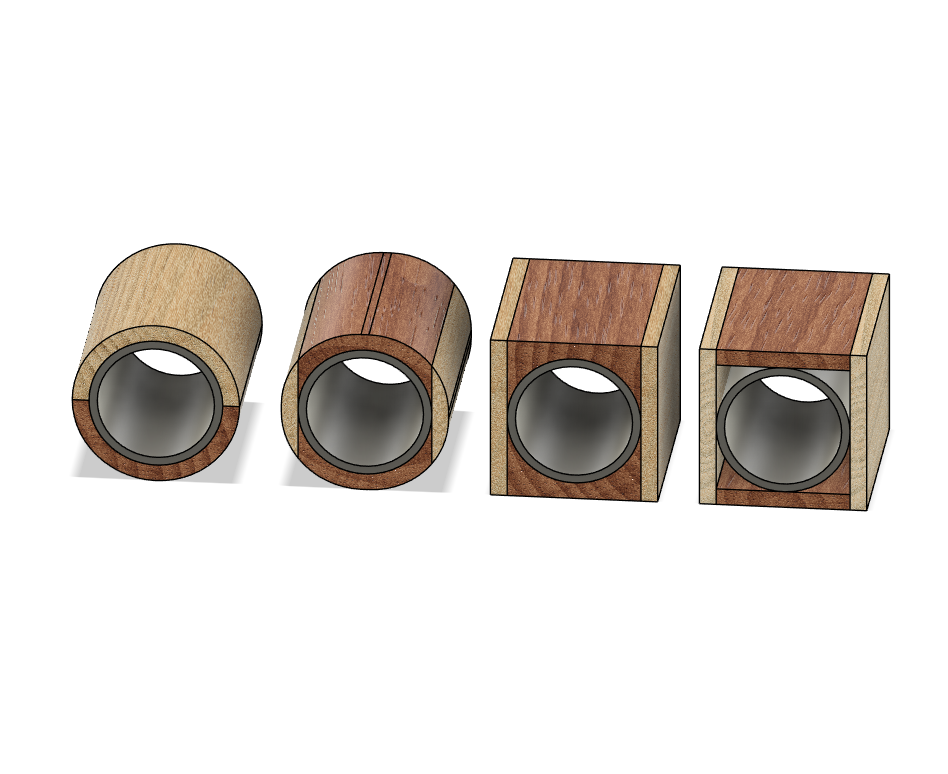
  • Develop and test a repeatable construction technique along the way that can be replicated by other home builders
  • Document the journey so others can follow

My Approach

My plan is to document this in a step by step fashion here, as well as over on my website Arborvelo.com and potentially on YouTube and Instagram.

The first step is to learn from tons of other great builders out there. I’ll be doing short writeups and lessons learned of other wooden bike building projects here: Wooden Bike Builders. We stand on the shoulders of giants.

I’m also doing a ton of work learning Fusion and getting the initial frame design drafted. I’ll post updates on that soon. Some unbelievable lessons that I’ve seen on here and I will be giving lots of credit as I start posting my drafts.

Definitely want to keep in touch with any other frame builders, so please reach out at matt@arborvelo.com or on this build log. Look forward to sharing the journey!!!

9 Likes

Looking forward to seeing the progress.
Wooden bikes are on a whole different level. At least to me. I know very little about woodworking so how to even begin making a wooden bike is completely foreign to me.

2 Likes

:clap:

It’s extremely rewarding to see someone riding and loving a bike you made!

Love it! I highly recommend YouTube. It will drive people to your website and brand. There are already some extremely successful woodworking channels. You will get thrown into the woodworking algorithms, which will push you into the bike algorithm, and visa versa.

1 Like

Yeah I’m a big YouTube consumer. Amazing reservoir of human knowledge. Overhead seems high on producing videos, but I do think it aids in discovery and is a great way to share the more practical pieces of what I’ve learned. So probably worth adding “how to produce videos” to my learning objectives.

Looking at your beautiful build thread, if I come 10% of the way toward what you are doing I’ll consider it a victory.

1 Like

Good luck on your wooden bike building. I have aspirations to build a bike in timber as well. I personally would love to see some how to videos on you tube. There is very little detail on you tube about making wooden bikes and almost nothing of cad drawing of bike frames that I could see. I will be following your log with interest.

2 Likes

Alright - great to have a fellow timber biker! I’m not yet to the wood purchasing stage yet, so this will be a journey.

I read your blog post about clamshell vs box beam construction. Very interesting! I’m looking forward to seeing your progress.

Frame Construction Choices

The first question to be confronted with developing a design on a wooden bike is how to form the “tubes” of the wood frame.

Just like a metal frame, you are leveraging the strength to weight properties of wood to design several triangles that are extremely strong and also light weight. And just like metal frames, you reduce weight by shelling out the material and using hollow tubes instead of solid material.

From my research, there seem to be two main methods of developing the “tubes” of wooden bike frames:

  1. Clamshell construction, which is the process of building two hollow halves of the main frame, then joining together, and
  2. Box Beam construction, which is the process of building up a tube of wood by joining four individual sides together

Each of these has their pros and cons, so let’s talk through.

Clamshell Construction

A picture is worth a thousand words – the clamshell design approach is easily exemplified by this image below from Sojourn Cyclery.

Here you can see the two halves of the clamshell construction, with the tubes nicely hollowed out. The metal inserts are nicely in place. Sojourn dose a nice job at setting up the internal cable routing at the same time.

Here’s a picture of the raw triangles as they are CNCd out to get the tubes. As you can see, the approach is to create two solid halves of each frame main triangle out of squared up timber, then you go about hollowing it out and rounding it off.

This design approach has several advantages:

  • You can use solid pieces of wood for each leg of the triangle on each side the clamshell, which makes for really beautiful output. (And if you laminate a few pieces on each side, the results can be really spectacular.)
  • It lends itself well to CNC machining, which can really speed up production. This is great for production builders.
  • From a construction perspective, this is probably the easiest way to get rounded tubes. It’s very easy to round over and hollow out two sides to form the clamshell
  • Assembly is also probably very straightforward, with one grand glue up at the end.

But it also has several disadvantages:

  • While this is still certainly more doable with hand tools, it will be more difficult to execute more complex design (get your router mojo going!)
  • You also have less control over grain direction. Since you are using a solid piece of wood for each half, you are basically optimizing around a single grain direction for 180 degrees of each side of the clamshell.
  • Likewise, any material defect in the wood becomes fairly critical, as you are reliant on perfection across the whole piece of the tube
  • Finally, the joinery at each corner of the main triangle becomes important to get right. This has been accomplished by finger joints or complex CNCed joints by different builders. But again, probably could be somewhat harder for a home builder.

Box Beam Construction

Just like it sounds, you are making four sides of a box to form a beam. This is a classic technique in home construction. See the home version below.

Taking this over to bike tubing, can apply similar techniques. Here’s a pretty clear version from Timberwolf Cycles:

And here’s a complex lamination process from Axalco.

What this means again is a set of advantages and disadvantages.

For the pros, we have:

  • Extreme control over grain direction, especially if you laminate up the layers for your box sides
  • Very high control over the thickness of the walls, based on your laminations (less reliance on CNC accuracy or your handiness with a router)
  • Easier joinery around the perimeter of the triangle, as you can use different lamination techniques or add reinforcement material to build strength in key areas
  • Because of the above, it is probably easier overall to create a lighter frame
  • More tolerance for defects in the wood, as you are not bound to large pieces and can select around any defects

And for the cons:

  • Can result in pretty boxy looking construction as evidenced by the Timberwolf above. (Although the Renovos, which have recently switched to beam construction, are a compelling counter-example.)
  • If you want to achieve light weight, you are probably dedicated to a lamination approach, which might not be interesting for every home builder. Also epoxy and glue make a mess.
  • Overall, probably a slightly more complex design approach to develop a fully integrated design that looks really good. A little less freedom than the clamshell designs

Conclusion

One of my main objectives is to create a project that can be executed by other home builders. I’m also after performance. The two construction techniques are close, but I’m leaning Box Beam.

I have a CNC and love to use it for personal projects. If I was doing a one off, I’d probably lean toward the clamshell. But if I didn’t have the CNC, I would not be happy about doing all that routing to round over all the elements. (For me, the router is the scariest machine in my shop.)

I’ve done steambending before, building a lightweight (12 lbs) canoe. And I’m intrigued by doing more bentwood laminations. It seems like a fun technique to try to apply to a bicycle.

So doing this post has finally got me to my conclusion: I’m going for the Box Beam.

Feedback welcome!!! (Cross posted here at Arborvelo)

1 Like

Fantastic detailed explanation of the 2 techniques. It is the first time I have seen anyone explain the options and their reasoning behind their choice of construction. I am a complete noob when it comes to building a bike and I only add the following, hopefully, as an addition to your efforts and not a criticism in any way.

I have seen a number of wooden bikes using what I would call a combination of both techniques. A clamshell with laminations. I feel this overcomes the grain orientation issue of clamshell and allows for a more ‘flowing’ Aero design than potentially the box beam. You are probably familiar with https://gastaboy.com/ who I believe is building one of the most aesthetically pleasing wooden bikes on the market. Great images on Instagram.

I have also come across veneer tubing with timber ‘lugs’ On the Making of Wood Tubes – splinter cycles I think this could be an interesting methodology where you could preform tubes and customize size via tube length and lug design. Could this be considered box beam construction in a way?

I am personally leaning towards a laminated clamshell design for the front triangle (with an internal carbon fibre layer) and possibly a veneer timber, wrapped over an internal form, for the rear triangle for my project. Thankfully due to my procrastination and your detailed explanation of your process I will have a clearer idea before I start. lol.

I am in Australia and have access to black wattle. It has great bending characteristics, good colour and reasonably good strength to weight properties.

Looking forward to your project development with keen interest.

2 Likes

You are quite right! I will do some writeups on some other frame builders, but laminating the main block of wood and then doing the routing is very common. You can get some cool effects that way. Thanks for turning me onto Gastaboy - I had not seen him yet. After scrolling through the pictures on his FB, I think he is doing clamshell with laminated up layers.

Very true. I thought about making a third category for “lugged construction.” The Splinter guy’s CNCed wood lugs are truly insane! Also those laminated tubes out of veneer are a labor of love. Here’s another builder doing tubes and lugs: https://www.instagram.com/normalbicycles/ The lugged construction is what you have with the Bamboo bike crowd as well. Perhaps I’ll edit my post to include this category. These guys definitely deserve some study and writeups at the least.

Honestly I am really torn. I think I’ll probably end up experimenting with both clamshell and box beam. I think it probably is easier to get more shapely forms out of the clamshell - but we will see!

Very different to what you guys are doing but I built this last year.

Story of what the project was all about.
redbull.com/endura-enduraland

Cool little film about the making of the bike.
YouTube Video

3 Likes

Amazing!!! Love it. Love the video of it in action! (I also was not aware the first bicycle was made in Scotland…)

Hi,

Your project sounds absolutely fascinating—combining woodworking expertise with the love for cycling is such a beautiful and personal way to create something truly unique. As someone who shares a similar passion, I’ve built a custom steel-and-wood city bike that blends the warmth and natural aesthetics of wood with the reliability and strength of steel. You can check out more about my project here: Steel-Wood City Bike.

I wholeheartedly agree with your points about wood being a remarkable material for bike building. Not only does it offer excellent natural dampening properties, but it also provides a deep connection to the environment and the joy of cycling. In my own experience, combining wood with a steel frame allowed me to highlight the best of both worlds: the organic feel and aesthetics of wood with the robustness and structural integrity of steel.

Your goals, especially keeping the bike under 20 pounds and developing repeatable techniques for other home builders, are really inspiring. I believe projects like yours have the potential to expand what’s possible in bike building while also encouraging others to explore unconventional materials.

If I can share one piece of advice from my own journey, it’s to really focus on the synergy between the materials. For example, how wood and steel (or other components) meet can become an aesthetic highlight as well as a point of functional innovation. I’m sure you’ll find similar moments of creative discovery as you progress.

Looking forward to following your journey on this thread and Arborvelo! Don’t hesitate to reach out if you’d like to exchange ideas or discuss techniques—I’d be happy to share more about my experience.

All the best,
Vincenzo

#WoodenBikes #SteelWoodHarmony #FrameBuilding

1 Like

Vincenzo - beautiful!! Hopefully I can contribute some art to the world like you have!

Rough Concept

After much wrestling in Fusion, I’ve got down a rough concept of the bike outline.

For version 0, I’ve decided just to copy the gravel geometry of the Trek Checkpoint in a 58CM frame:

I’ve spent a lot of time on YouTube learning fusion. The most valuable advice came from CFF’s own @Daniel_Y. Here’s the link to his canonical “how to draw a bike in Fusion" tutorial posted up here on CFF.

I also blasted through a quick class on Fusion on Udemy. Well worth the $15 bucks! https://www.udemy.com/course/fusion-360-complete-course/

After copying Daniel’s tutorial a couple times, I was brave enough to venture out on my own in Fusion.

It immediately became clear that given the different profiles of the wood frame I’m using, I’d have to adapt the “centerline” approach that Daniel is using. (Round tubes can easily be swept down the centerlines. I needed a different approach given the wood tube intersections I had invisioned.) Additionally, the geometry of the Trek created some pretty tight chainstays that needed some creativity (which is possible in wood!) to compress that dimension.

I ended up with a wild mess / cludge of sketches. Mostly things are constrained, but I left a lot of the control point splines unconstrained at the moment given my iteration. But in the spirit of perfect is the enemy of the good, I’m pushing ahead on this design and then will go down and fully constrain everything once I’m fairly comfortable with it.

You can see some unconstrained splines in there. And also you can see the projection of the “Base Sketch” concept that Daniel uses as the underlying layout model.

Probably the best thing to do in the end will be to start from scratch and design the whole thing. I’ve learned a lot of lessons and probably could get the whole thing done again in an hour or two. The parametric model pretty much works now, but I’m sure I can make this much more simple at the end.

Next steps are for me to finalize the dimensions based on some of the inserts I am awaiting in the mail for the BB, seat tube, and headtube. I’m leaving the dropouts as a problem for Future Me. I will likely use some Paragon dropouts, but they will need some custom attachments.

Additionally, I have some innovations on the “clamshell vs box beam” construction method that I want to model out and share next.

1 Like

Tubing: Box Beam vs Clamshell

In further refining my model in fusion, I’ve gotten into the details of box beam vs clamshell construction a bit more. The advantages of box beam construction for the tubing are becoming even more apparent.

As an example, let’s use a model of a seat tube, which needs to wrap around a metal or carbon seat tube insert. For this example, let’s imagine the seat tube itself has an outer diameter of about 1.25″, or 32mm. Let’s use a wood wall thickness of 4mm for this example. Now let’s run through some different construction techniques using commonly available router bits.

Clamshell

Here’s a cartoon example of clamshell construction, wrapped around a seat tube insert.

Clamshell example

This could be accomplished with a cove bit on both sides of the clamshell.

What we can observe from this is the obvious fact that there are two points of glue up, each with 4mm of contact area. As the Renovo owner has mentioned, this can leave a lot to error during the glue up if wood shifts, you have imperfections, etc.

Now let’s look at a pure Box Beam construction.

Box Beam

Here’s a cartoon of Box Beam.

Box beam construction example

As we can see here, the box beam method effectively doubles the surface area for glue up: there are four joints of 4mm each. However, it still leaves a large gap around the seat tube. So this is probably not the ideal solution. Let’s modify it a bit with some routing with a 1.25in cove bit.

Box Beam with Cove Routing

Here’s a cartoon of a routed box beam.

Box Beam with cove bit routing

Here we’ve matched the shape of interior sleeve, giving great bonding potential. And we’ve maximized the surface area of the glue up along the entire length of the side – 80mm of glue up surface area compared to the original 8mm with clamshell. A huge improvement!

However, we have a downside in that we have a lot more material here and weight will be much higher.

So let’s attack that with a roundover bit. Let’s use a .75in roundover bit for this example.

Box Beam with Cove and Roundover Routing

Here’s the final iteration with rounding over the final edges.

Box Beam routed with cove and roundover bits

Hitting the edges with a roundover bit takes a lot of that excess material off. With a 4mm wall, it doesn’t quite create fully round tubes, but it comes pretty darn close.

But it does create a LOT more surface area for the glue up. Fusion tells me each of those edges from center of tube to top of lamination is about 12.5mm, so 50mm of total glue up surface area compared to the original 8mm in clamshell – a 6x stability improvement. (I fully recognize that those ears on the cove routing don’t represent real “meat” for the glueup. But the point remains even with significant reduction.)

Conclusions

It seems that the box beam construction method can be used with a combination of readily available routing bits to achieve nice looking tubes, maximizing the glue-up surface area while also achieving the relatively thin walls you want for a light frame. Look forward to trying this out.

3 Likes