First post, first time building a frame. I absolutely love steel bikes and I like to build stuff myself. I have a huge task, I’m slowly learning and maybe finally I can make it happen. I’m sharing my ideas because maybe there is something very wrong with my plan and the more experienced can spot it and I can fix it.
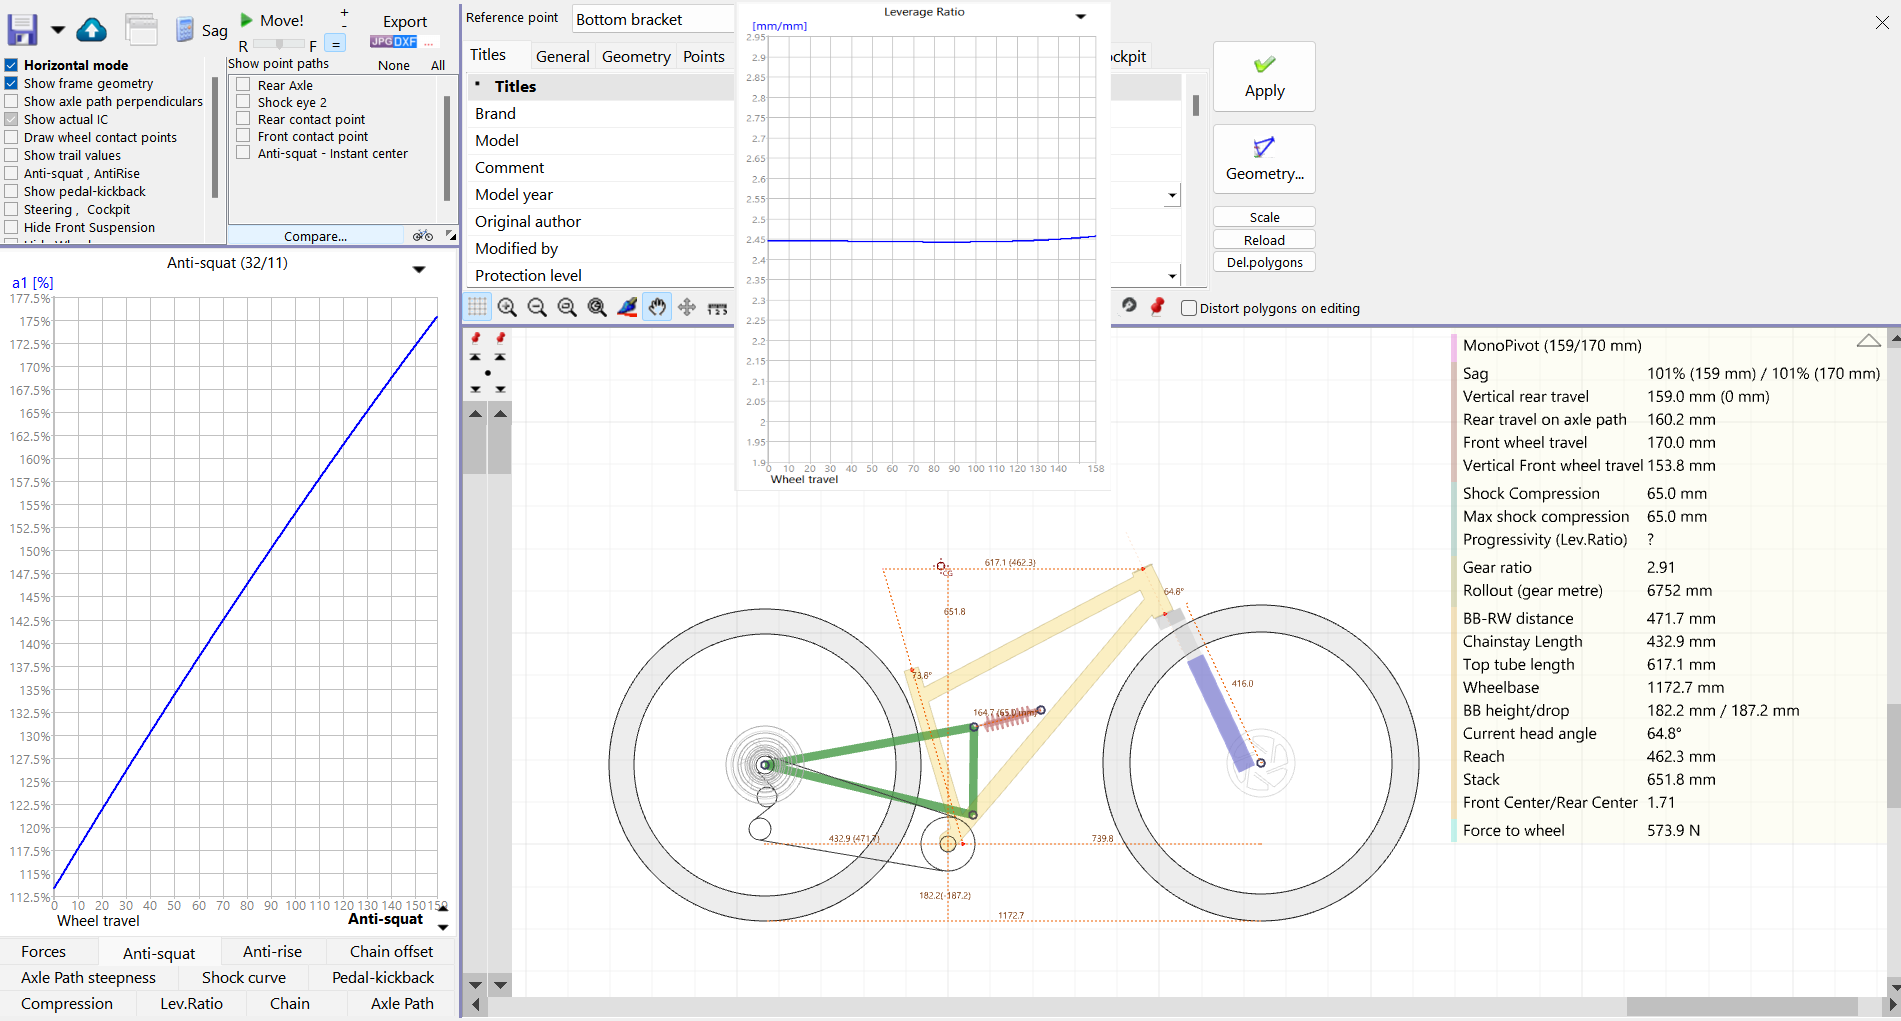
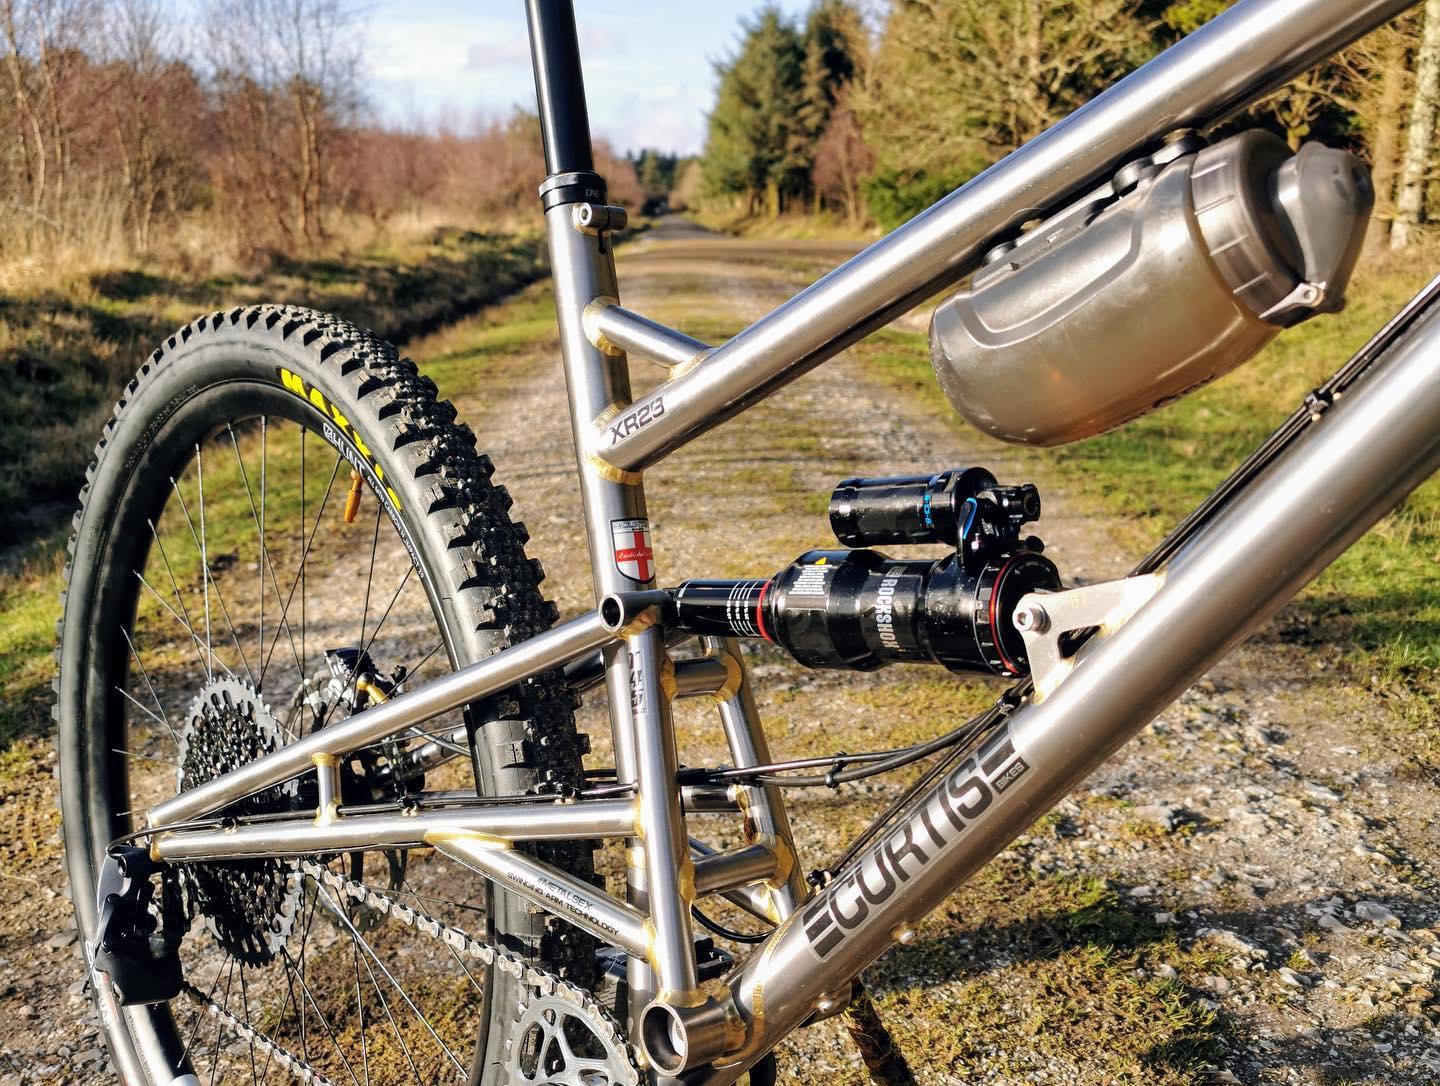
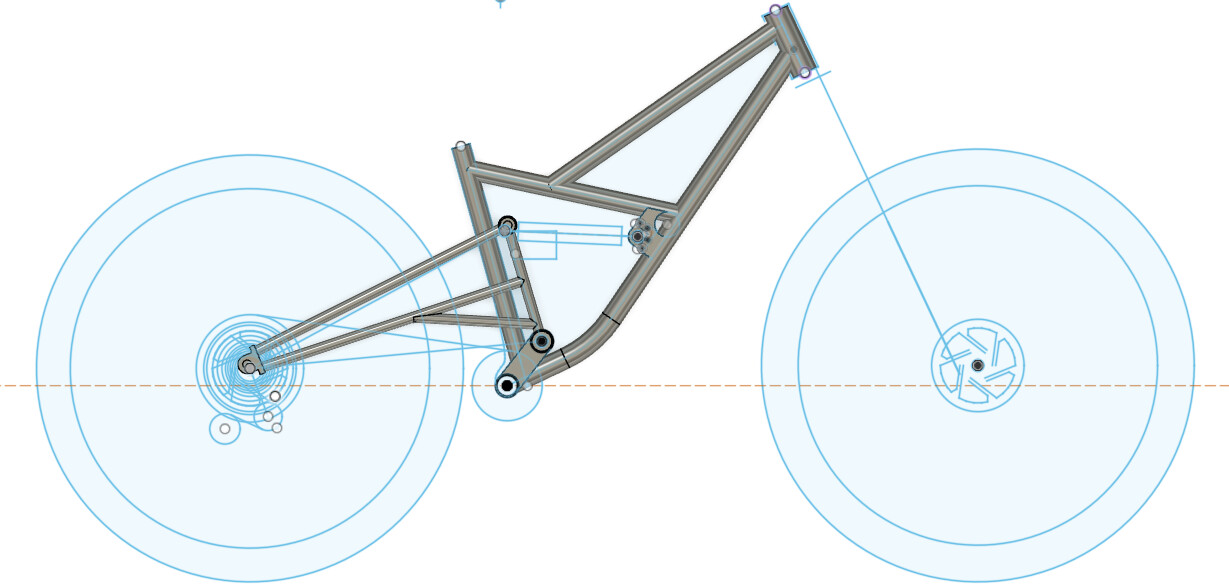
Trying to go for KISS - keep it simple stupid path. Designed this enduro bike to have 160mm rear travel using 230x65 air shock, and 170mm fork. Linear leverage ratio. Main pivot bearings inside rear triangle - copying Curtis rear triangle.
I got lift arc tig without pedal and I’m currently practicing on 35x1.5 tubes, this is currently the hardest part. I got access to mills and lathes and I know where I can get the tubes.
Tubes are Columbus straight gauge:
TT - 35x0.9
ST - 35x0.9
DT - 38.1x0.9
BB - 40x73 English thread
HT - 44x120
Rear triangle - Can’t decide if I should go for 19x0.9 or 22x0.9 tubes.
I weight only 72kg so I’m thinking should be tough enough.
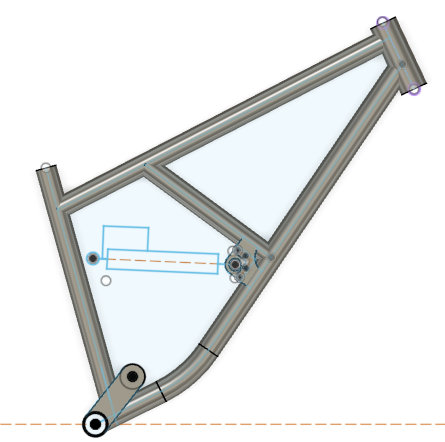
I have done some static stress test on the front frame, this is why I have added the extra tube to take a little stress away from DT. My skills are not good enough to simulate the rear triangle, I keep getting a lot of errors. So probably will go for 22 tubes.
The biggest task in building frames is probably building fixtures and other tooling and workholding, so the frame you build is actually the frame you designed in the first place
A lot of thought can go into the order in which you put things together like for example do you weld the chainstay to the dropout and then cut the mitre for the main pivot, or the other way around, or do you mitre everything at once and then try to weld it together with as little warpage as you can…
I love how many people seem to be tackling full suspensions for their first frames.
If you have the fab skills and access to some nice tools, I guess it’s not so bad. But this is definitely not KISS. Keeping it simple is starting with a lugged road or track bike.
I’m in no position to critique the suspension design, but the frame design has a few potential issues:
Is the chain supposed to squeeze between the two stays? Will it thread the needle in all gears in the full range of travel?
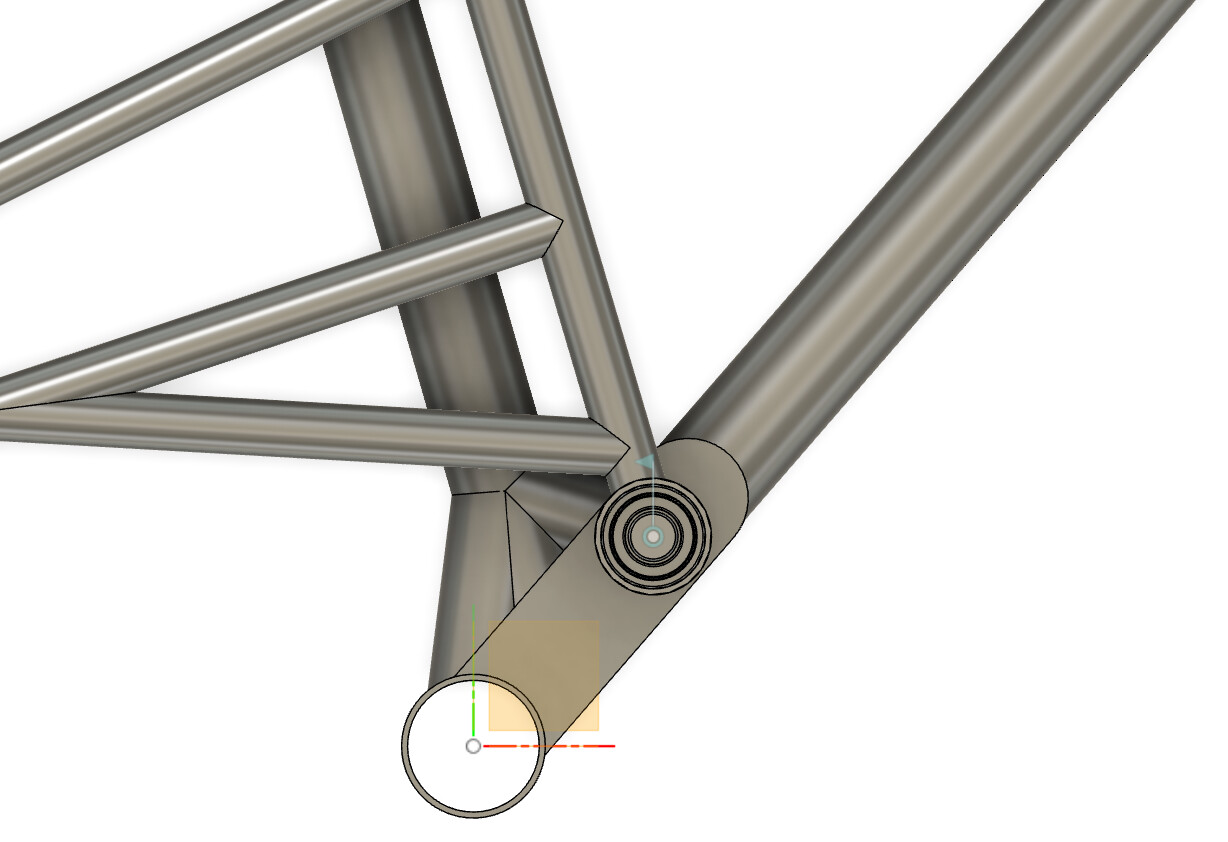
The seat tube and main pivot connect to the down tube. If you don’t sleeve that area I don’t think the .9mm tube will last very long.
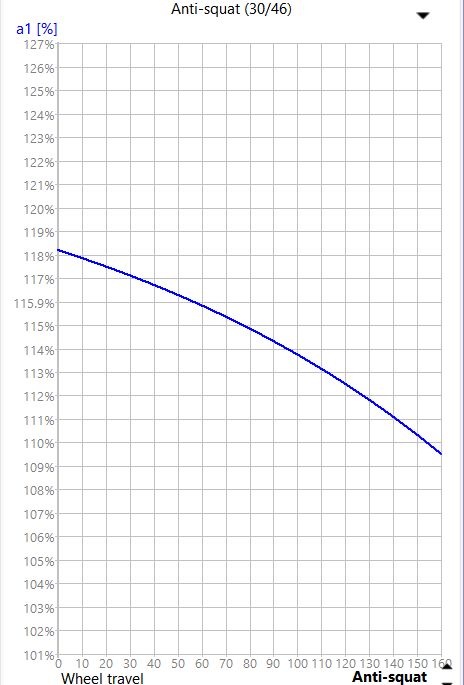
It might pay to check the anti squat in a climbing gear as that it more relevant to real world riding. I never worried about a little pedal bob cranking down a hill in the hardest gear.
I would second the suggestion to sleeve the downtube at the pivot, I think Walt used to recommend .065" wall thickness for pivot points. If you have a lathe you could turn a shoulder onto a section and press it into the bottom of the dt and weld it on like a seat post topper. Would be good preventing strength issues with the offset seat tube as well.
I checked that it clears bigger gears, not so sure about the smallest one. If it does not, I will have to figure it out while putting it together. It does clear the rear tire, but not knowing how much it will flex there might be some rubbing.
I would think sleeving DT would add a weak spot, because of extra weld, so maybe I should pump up DT wall thickness to 1.5mm.
Good on you for aiming for a full suspension on bike 1! I would second everything that has been said especially @Luniz82 , the cad is by far the easy part, fixturing is going to be like building a whole other frame or two of you’re starting from scratch.
As for welding I would highly recommend welding .9 wall tubes at acute angles for practice since that’s what I find to be the toughest. Good luck!
Yes right now I’m stuck at welding, need lots more practice. There is a possibility that I will pay someone to weld it for me, but knowing how to TIG weld is a good skill to have, so I’m motivated to learn. If I get a bit better I will try different angles.
I’m planning on building a frame jig similar to this, and a separate one for the rear triangle. Have seen BTR one, and it looks easy to make.
Thanks for the visuals! It looks like the chain will clear just fine with the bent stays.
You can clearly see in the Curtis photo that the down tube has a refinforcing sleeve partially wrapped around the down tube at the main pivot. It looks like the seat tube connects to the bottom bracket shell. I’d follow the Curtis design on both points.
Jump in, go for it. My second frame was a full suspension single pivot. All done by hand with just a bench vise, hacksaw, and files. No jig.
Swap out the straight seat tube for a bent one and you can land it on the bb instead of the downtube. Then fiddle with your main pivot location and get it to tie into the seat tube and the downtube. That would remove need to sleeve / double up at the base of the downtube.
I can’t find the picture but someone posted a fat bike frame with a similar seat tube/downtube attachment and it cracked. If you’re set on the straight seat tube, maybe find a way to connect it to the bottom bracket with braces or gussets. I’m no expert on steel, but pedaling and suspension are going to put a lot of side/twisting forces on that area. It will likely crack.
You guys have put me in a hard spot. For sleeving I can not find any tubes to fit with 38.1x0.9 tube in EU. Only mega expensive shops.
I don’t really want to bend st and merge it with dt and main pivot. Because then my shock wont be linear, and all the welds will be in one tight space.
And I was incorrect. There is no 38.1x1.5 tube available.
It seems if I want to keep my design, I will have to split the 38.1 tube and weld a sleeve similar to Curtis. And brace the area between ST, DT and BB.
It might be worth checking how much freight will cost from aircraft spruce. I am in New Zealand and I can get a pretty decent quantity of tubes sent for $30usd and they have an excellent selection of sizes.
Lets talk about sleeveing the DT, can’t find much info. If I want to use 38.1x0.9, should the sleeve OD be bigger or the same? Wall thickness? How much overlap? Does it have to be press fitted or loose?
Aircraft spurce wants a lot of money, but cheapest so far.
I can get 38.1 or 41.275 tubes with wall thickness of 1.65, 2.1, 2.4.
I’m think 38.1x2.1 or 2.4. Overlap 50mm. Hand fit tight.
If it is too tight, TIG welding would make it crack?
But, I don’t think anything needs to be that thick. If you’re using a 38mm DT (for example) in .035" (for example) buy a foot of 38mm (1.5") in .049" or .063", split it and use that for your double layer plates, should be more than strong enough. That’s how I do all of mine. The DH frame just used the drops from the 38mm .049 DT, the trail bike got 16g exhaust tubing reinforcement plates.
If I needed something to wrap completely around a tube, like the pivot reinforcement on that Curtis, I’d make it 2 pieces, fit it, then tig braze the seam up. Trying to make that whole thing slip fit in one piece looks hard and I don’t like hard. I also tig braze all of my reinforcement plates in and I only do the joints that run parallel with the tubes, never across.
Take all that with a big grain of salt, I’m just learning too. Good luck on the frame! Keep us posted.
If your DT is 38.1, you’d want around a 40mm with around .9mm (0.035") walls for your sleeve. You could use slightly smaller or slightly larger tubing for the sleeve and then you just might need to do some blacksmithing work to make it fit tight around the circumference of DT.
I’ll buy some materials for jig this week. Still have to practice welding.
Sketched up some more ideas. Main pivot is attached with 40x40 square tube. 8.3% progressive rate. I need to see if I can fid someone who can bend some pipe for me, because: