Thanks, that’s what I am thinking as well. Maybe wire to hold it.
Another day, another tool. The only thing I needed to buy is the indicator. No more eyeballing butts.
8 Likes
Made a Paul Brodie-inspired 990/ canti fixture. I loved how his can be lifted off vertically right after brazing, so that’s what mine does! Worked really well on the three frames I just did. This fixture works with the common 1/2x2-1/2 dummy axles. I have a new plate I’m machining for more width adjustment, and better handles (my 3d printed ones melted first go ![]() ), so it’s a work in progress.
), so it’s a work in progress.
14 Likes
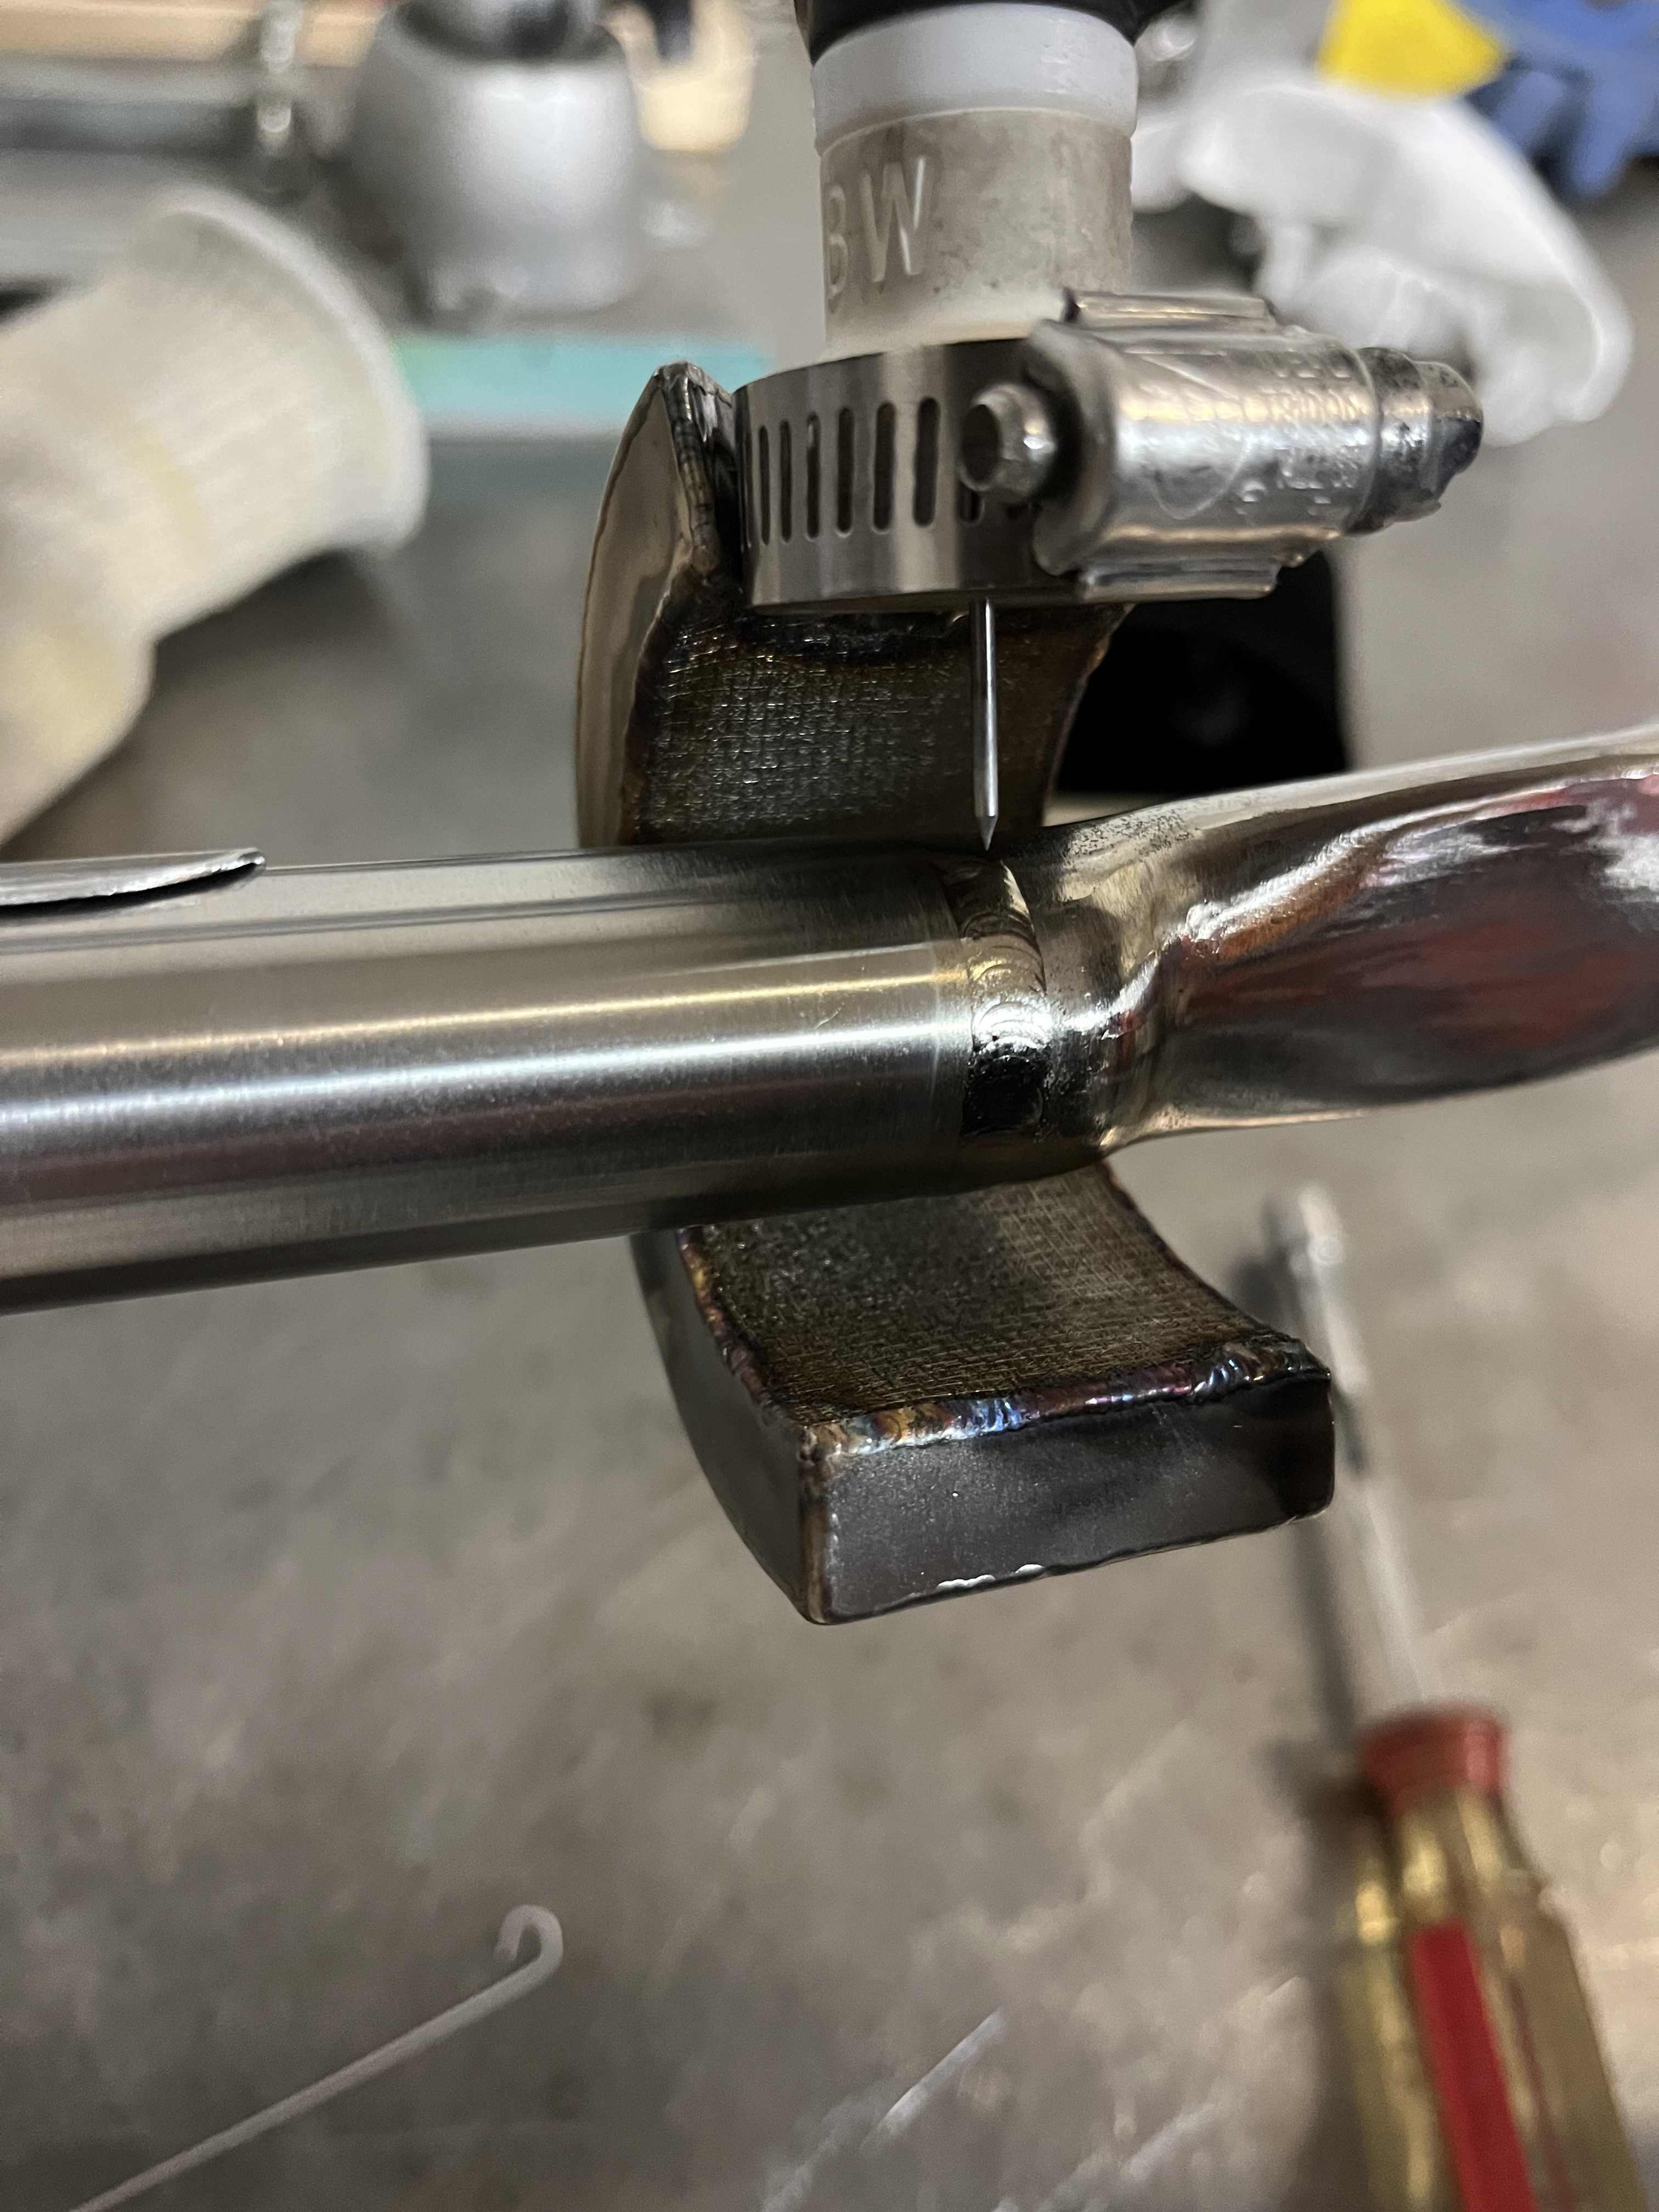
I was having a hard time with the homemade trailing shield I had been using for welding small titanium tubes like chainstay/ yoke joints welded on a small positioner. Was difficult to avoid getting some discoloration . I made a better trailing shield that wraps around the tube a lot more. The copper tube mates to two other perforated curved tubes inside the trailer and it’s stuffed with super fine steel wool. Stainless felt metal for the screens. Now I can rip around them fast without worrying about shielding!
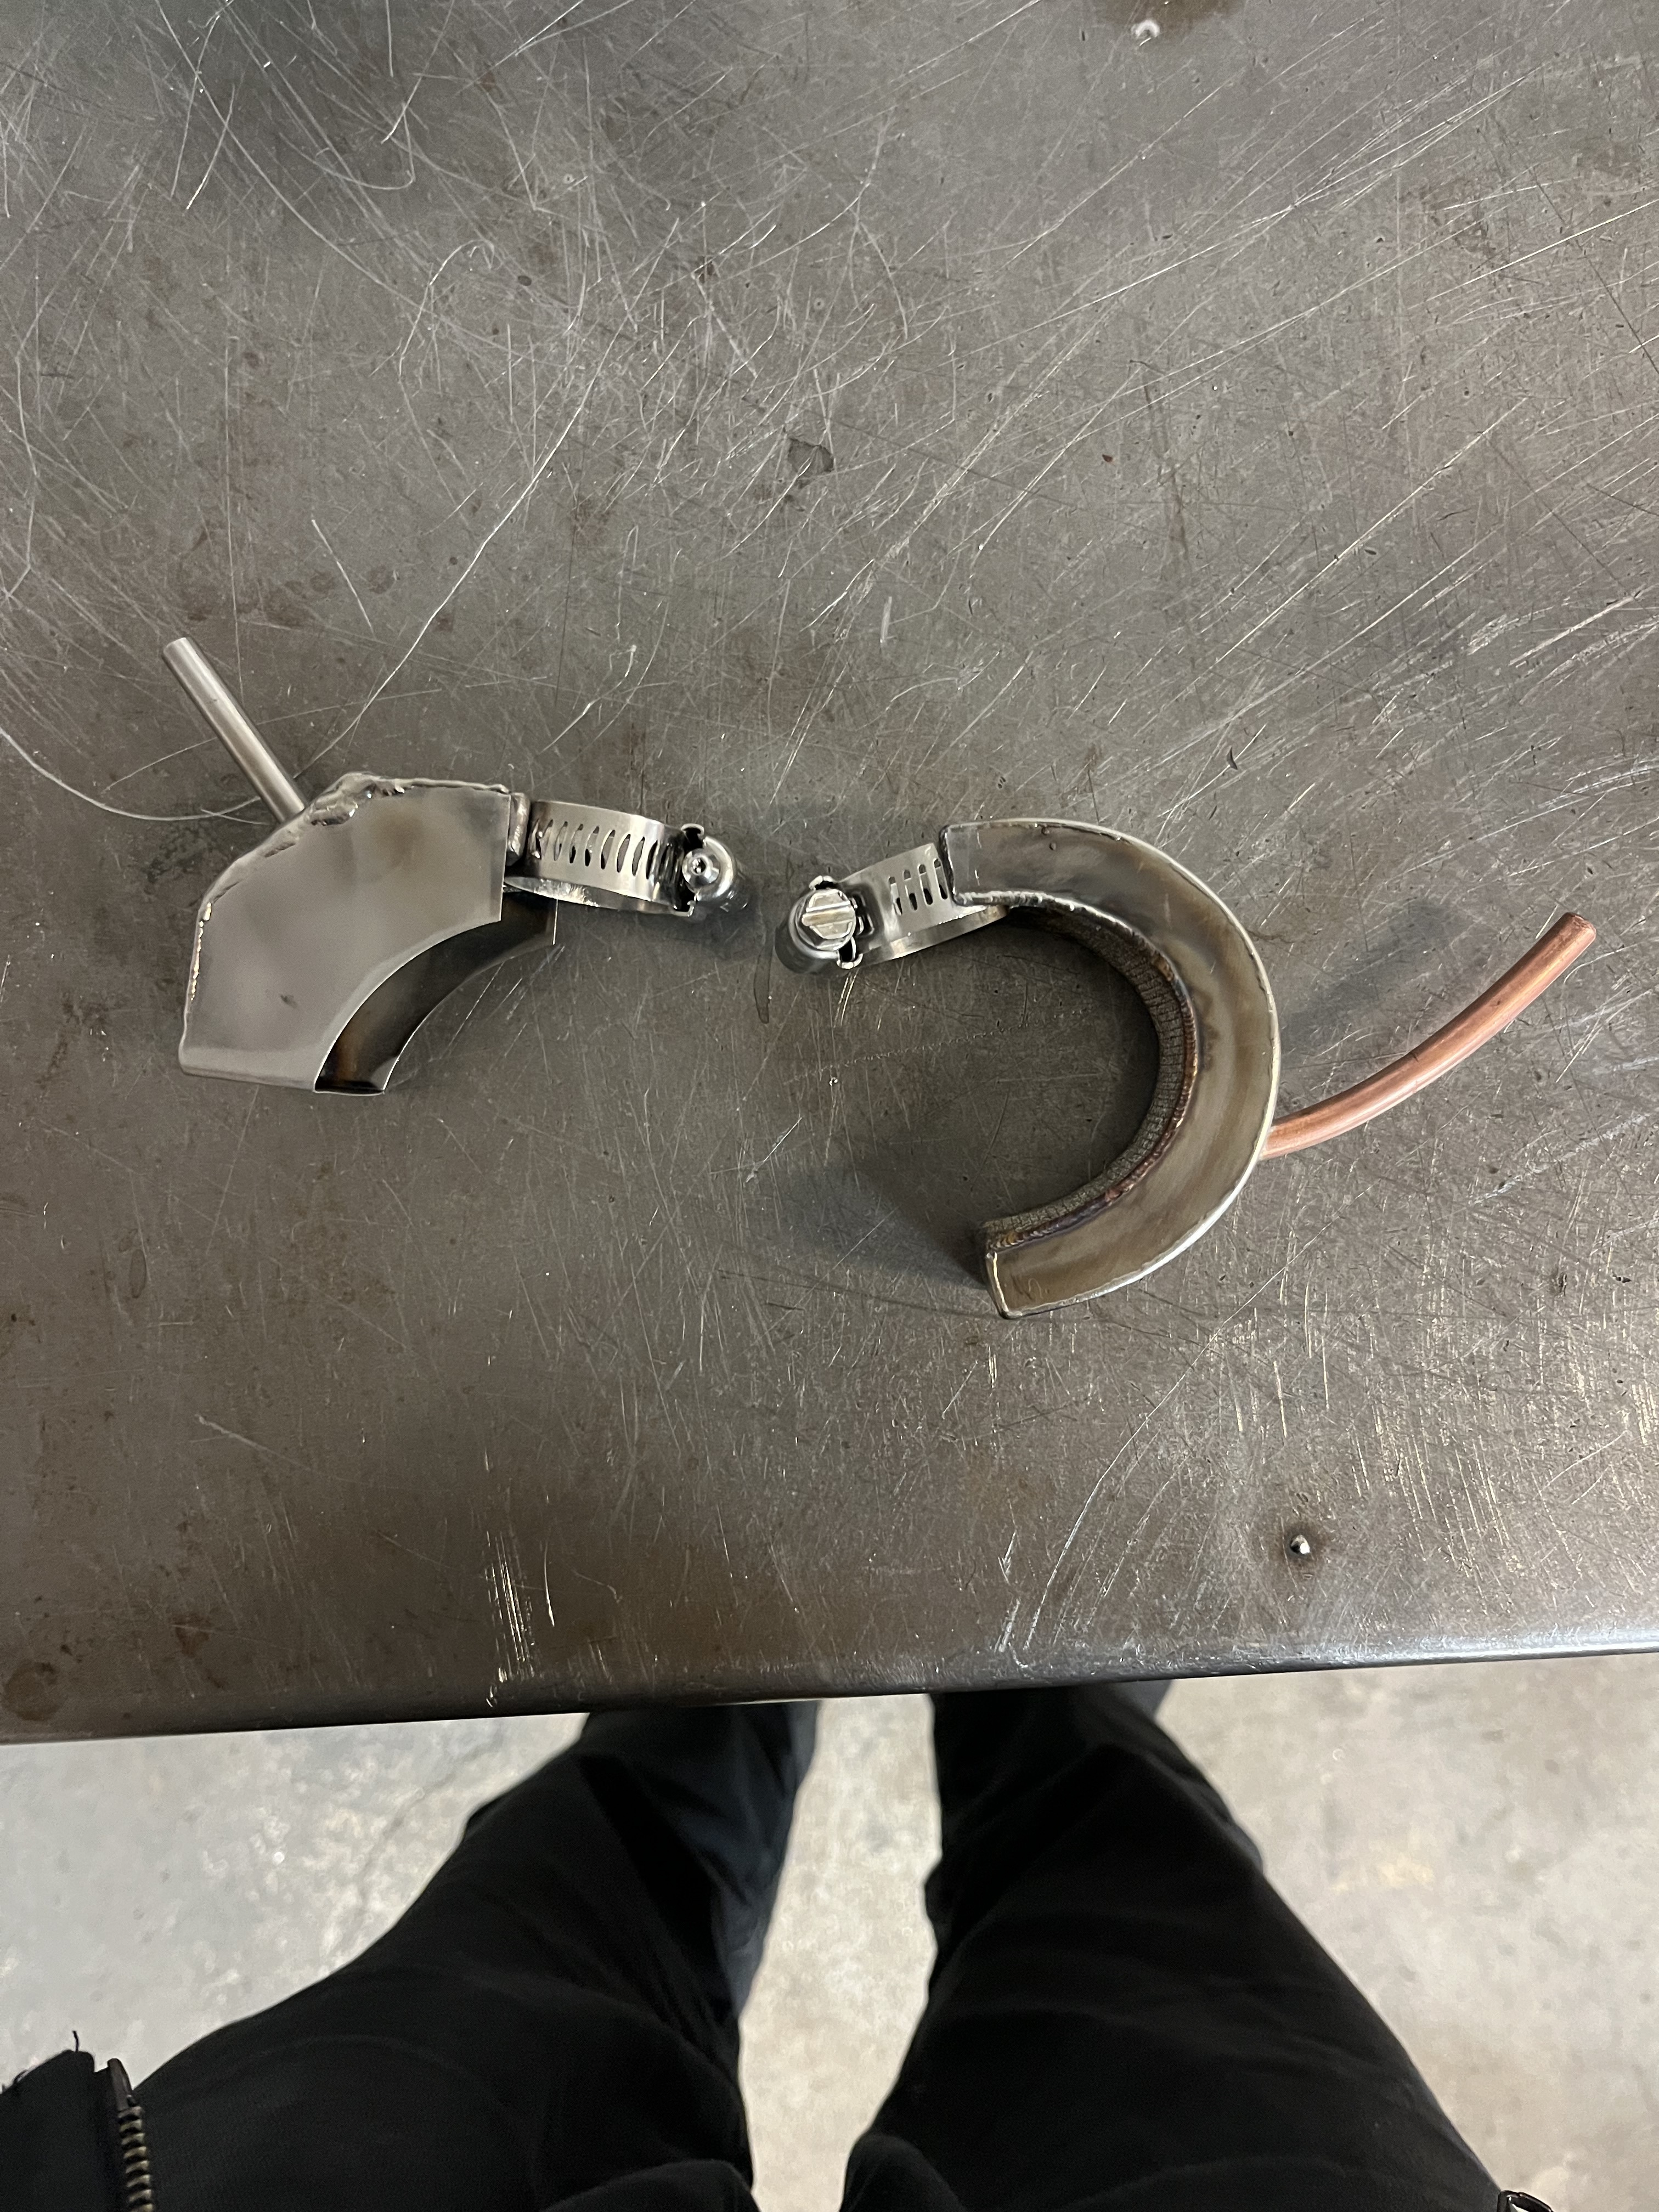

30 Likes
I made a thing to hold cable stops to the DT for brazing. An old chain makes a pretty good weight to hold odd-shaped things in place. ![]()
18 Likes
Here’s a shot I took many years ago of a few various clamping blocks. The wood ones are a mix of bought and self made. The Al bar based clamps are self made. I use these Al bar type clamps quite often and have made a few different sizes over time. Note the canti boss shaft clamp has a “U” brake clamp at the other end (and I think I’ve only used this end once).
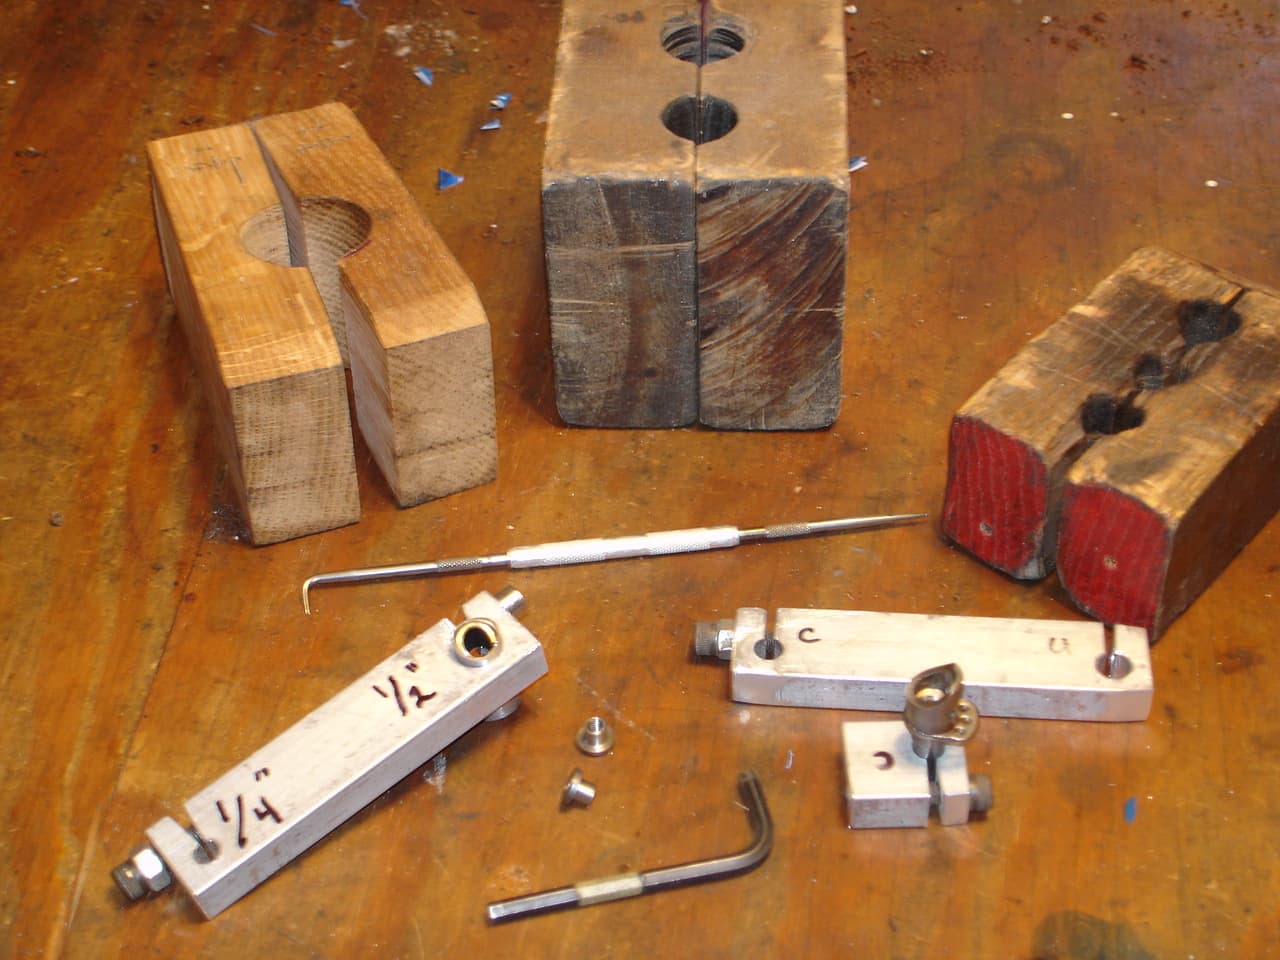
Here’s a link to my Flicker album of tools There’s nearly 80 photos of tools I’ve used/made over the last 45 years. Elsewhere in other albums are more shots of frame making and such. Of the 2800 photos maybe half are frame making related. I have begun to scan and save the old bike industry catalogs I’ve collected from Interbike and other industry sources. Andy
10 Likes
I have a stack of vintage bikes waiting to be restored and I finally started in on an early 80’s Erickson. Over the years, the 5sp campy rear was replaced with 7sp 600 derailleur and freewheel, the rear rim had been replaced with something more modern, and so on. Anyway, over the weekend, I was stripping it down to bare frame and fork to polish the paint and I couldn’t get the fixed cup undone. I’d recently seen a nice VAR tool on ebay and thought about ordering it but then I thought, heck, I have a mill. I’ll bet I can make something:
Voila! I used a 3/8" plate of stainless. It worked perfectly. I bolted it all together and tapped a corner with a hammer and the fixed cup came loose. I’m working on anodizing a few other pieces so I may anodize the aluminum plug here. I wish I had made it from tool steel so I could harden it but…whatever.
8 Likes
I have most of a frame-alignment table, garage-builder style. Not done yet.
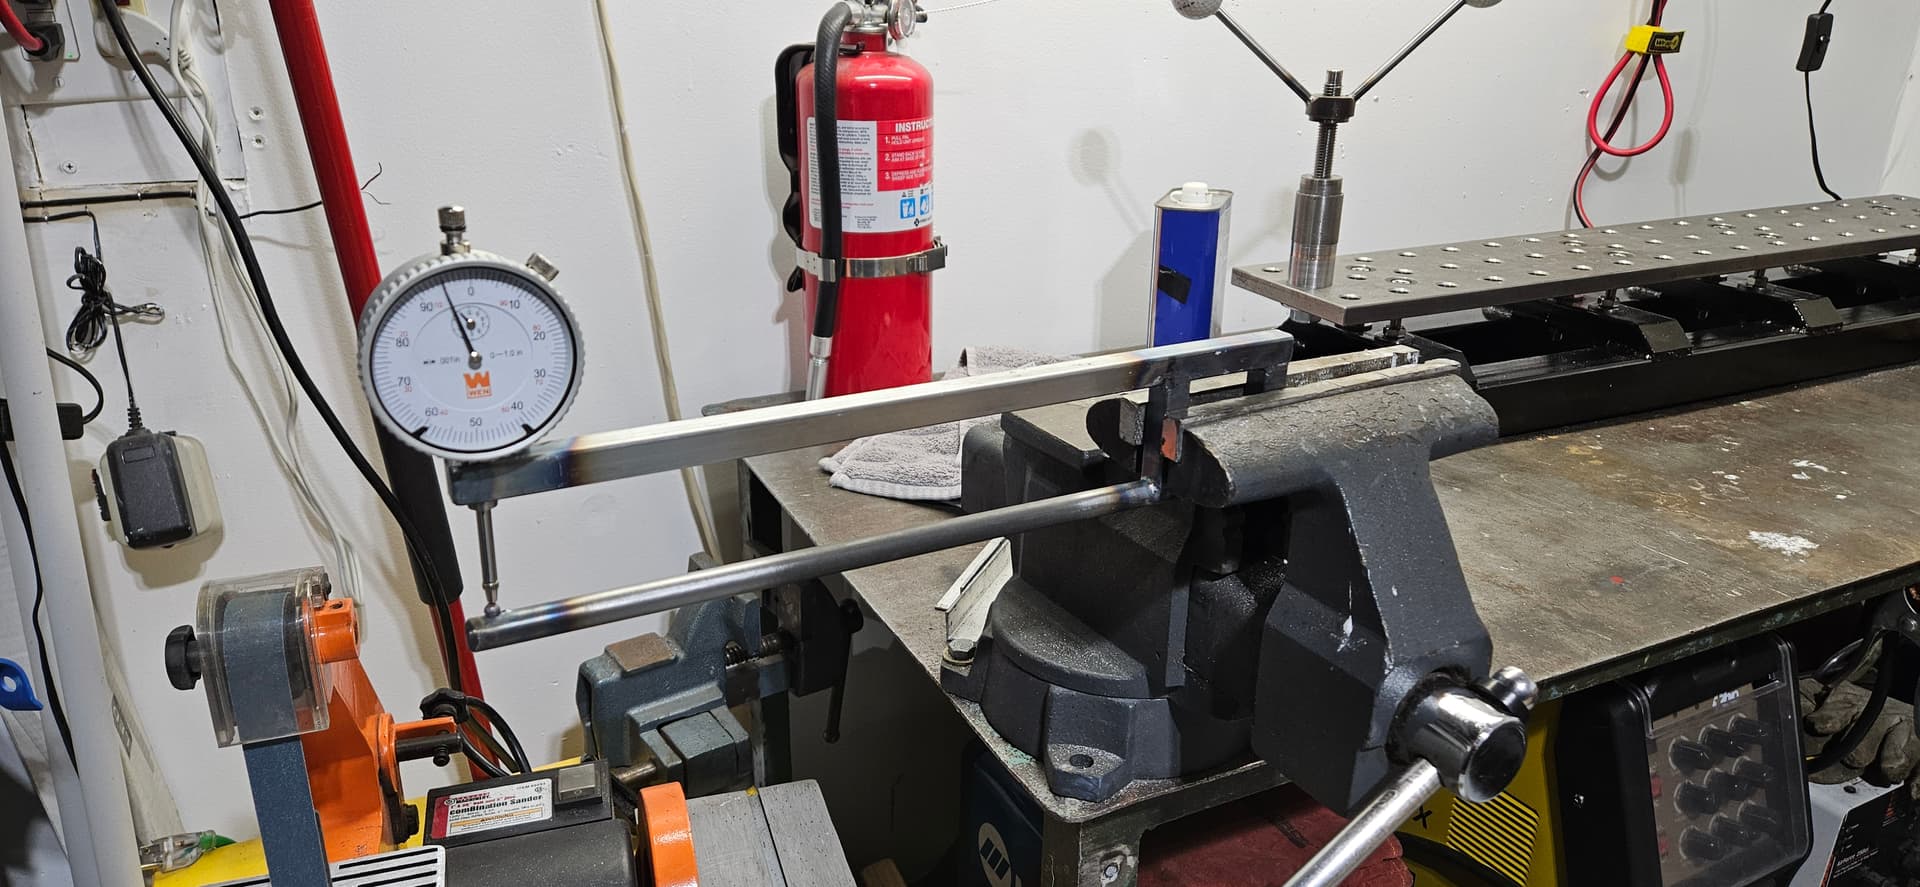
After ~20 years of aligning to sub-mm tolerance on a top-quality Marchetti table at one place I worked, and 6" thick A-quality granite slab at another (plus a couple more — I moved around a lot…), I retired from the biz and am now building out an amateur shop in my basement and shed.
I’ve always said such obsessive alignment isn’t necessary for “performance” or even “rides good”. I was going to align frames (if I ever get around to building one) using a straight edge and eyeballs, like they did at Jack Taylor as you can see in the movie “Bicycle Brothers”. You can actually get it pretty darn straight by holding the frame up to a window just right, so there’s the slimmest sliver of daylight between the ST and HT… plus a “frame stick” which is a straight piece of metal with an indicator screw at one end. See Paul Brodie’s Youtube for a super-fancy version, but it’s no better than my nearly-free one made of scrap. That’s how we aligned frames at the first two places I worked, '70s and early '80s, and I promise you, no human could detect whatever misalignment we missed that way. There really is a “good enough” point, where getting it any straighter is just a sales tool.
So I thought I was going to resist the temptation to make an alignment table, but then I realized I had all the parts I needed to make one on the cheap.
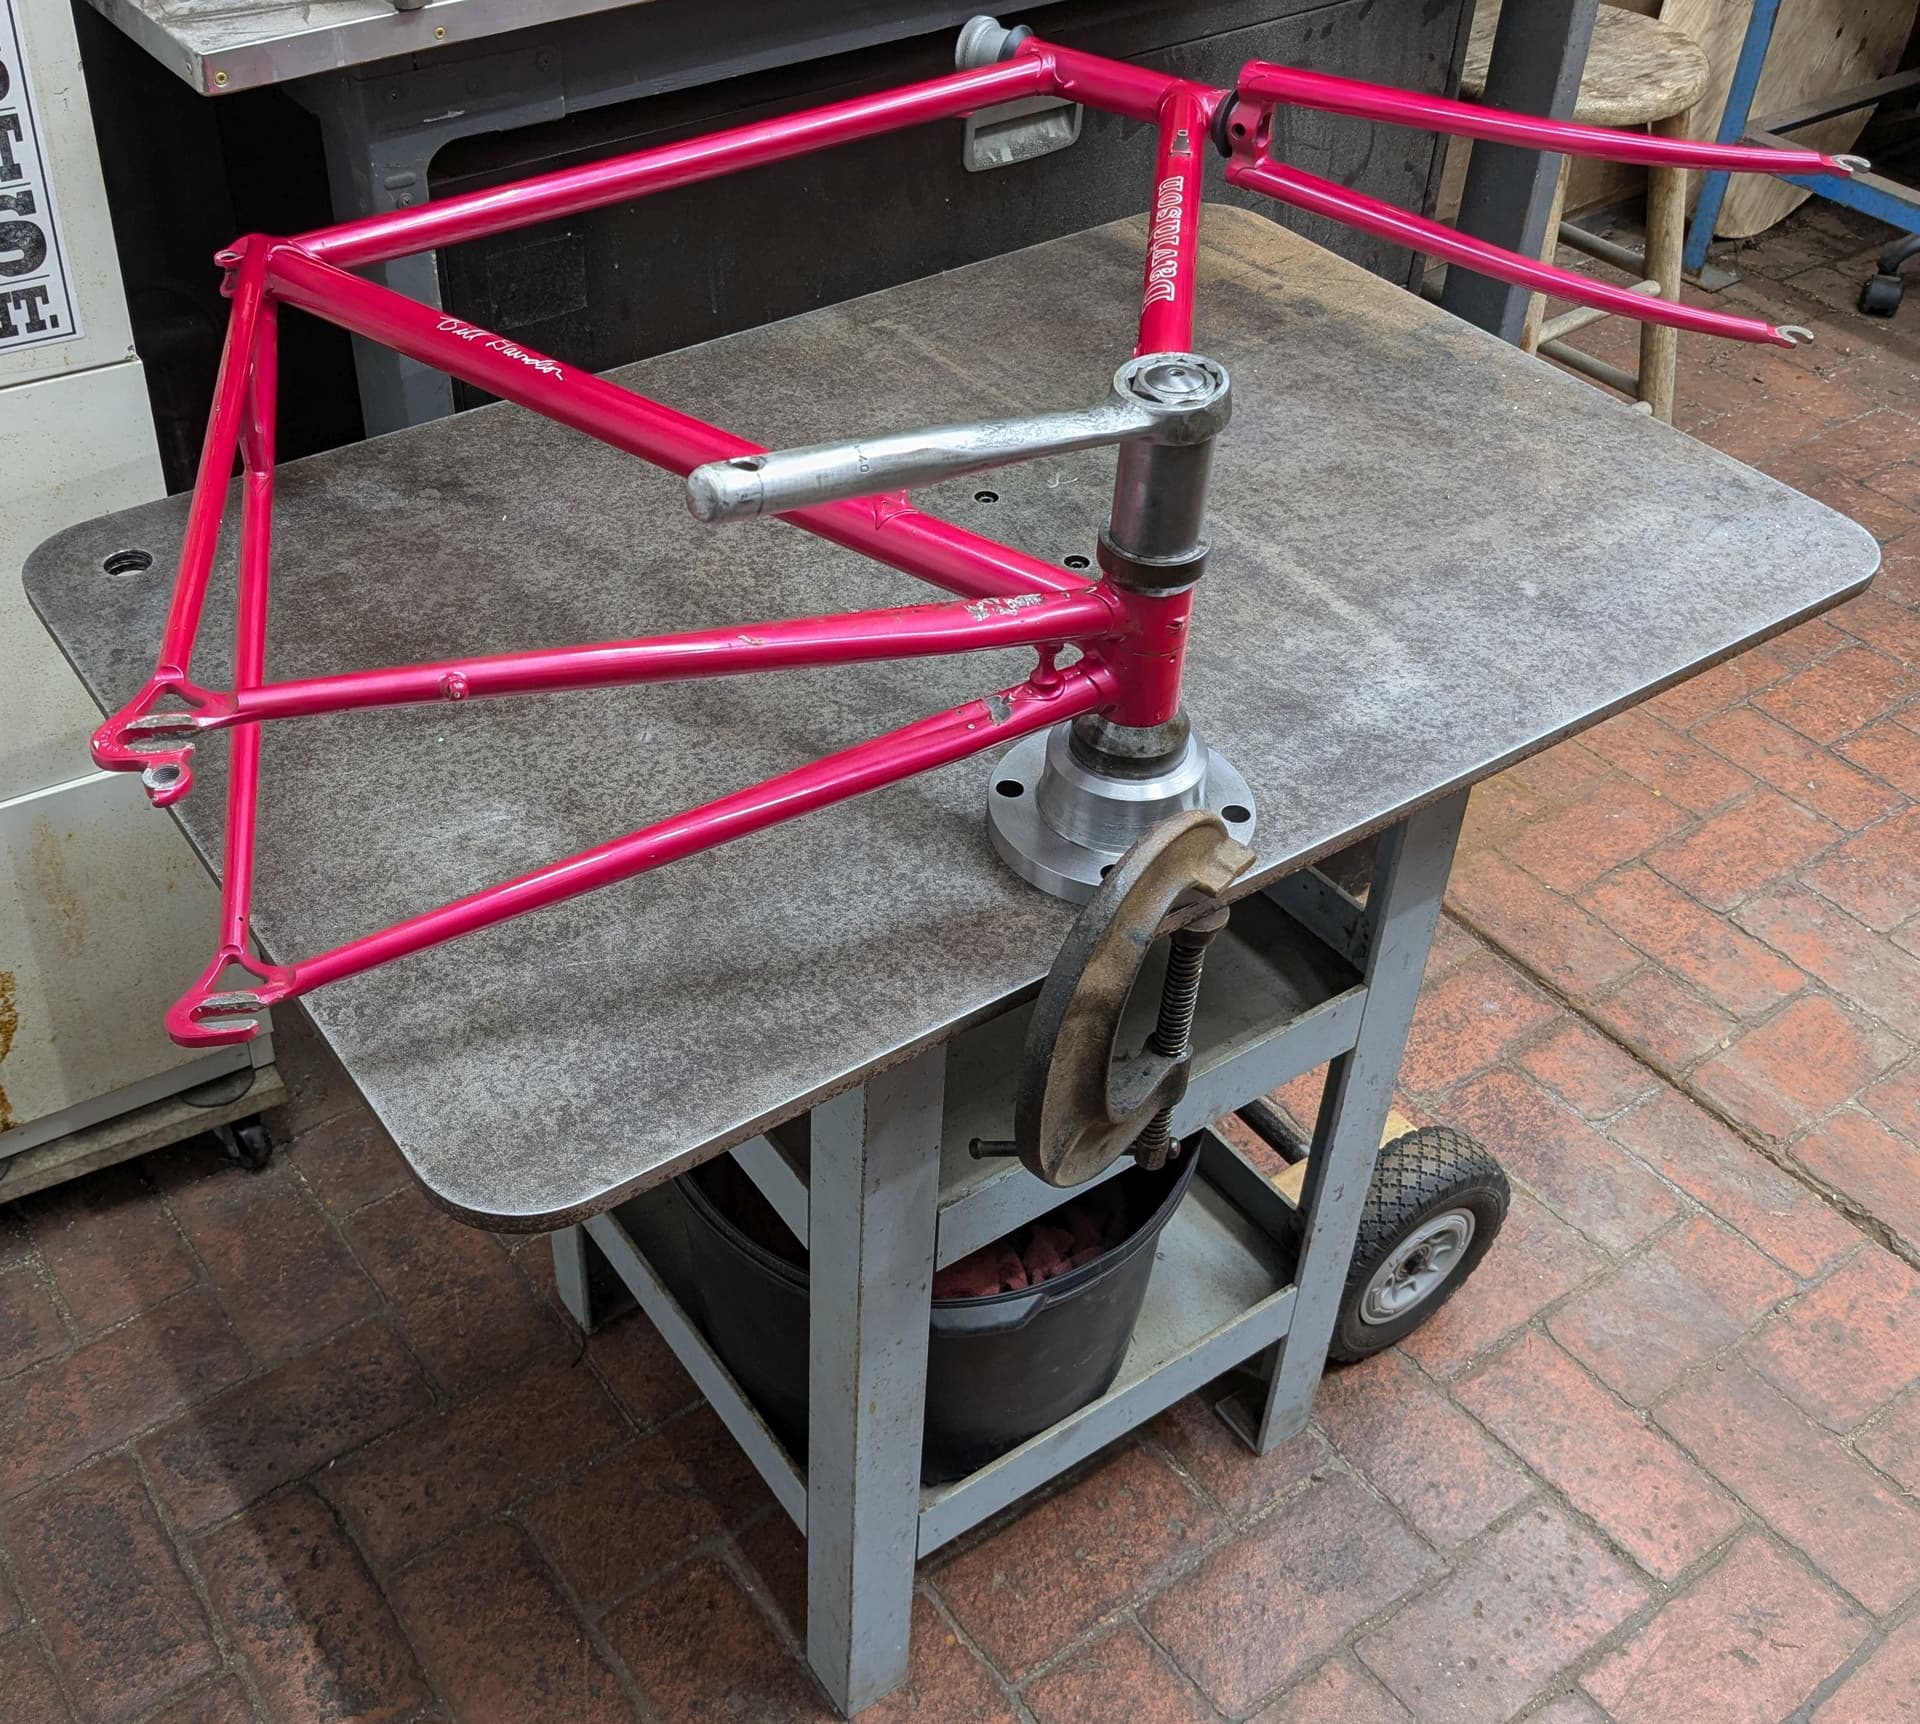
The “flat surface” is the base from a two-sided Park Professional bike stand, that was given to me free about 30 years ago and had been sitting outside rusting for a decade before I got it. Then extra decades of rusting in my damp cold shed through Seattle winters. But it’s impressively flat, for a piece of hot-rolled steel, and at 1/2" thick it’s stiff and strong enough too. I did have to buy the stand it’s on, got it off Craig’s List for less than that much steel would have cost. The guy built it and painted it and then had to move in a hurry. Super heavy, made of 1/4" thick angle and plate, with big honkin welds, couldn’t have done it better myself. I added the wheels, that touch the ground when you tilt it, because my shop is too tiny to have it out full time. I need to roll it into a corner when not in use.
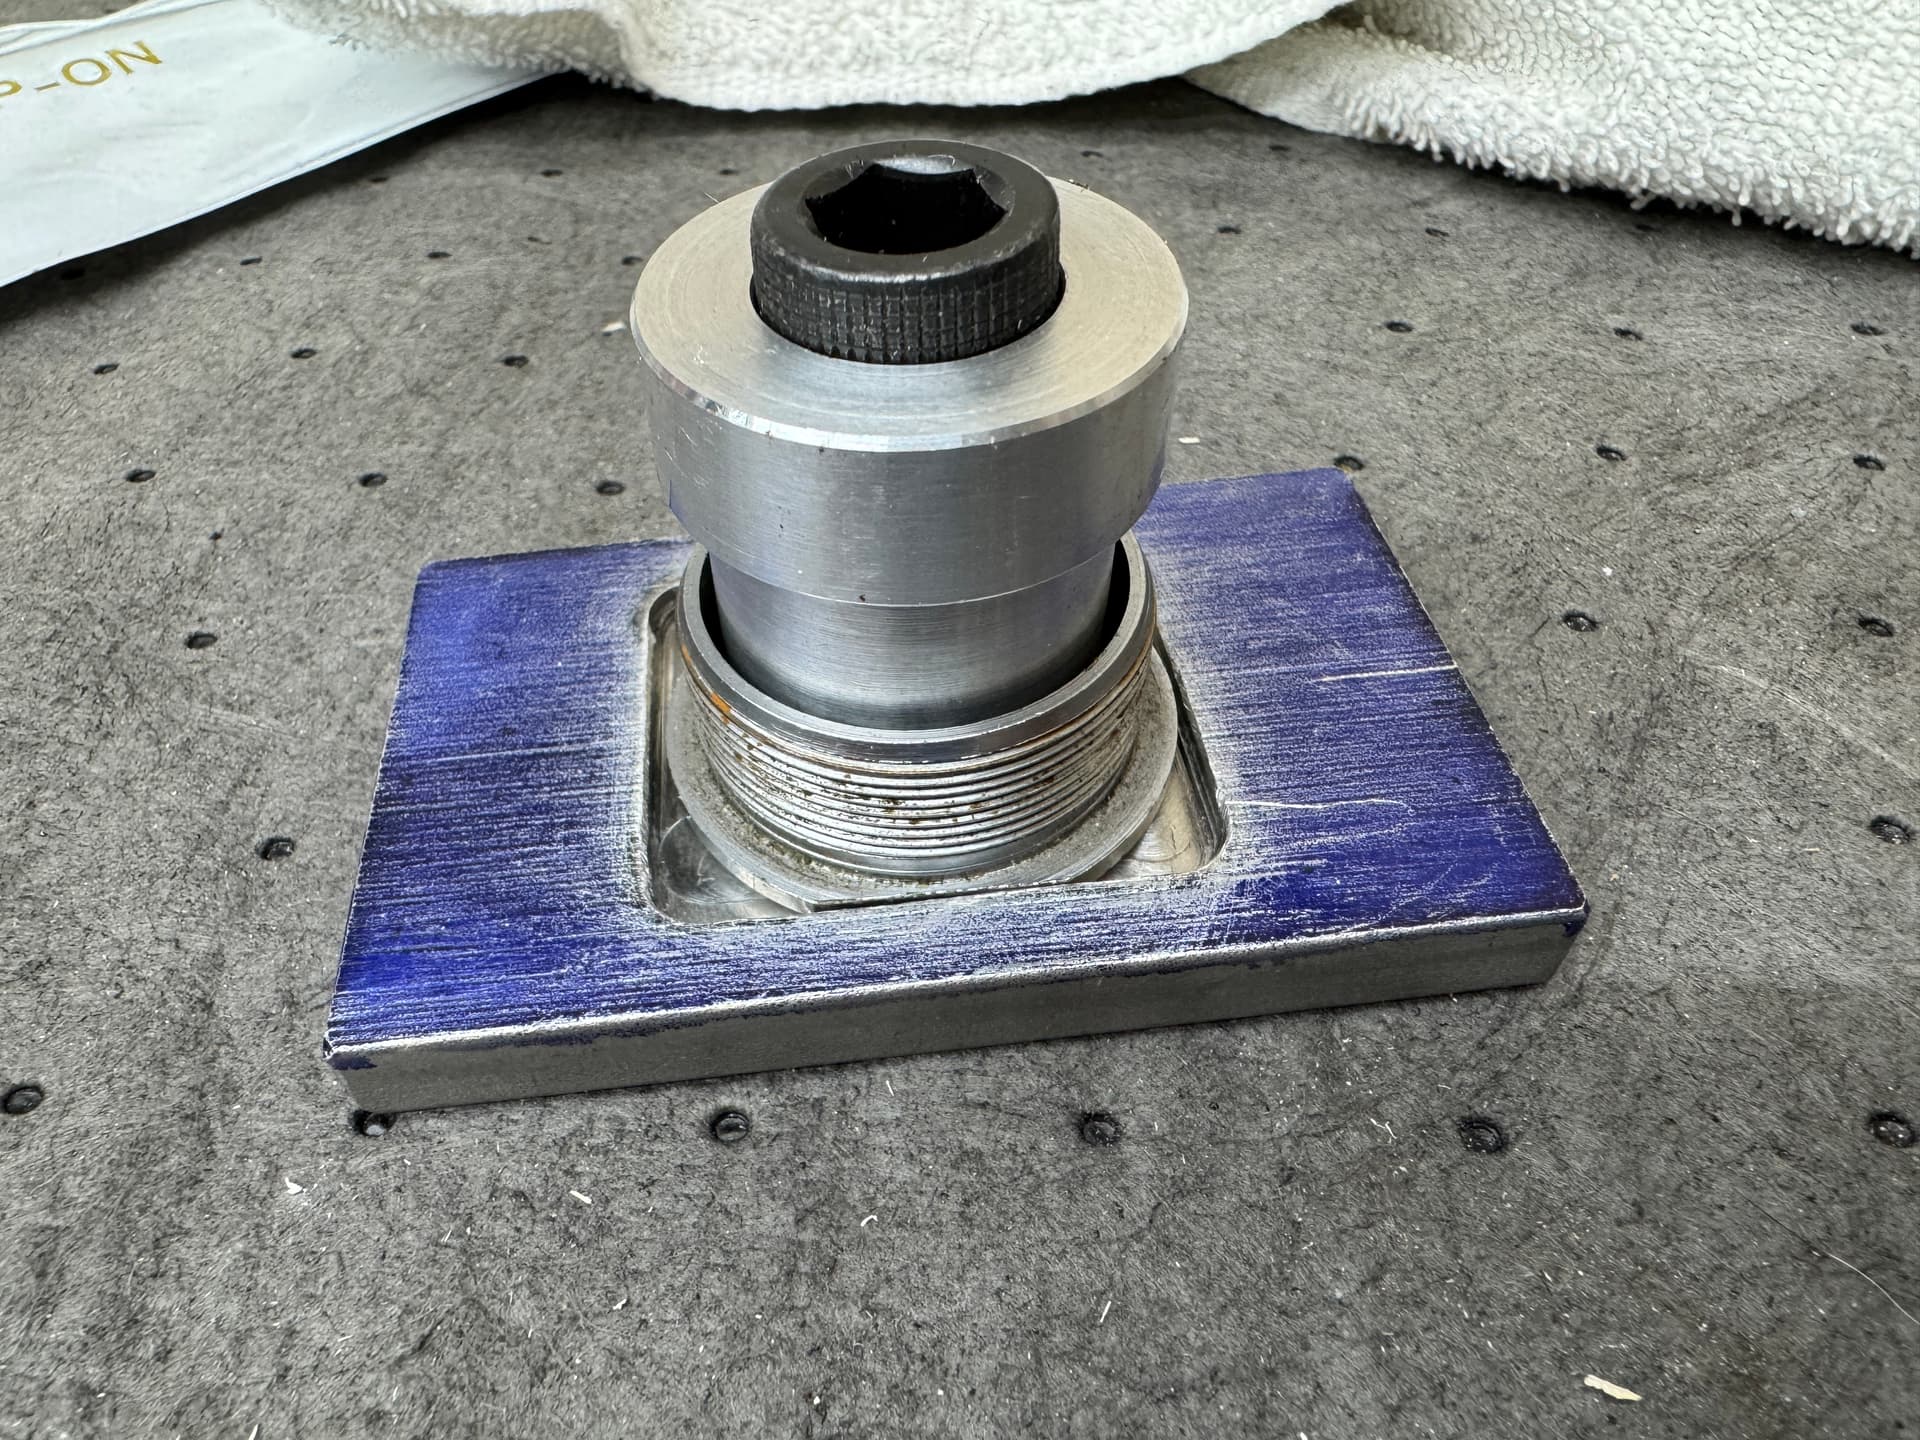
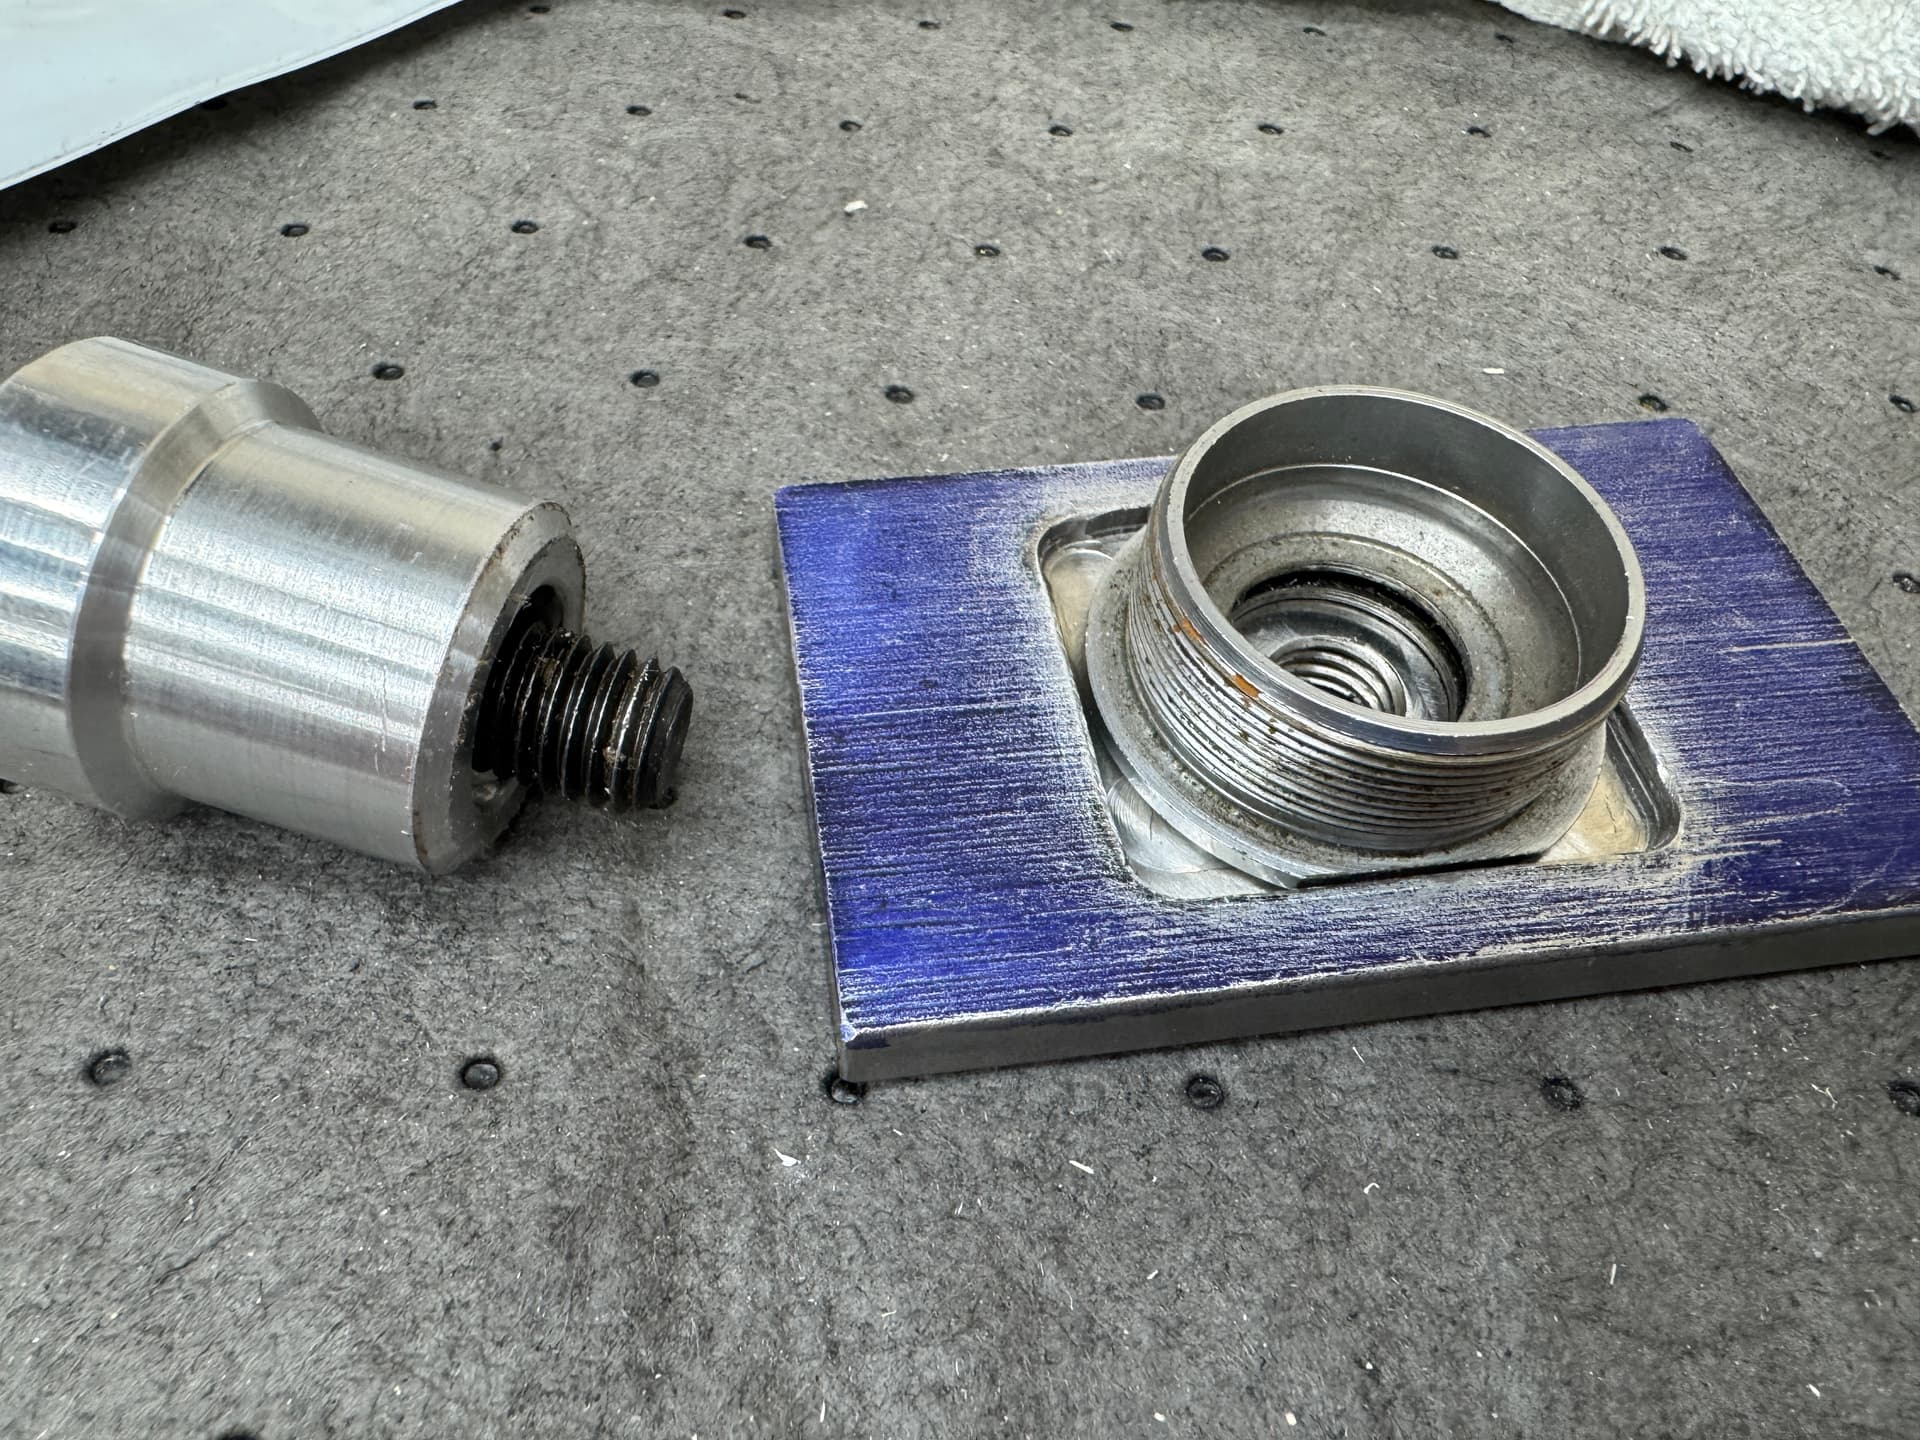
The BB post is wacky. Many years ago I got some sort of automobile suspension strut alignment fixture, made by K.O.Lee, looks to be 50 years old at least. The base of the K.O.Lee thing is about 80 lb of cast iron with a precision surface, which I use for my fork alignment table (that’s another story), but it also had this hardened and precision-ground post at one end, which I was able to modify to hold a bottom bracket perfectly. More precise and repeatable than even the Marchetti I’d used long ago. 1" diameter acme thread for the nut that holds the BB shell, way skookum. But it was too short, wouldn’t put the frame high enough off the table for the dropout to be above the surface.
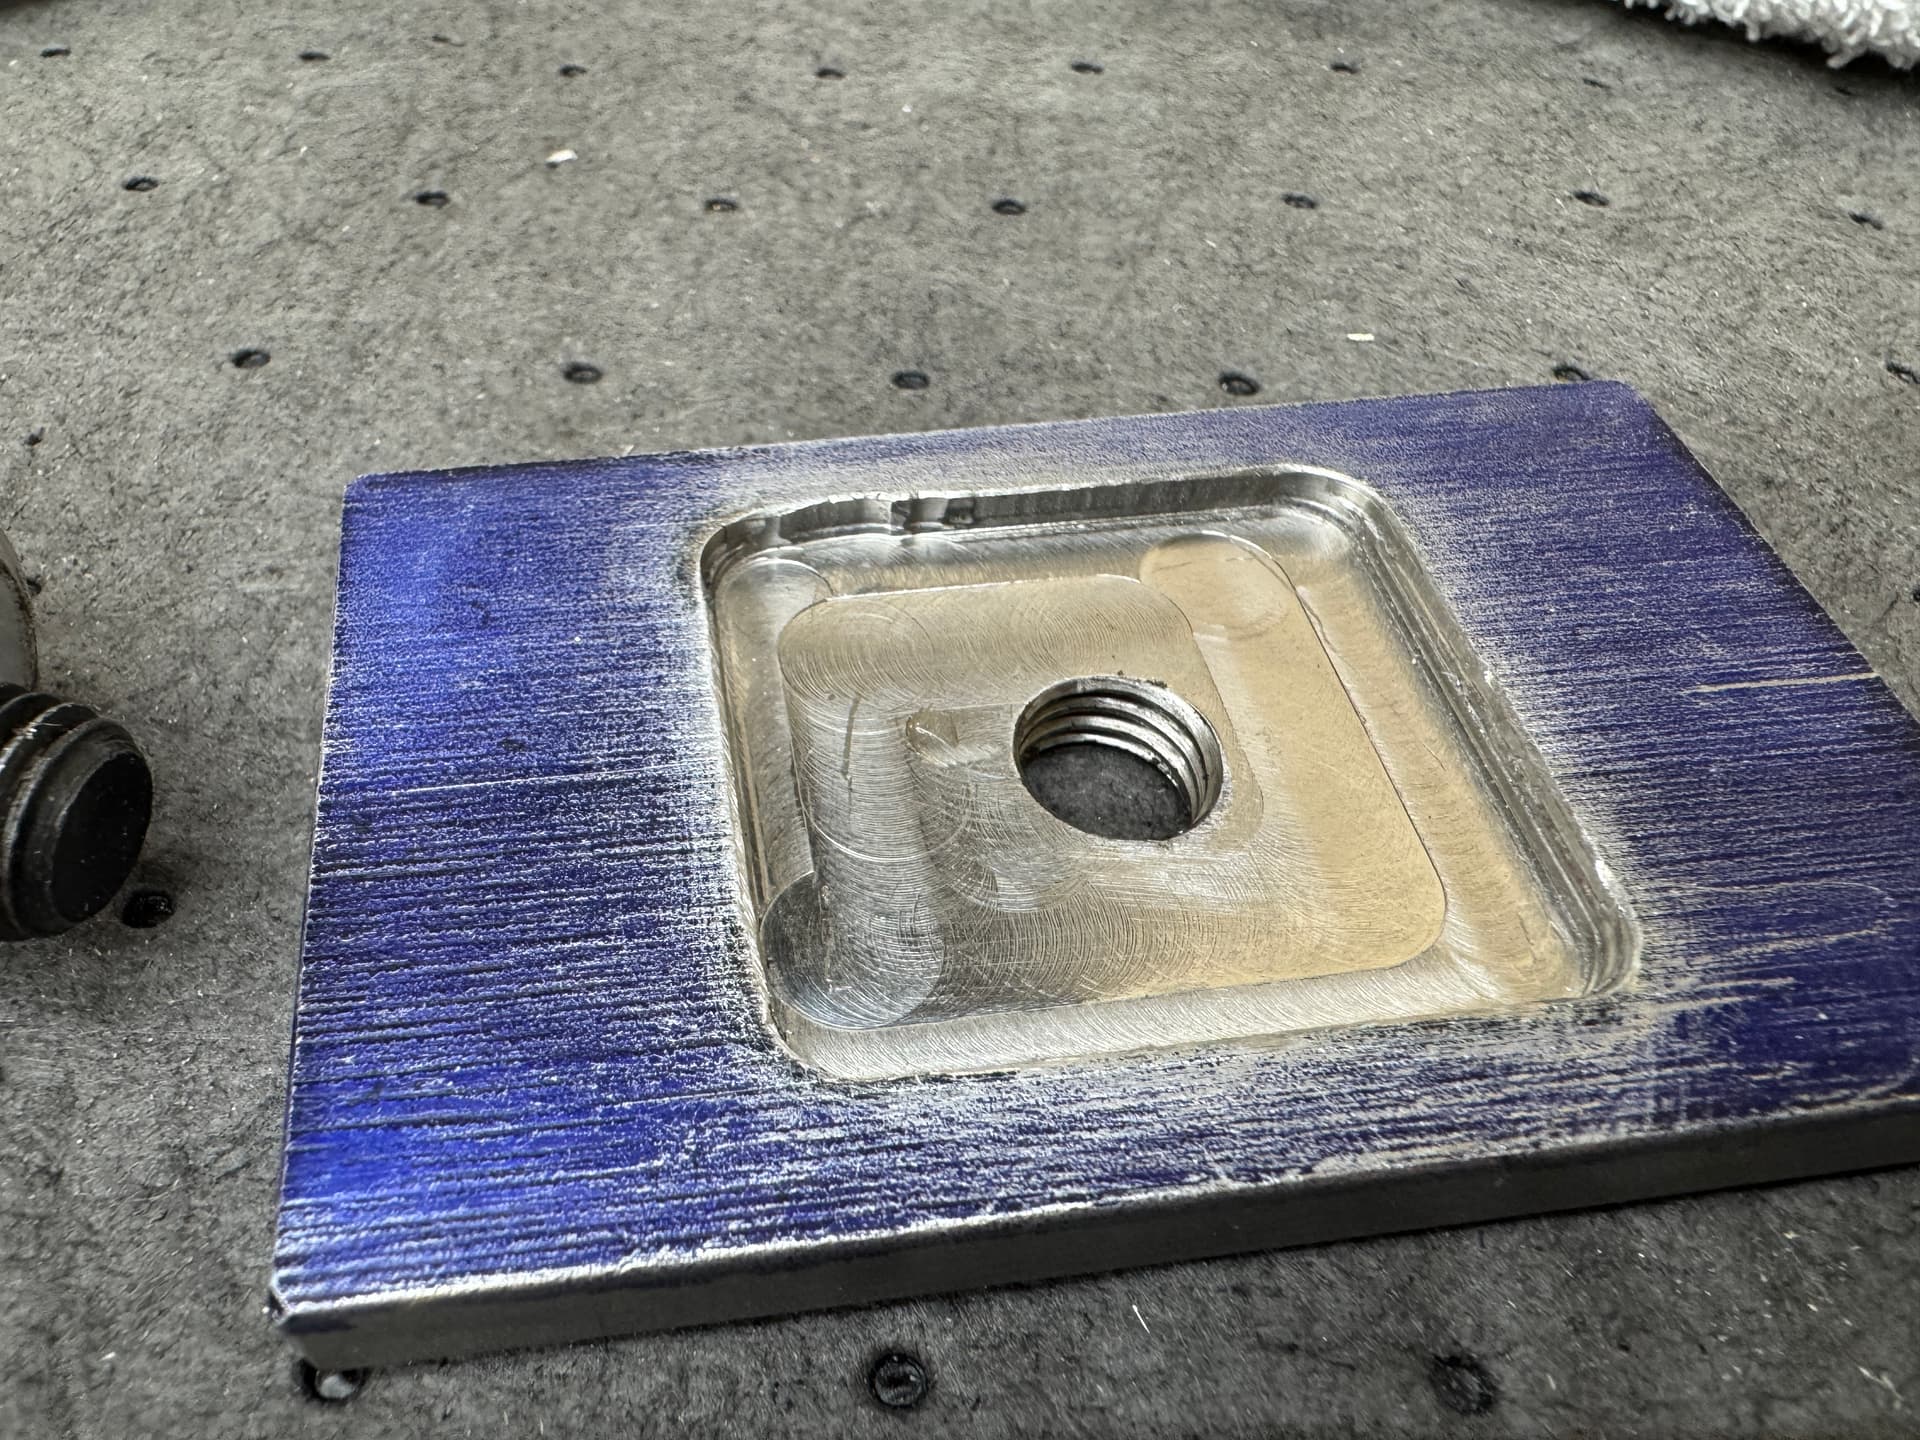
Then I realized my Taiwanese lathe came to me with a spare backing plate for mounting a chuck to the threaded spindle nose. I have enough chucks, don’t need this for the lathe, so it’s now part of my alignment table BB post — it’s the part with the large flange with 4 holes to bolt it down. But it had a 2-1/4" hole in the middle, with an 8 tpi thread, so I had to make an adapter to thread into that, with a 1" hole for the K.O.Lee post to attach to.
Making the adapter with an 8 tpi thread on my lathe was a bit nerve-wracking but fun. As I’m sure you know, threading up to a shoulder is always “interesting”, and such a coarse thread means the carriage is moving very rapidly towards crashing into the shoulder. And you have to do it over and over, taking only a shallow cut on each pass, due to the limitations of a benchtop lathe. But I got 'er did, no crashes (phew!) After assembly, I faced the bottom of the flange in the lathe, holding the K.O.Lee thing in the 4-jaw, so I know the axis of my post is very normal (perpendicular) to the bottom of the flange.
In the pic, the BBpost is held on with a C-clamp as a mockup, trying to decide where to put it. That Park stand base isn’t large enough really, but that’s a plus for my tiny shop, and I can move the frame around to get this or that into a good place for measuring. I may make multiple sets of 4 threaded holes to bolt down the post various places. With an air-ratchet, moving the post to another position will take about a minute.
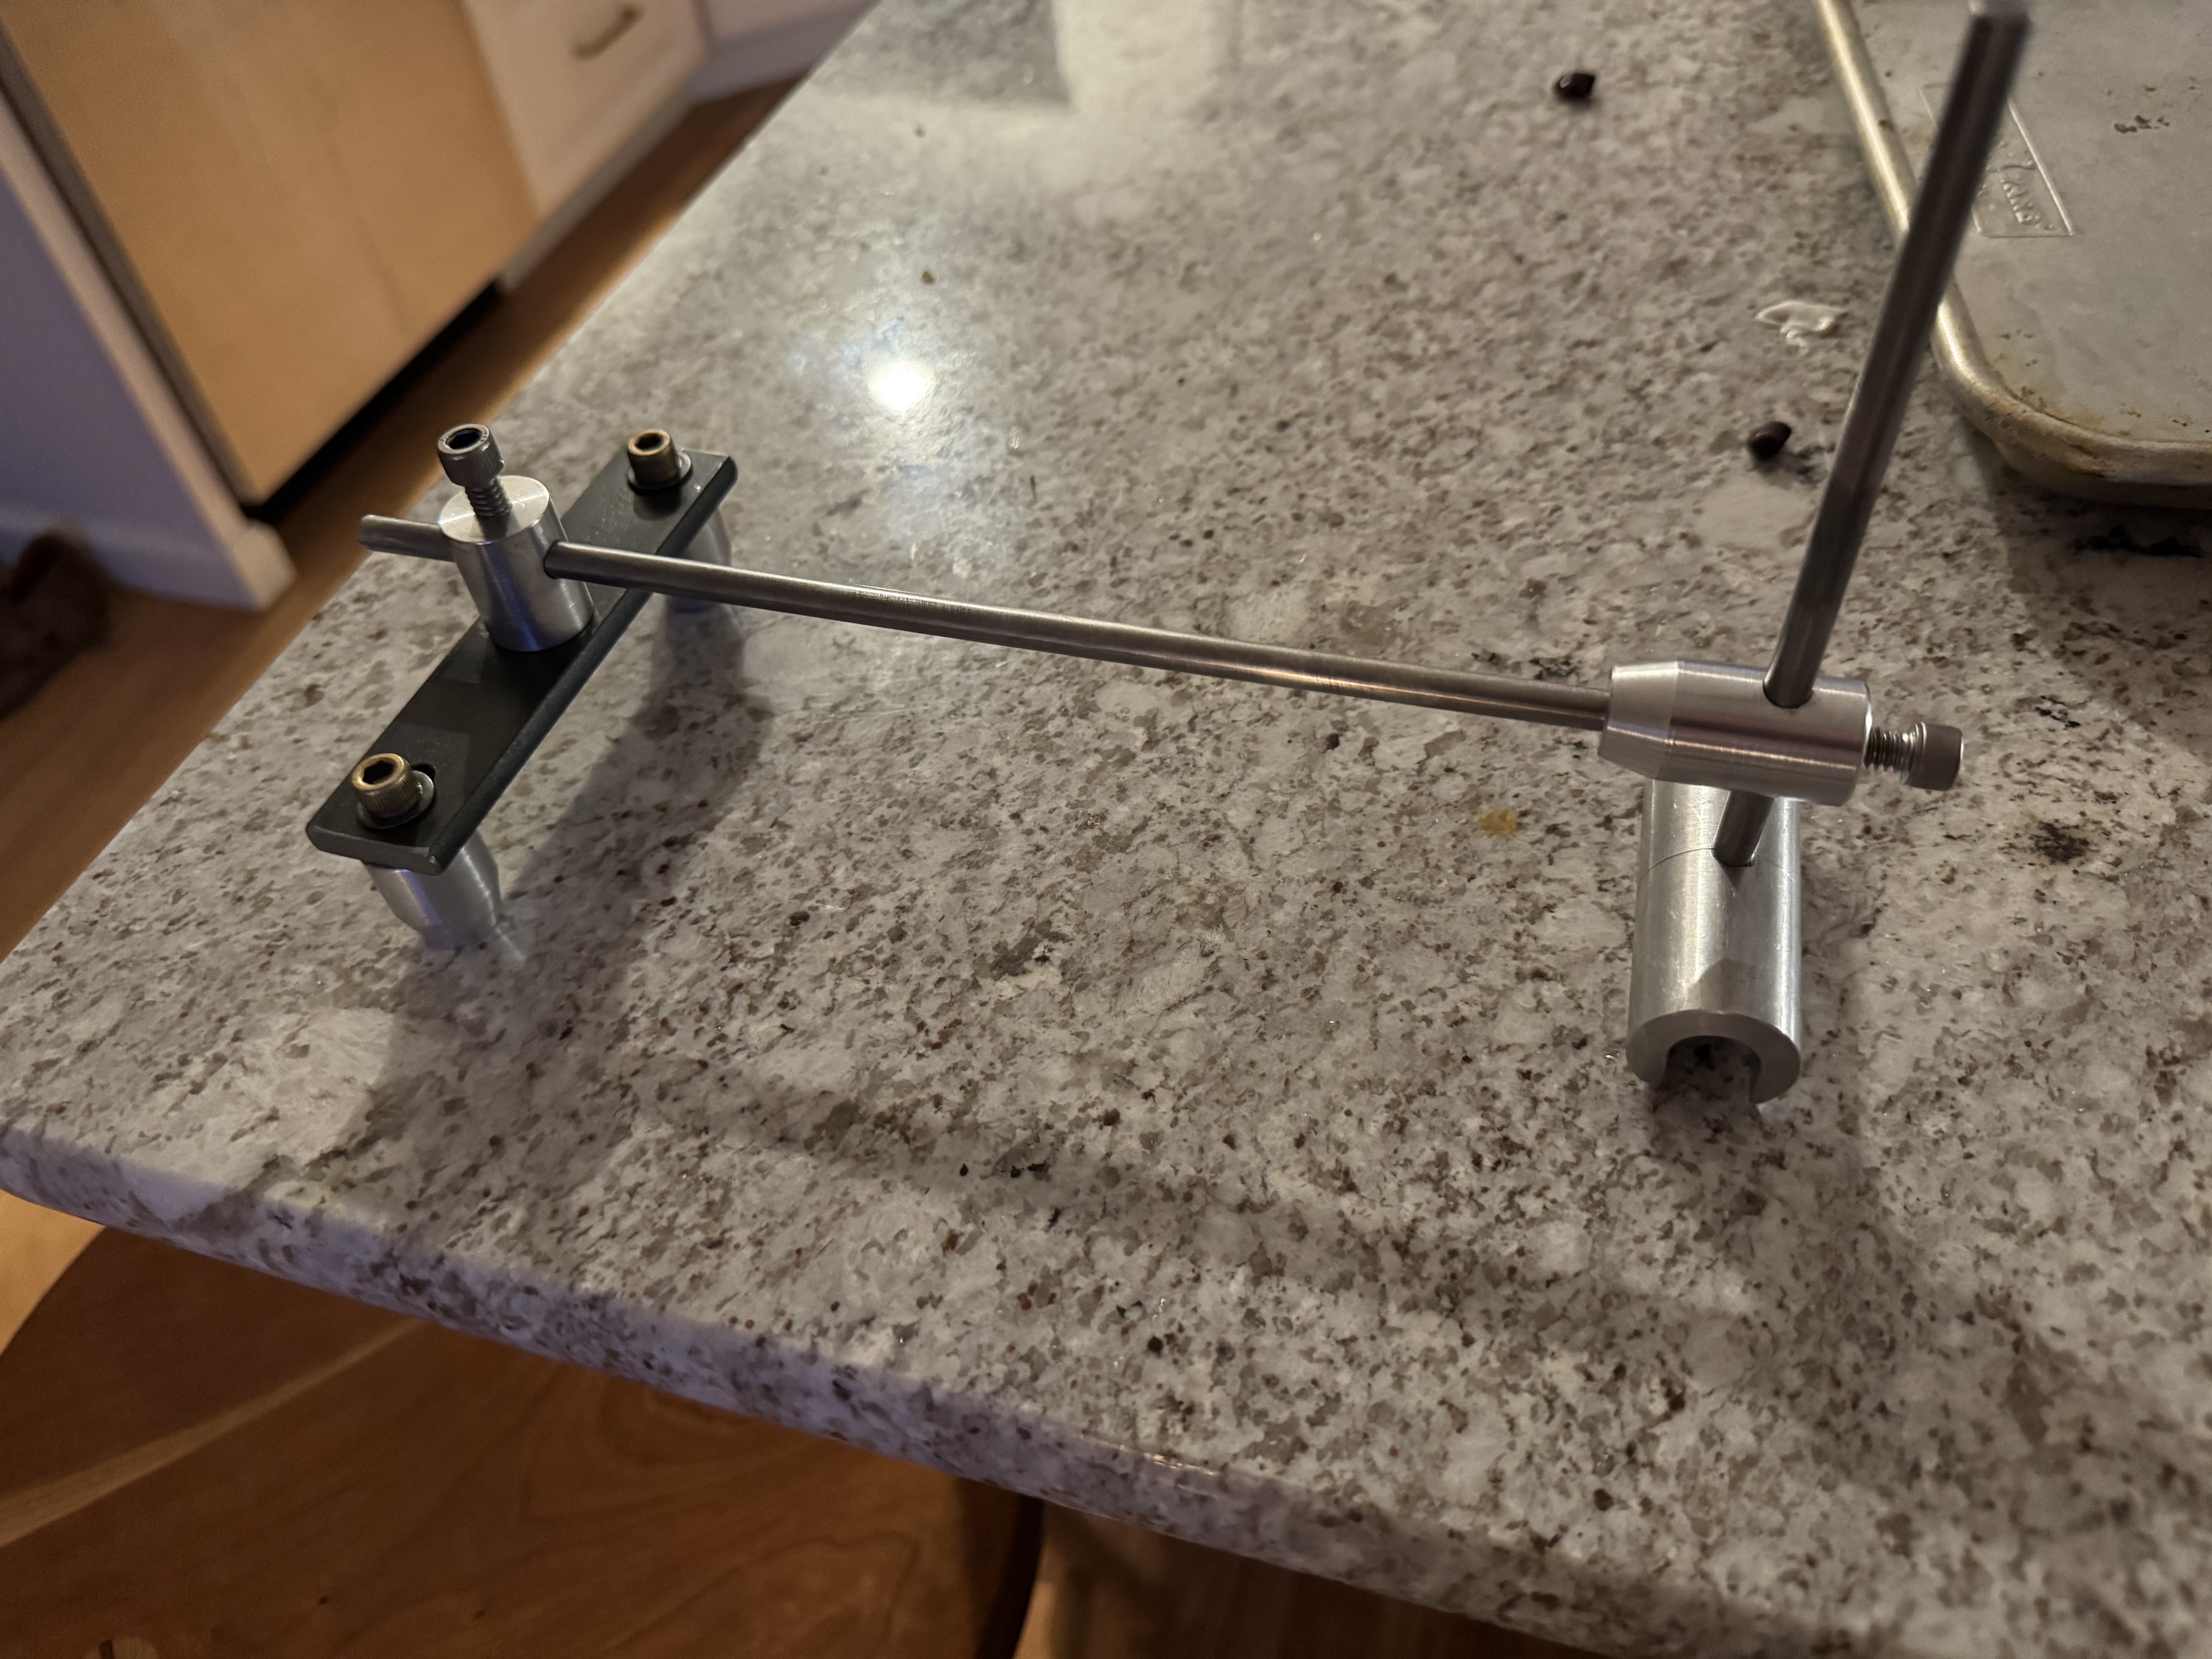
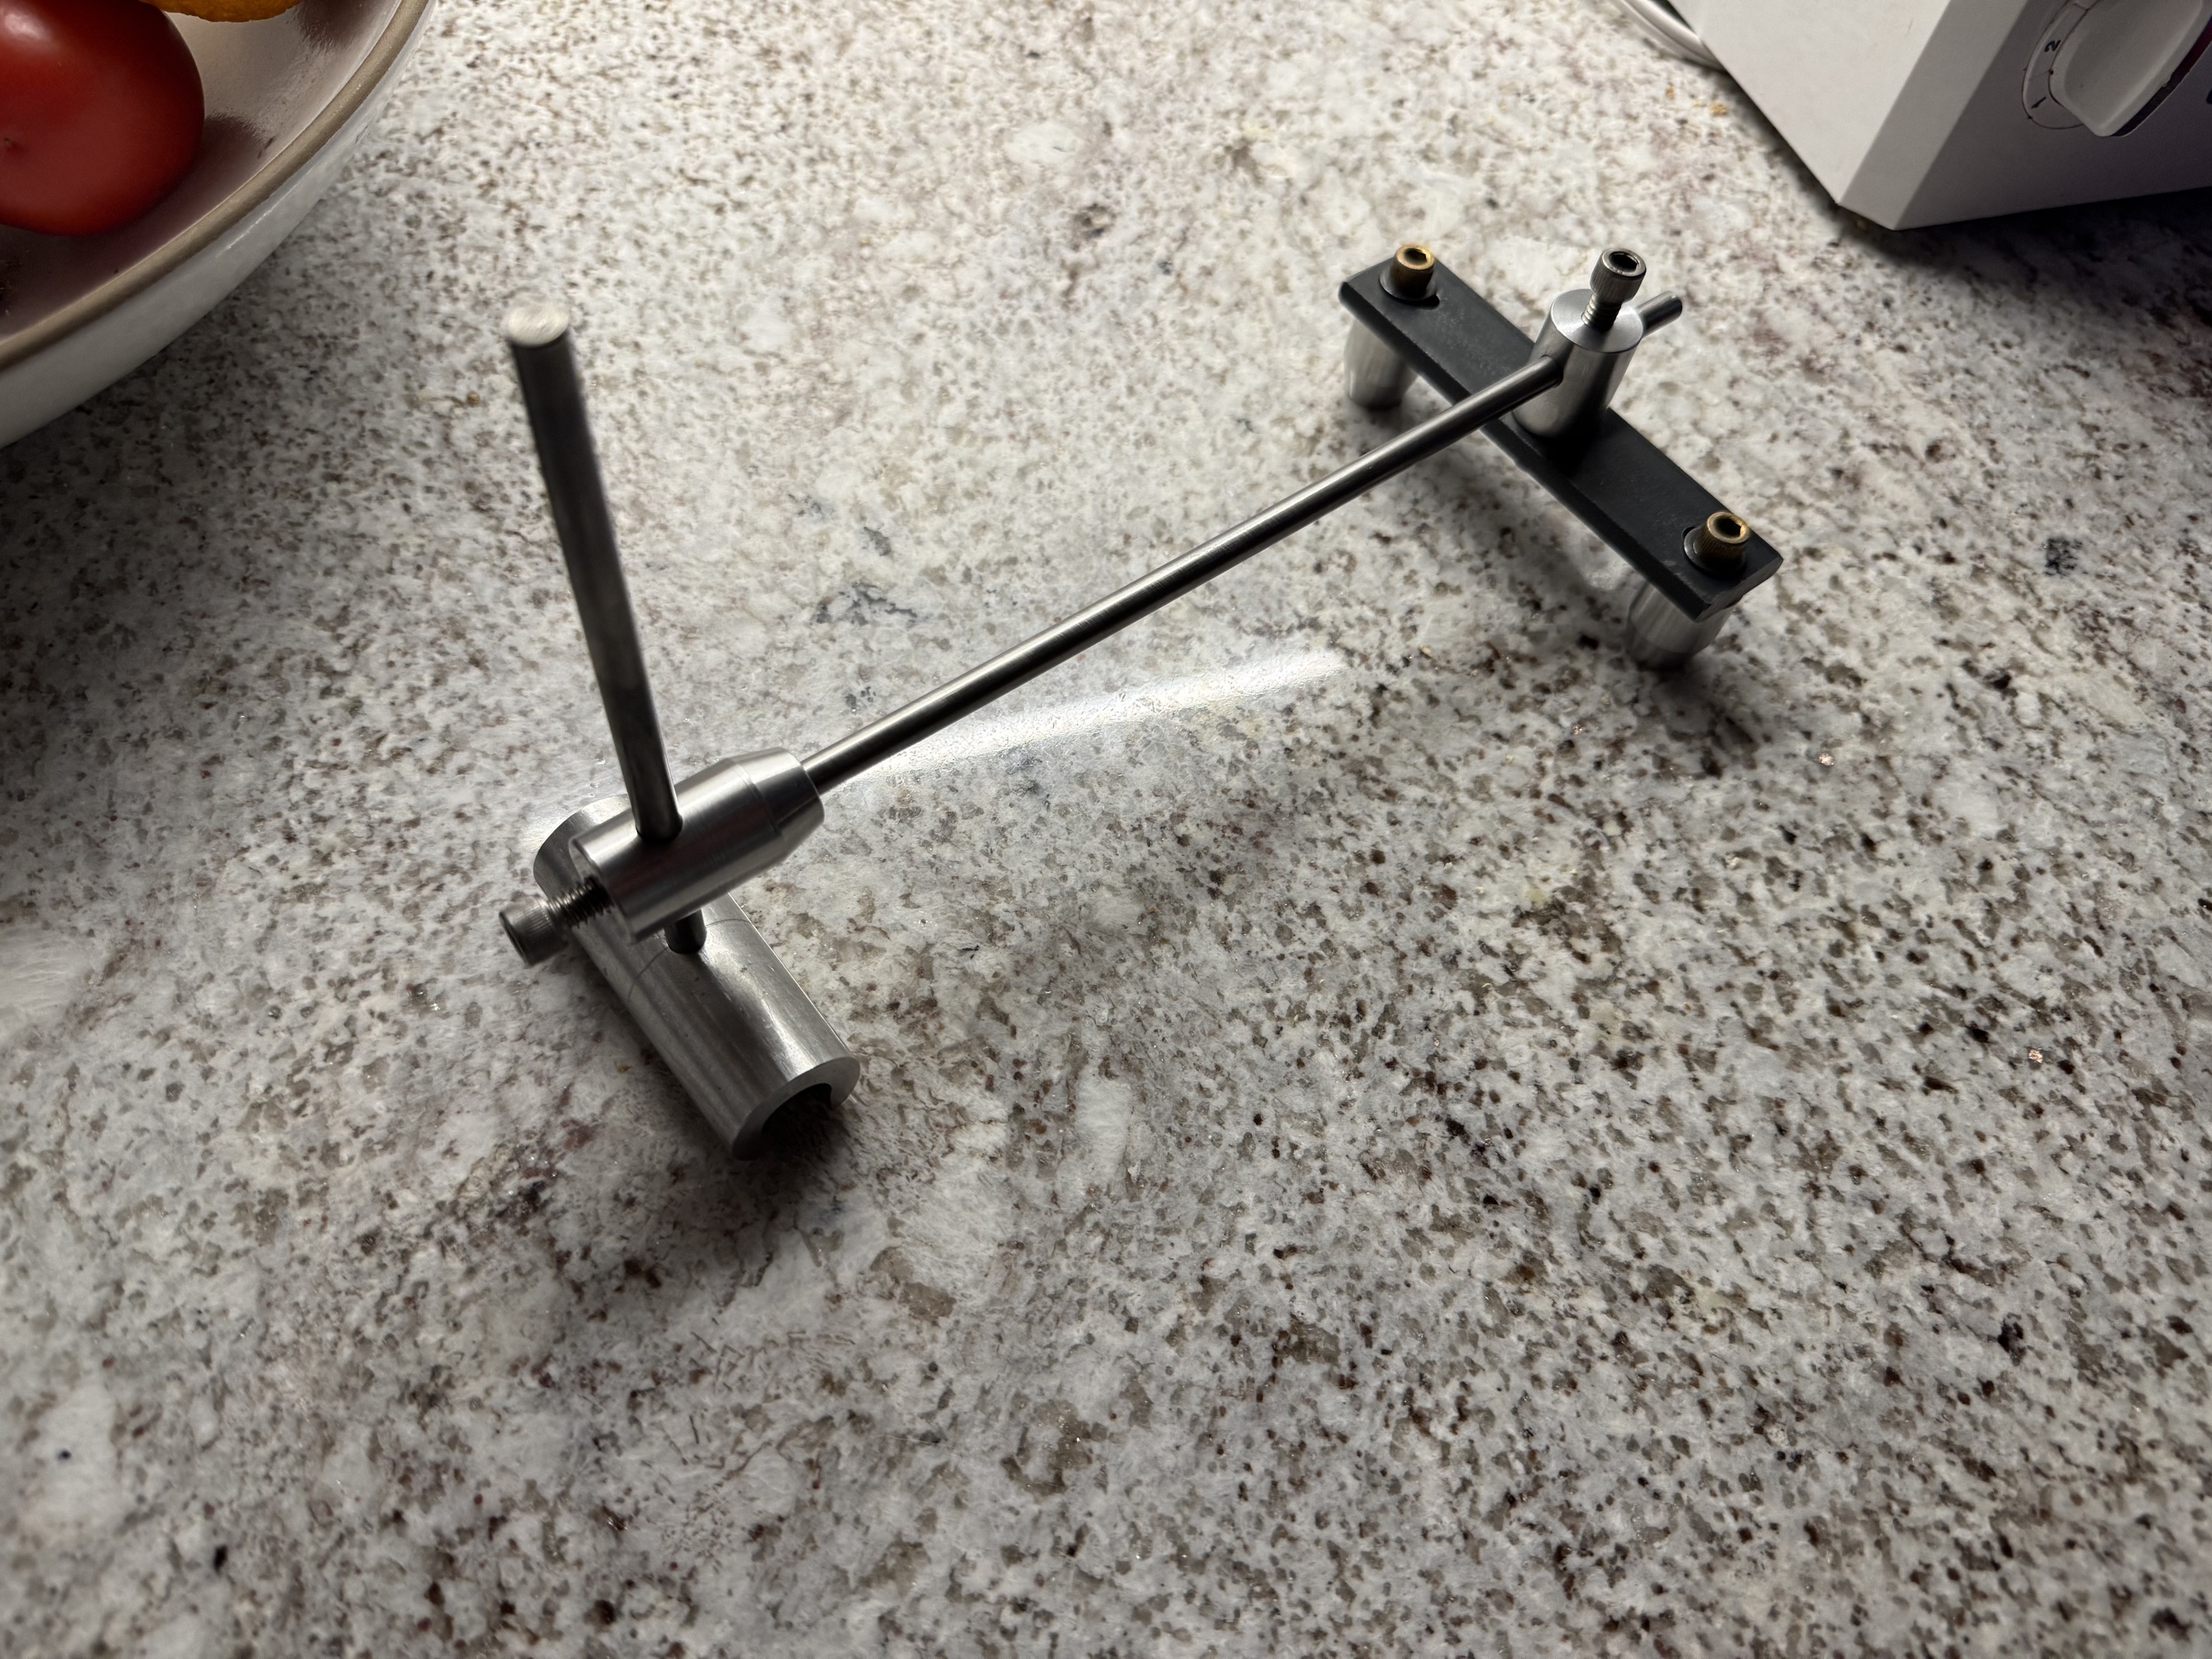
Here’s my rear triangle checking doodad, machined long ago by Alex Wetmore I believe, on his hobby-sized CNC mill in his basement (Alex can confirm or deny this). Later ones were made by Hahn Rossman, this may be one of those. Handy and clever. (That refers to the tool, and to Alex and Hahn!)
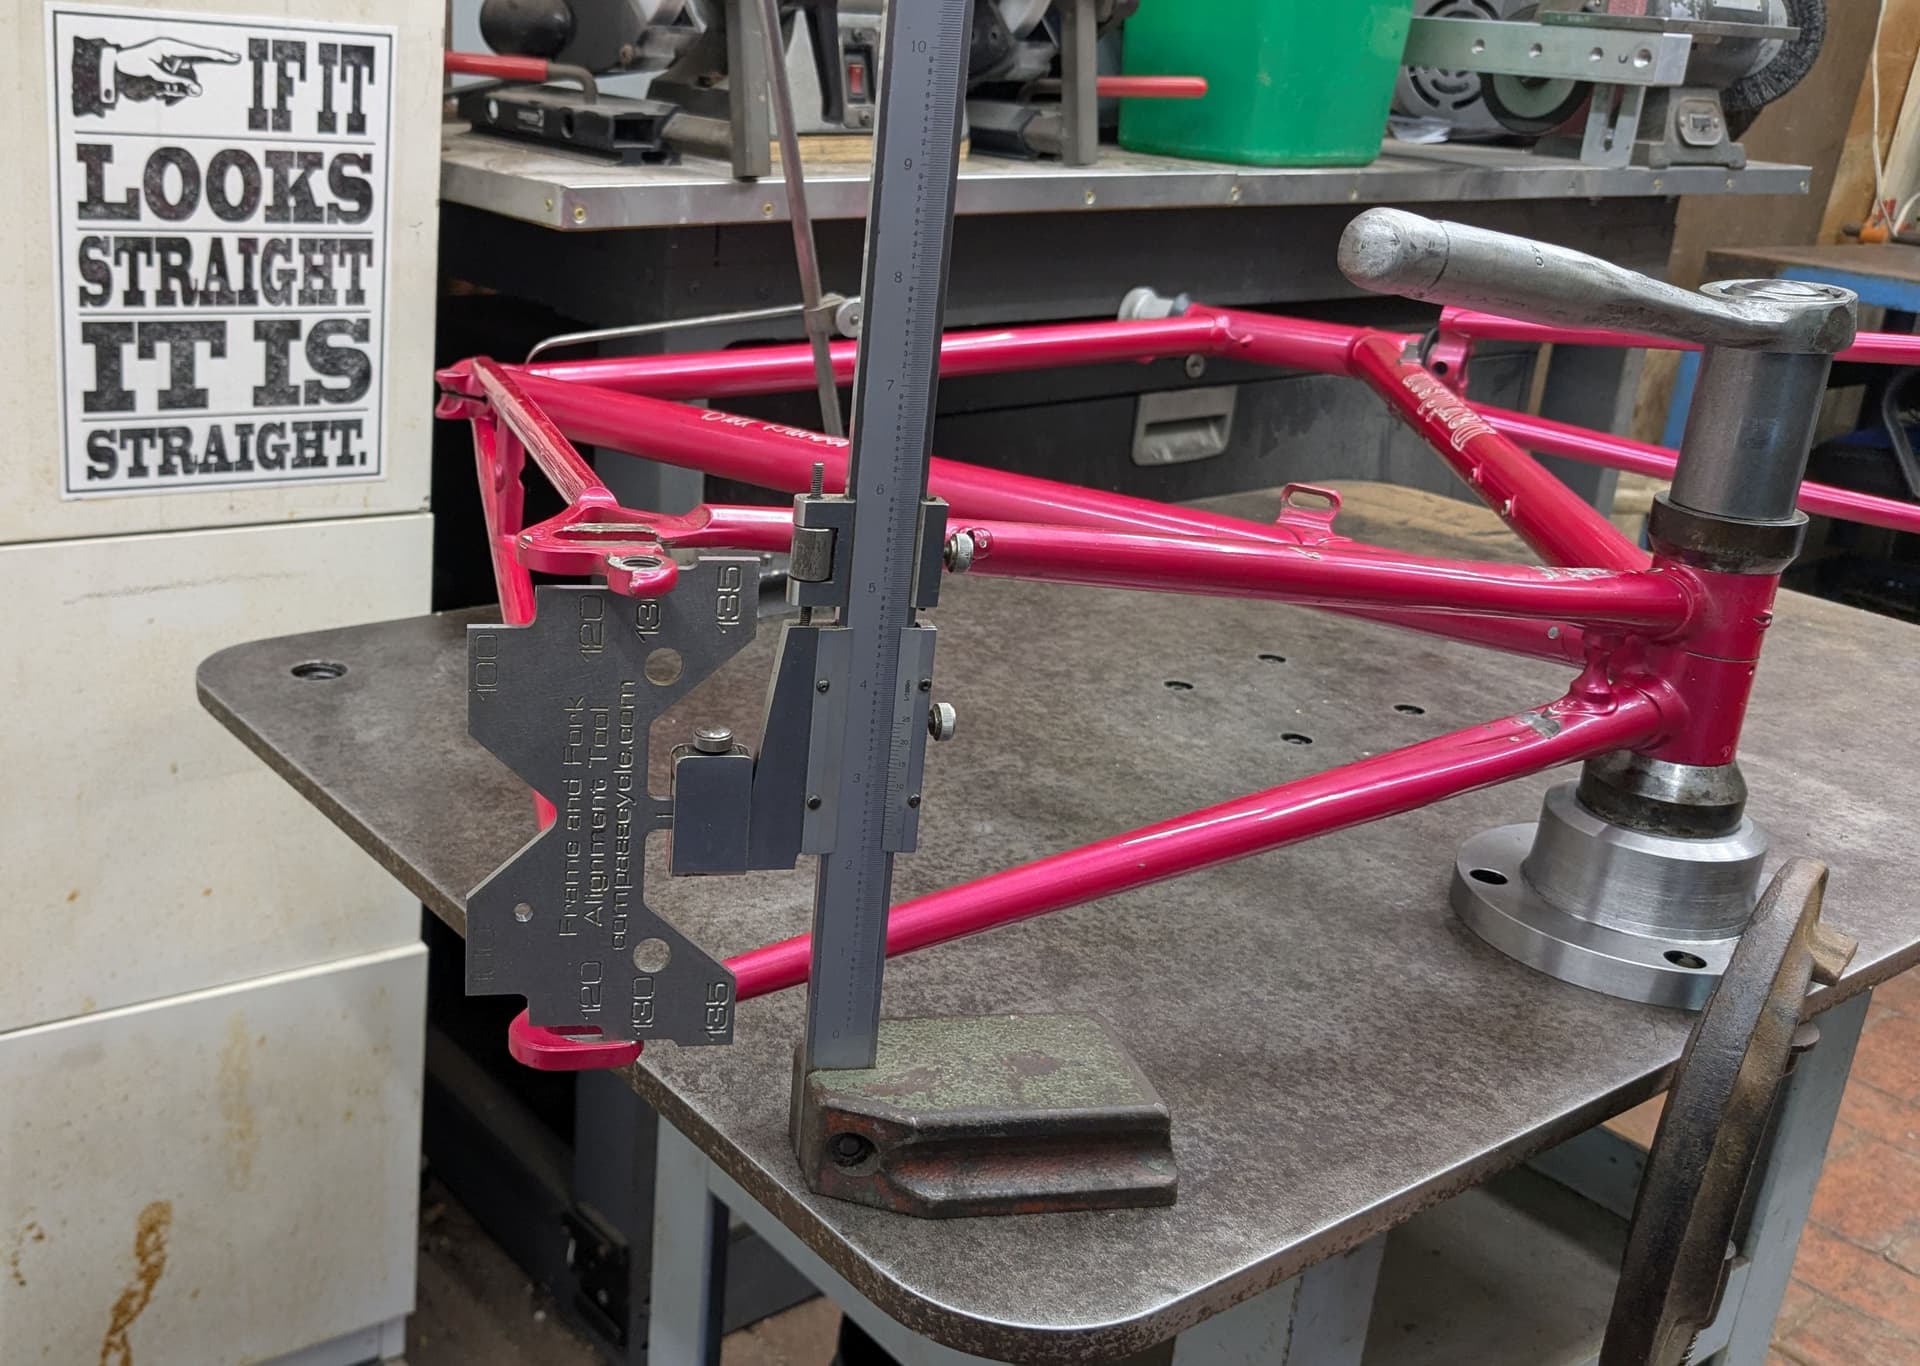
The “If It Looks Straight…” poster is by Jimmy Diresta.
You can also see the vintage Brown & Sharpe height gauge in the background, with a sharp point touching the seat tube. I might succumb to the siren-call of a dial-indicator instead of that scratch gauge, if only to not scratch the paint when checking a painted frame, but a scratch gauge is a very fast and easy to use method when you don’t need a number, you just need 4 points on the frame to be the same height. The vee on the Wetmore/Rossman doodad will also do the same thing, so I may just use that, though it needs better eyesight (and/or brighter shop lights).
Still remaining to be made:
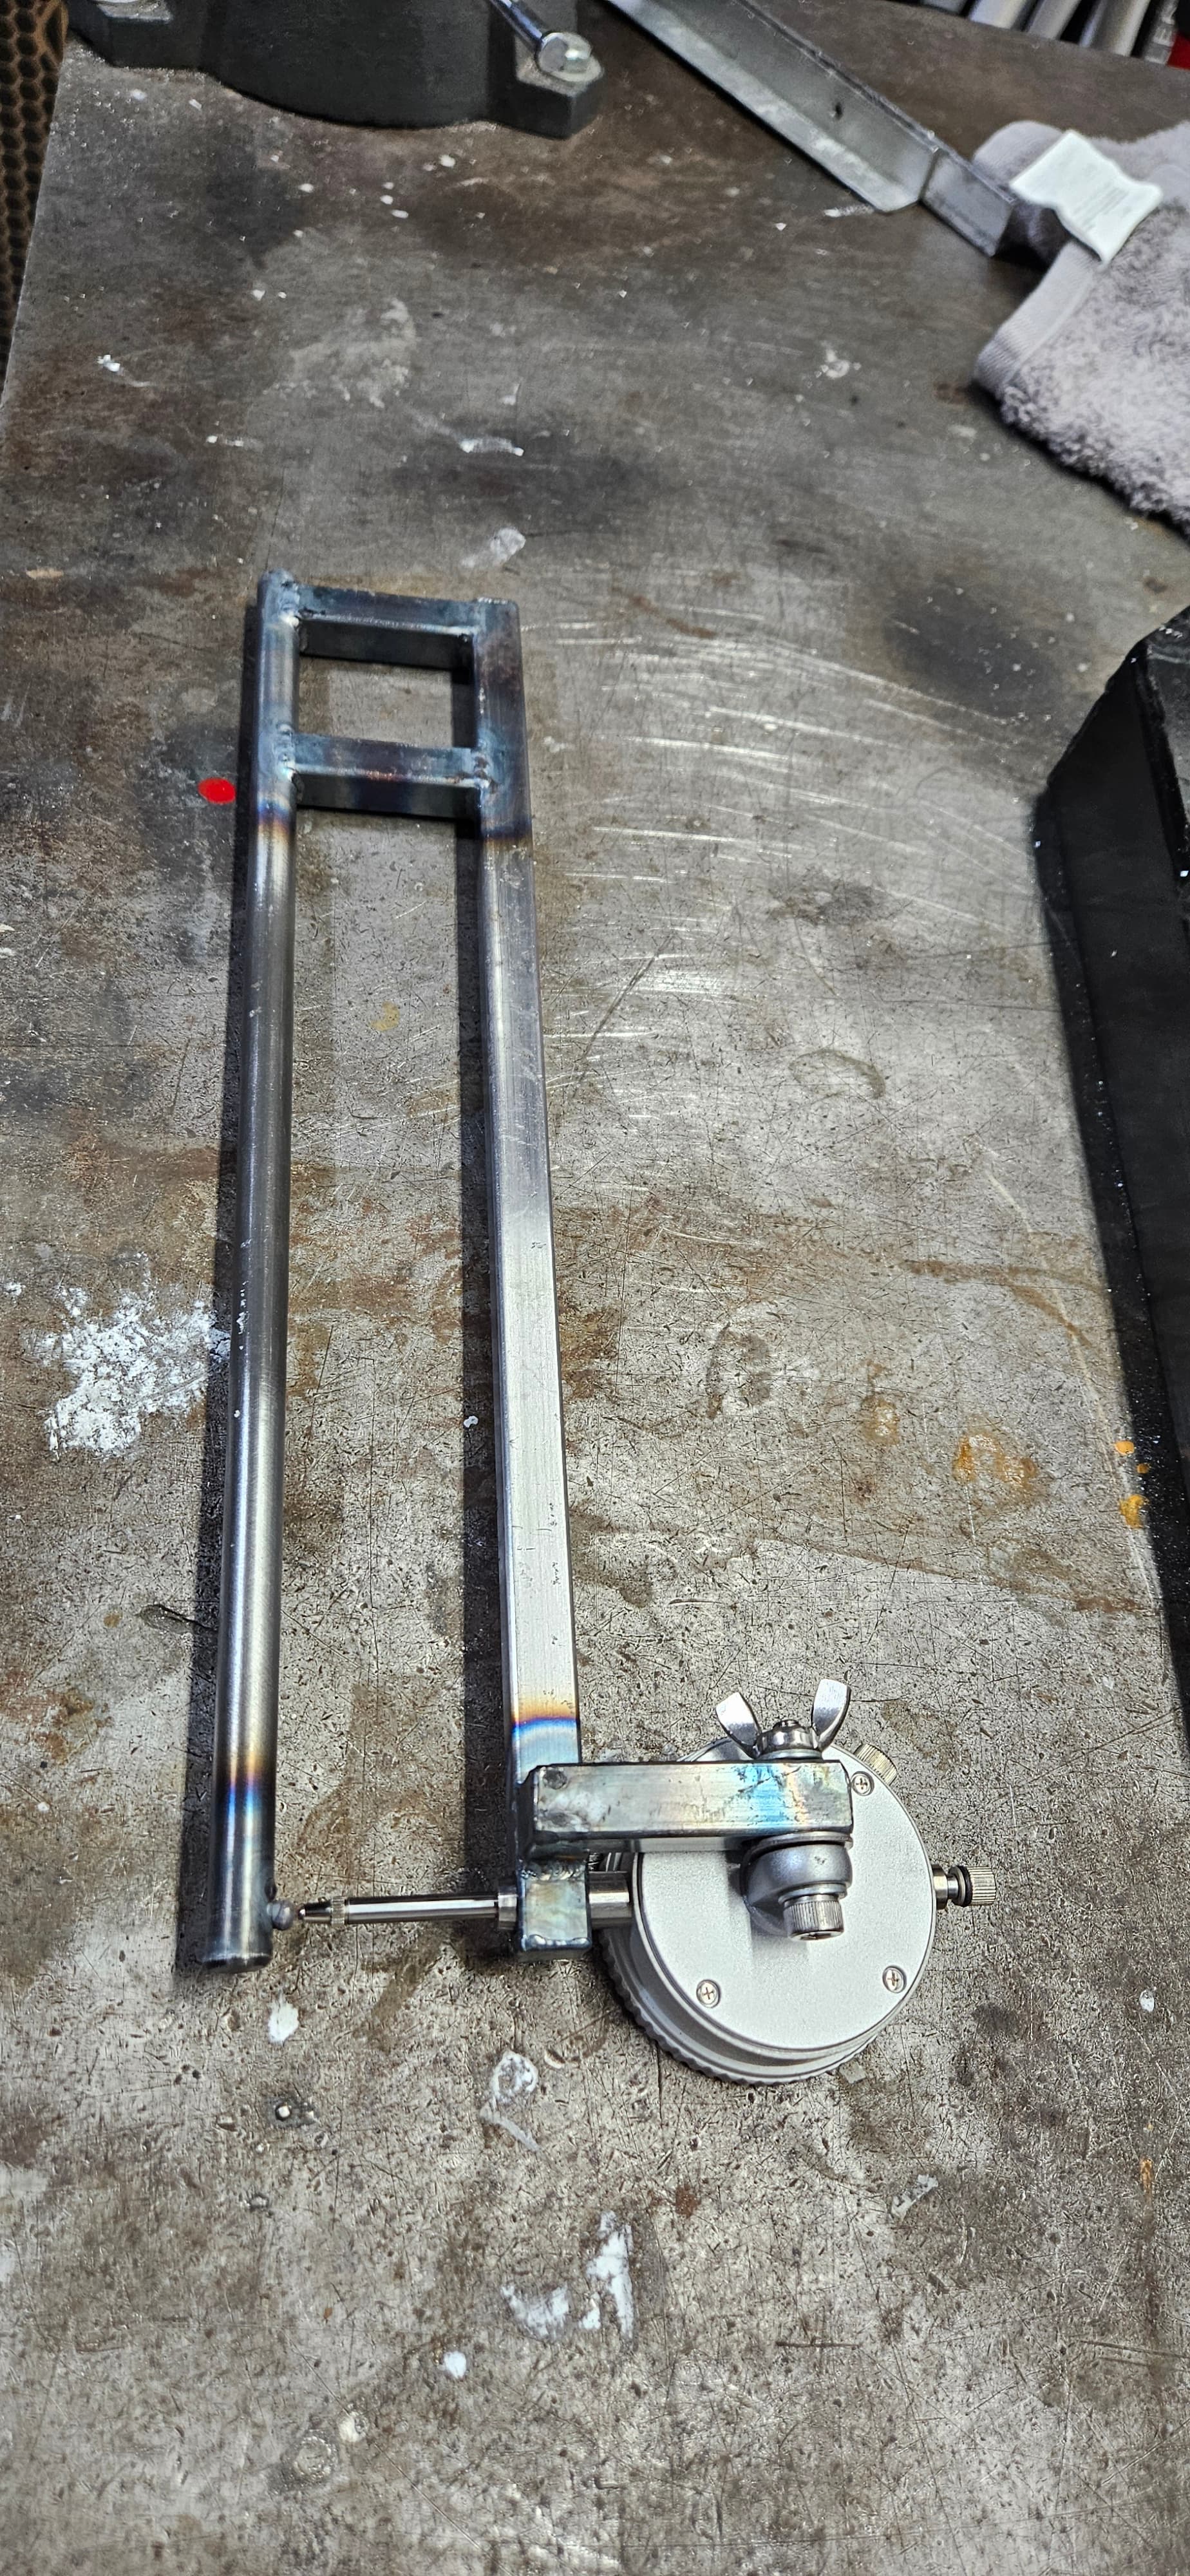
(1) a datum to measure HT twist. I will use a 1-1/8" tube, since my ST is also 1-1/8", so the 4 points I measure to check for twist are all the same height, no math required. The tube will be locked in to the HT by collars with a slight taper and slits, so the collar clamps down on the tube when you force it into the HT. Here’s one I made, just need to make the second one:
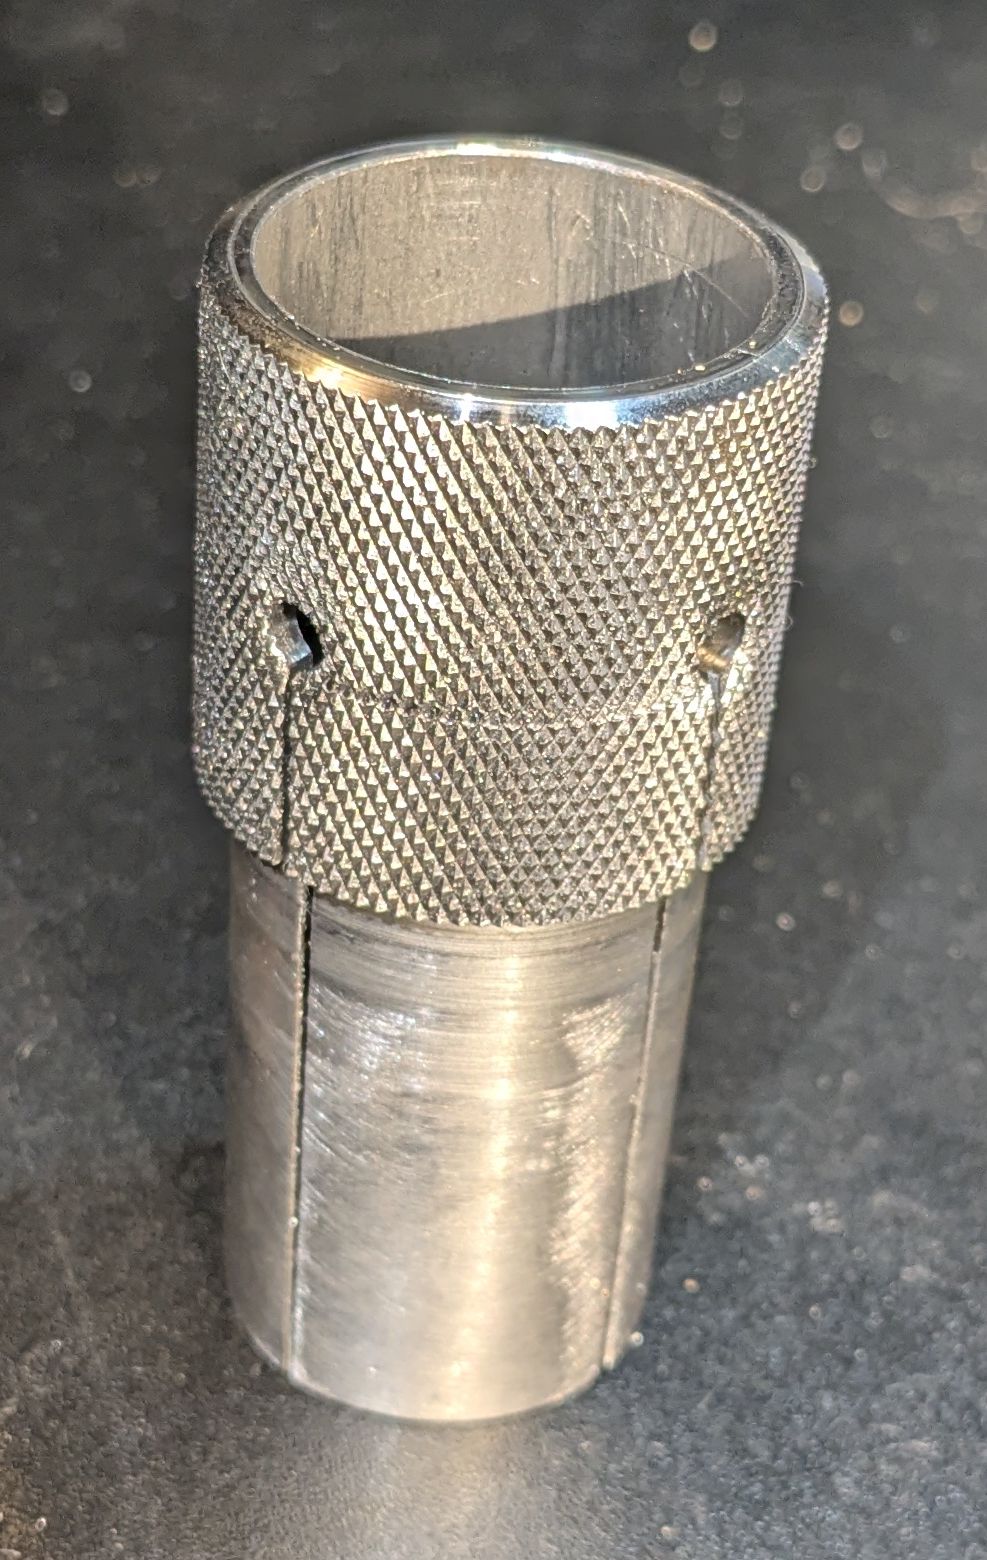
I was designing it as I built it (git 'er done!), decided it needed to be longer, so knurling after the slits and relief holes were already there messed up the knurl a bit, but I can live with that. I tested it and it locks onto the tube very strongly
(2) I need to make a “jack” or fulcrum that you put under one end to hold it that height off the table while you apply bending leverage to the other end. Probably with a curved plastic pad at the top to be gentle on the frame. Acetal or HDPE, whatever I have in the junkpile. Actually will make two jacks, one each for the ST and the HT.
Yeah I know, you just “weld 'em straight” and never do any post-weld alignment. Good for you. Me, I often want to improve the alignment a little, and since I only want to make vintage style bikes with small diameter tubing, I know for a fact I can align them without kinking. I have cold-set at least a thousand frames, many of them with 0.4 mm heat-treated tubes and even a few with 0.3 mm. And I’m set in my ways, so don’t bother trying to talk me out of it. I’m also well aware of the pros and cons of a BB post as datum versus using bench centers to hold the frame by the head tube, so we can discuss that if you want, but I’m not changing course at this point. I know the workarounds for the problems with a BB as datum.
Now I have to make friends with someone who has a mag-drill, for putting holes in this plate to bolt down the BB post. I can drill 1/2" holes with a hand drill but it’s not easy for this old fart, hoping to avoid that, especially if I want 2 or 3 places that I can locate the post, to get around the limitations of the small surface area. For example I might need it all the way in a corner to reach both ends of the HT datum on frames with a long front-center, but then the rear triangle will be fully off the table, no way to measure it without moving the frame.
I’ll let you know how it goes after I’ve actually tried it.
11 Likes
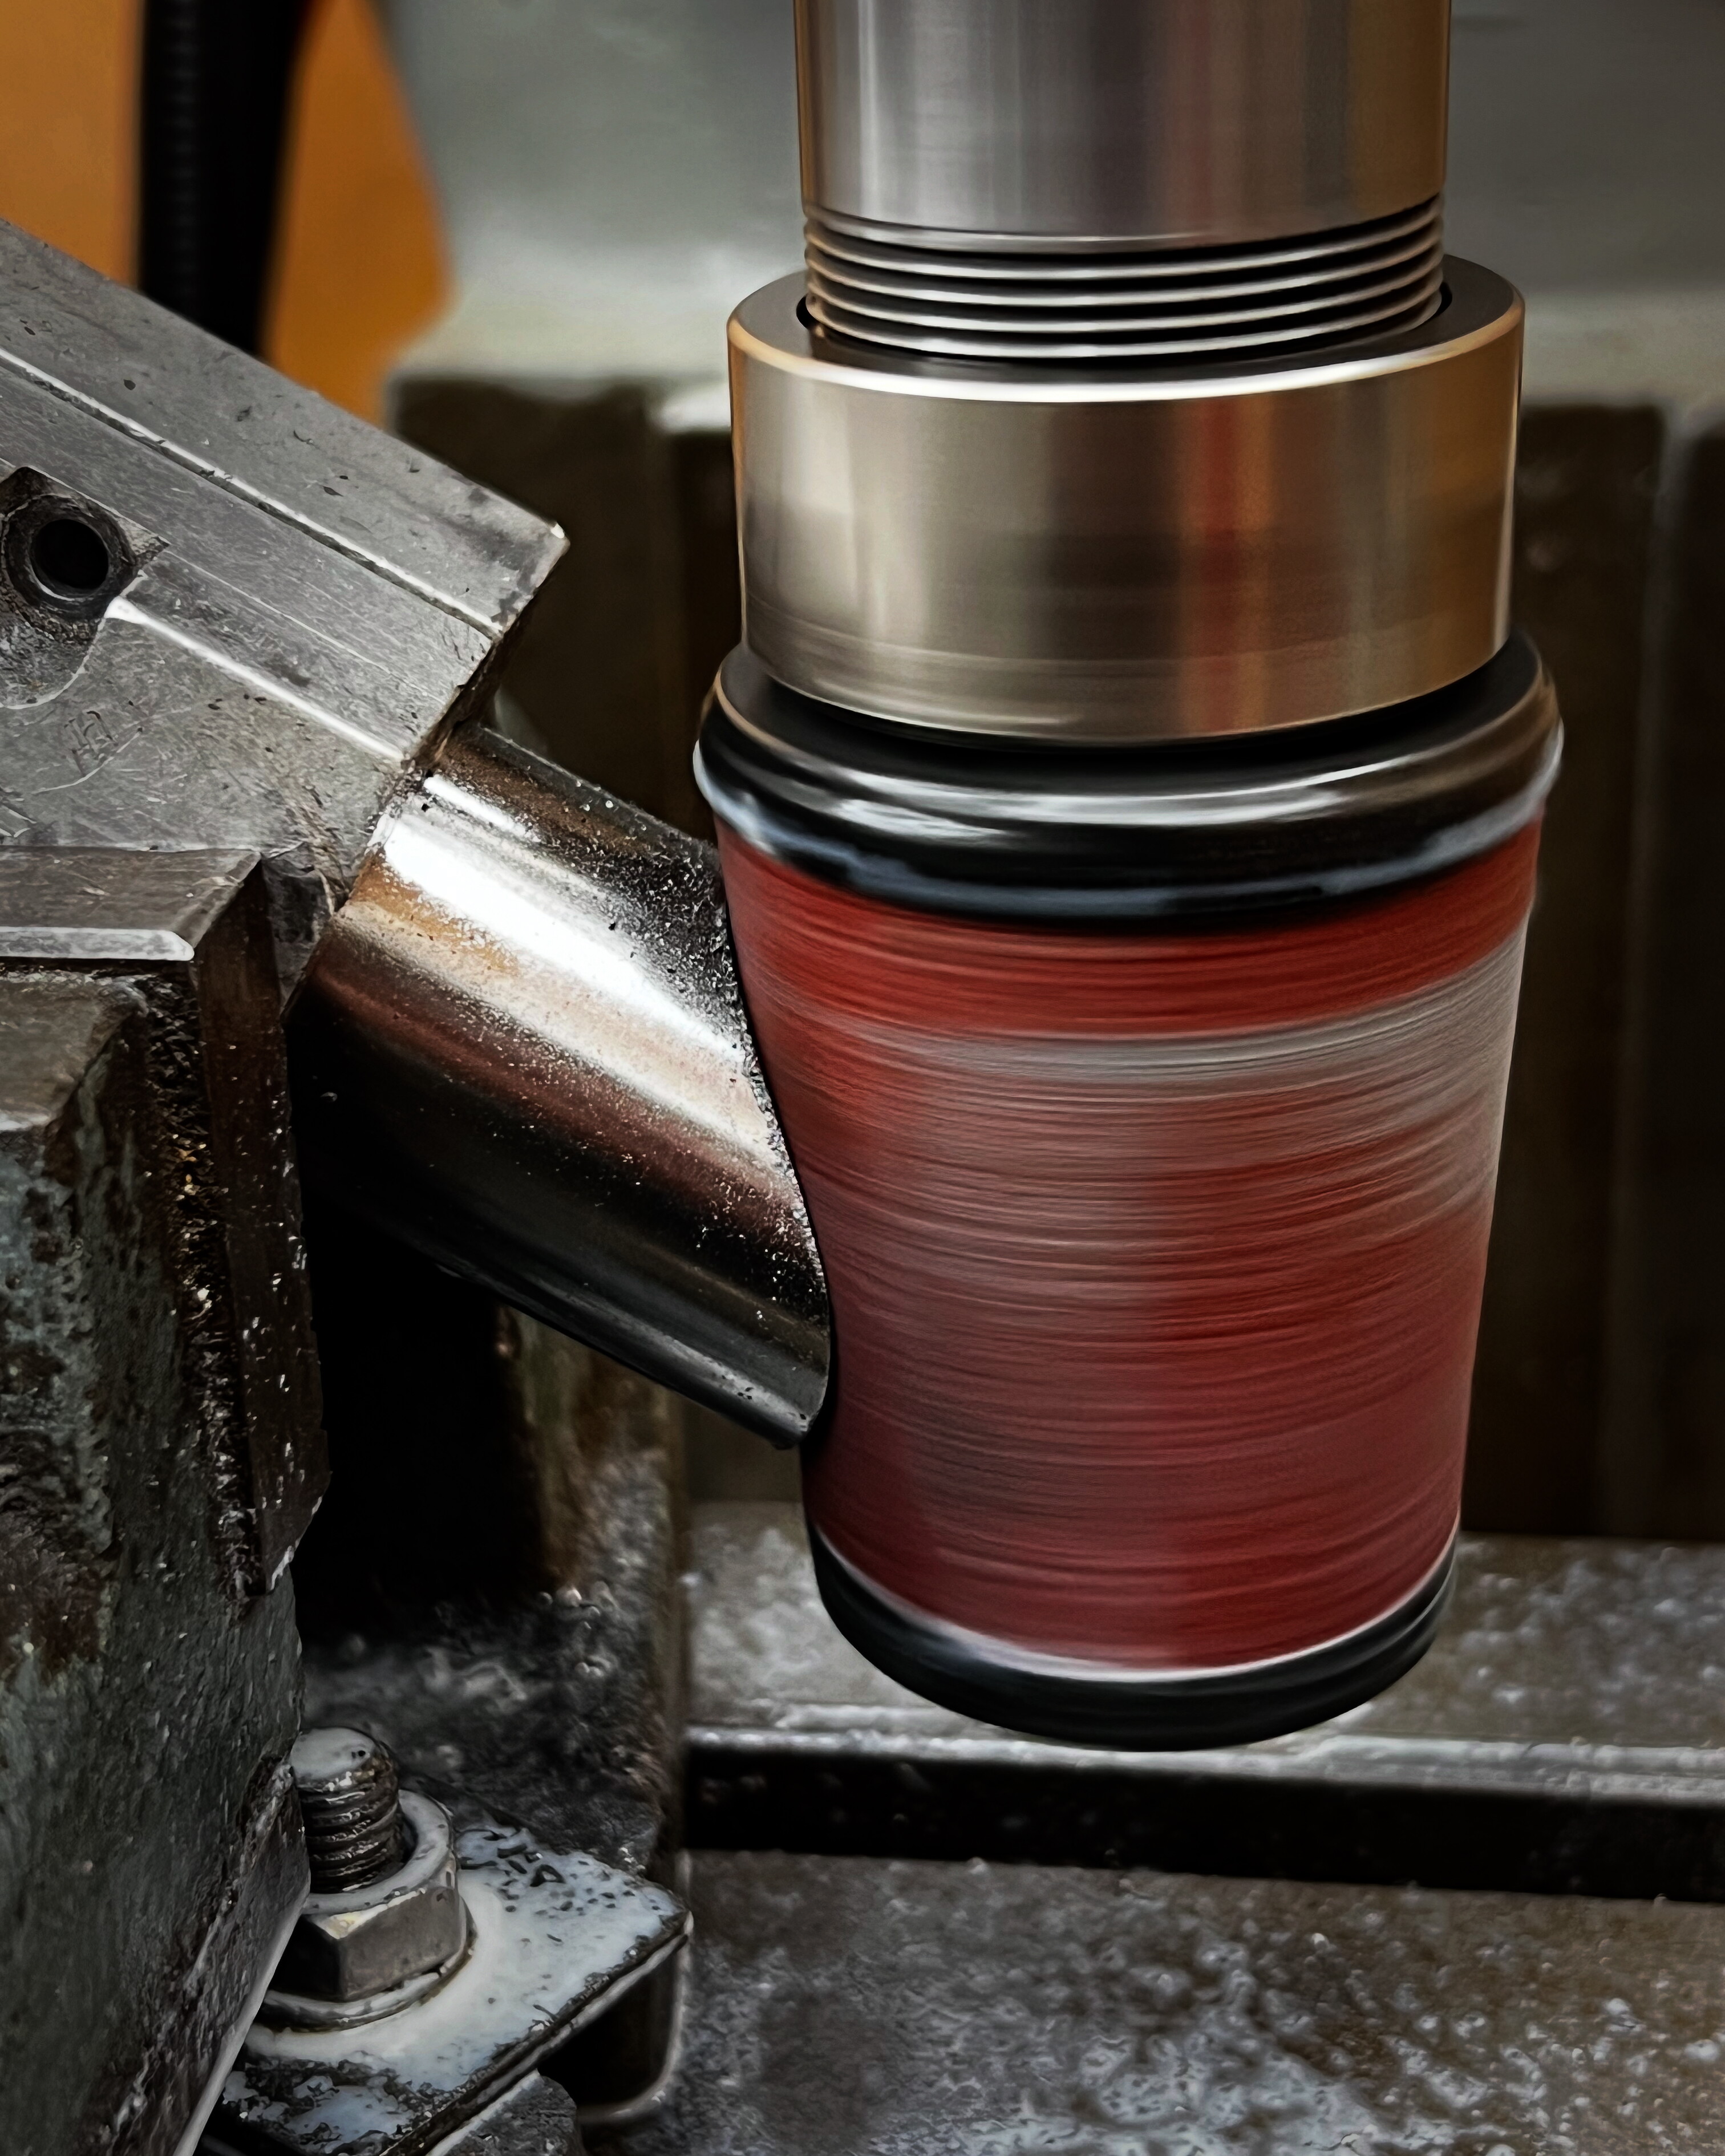
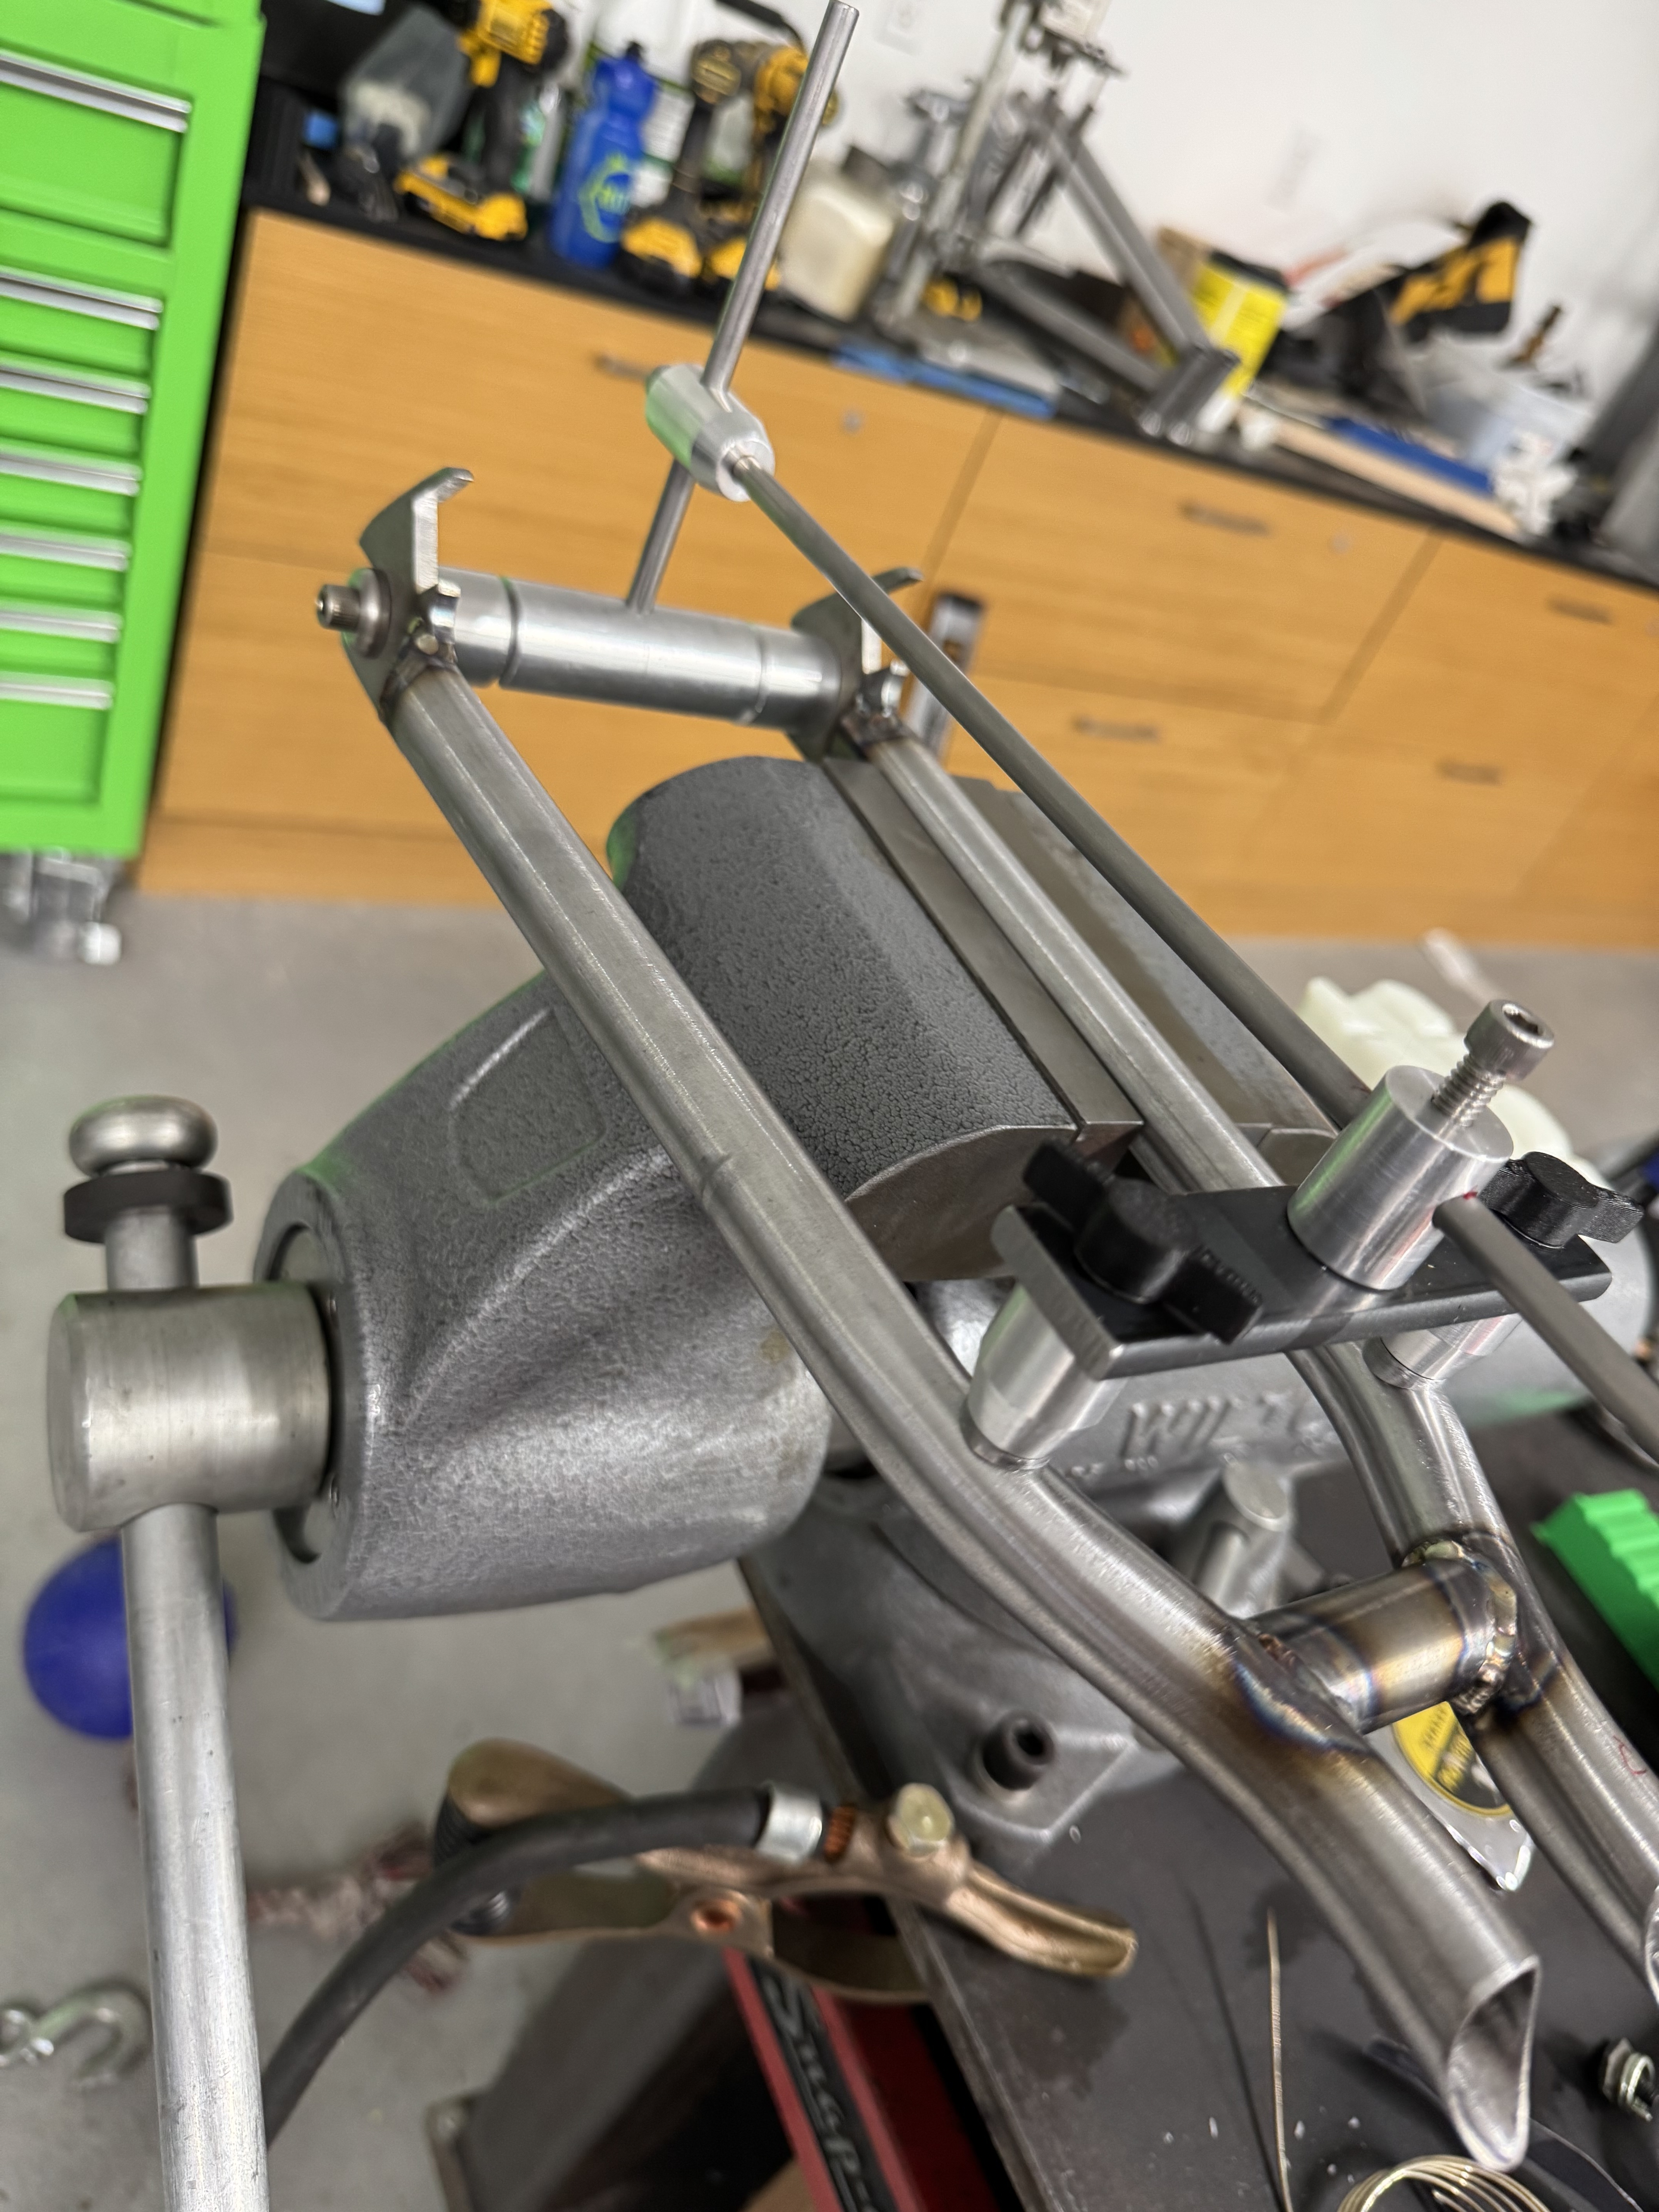
Since I mentioned the K.O.Lee fixture that I made into a fork alignment table, here’s a pic.
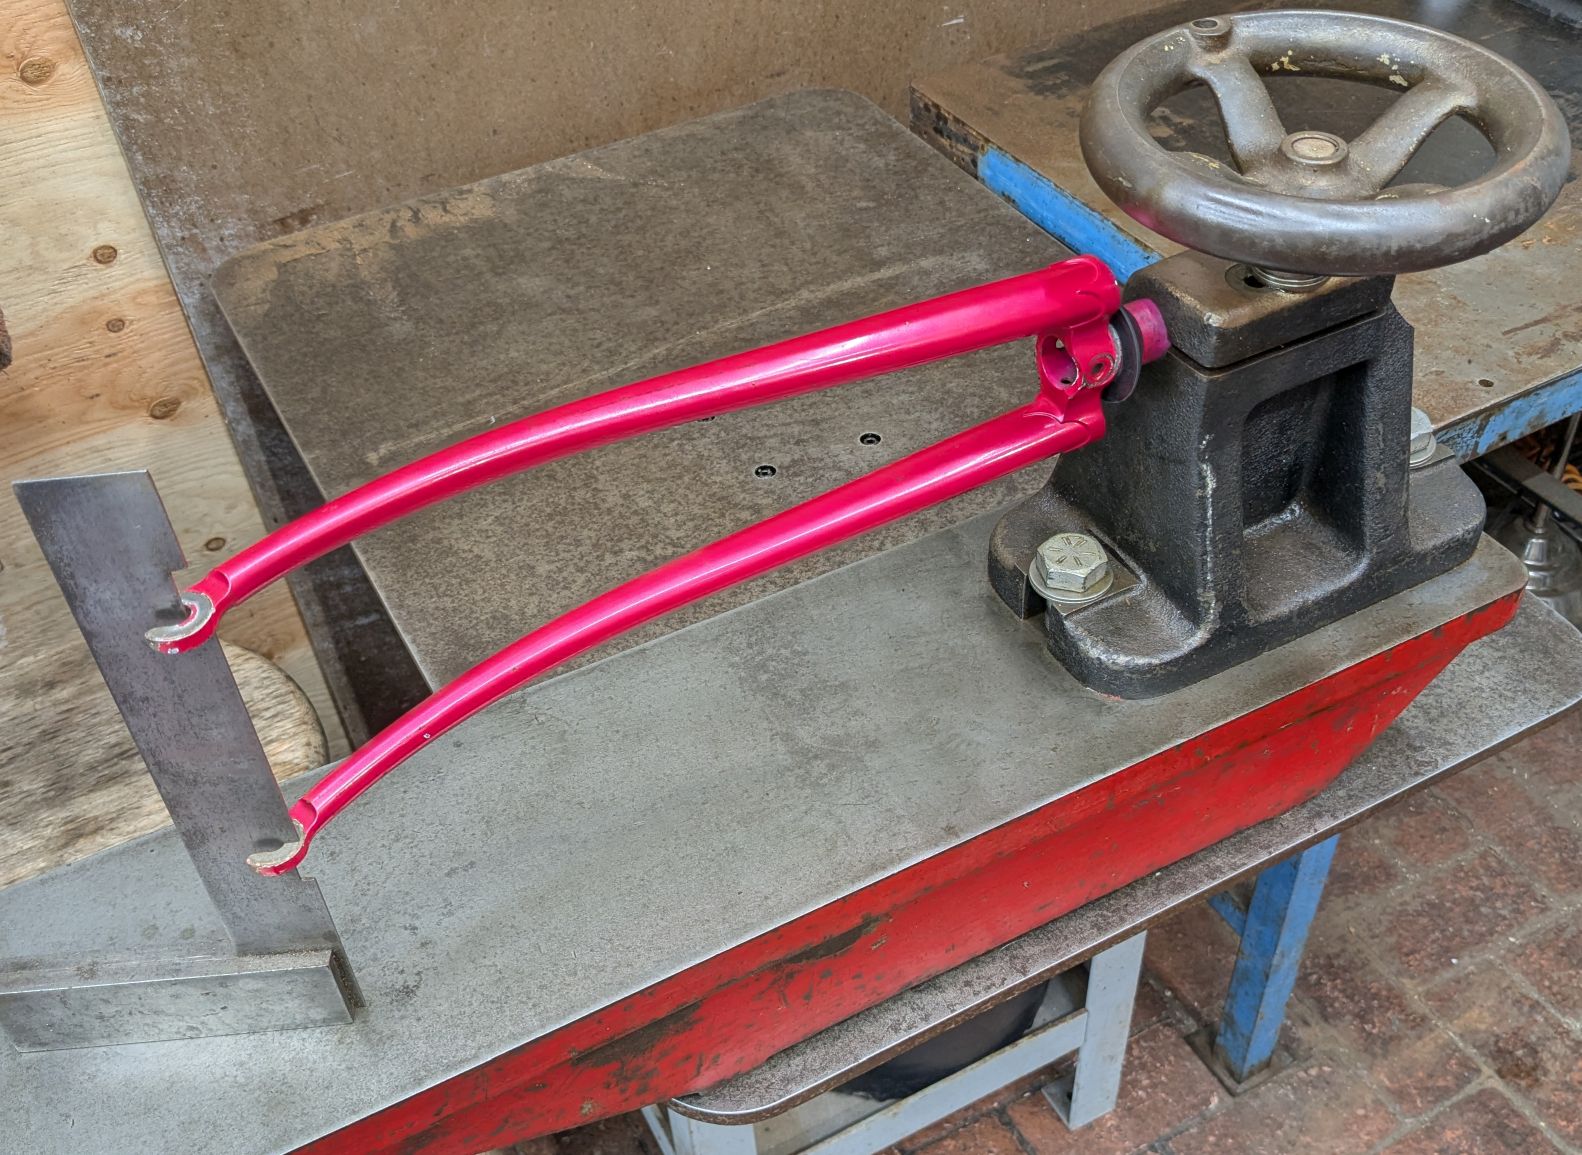
The red thing is the K.O.Lee automobile thing (dunno what it was for). The black thing was a center, to use as a tailstock with an indexer or rotab on a milling machine, or with another matching one as a pair of bench centers. The center it came with was 1.000", fits a steerer super nice as long as you don’t need one o’ them new-fangled “OS” steerers. ![]()
Later I bought a 3-jaw lathe chuck that someone mounted to a precision 90° angle fixture. I might remove this black tailstock thingum and use the 3-jaw instead, because it’ll fit any diameter of steerer. Maybe only if the day comes I have to work on an OS steerer. (I’m a confirmed retro-grouch, so far 100% inch steerers.)
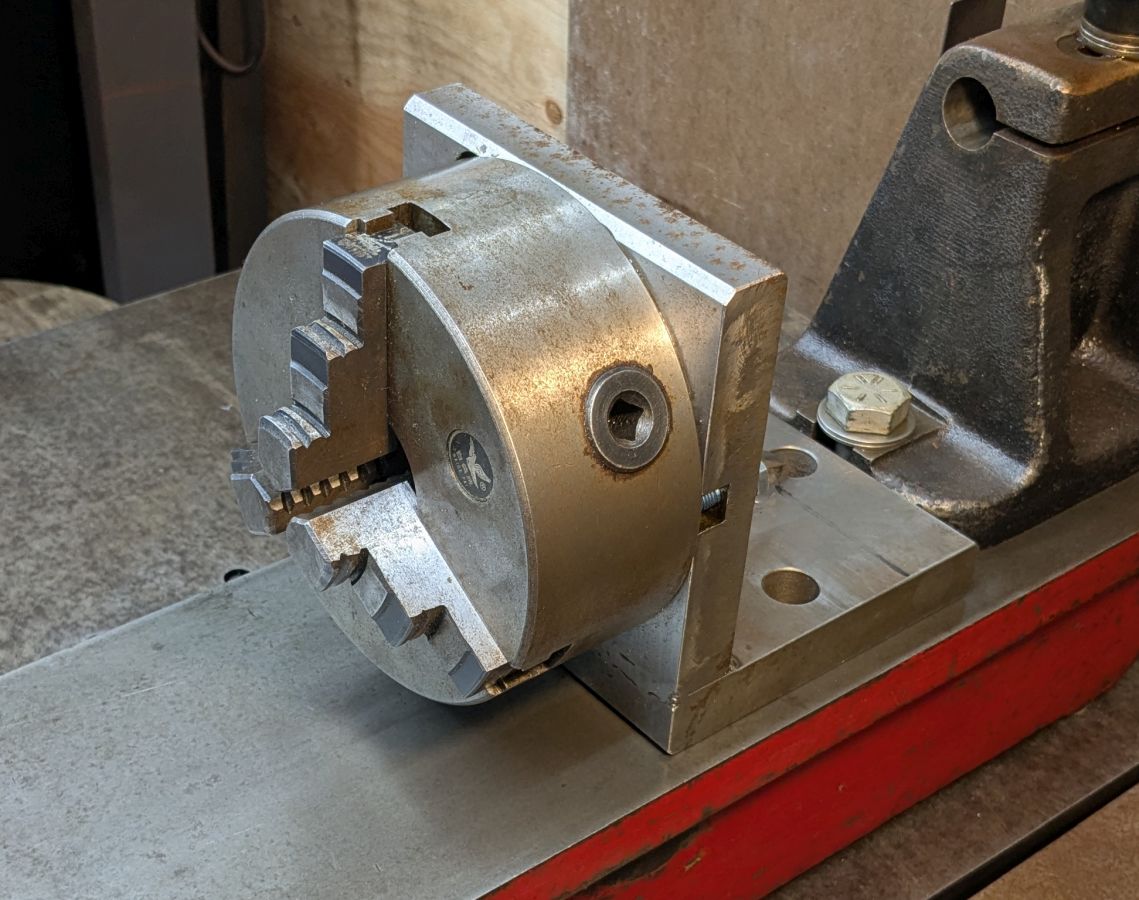
Bonus feature of the 3-jaw is it’ll hold any fork at the same centerline height, so my dropout-width thingum will work the same regadless of steerer diameter. But for 1" steerers, you can’t beat this tailstock for strength, rigidity, precision and repeatability. I know it’s extreme overkill for this use, but that beats underkill.
The dropout-width checker is set for 100 mm only, but that’s everything I’m likely to do. It’s an old precision machinist’s square that was rusty and dinged up so I didn’t mind grinding some new notches in it. “Not adjustable” is another way of saying “can’t get out of adjustment”. I could use the Wetmore/Rossman cnc dropout-width doodad for this, setting the vee to center on the steerer, but this notched square is faster and more reliable.
Though the alignment table is over a hundred pounds, it still needs to be bolted down to my welding table for reefing on a fork. Then unbolted and put away between uses. In my dream shop it would have a dedicated place, but I’d have to buy a bigger house.
16 Likes
That right there pretty much sums it up. Everyone has their own set up and method. No one is wrong. Great couple of posts and demonstrates you don’t need rocket science to build bikes. Just patience.
8 Likes
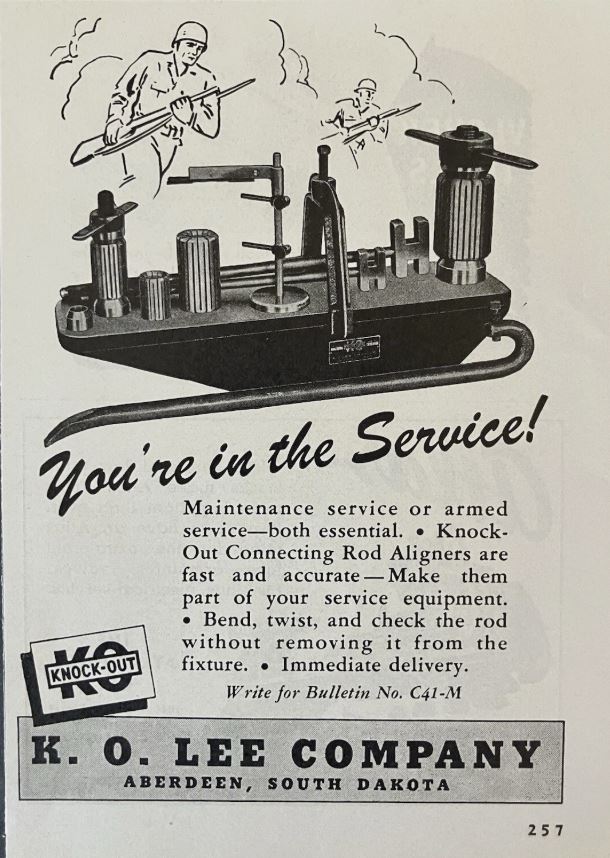
Haha I found out what my fork-alignment table is made from. Here’s one for sale on ebay for only $1200! (I think I paid $100 for mine but it didn’t come with all those attachments.)
It’s called a “Universal Rod Aligner”, for piston engine connecting rods. I found an ad for one from 1943, looks identical, so mine might be older than I thought.
6 Likes
Not really a framebuilding tool but I figured if I’m gonna start building frames in my garage I better have somewhere to put them so I popped over to the hardware store down the street for some flat bar and made these:
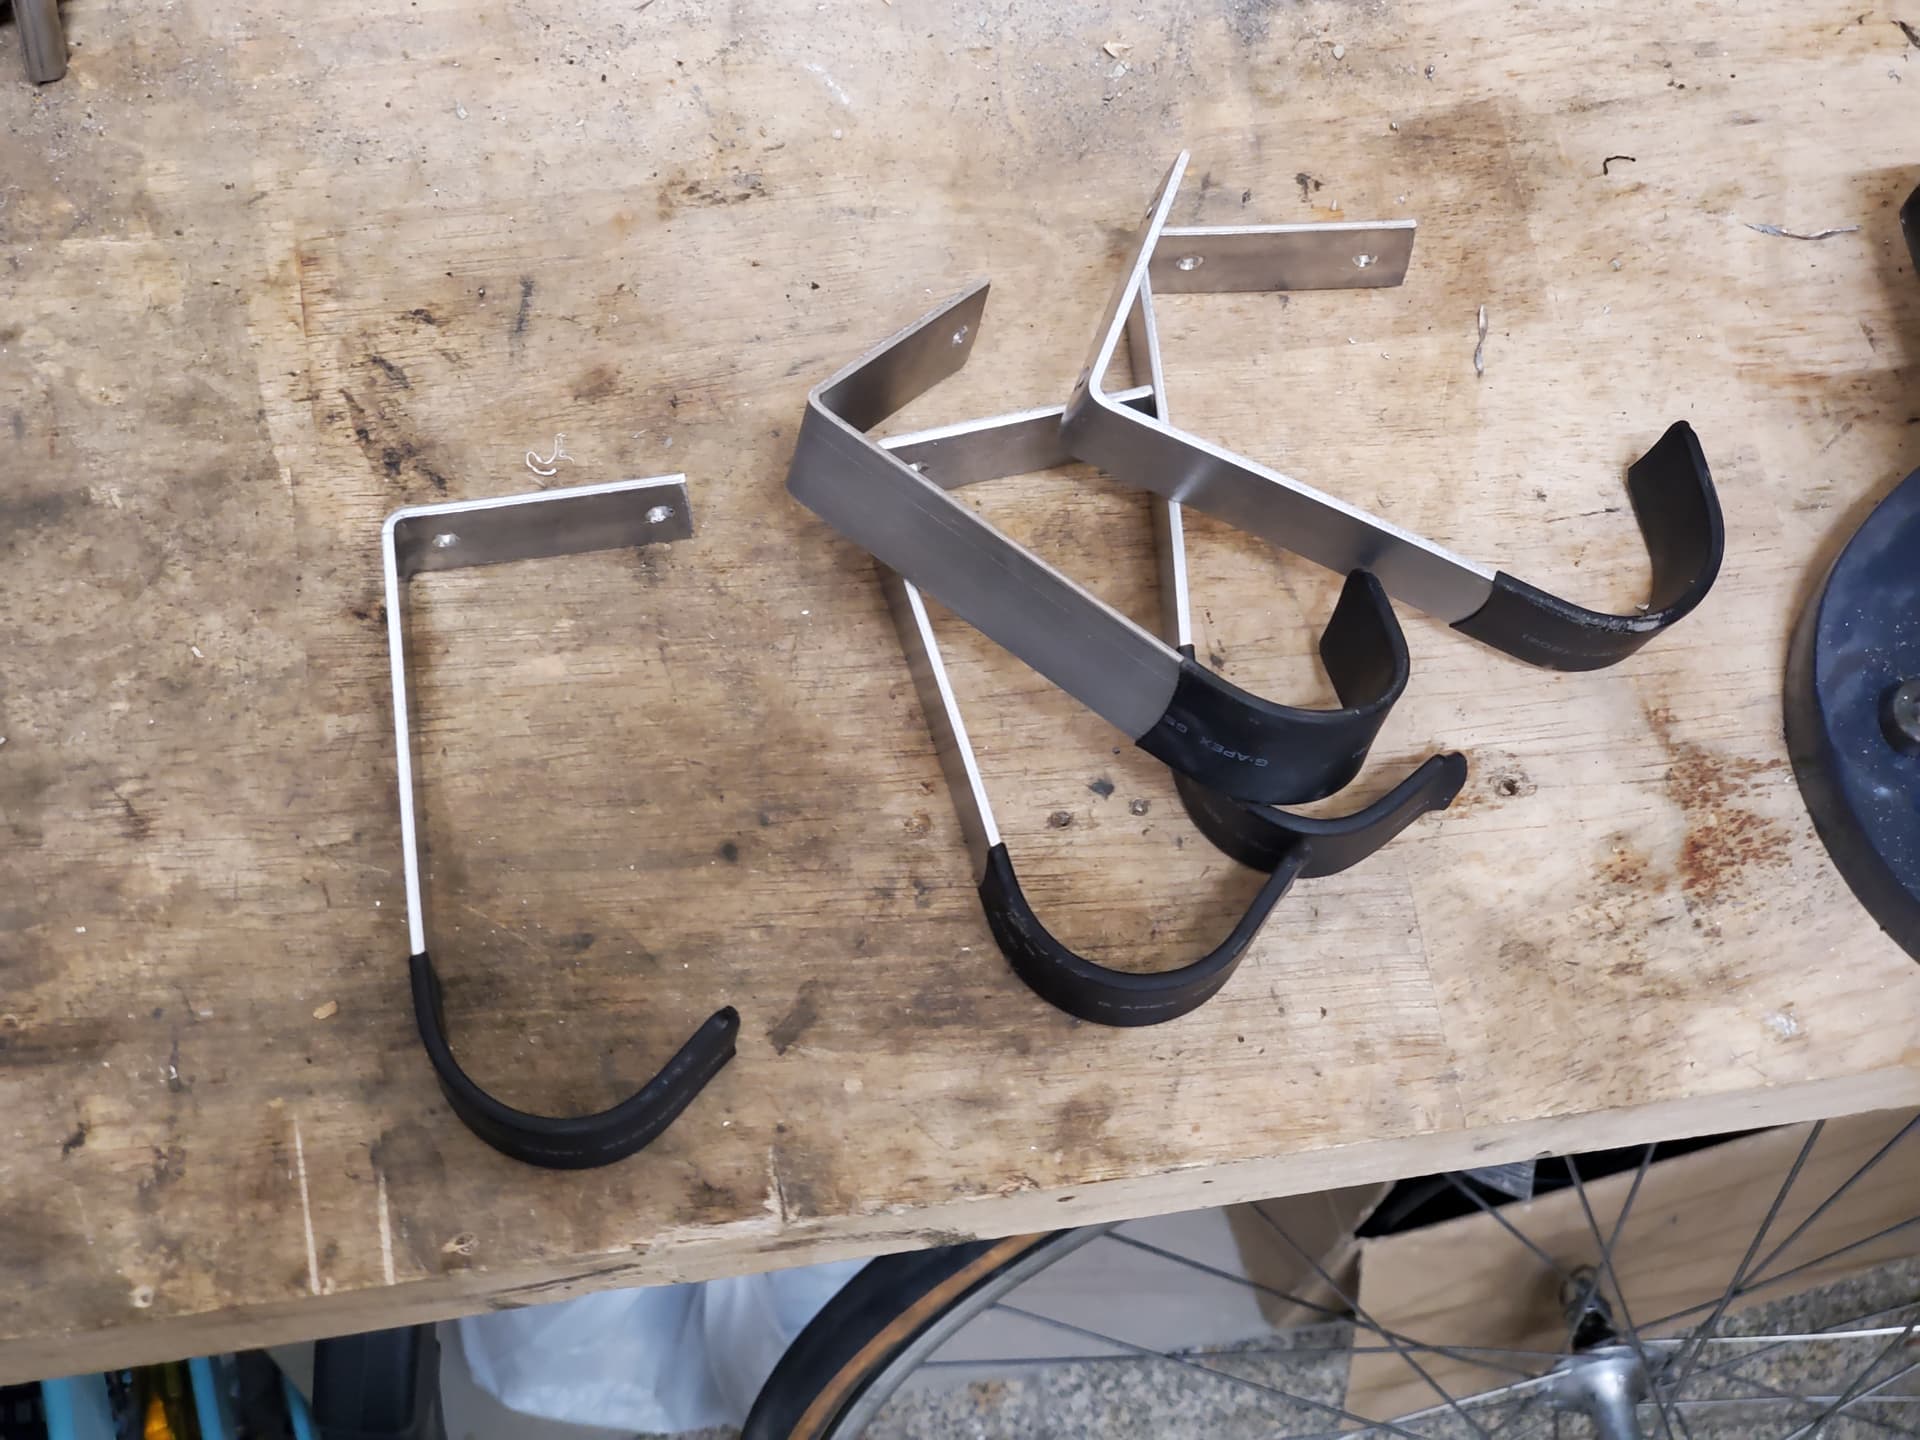
It’s 200mm of 20x2 aluminium flat bar and 80mm of 20mm heatshrink which costs me about €1 each which is good because I’ll be making another 20 or so for wheels and tires because I’m sick of them being stacked against eachother and getting all tangled up.
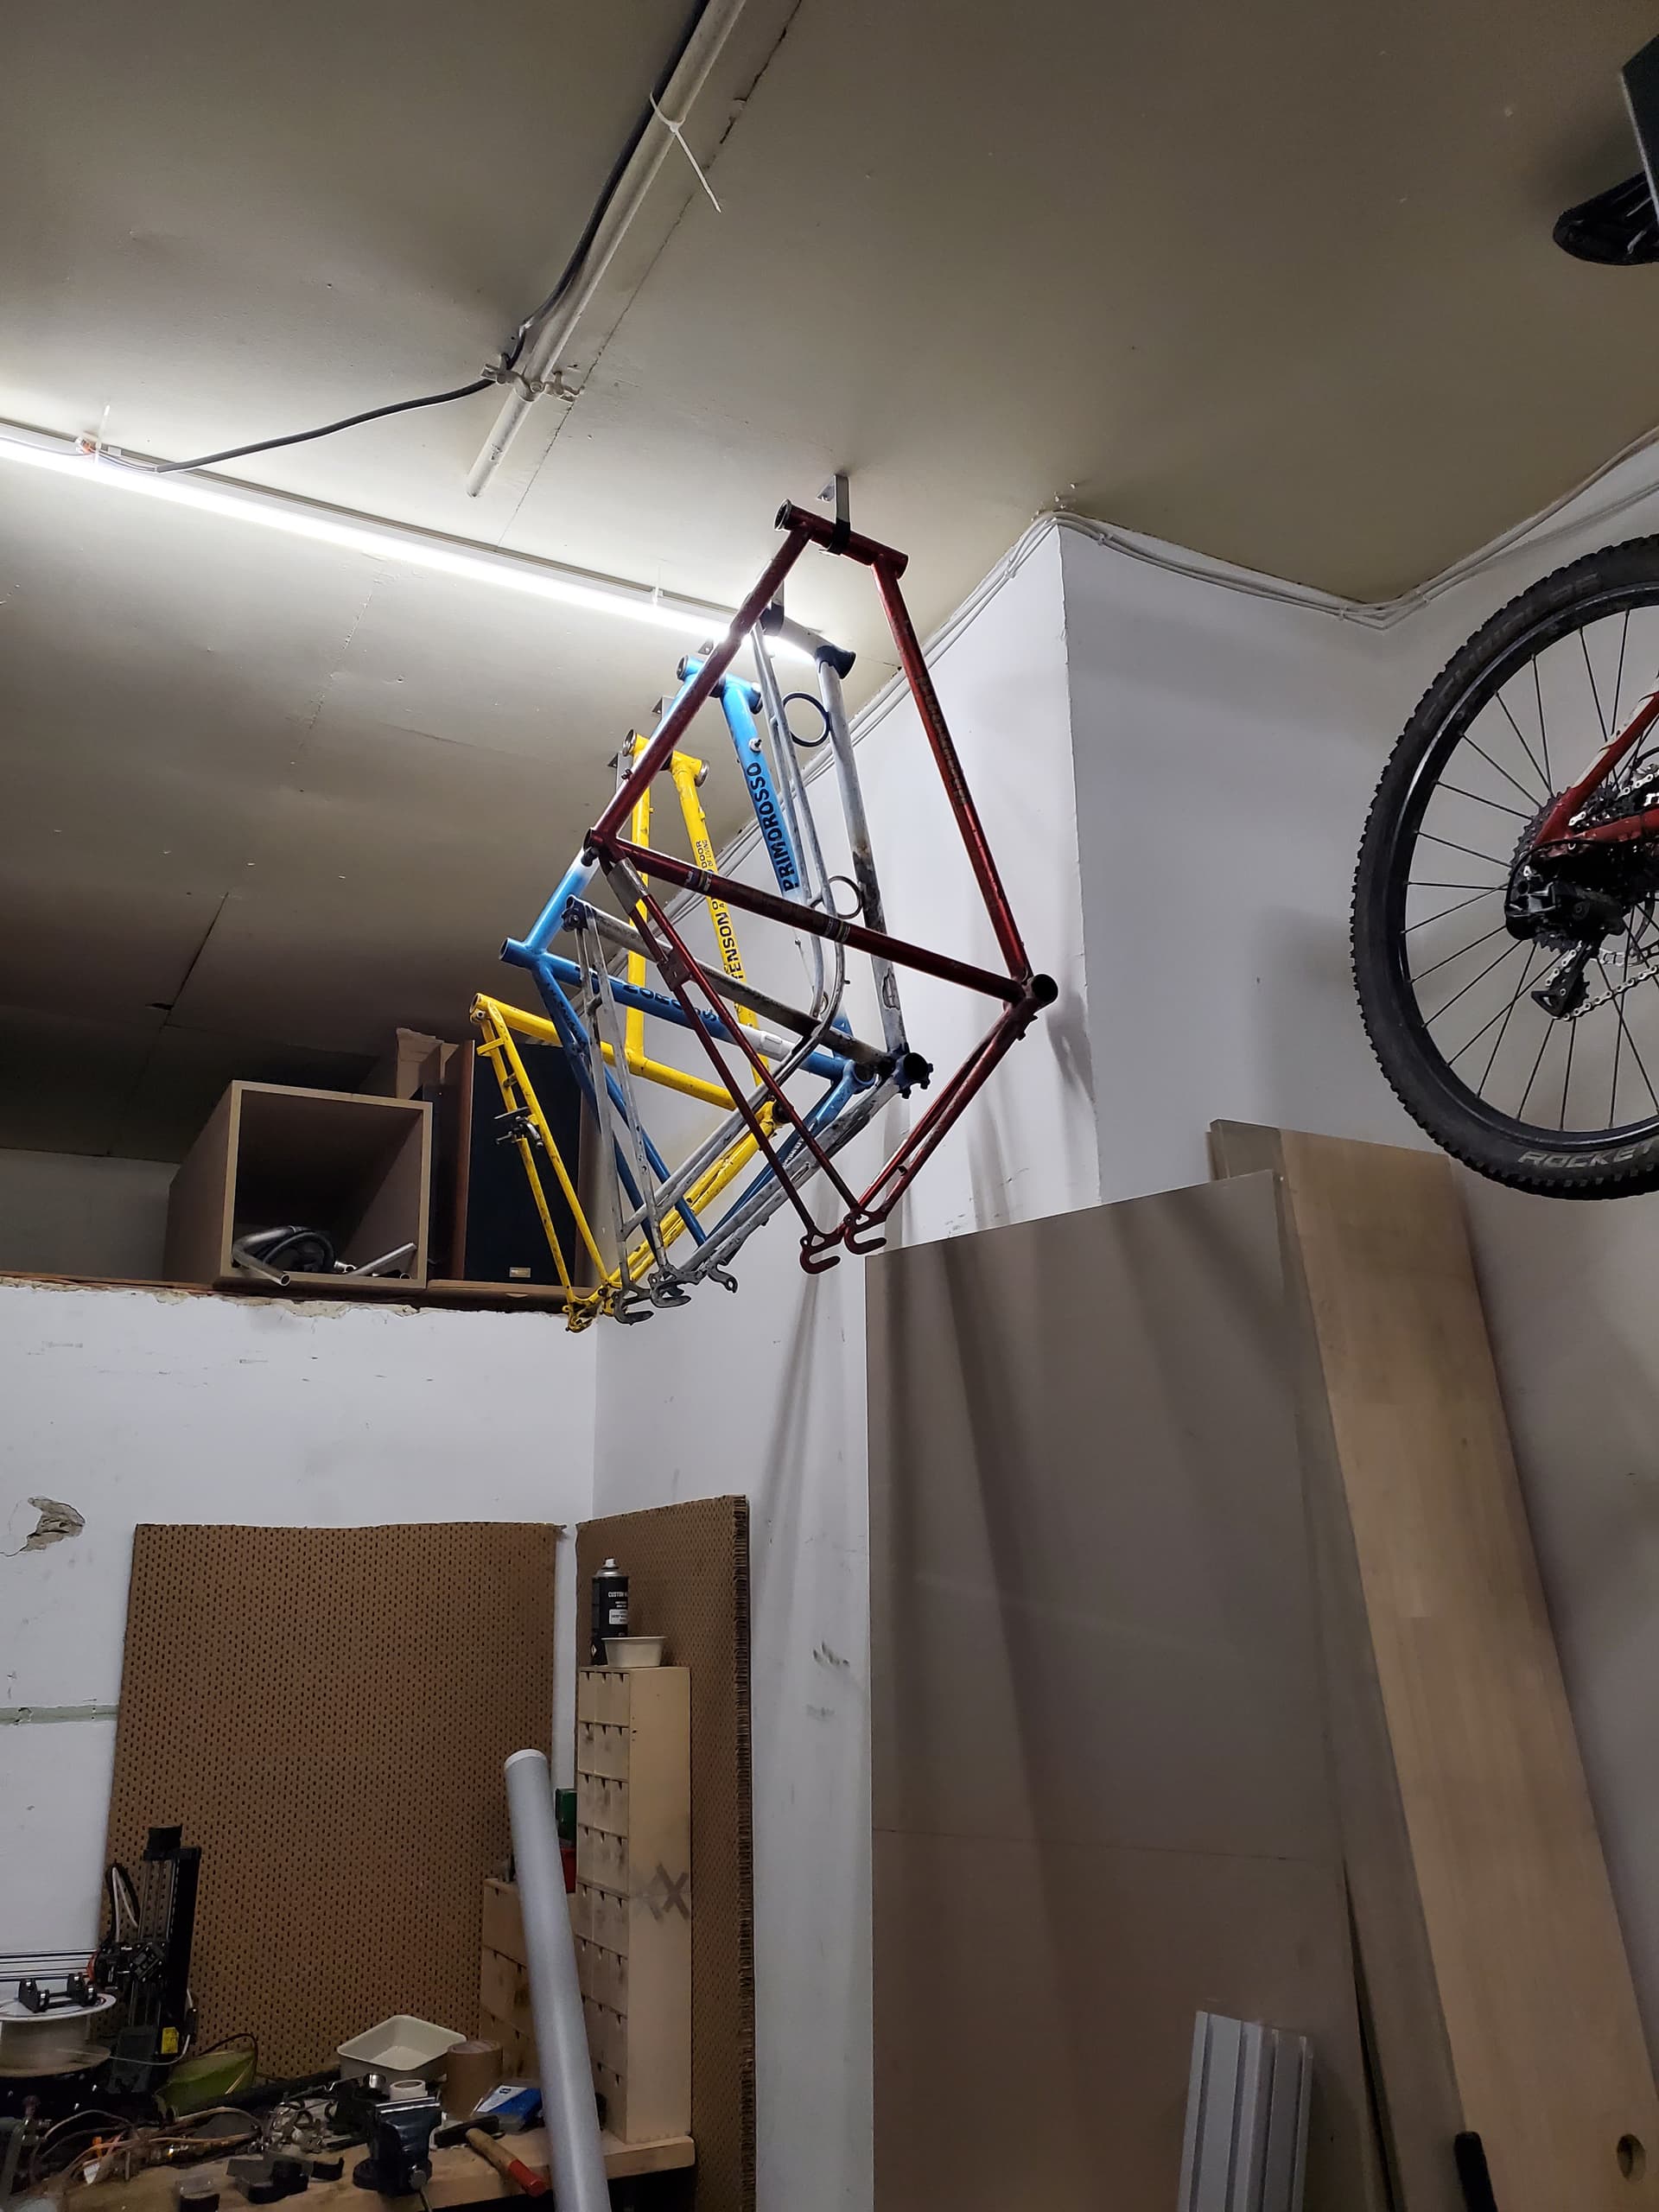
Living in a house from the 1890s does have its benefits like these massively high ceilings!
9 Likes
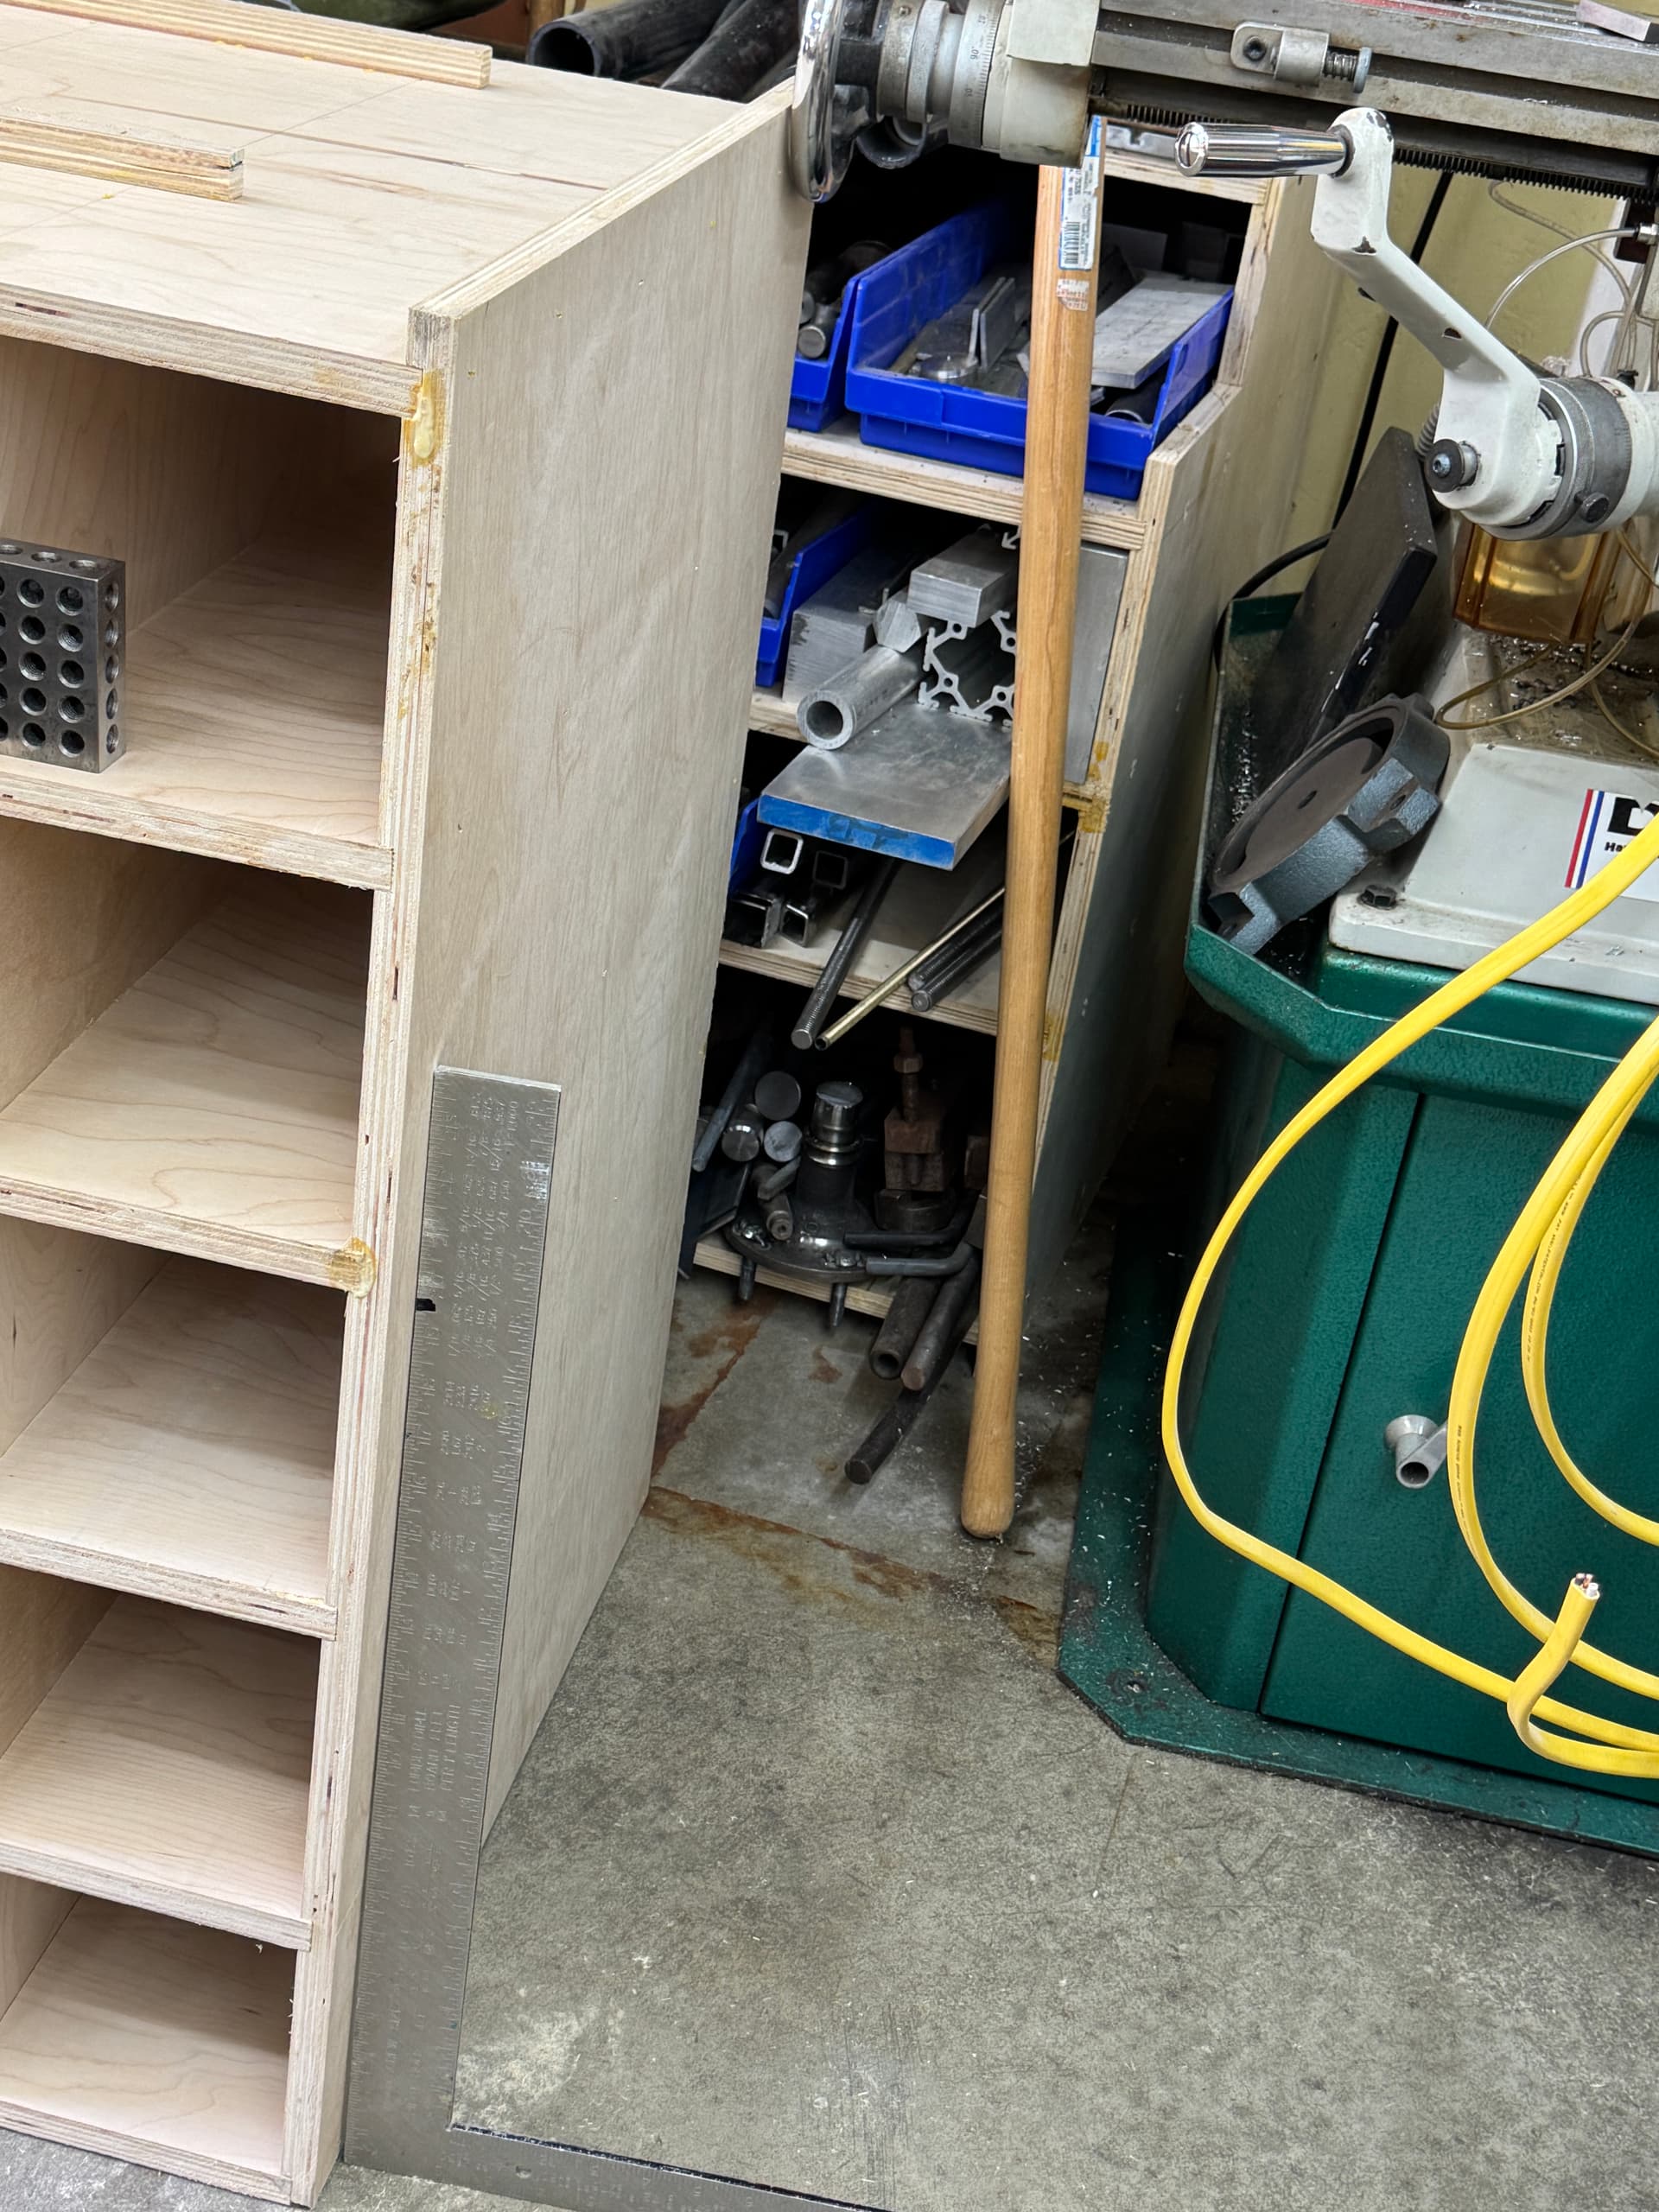
Well, not really sure it’s a tool but, this is something I have been working on for a long time. Design, process, techniques and tools took some time to get together. I few visits to my local Rockler for tools and technique coaching and I finally have a way to organize my tubes! 45 cubbies which comes out to 90+ dado slots and 40 dividers. Luckily we have had some good weather and my neighbors don’t mind the noise and dust of a router going for an entire weekend! I slotted it in under my bench with 3mm to spare on one side and 10mm on top. It’s 60" wide, 35 1/2" tall and 24" deep.
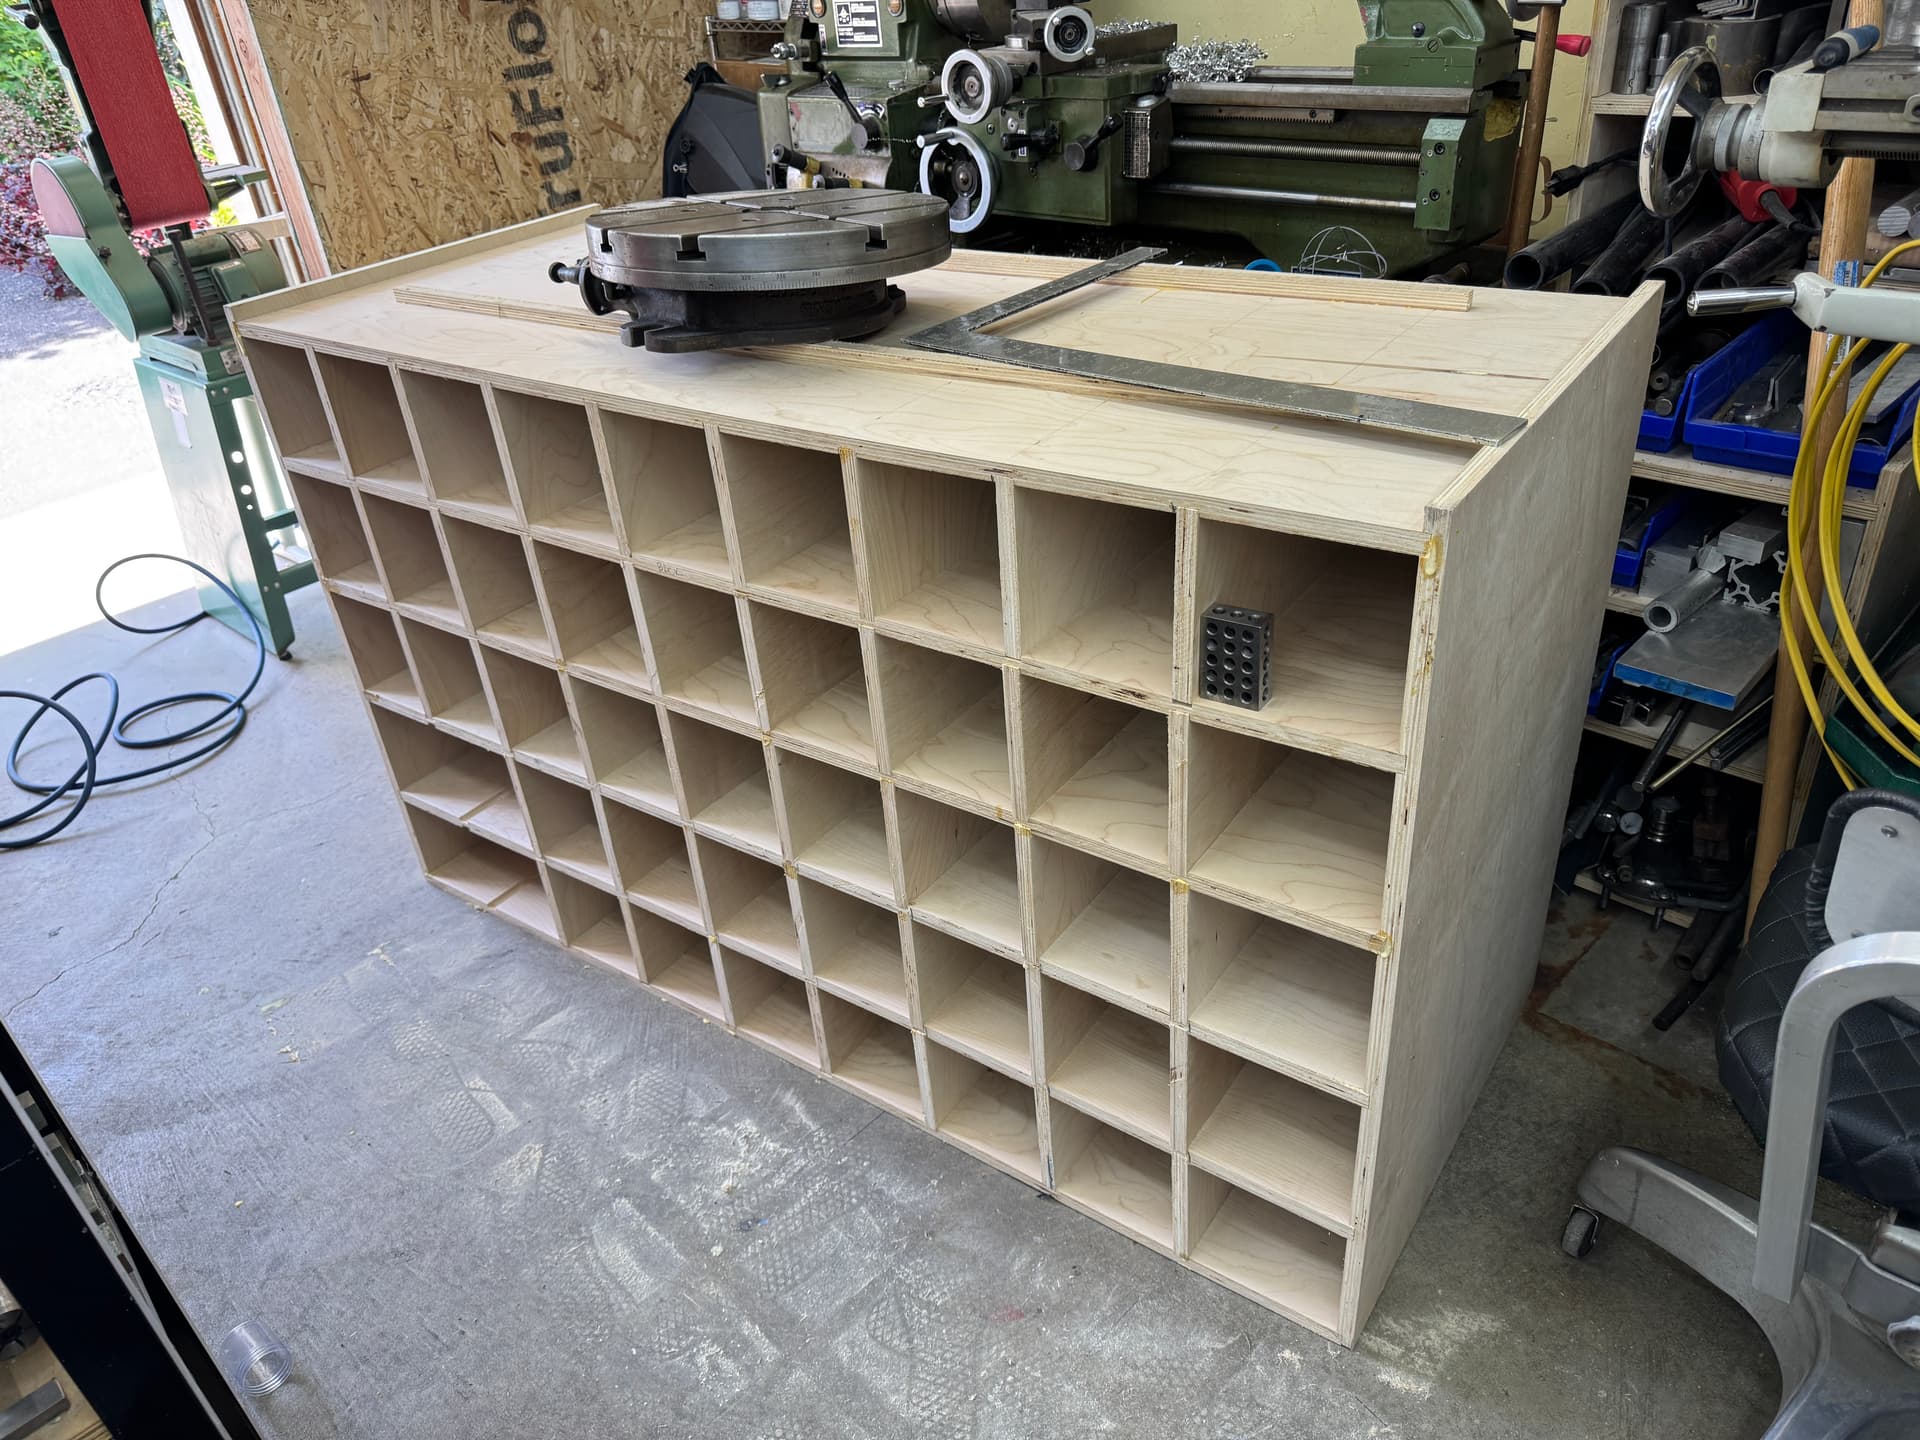
Once I had it all glued and stapled, I put the 15" rotary table on it to compress it as it dried. The rotary table weighs a bit more than 100lbs. And it was just slightly off square so I advanced my mill table against it to apply some pressure in the right direction as it dried. A few hours later it’s as square as I care to measure! Mass is your friend!
18 Likes
Oh wow, this is inspirational ![]()
I have kind of a fun project and had to make a new braze-on positioner.
If anyone is familiar with an old MTB framebuilder called Tom Ritchey you might be interested. ![]()
Back in 1980 about 110 or so frames were ordered from Ritchey by Cupertino bike shop. these frames weren’t serialized, they didn’t have braze-ons or paint or a fork. They were stored in a chicken coop behind the store until some point later in time and people started collecting the original fillet brazed Ritchey’s and the Chicken Coop bikes became quite special.
Fast forward to a few weeks ago and a prominent collector who I have been working with on a few other projects contacts me and says 'hey, I have a pristine, unfinished Chicken Coop bike and I want you to add the correct Campagnolo Diver Helmet cable stops, MAFAC rear canti posts and a campagnolo cable guide on the BB. I also need another 20 or so of those brass cable housing ferrules!". These old Ritchey’s used brass housing ferrules and I’ve become somewhat of a supplier to those restoring these bikes.
The first thing was to fully document the frame! It’s not often one gets to see a 45 year old frame of this importance without paint. The markings on the 4130 tubing are clearly readable. Anyway, I made this little guy to help me position the diver helmet cable stops:

If you care, you can follow along with the project in this album:

12 Likes
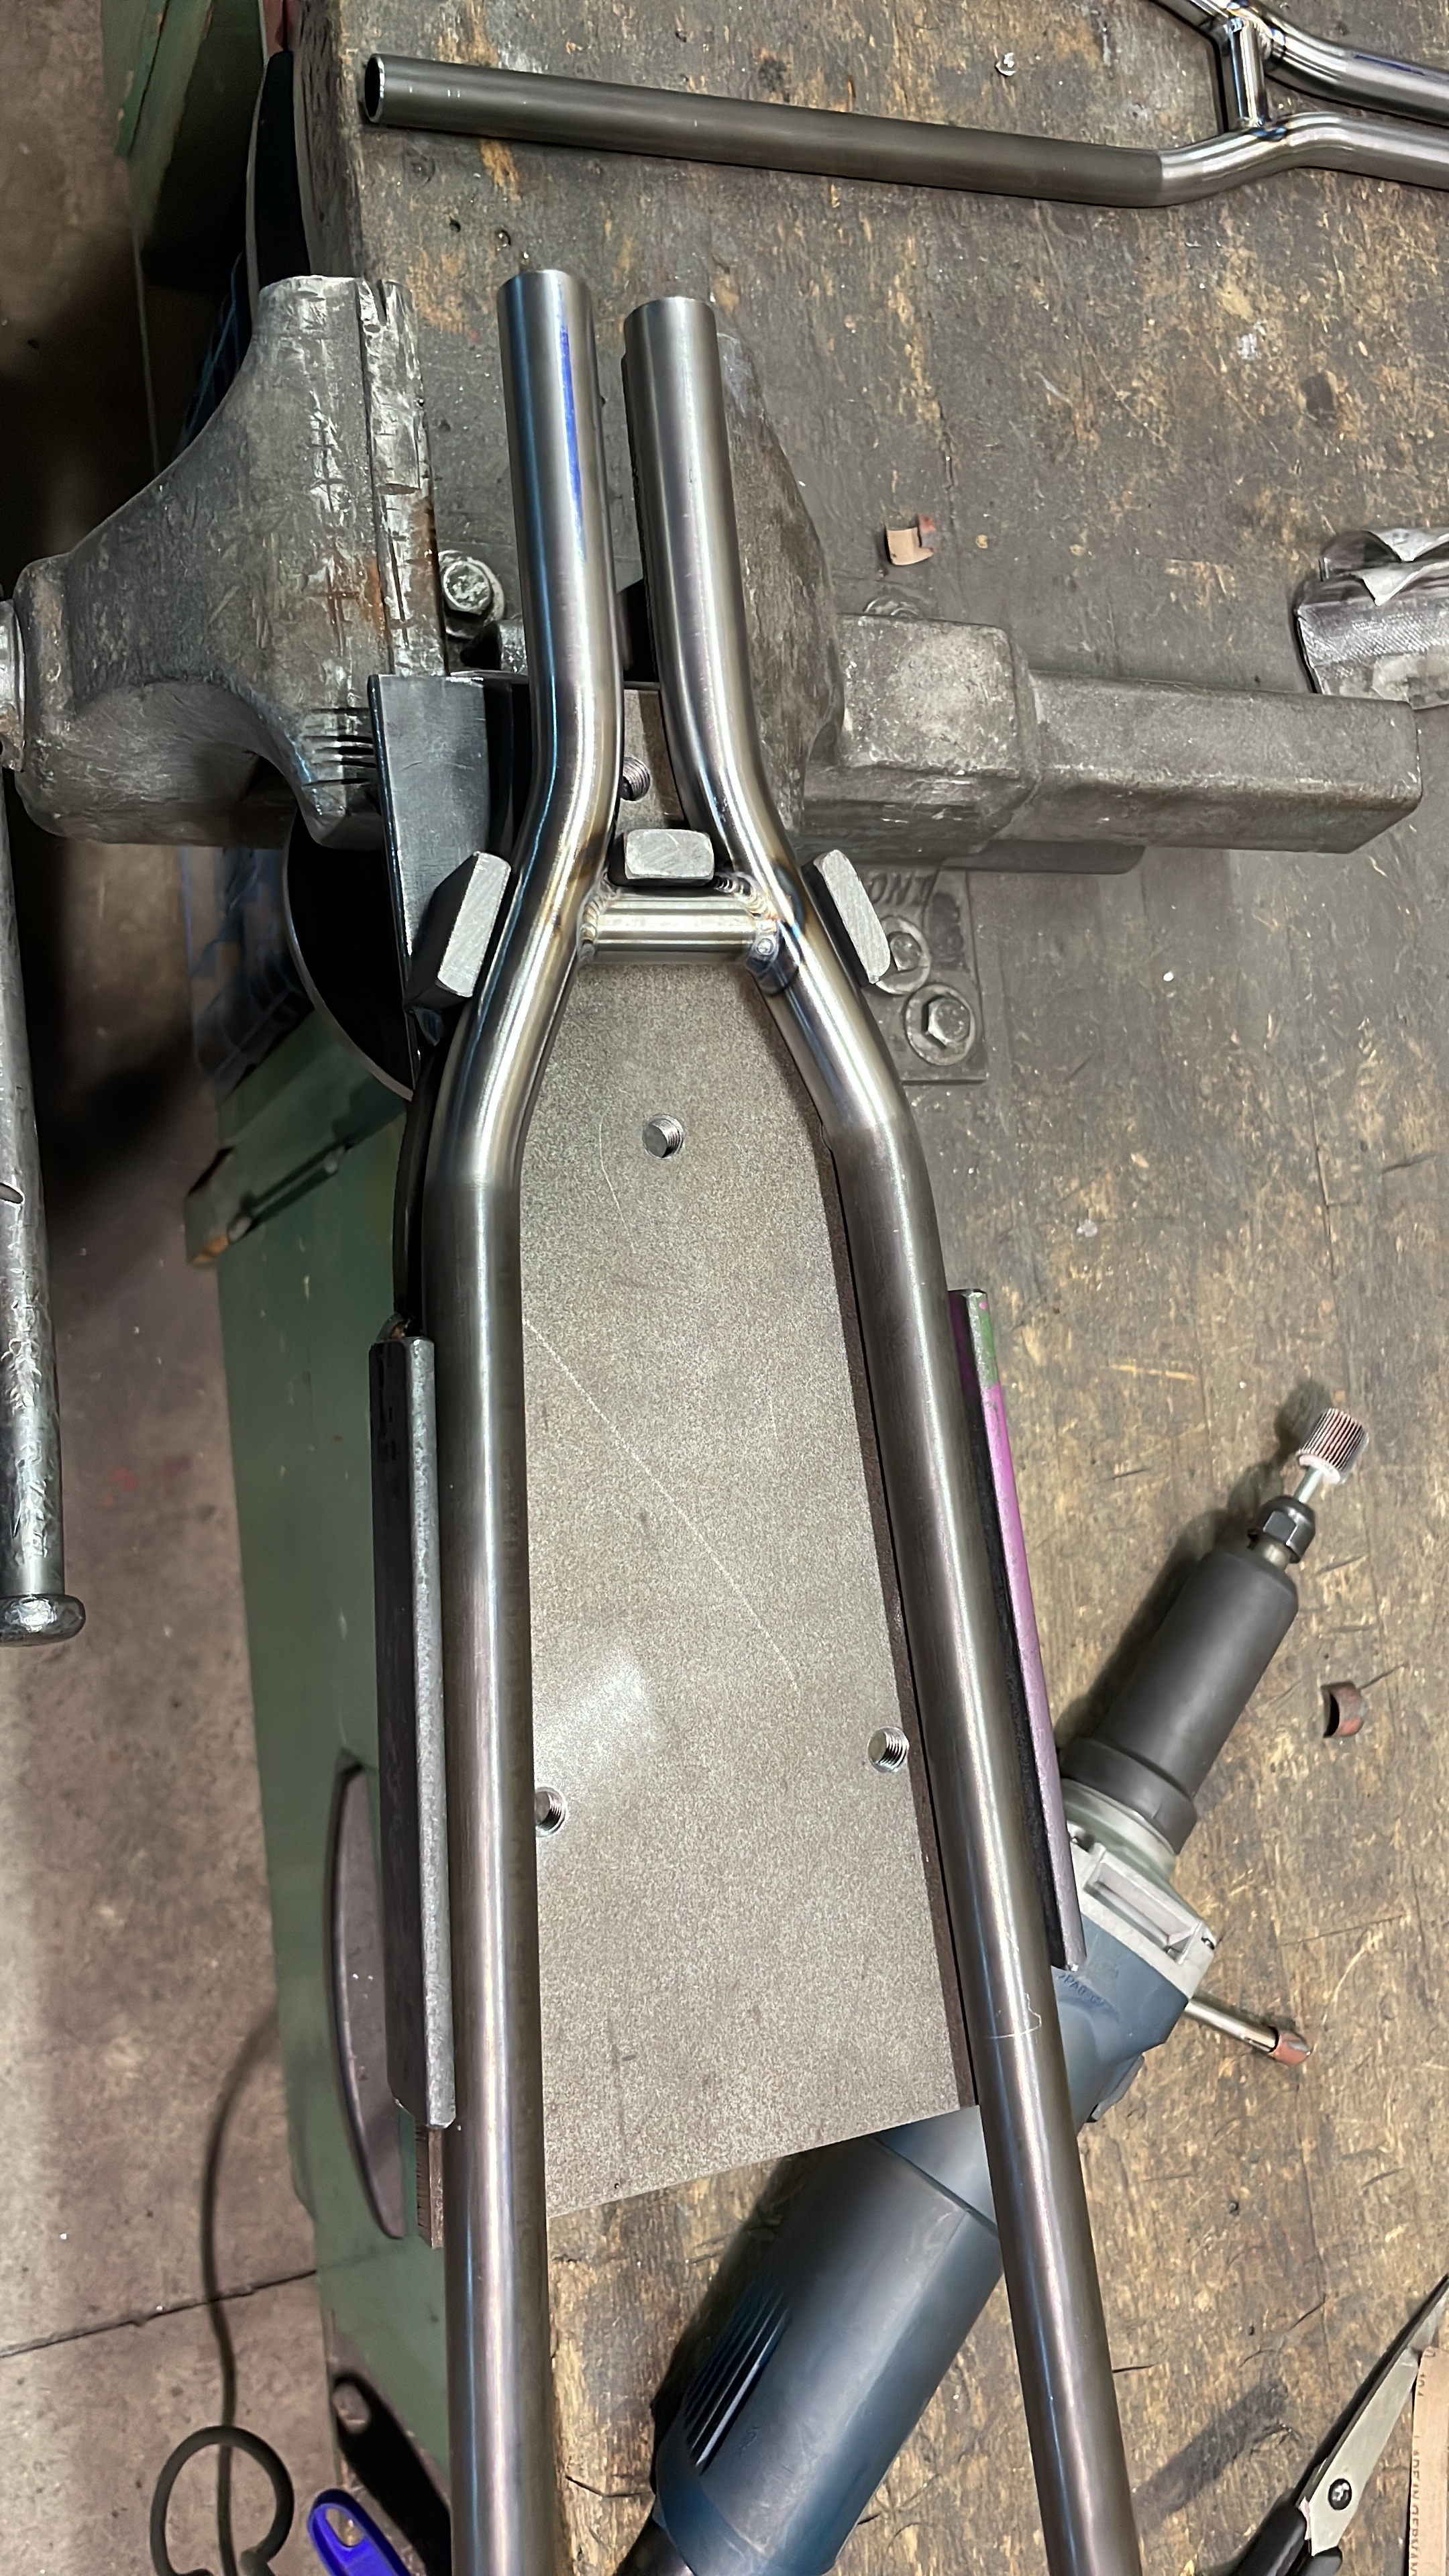
Made this a couple of days ago, and used it for the first time today. Super-stoked on how well it worked.
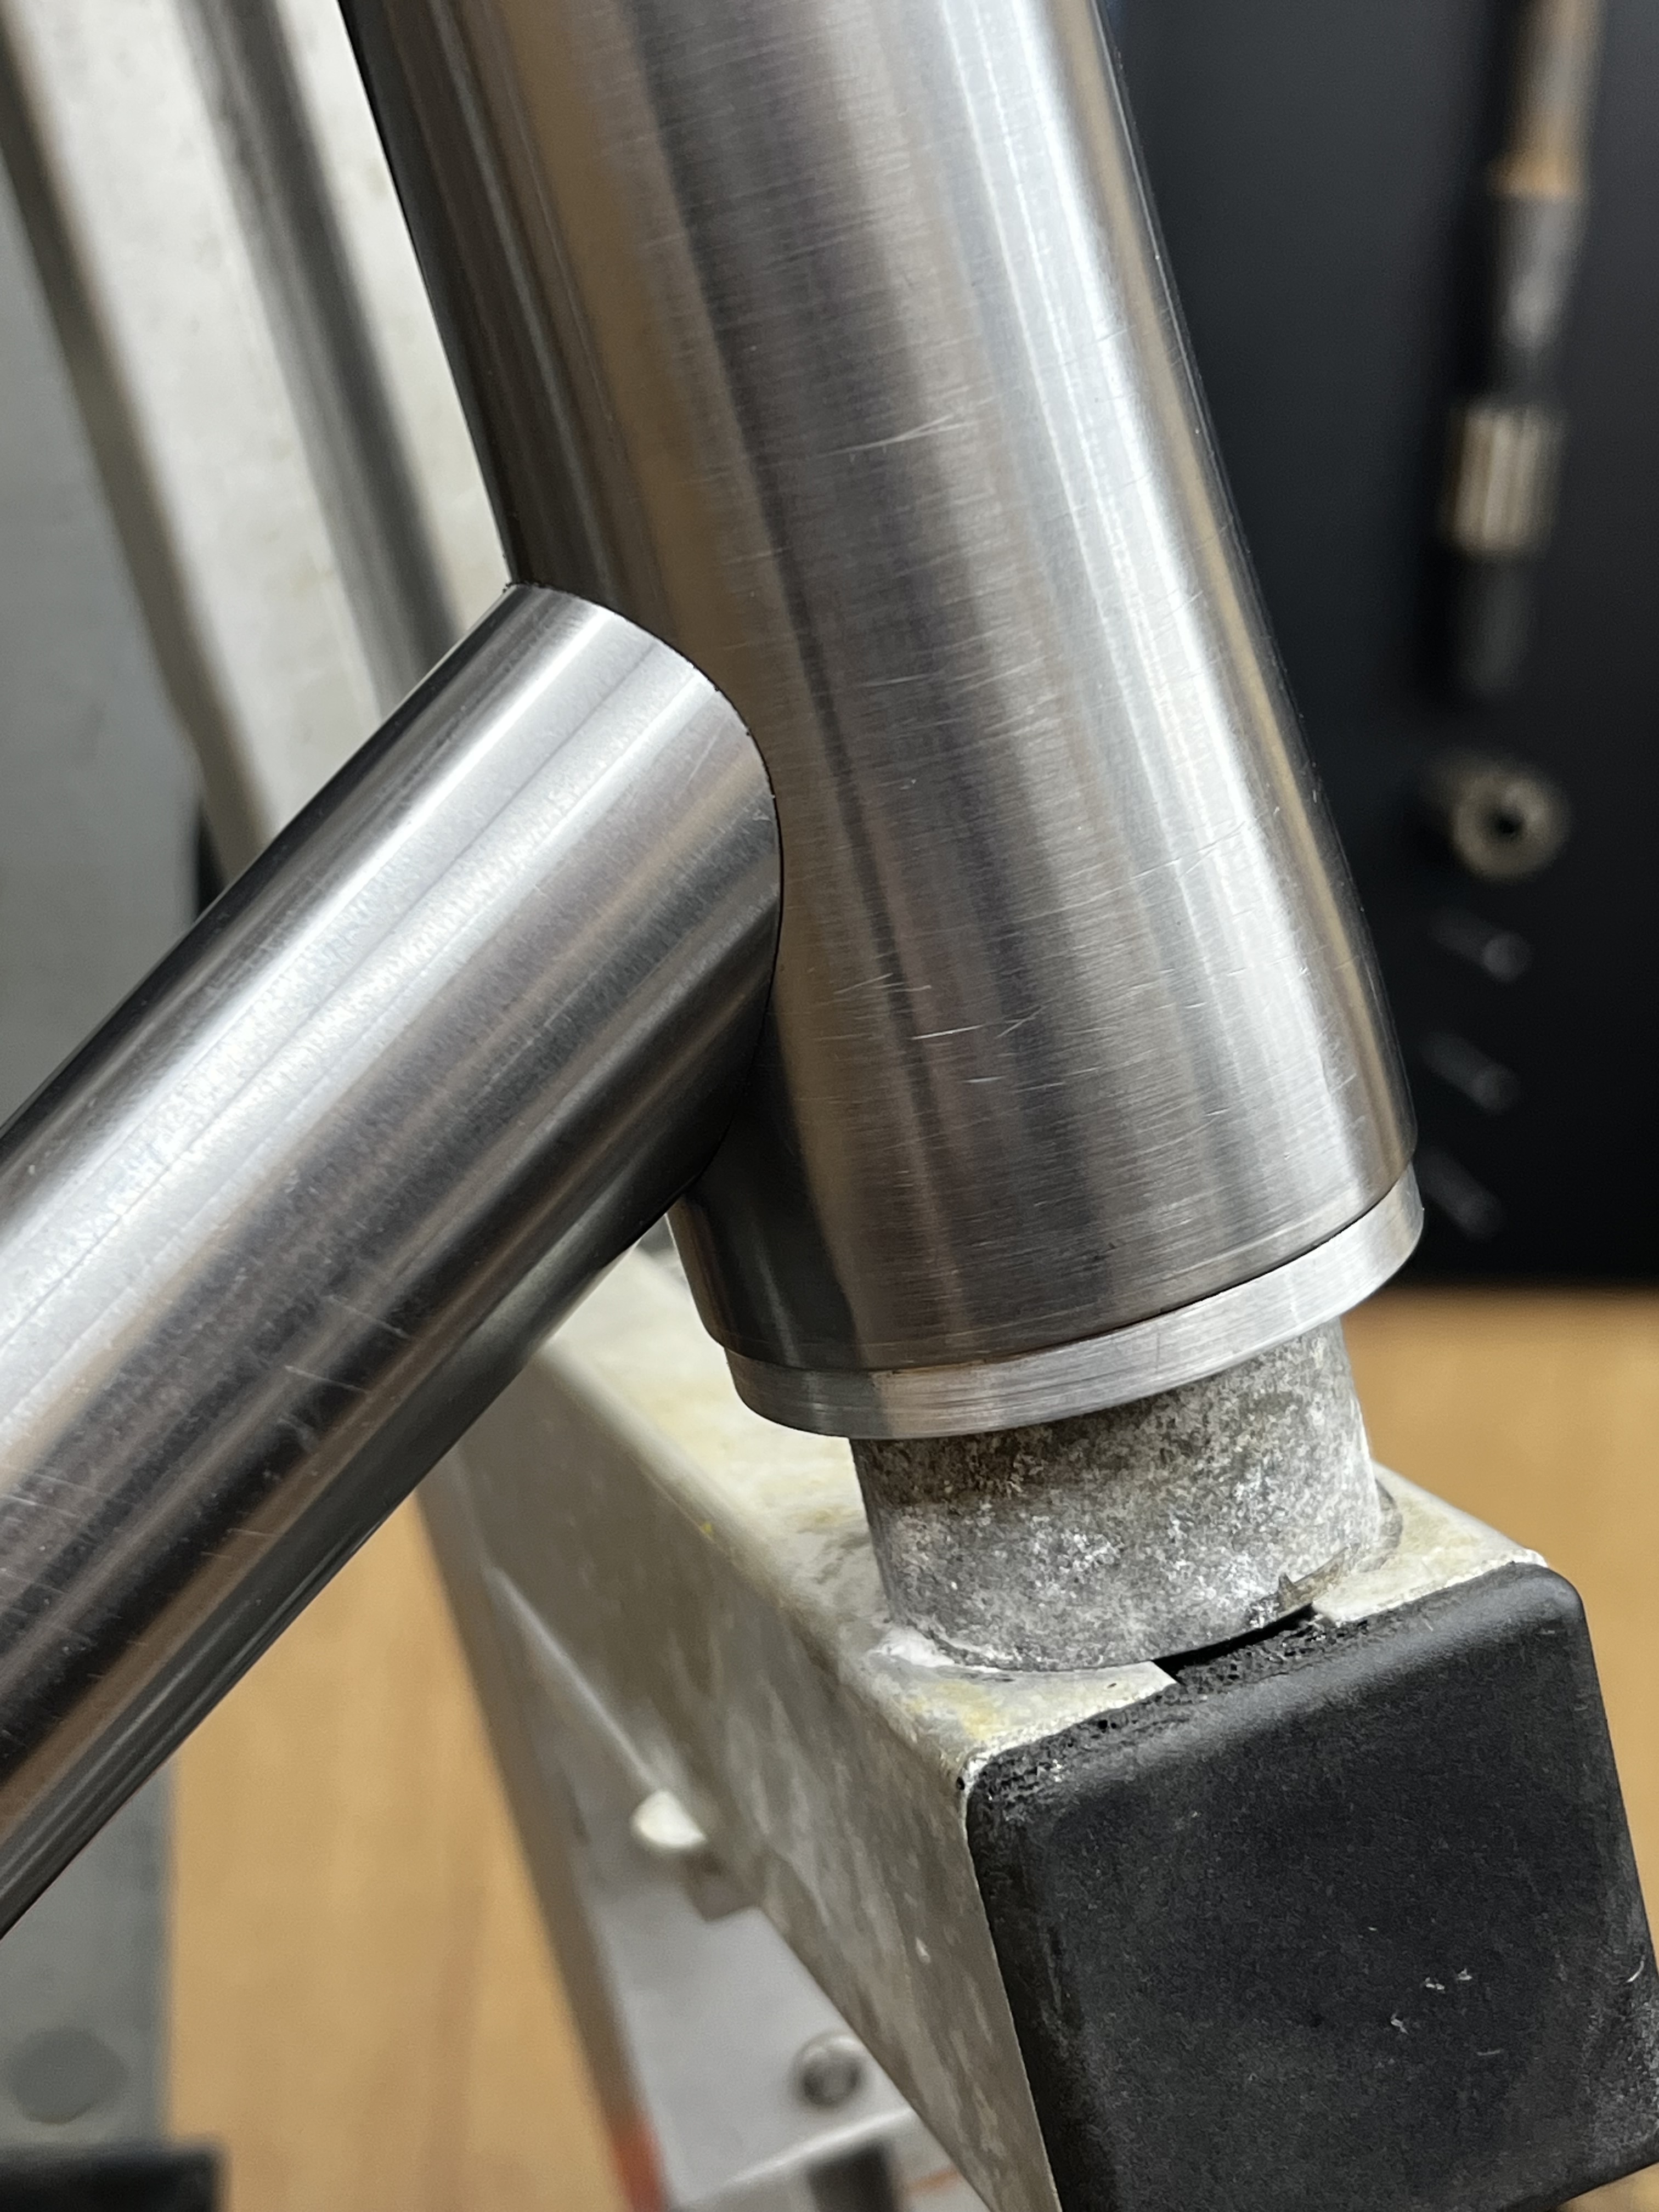
I make segmented forks and the problem I was having is that however I try to fixture them up, when I tack them and then go to check them with a wheel they’re always slightly on the piss. So I have to cut the tacks, move them absolutely tiny amounts (like half the width of a tack), and test again. And again. That can be a real test of patience.
So I just wanted something that fit in the dropouts exactly (M8 threaded rod is a slightly loose fit and I think that’s where some of the problems come from) and then has a perfectly square and centred extension to go up to the middle of the fork, just like a wheel would basically, but less bulky and in the way.
I made the short end on my minilathe out of some stainless round bar. The centre piece is just some 3/4" 16-gauge tube I had lying around. I got it square by a process of tack-and-bash and checking in a known perfect fork.
This is how you use it. The left leg is already tacked. There’s a straight line drawn on the table, which I can easily see goes all the way down the steerer, the middle of the tool, and to the midpoint between the dropouts to see it’s all assembled correctly. Got a couple of tacks in, checked it with the wheel (both ways round of course) and it was absolutely bob-on first time.
11 Likes
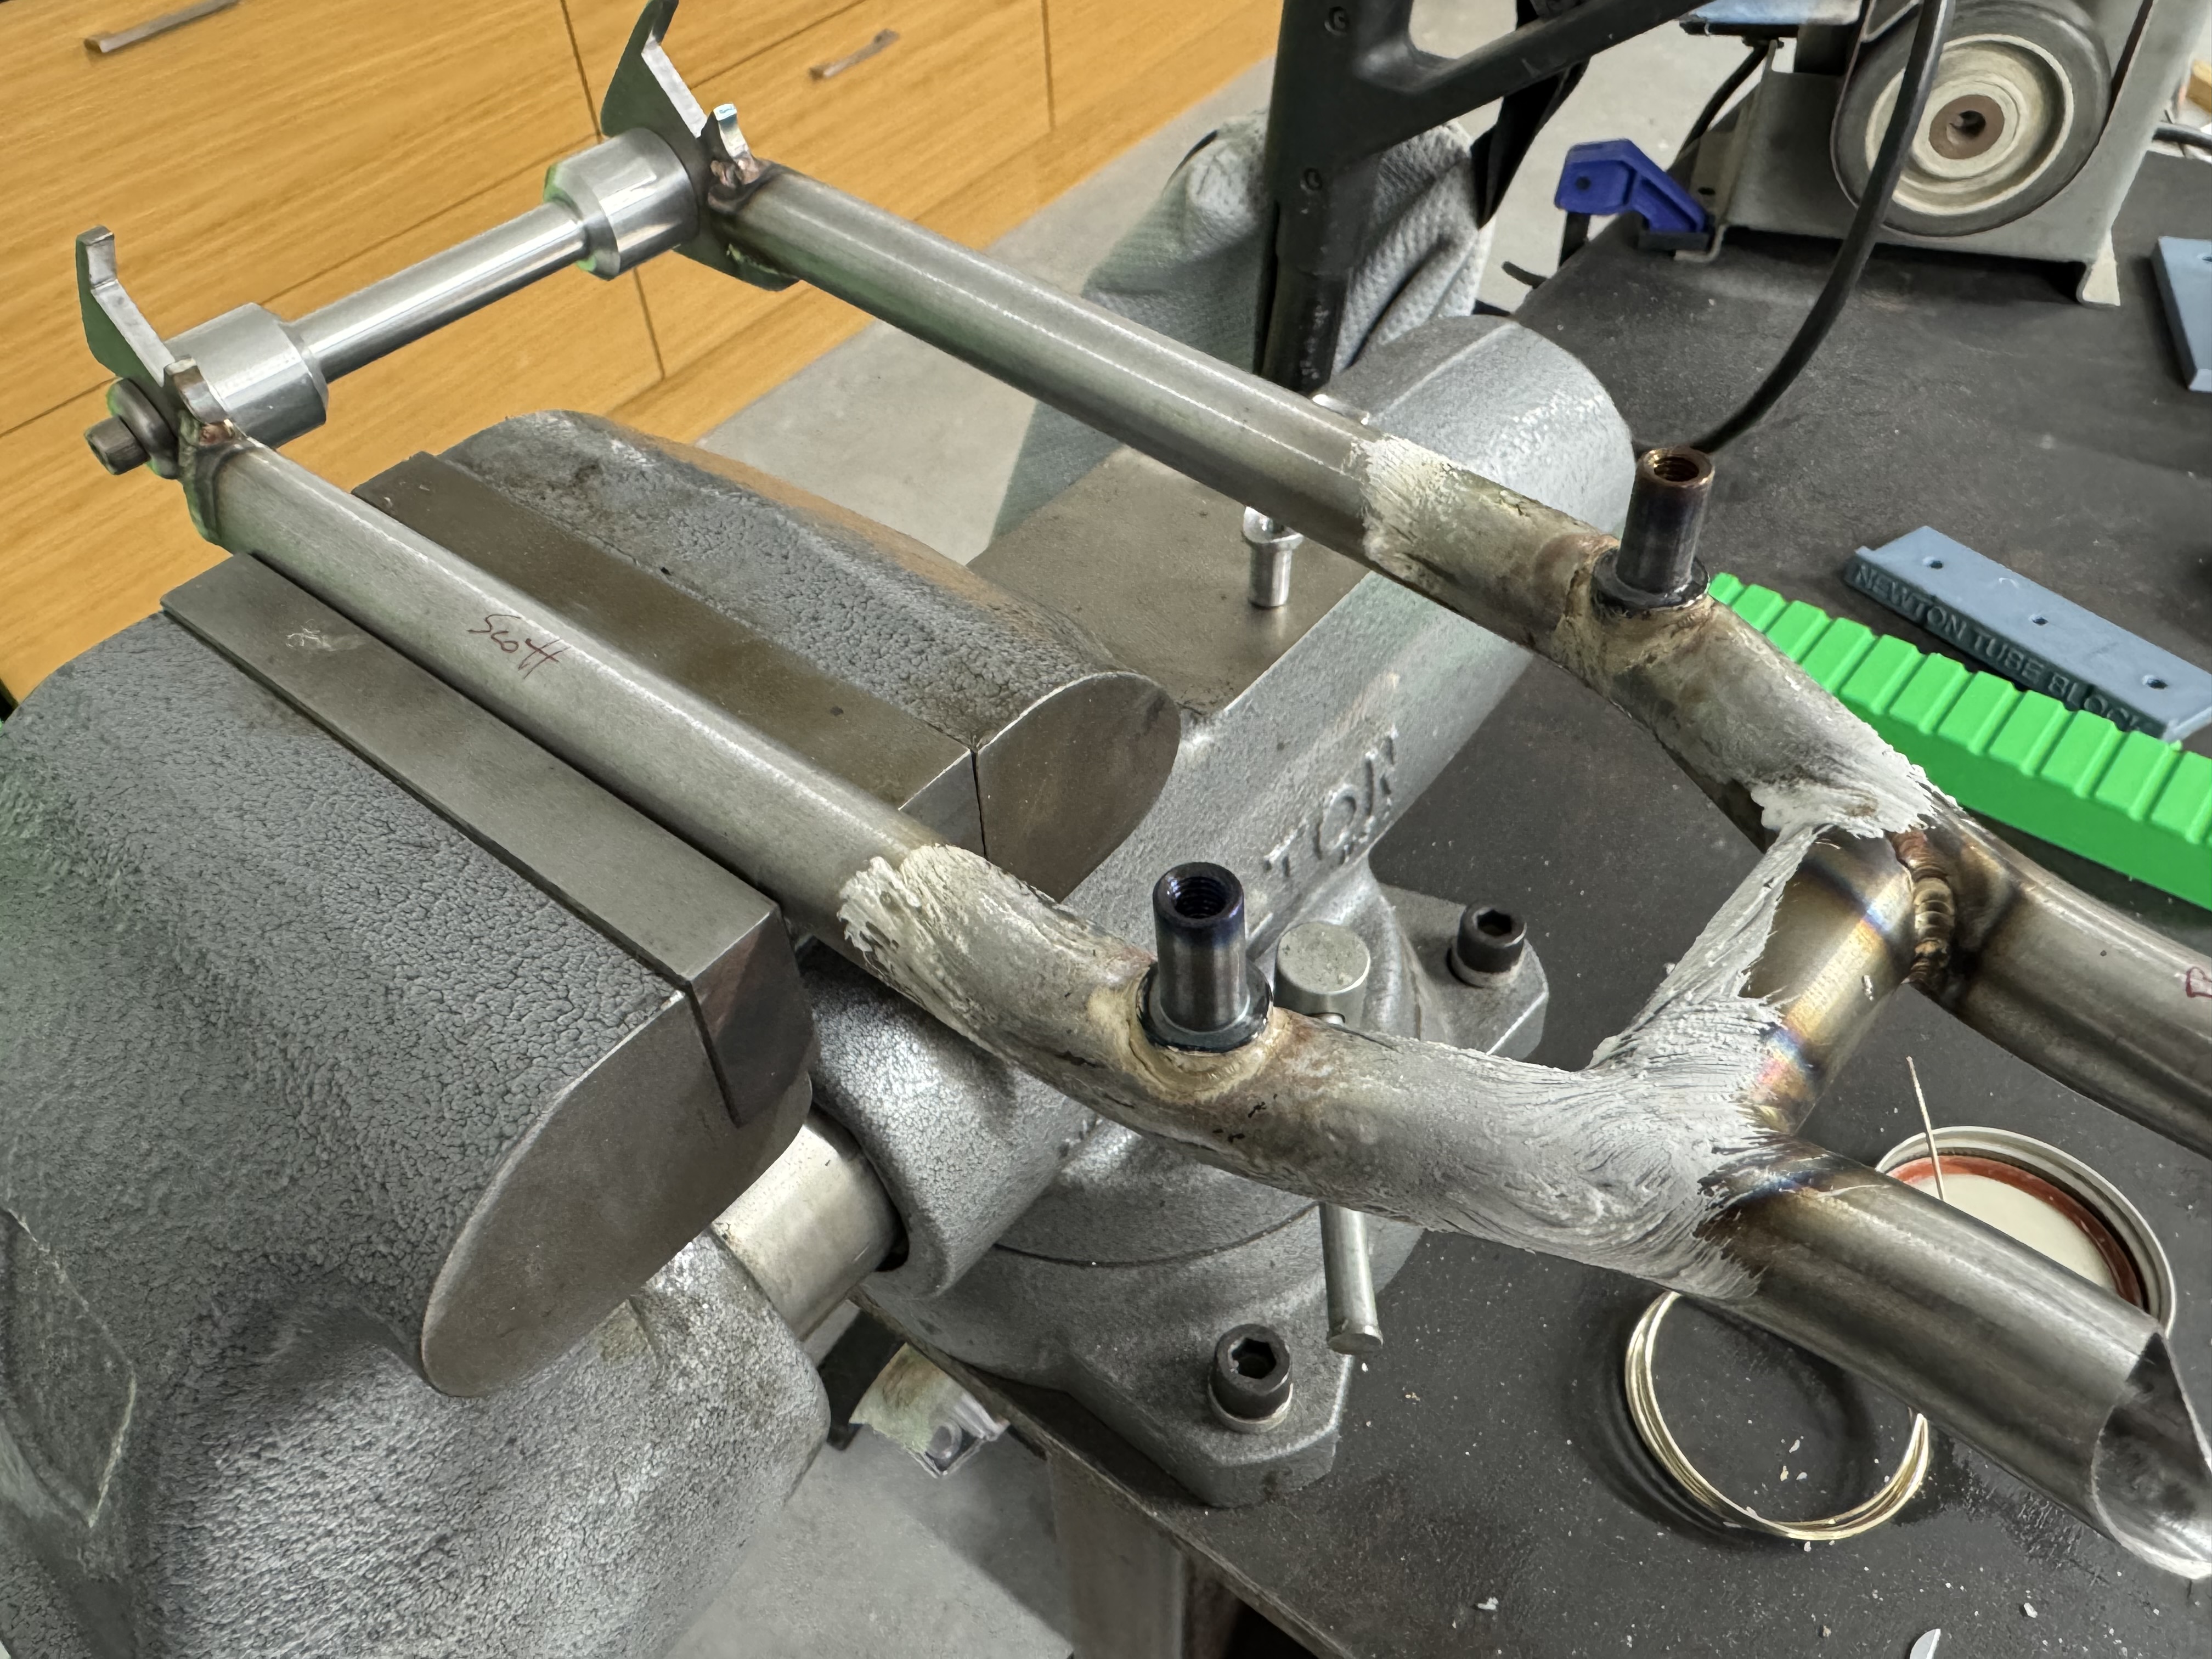
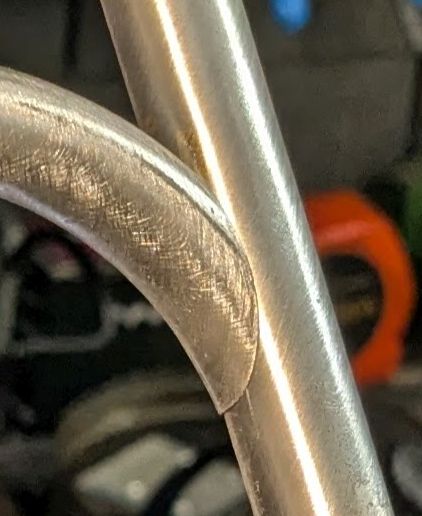
Mitering a brake bridge on the belt sander:
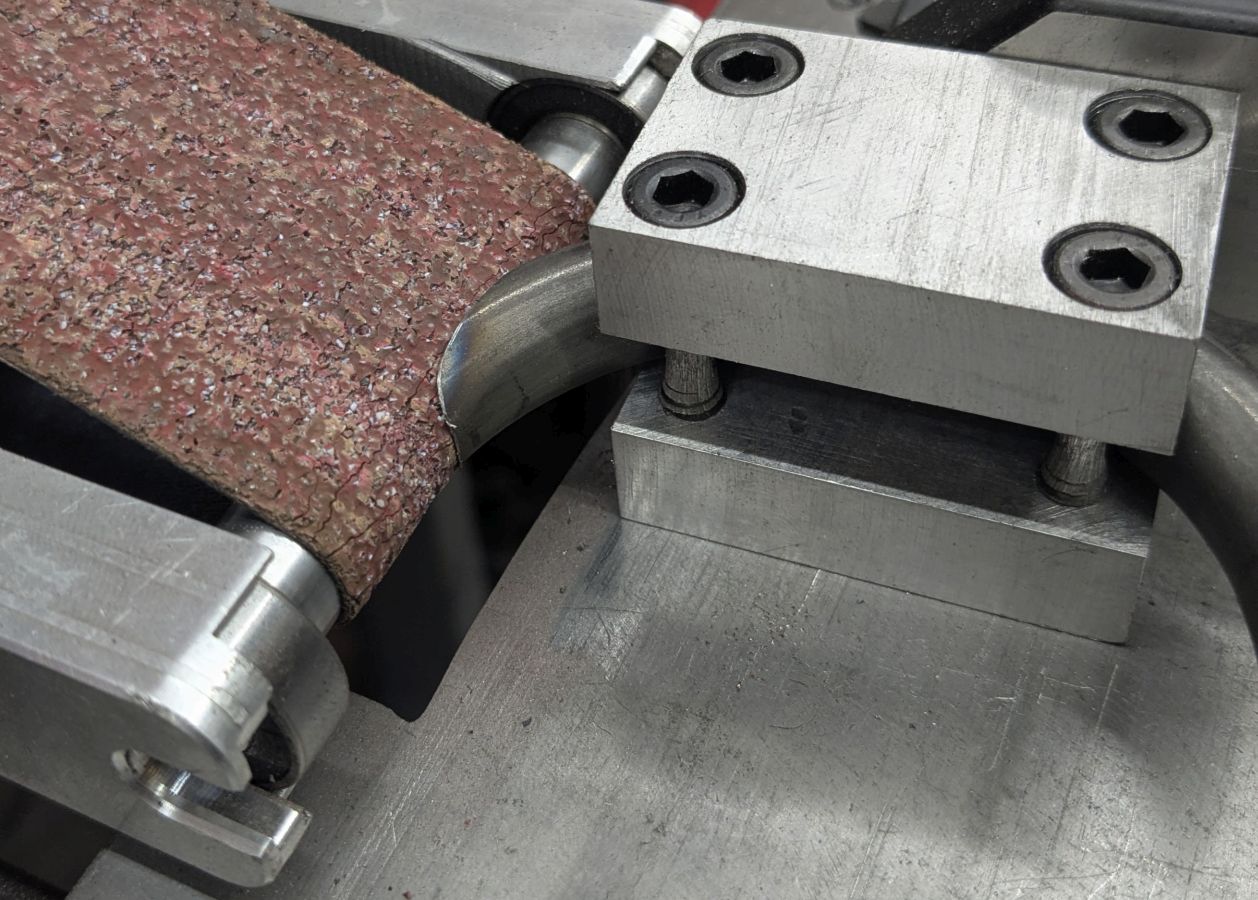
The actual miter grinding took about 5 seconds (even with that worn-out belt!), but making the thing took a couple hours. That’s adapting the sander, and making the bridge holder. Since I’m a hobbyist, I’ll probably use this fewer than 10 times in my life — no way does it pay off in terms of time saved. But it was fun, and the miter comes out perfect.
Here’s the view from a bit further away, showing the sliding miter gauge (off a bandsaw, but they’re generic). The sliding feature means you can move it side-to-side while grinding, so you use the whole belt, not just wearing it out in one spot. The part stays cooler too.

None of this is new or original. The Small Wheel Adaptor (SWA) for the belt-sander is by Ameribrade, and there are many others you can buy. I extended the work support table to add the groove that the miter gauge slides in. The basic concept is stolen from N Czernysz who showed it on his Flickr ages ago.
Note, don’t bolt this SWA onto your belt sander unless it is variable-speed. The tiny contact wheel spins super fast and burns up the little bearings in no time unless you can slow the machine down.
I also have contact wheels in the sizes needed for mitering main triangle tubes, but I’d rather do those on the mill with a holesaw. Still, some people have had good success with abrasive mitering on the whole frame — it’s a real option, if kinda messy, lots of dust & grit thrown into the air.
14 Likes
Right now I build my first batch of bikes with my friends. One of them has access to a Watercutter wich is great for many things. He made me a template for mitering the chain stays. And I can throw the jig on our big saw to cut the chain stays to length.
8 Likes
Might as well show a pic of the bridge, dry-fit:
Brazed and shoe-shined, with a rough indication of where the RAID pivot BOs will go. The bridge will make the miters on the pivots “interesting”, but worth it if the bridge stiffens the brake. Which seems likely.
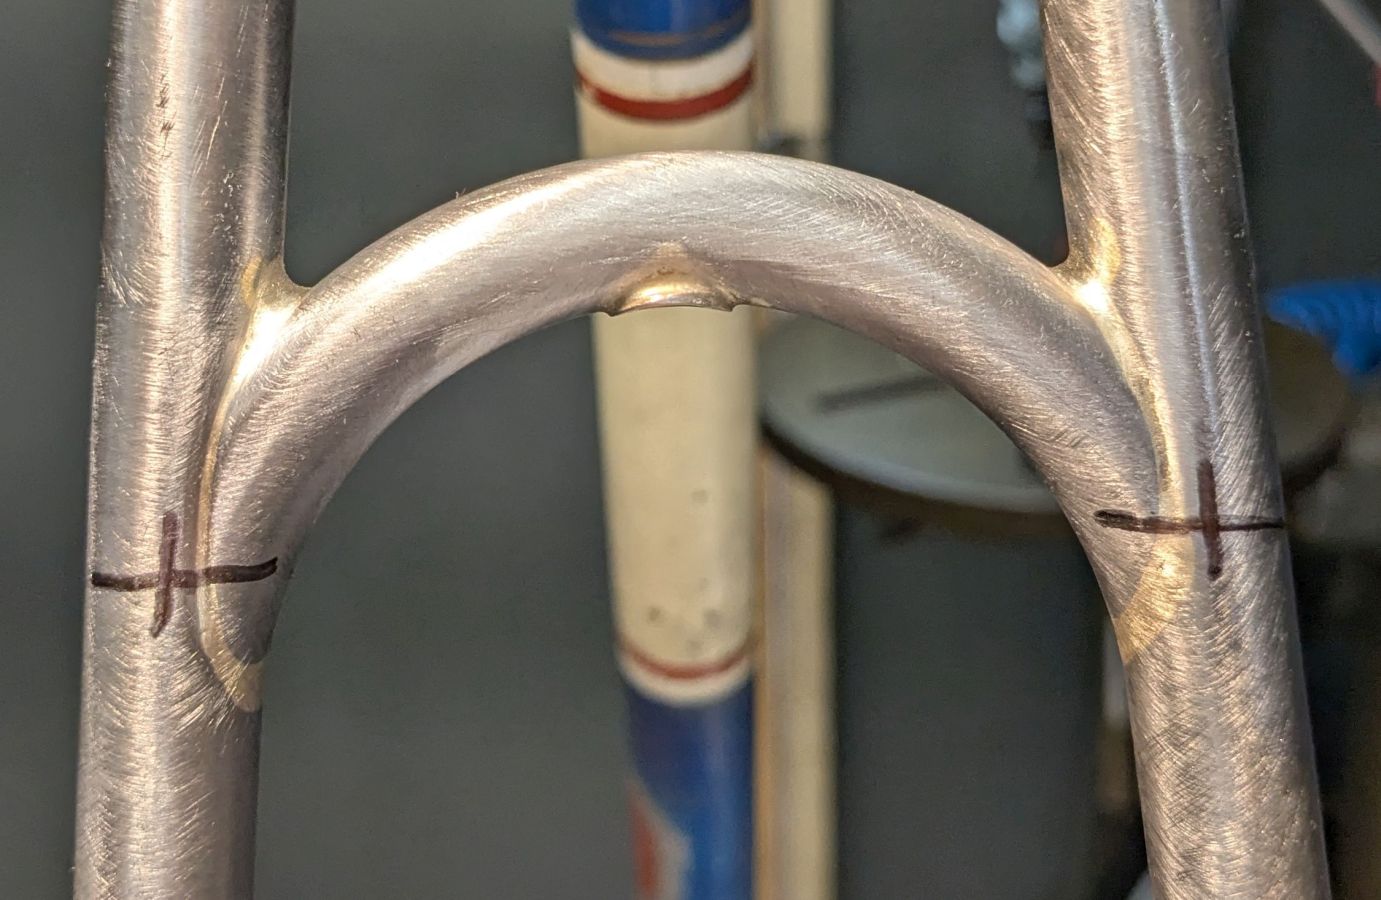
brazed with “System 48” and matching flux, from Cycle Design [RIP]. First time trying it, seems about right for a bridge, makes a little fillet. I think I will fillet around the pivots, at least a smallish fillet, with Fillet Pro.
The fillet is a bit scant at the “cheeks” of the joint, but I will fill that in when the pivots get brazed. Anyway it’s just an old French bike, doesn’t need to be this nice. I just like it.
12 Likes