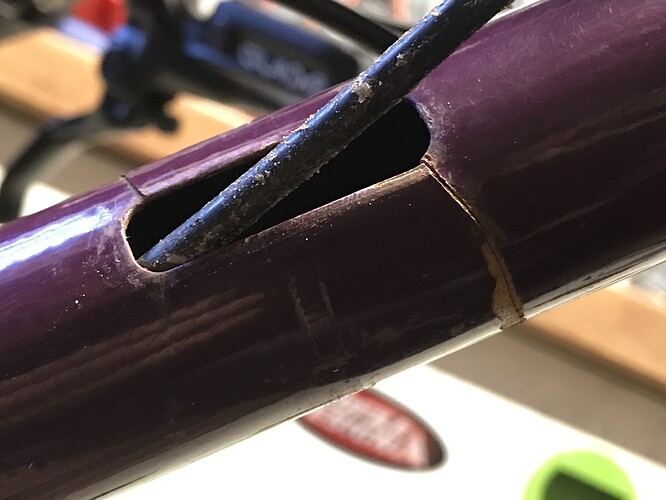
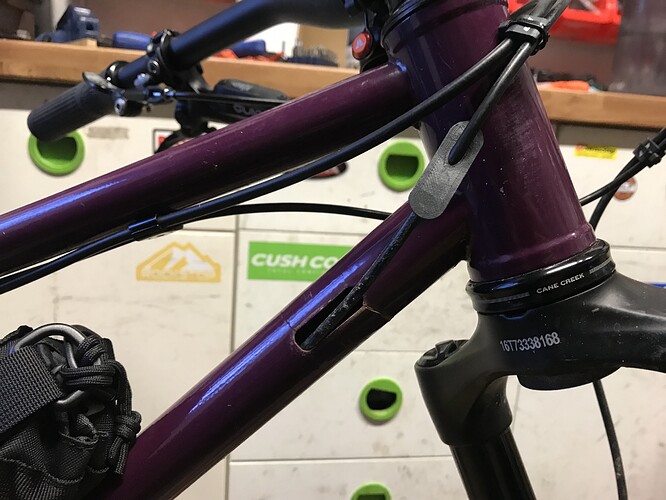
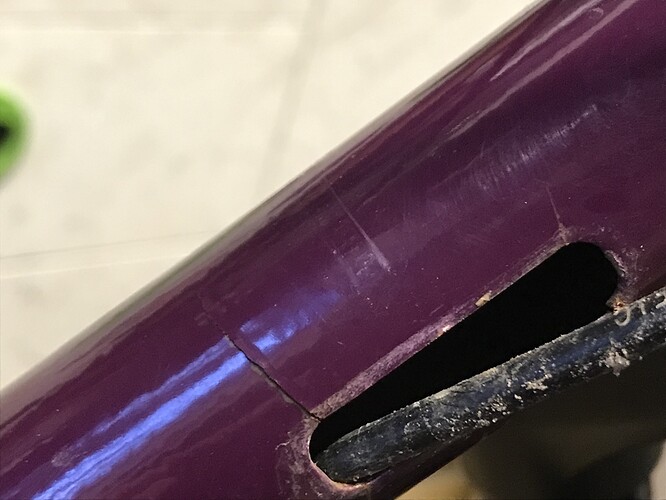
We've got breakage! Worth repairing?

Well, it’s been a fun summer zooming around on the frame I built last winter but now it’s broken. I guess this is what people mean when they talk about stress risers? Anyway, from a technical/mechanical perspective, what do you think about repairing it and, if so, how should I approach the task?


My completely uneducated starting point would be: 1) strip paint; 2) weld the cracks to stop them causing more problems; 3) patch a gusset top and bottom; 4) drill a new dropper cable port on the seat tube; 5) ride it some more.

The alternative view is that I’m planning on building a replacement this coming winter so do I cut my losses and spend the rest of the year riding the old single speed?

Would really appreciate the wisdom of the hive mind on this.

1 Like

Spend your time on the new frame and ride the single speed!

2 Likes

Time spent on repairs are better spent on the new frame. If you make the repair, you’ll have a frame with a patch on the tube. You will always wonder as you fly downhill, “How good a job did I really do?”.

2 Likes

Duct tape and bubble gum should fix that.
I agree with the others. Start a new frame.

1 Like

New down tube.

6 Likes

I would repair it if it were me, and then start work on a replacement. I would go with replacing the downtube altogether and make the routing external. Was the seat tube or down tube attached at the BB first? It will be a lot easier if the seat tube was attached first

The DT was attached first :slight_smile: Would it make any difference to your calculations if you knew there were other known and potential issues with the frame (too flexy, suspect ST durability, bodged ST repair at the BB junction, etc. See original post)? I have previously considered replacing the TT and/or DT to resolve the flex as I really enjoy riding the frame. I’d even got used to (and quite liked) the noodliness sometimes.

My first inclination was obviously to repair it with a patch/gusset which sounds like a bad idea. I guess a tube replacement might actually be good practice, although I also appreciate the advice offered by others about leaving it alone and focusing on the new version. Maybe I could do both … focus on the replacement (with improvements) this year and allocate some time later to replace the tube (or tubes) on this one so I have a usable spare when I inevitably need it next time :smiley:

I’ll give it some more thought. Thanks for your replies, everyone.

For future builds, what would be the best way to avoid this in future? A reinforced and soldered port entry? Smaller port? Different port location (where)? External routing all the way to the seat tube (might go this route in future anyway as internal routing’s a PITA)? Wireless dropper :smiley: ?

I think the only proper way to repair that is with a new down tube, which is actually a surprisingly easy thing to do - hack saw, angle grinder with a flap wheel. You’ll have a new one on there in a day. Re-do those cable ports with some reinforcements and you’ll be better than new.

Those holes for the port are in one of the highest stress areas on the frame. This really isn’t a surprising failure. If I ever do any internal routing (which I avoid at all costs) I make sure it is in the butt and also reinforced, usually by brazing a tube in there.

6 Likes

Yeah. You put an enormous stress concentration in a high stress area,* didn’t do anything to make up for it, and probably rode it like a proper mountain bike ought to be - of course it failed. Oh well, at least you weren’t (physically) hurt by the failure and can count this as a learning experience. Another data point for Peterson’s stress concentration factors.

IMO this is the way. Braze small cable guides somewhere away from the bottom or top of the tube and you’ll have minimal stress concentration. If you must route the cable internally, reinforce the area with a mating tube on the inside (Devlin) or outside (wzrd).

*Yeah, it’s centered on the neutral axis, but the point stands. It’s on the down tube, which is the largest tube on the bike for a reason.

3 Likes

I actually think this could be a prime learning experience. You know how the bike rides with the 31.8mm tube that broke. If you replace it with a 34.9 or larger then you have a pretty cool experiment on how downtube diameter affects the ride/stiffness of the bike

9 Likes

How’s the back end? Could you do a half-n-half, keep the BB/stays/dropouts and replace the ST/DT/TT/HT, to solve all the issues at once?

1 Like

I think the back end’s solid. I’m reluctant to go to the effort of replacing the seat tube - that feels like an altogether bigger job - but I agree with @adamsklar that the down tube (and top tube … and head tube - might as well!) should be easy enough to replace so I could possibly have this back on the trails quite soon.

I’d planned on building v2 of this frame with fixed UDH dropouts, a better seat post, and tweaked geo anyway, but hadn’t expected to start that until the tail end of this year at the earliest with a rideable bike expected around spring '24. With 3 new front tubes, this frame should see me through until that’s ready and may well end up as a replacement for my current winter single-speed ('98 Kona Cinder Cone) after that.

And with that … thanks to everyone who took the time to reply. I’m going to take this as a learning opportunity as @Pi_bikes suggested and go with larger tubes on the front to see what difference it makes.

4 Likes

+1 for replacing the down tube (and going bigger for good measure). Glad to hear you are going that route. If you’re not building a new frame right away, this will get you back on the trails soon. Good luck!

2 Likes

Repairing your own work is a valuable experience and important to do in my eyes.

However you end up doing the repair, you’ll learn new things, new techniques, a new way of looking and building. Afterall, much of framebuilding is just fixing many small errors you’ve made along the build process anyway.

I don’t know steel so I can’t comment on the how-to in this case, but I hope you find a creative solution and learn along the way.

3 Likes

The tube replacement is done. I’ve gone up a size on both main tubes (25.4x0.8mm → 28.6x1.0mm TT; 31.8x1.0mm → 35.0x0.9mm DT); the HT is the same size but I figured would be better to start afresh rather than reuse the old one as they’re not too expensive.

Welds at the front end with the new tubes went well. I cut the old tubes back to the ST/BB and tried to clean up inside as much as possible but the welds were really bad - quite a lot of porosity which I mostly ground back and re-welded. It was especially ugly around the BB. I think it’s going to be ok for a while and I plan on making a version 2 of this frame next year so it only needs to survive until then.

For future reference, what’s the best way to clean up tubes when repairing frames? And are there any tips for welding to try and avoid problems? Or would it be better to braze rather than TIG when replacing tubes? This is all completely new to me so learning on the hoof!

2 Likes

You will have to let us know how it rides compared to before!

I imagine flappy disc would be the go to for cleaning up tubes. A friend once recommended if you were having contamination issues on a section when tig welding to try using some stainless steel filler as it is less reactive, though not sure how that would play in with thinwall 4130 though as he is a general fabricator not a framebuilder and would generally be working on heavy farm equipment.

Here’s a BTR video of a seat tube replacement that may be of interest

3 Likes

Thanks for posting that - I’ll have a watch later this evening. I can’t believe I hadn’t subscribed to BTR’s channel already!

The flappy wheel did well for cutting back the excess metal but I suspect the contamination was coming through from inside the seat tube and BB shell. I’ve also just invested in a smaller air grinder as I found the big angle grinder unwieldy and felt I could easily have eaten through the thin walls of the tubing. I did try cleaning up inside the tubes with a small drill-powered strip of emery paper (obviously avoiding the BB threads and not able to get into the bottom of the ST) as well as using a clean steel brush and plenty of acetone but it didn’t seem to work.

Perhaps a lower welding current to produce less burn-through would help if it’s the contaminants on the back-side of the old tubes which is causing the problems? Or a good long soak in a degreaser followed by the same in a clean water bath and then plenty of acetone? I’ll see what Burf has to say on the subject.

Good on you for getting on with this, doing repairs is always super educational.
I have a couple of thoughts to offer; please know I mean them in support, we don’t know exactly how you went about this, but some of it feels familliar. ive had a look at your build threads to try and gauge what advice might be good at this point; I hope something here helps :+1:

if you’re using ER70s-2 filler, moving to ER70s-6 might be worth investigating; both in general, and for difficult or potentially dirty work. My very basic understanding is that ER70s-6 was developed for blocked surface welding (where it’s impractical to shield the back) and thus deals with drawing contamination “through from the back” better.

Anecdotally some people do weld 4130 with a stainless filler (I’ve seen unsuscessfull but heard of successful use of 312, and i’ve heard of people using a filler called weldmold 308 also ), but I’ve got no reason to suggest you do so, though others here may.

I would guess, that the best help I can offer in this case would be to suggest you focus on a more thorough series of techniques to clean/grind/remove bad material and contaminants to set yourself up for success.

Getting things seriously properly clean takes an approach that was far, FAR beyond what was intuitive to me when I started trying to fix broken steel things (as someone who’d been making things my entire life) . It took me years of full time fabrication in a conducive learning environment to actually get a handle on what a comprehensive approach to repair work like this looks like, and looking at what I do now, from the perspective of my former self, would seem bizarre and anal retentive at best; but learning to take the time and materials to really get the pre-weld situation as favourable as i possibly can, is the thing that has made the difference between struggling towards the outcomes I want, and reliable best possible results.

things like;
more use of fresher, cleaner, higher quality abrasives.

more custom or one off tools for getting those abrasives to be where I need them (like down the bottom of a seat tube)

more patience to actually use that tool to do its job thoroughly; going slow and taking a long time is a great way to arrive somewhere precisely. even if it means replacing the piece of emery cloth on the end of that stick 15 times and looking down the seat tube with a torch every 30 seconds for half an hour…

more experience from grinding out contaminated welds giving me the confidence to remove a bit of base metal where I need to, knowing I can replace it. and tools to do this where I need to and not elsewhere…

things like switching to fresh abrasives from a dust-proof container for a final cleaning pass on an already isopropyl-cleaned part, if I know its going to be a bit of a difficult one; really doing everything one can.

without going on; the things you can invest in almost any welding situation that will pay off with a better weld, basically all happen before you turn the gas on; fitup, setup, setup, cleanliness, practice.

keen to hear what you think of the bigger tubes on the same geometry; im a BIG proponent this kind of behaviour…
5 Likes

Thanks, that is all really useful info. I’m sure I’ll encounter the same situation again and may even seek it out in order to develop my skills. The person who introduced me to TIG welding (a quick 1-day intro so not exactly a deep dive, but it was a start) used stainless filler with 4130 but I later read that it can produce brittle joints as it lacks ductility, so went for ER70s. I will look into ER70s-6 though - I just picked up -2 because it was there and I didn’t know any different. I can see the custom tooling will be very useful - it was very obvious I’d skipped grinding at the foot of the seat tube as the welds at the top where I did clean more thoroughly inside, while not perfect, were a lot better than around the BB.

I’m also aware I need to be more disciplined about things like cleanliness when preparing my electrodes and filler material so will aim to make some improvements in that area next time. I’m planning on taking an evening class on TIG welding early next year too, which may help me get a better understanding of current control and penetration as well as having the ear of an experienced welder!

I’ll get the bike back on the trails and let everyone know what I think of the bigger tubes.

2 Likes

I’ll second all your thoughts on cleaning; it’s the foundation of a sound weld. My standard is bright metal everywhere within about a 1/2" of the weld, clean and dry.

2 Likes